
Popular categories
Looking for a yarn?


Comments / Questions (42)
![]() Dominique wrote:
Dominique wrote:
Je tricote la taille L. Le nombre de maille que j'obtiens après les augmentations des manches ne correspond pas: 25 mailles au départ puis 5 fois 2 et une fois 1 ne font pas 53 mais 47. Où est l'erreur ? Merci pour vos explications.
02.11.2018 - 17:47DROPS Design answered:
Bonjour Dominique, effectivement, il faut monter à la fin 1 x 4 m - la correction a été faite, merci. Bon tricot!
05.11.2018 - 08:17
![]() GASPARD wrote:
GASPARD wrote:
Bonjour, Je voudrais savoir quel est l'intérêt de tricoter avec une aiguille circulaire en aller-retour ... pourquoi ne pas prendre une aiguille droite : quelle est la différence ? je vous remercie par avance de votre réponse. Sylviane
31.10.2018 - 13:55DROPS Design answered:
Bonjour Sylviane, le dos, le devant et les manches se tricotent effectivement en allers et retours sur aiguille circulaire pour avoir suffisamment de place pour y loger toutes les mailles. Vous pouvez tricoter sur aiguilles droites, veillez à bien conserver la bonne tension car vos mailles seront plus serrées. Seul le col sera ici tricoté en rond. Bon tricot!
31.10.2018 - 15:14
![]() Guyot wrote:
Guyot wrote:
Bonjour Ou se trouve le diagramme a1, Merci
25.10.2018 - 10:17DROPS Design answered:
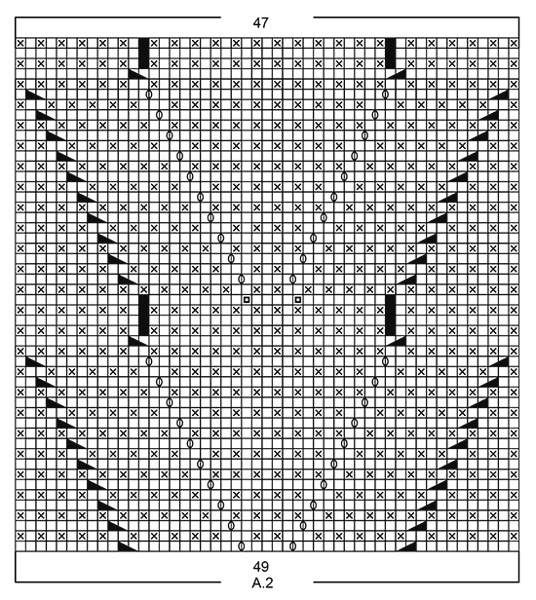
Bonjour Mme Guyot, le diagramme A.1 se trouve au niveau du schéma des mesures, à droite, sous la manche, C'est un petit diagramme sur 2 mailles et 4 rangs. Bon tricot!
25.10.2018 - 10:19
![]() Zurings Lutg wrote:
Zurings Lutg wrote:
Hallo Volgens beschrijving moet ik voor de armsgaten (voorpand maat L) 2x1st en 2x2st en 1x4 St nieuwe St opzetten (in totaal 8St volgens beschrijving. Als ik goed kan tellen zijn dit in totaal toch 10st??? Bij achterland heb ik hetzelfde probleem. Waar zit ik fout?
17.10.2018 - 15:57DROPS Design answered:
Dag Zurings Lutg, Het lijkt er inderdaad op dat er een foutje zit in het aantal steken voor maat L (en XL). Ik heb het doorgegeven en momenteel wordt er naar gekeken door de afdeling design.
18.10.2018 - 21:20
![]() Ans Van Strien wrote:
Ans Van Strien wrote:
BIj de meerderingen kom ik uit op 10 steken aan elke kant ipv de 8 die jullie tellen. Wat moet ik aanhouden?
16.10.2018 - 12:58
![]() Helle Buhl wrote:
Helle Buhl wrote:
Hej jeg er ved at give op kan ikke få mønster til at passe når jeg har lagt skulder og skulder sammen hvad gør jeg mon forkert ?
08.10.2018 - 10:15DROPS Design answered:
Hei Helle. Du strikker: mønster som før over høyre skulder, legg opp masker til halskant, mønster som før over venstre skulder. Neste pinne (fra vrangen) strikker du mønster som før over venstre skulder, vrang over maskene du la opp, og mønster som før over høyre skulder. Videre strikker du som anvist: 1 kantmaske rille, strikk mønster som før over de neste 11-13-15-17-19-21 maskene (siste maske er en rettmaske), A.2 (= 49 masker), strikk mønster som før over de neste 11-13-15-17-19-21 maskene (første maske er en rettmaske), 1 kantmaske rille. På hver side av A.2 har du en rettmaske - som passer med 2. omgang i A.2. slik at rillemønsteret fortsetter. God fornøyelse
16.10.2018 - 14:23
![]() Zurings Lut wrote:
Zurings Lut wrote:
Zurings Lut 22.09.2018 - 11:36: Hallo,\\\\\\\\r\\\\\\\\nVoorpand: ik heb de twee schouders samengebracht en ik heb1 naald teruggbreid (averechts) aan de verkeerde kant. Ik wil nu beginnen met telpatroon A2, maar volgens de afbeelding van dit telpatroon begint dit ook met een volledig averechtse(aan de verkeerde kant) of rechtse (aan de goede kant). Of is de eerste naald van het telpatroon tevens de laatste naald van de twee schouders samenbreien?
28.09.2018 - 15:58DROPS Design answered:
Dag Zurings Lut, Nadat je de naald averecht hebt gebreid en begint aan het patroon, begin je rechts onder en de eerste naald (en alle oneven naalden) van het patroon is aan de goede kant.
04.10.2018 - 12:26
![]() Zurings Lut wrote:
Zurings Lut wrote:
Telpatroon
28.09.2018 - 15:51
![]() Germana wrote:
Germana wrote:
Buongiorno ho un problema con gli aumenti per gli scaldi davanti per la taglia L non mi tornano le maglie aumentate a me risultano 10 per lato e non 8.......grazieeee
27.09.2018 - 12:17DROPS Design answered:
Buongiorno Germana. Segnaliamo l'errore al settore design. Il testo verrà corretto quanto prima. La ringraziamo per la segnalazione. Buon lavoro!
27.09.2018 - 12:51
![]() Zurings Lut wrote:
Zurings Lut wrote:
Hallo,\\\\\\\\r\\\\\\\\nVoorpand: ik heb de twee schouders samengebracht en ik heb1 naald teruggbreid (averechts) aan de verkeerde kant. Ik wil nu beginnen met telpatroon A2, maar volgens de afbeelding van dit telpatroon begint dit ook met een volledig averechtse(aan de verkeerde kant) of rechtse (aan de goede kant). Of is de eerste naald van het telpatroon tevens de laatste naald van de twee schouders samenbreien?
22.09.2018 - 11:36
|
||||||||||||||||||||||
Aster#astersweater |
||||||||||||||||||||||
 |
 |
|||||||||||||||||||||
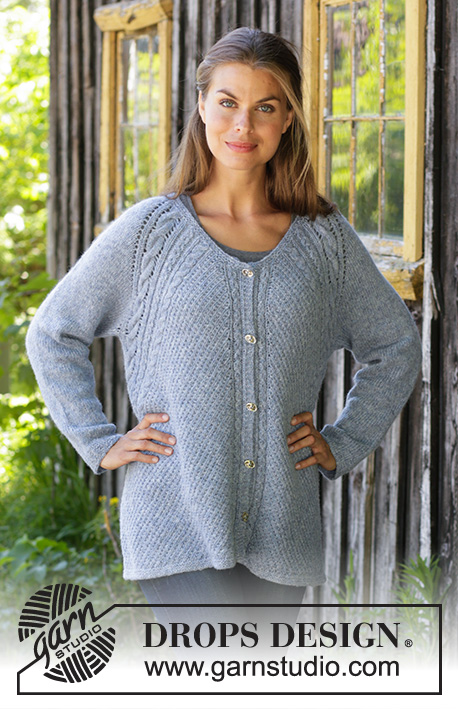
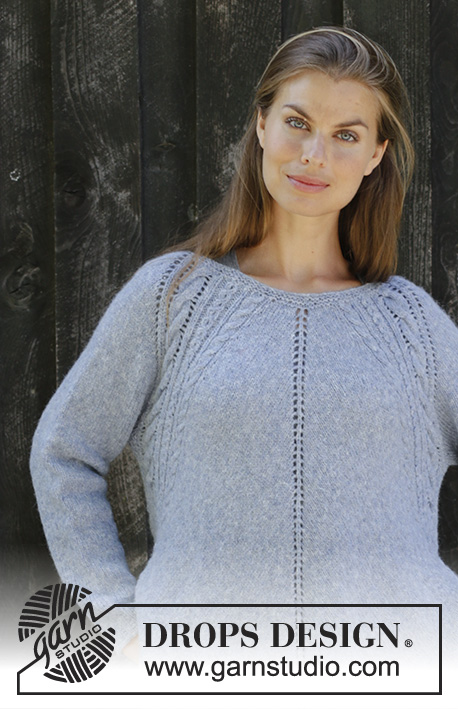
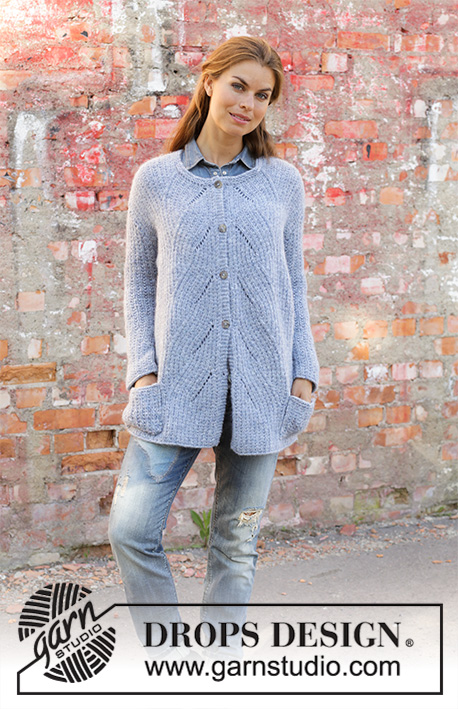
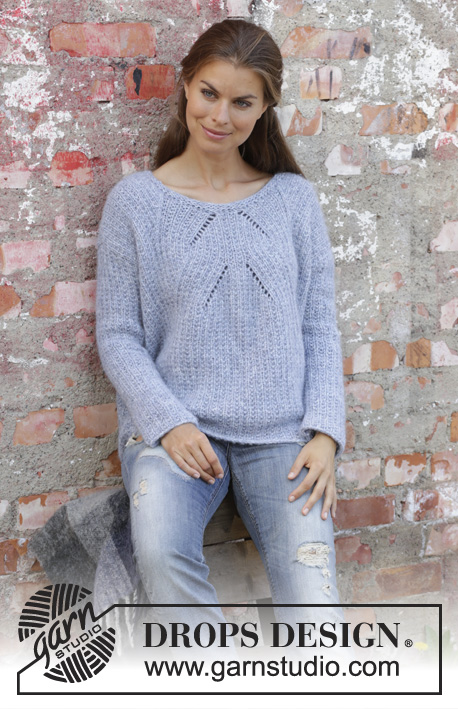
Knitted jumper in DROPS Air. The piece is worked top down with textured pattern and lace pattern. Size S – XXXL.
DROPS 194-4 |
||||||||||||||||||||||
|
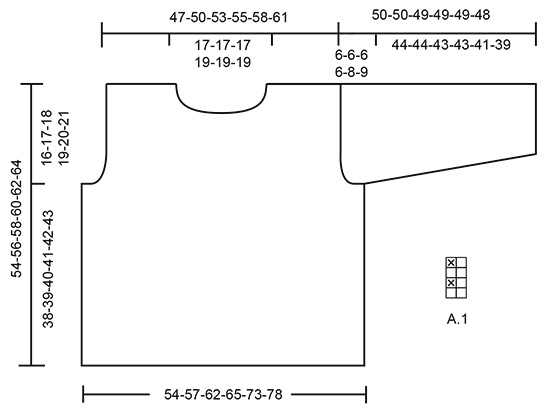
EXPLANATIONS FOR THE PATTERN: ------------------------------------------------------- RIDGE/GARTER STITCH (worked back and forth): 1 ridge = Knit 2 rows. PATTERN: See diagrams A.1 and A.2. The diagrams show all the rows in the pattern seen from the right side. DECREASE TIP (for sleeves): All decreases are made from the right side! Decrease as follows after the 1 edge stitch in garter stitch: Slip 1 stitch as if to knit, knit 1, pass the slipped stitch over. Decrease as follows before the 1 edge stitch in garter stitch: Work until there are 3 stitches left on the row, knit 2 together, 1 edge stitch in garter stitch. ------------------------------------------------------- START THE PIECE HERE: ------------------------------------------------------- JUMPER - SHORT OVERVIEW OF THE PIECE: The piece is worked back and forth in sections which are sewn together to finish. You work top down with circular needle. FRONT PIECE: Left shoulder: Cast on 25-27-29-29-31-33 stitches with circular needle size 6 mm and Air. Purl 1 row from the wrong side. Then work pattern as follows from the right side: 1 edge stitch in GARTER STITCH – read description above, A.1 (= 2 stitches) until there are 2 stitches left on the row, work the first stitch in A.1, 1 edge stitch in garter stitch. Continue like this back and forth until the piece measures 4-4-4-4-5-5 cm – adjust so that the next row is worked from the wrong side: ROW 1: Work pattern as before over all stitches and cast on 1 new stitch at the end of the row (= towards neck) = 26-28-30-30-32-34 stitches. ROW 2: Work 1 edge stitch in garter stitch, work pattern as before until there is 1 stitch left, 1 edge stitch in garter stitch. ROW 3: Work pattern as before over all stitches. Lay the piece to one side and work right shoulder. Right shoulder: Cast on 25-27-29-29-31-33 stitches with circular needle size 6mm and Air. Purl 1 row from the wrong side. Then work pattern as follows from the right side: 1 edge stitch in garter stitch, A.1 until there are 2 stitches left on the row, work the first stitch in A.1, 1 edge stitch in garter stitch. Continue like this back and forth until the piece measures 4-4-4-4-5-5 cm – adjust so that the next row is from the right side: ROW 1: Work pattern as before over all stitches and cast on 1 new stitch at the end of the row (= towards neck) = 26-28-30-30-32-34 stitches. ROW 2: Work 1 edge stitch in garter stitch, work pattern as before until there is 1 stitch left on the row, 1 edge stitch in garter stitch. REMEMBER THE KNITTING TENSION! Now work the right and left shoulders together from the right side as follows: Work as before over the 26-28-30-30-32-34 stitches on the right shoulder, cast on 21-21-21-25-25-25 new stitches on the needle for neck, work as before over the 26-28-30-30-32-34 stitches on the left shoulder = 73-77-81-85-89-93 stitches on the row. Work back 1 row in this pattern from the wrong side and 1 edge stitch in garter stitch in each side (purl the new neck stitches). Now work pattern as follows: 1 edge stitch in garter stitch, work pattern as before over the next 11-13-15-17-19-21 stitches, A.2 (= 49 stitches), work pattern as before over the next 11-13-15-17-19-21 stitches, 1 edge stitch in garter stitch. Continue like this back and forth. When the piece measures 13-14-13-14-15-15 cm cast on new stitches for the armholes at the end of each row in each side as follows: Cast on 1 stitch 2-2-2-2-2-2 times, 2 stitches 0-0-2-2-3-4 times and 4-4-2-2-4-4 stitches 1 time (a total of 6-6-8-8-12-14 stitches increased for the armhole in each side of the piece) = 85-89-97-101-113-121 stitches. The new stitches are worked into pattern A.1 as you go. Continue like this back and forth until A.2 has been completed in height. When A.2 has been completed in height you have decreased 2 stitches in the diagram = 83-87-95-99-111-119 stitches. Now continue with pattern A.1 with 1 edge stitch in garter stitch in each side. When the piece measures 54-56-58-60-62-64 cm from the shoulder, cast off with knit over knit and purl over purl. BACK PIECE: Right shoulder: Cast on 25-27-29-29-31-33 stitches with circular needle size 6 mm and Air. Purl 1 row from the wrong side. Then work pattern as follows from the right side: ROW 1: 1 edge stitch in garter stitch, A.1 (= 2 stitches) until there are 2 stitches left on the row, work the first stitch in A.1, 1 edge stitch in garter stitch. ROW 2: Work pattern as before and cast on 1 new stitch at the end of the row (= towards neck) = 26-28-30-30-32-34 stitches. ROW 3: Work 1 edge stitch in garter stitch, work pattern as before until there is 1 stitch left on the row, 1 edge stitch in garter stitch. ROW 4: Work pattern as before over all stitches. Lay the piece to one side and work left shoulder. Left shoulder: Cast on 25-27-29-29-31-33 stitches with circular needle size 6 mm and Air. Purl 1 row from the wrong side. Then work pattern as follows from the right side: ROW 1: 1 edge stitch in garter stitch, A.1 until there are 2 stitches left on the row, work the first stitch in A.1, 1 edge stitch in garter stitch. ROW 2: Work pattern as before over all stitches. ROW 3: Work pattern as before and cast on 1 new stitch at the end of the row = 26-28-30-30-32-34 stitches. ROW 4: Work 1 edge stitch in garter stitch, work pattern as before until there is 1 stitch left, 1 edge stitch in garter stitch. REMEMBER THE KNITTING TENSION! Now work the left and right shoulder together from the right side as follows: Work as before over the 26-28-30-30-32-34 stitches on the left shoulder, cast on 21-21-21-25-25-25 new stitches on the needle for neck, work as before over the 26-28-30-30-32-34 stitches on the right shoulder = 73-77-81-85-89-93 stitches on row. Work 1 row back from the wrong side in pattern as before and with 1 edge stitch in garter stitch in each side (purl the new neck stitches). Now work pattern as follows: 1 edge stitch in garter stitch, A.1 until there are 2 stitches left on the row, work the first stitch in A.1, 1 edge stitch in garter stitch. Continue back and forth like this. When the piece measures 13-14-13-14-15-15 cm cast on new stitches for the armholes at the end of each row in each side as follows: Cast on 1 stitch 2-2-2-2-2-2 times, 2 stitches 0-0-2-2-3-4 times and 3-3-1-1-3-3 stitches 1 time (a total of 5-5-7-7-11-13 stitches increased for the armholes in each side of the piece – NOTE: You cast on 1 less stitch for the armholes on each side of the back piece than on the front piece so that the pattern will fit into the sides of the body = 83-87-95-99-111-119 stitches. The new stitches are worked into pattern A.1 as you go. When the piece measures 54-56-58-60-62-64 cm from the shoulder, cast off with knit over knit and purl over purl. SLEEVE: Cast on 19-23-25-27-27-27 stitches with circular needle size 6 mm and Air. Work pattern A.1 until there is 1 stitch left, work the first stitch in A.1. Continue like this back and forth, AT THE SAME TIME at the end of each row cast on new stitches in each side for the sleeve cap as follows: Cast on 2 stitches 3-3-3-3-2-2 times, 1 stitch 0-0-0-0-4-5 times, 2 stitches 2-2-2-2-2-2 times and 4 stitches 1 time = 47-51-53-55-59-61 stitches. The new stitches are worked into pattern A.1. When all the stitches are cast on, insert a marker thread in the piece. THE PIECE IS NOW MEASURED FROM HERE! Continue back and forth with pattern A.1 and 1 edge stitch in garter stitch in each side. When the piece measures 4 cm decrease 1 stitch in each side – read DECREASE TIP. Decrease like this approx. every 5-5-4-4-3-3 cm a total of 7-8-8-9-10-10 times = 33-35-37-37-39-41 stitches. Continue until the sleeve measures 44-44-43-43-41-39 cm from the marker thread (shorter measurements in larger sizes due to wider shoulders). Cast off with knit over knit and purl over purl. Work the other sleeve in the same way. ASSEMBLY: Sew the shoulder seams inside the cast-on edge. Sew the sleeves to the body inside the cast-on edge on the sleeves and inside the 1 edge stitch in garter stitch on the body. Sew the sleeve and side seams inside the 1edge stitch in garter stitch. NECK: Knit up 66-78 stitches from the right side with short circular needle size 6 mm. Work 2 ridges. Cast off with purl. |
||||||||||||||||||||||
Diagram explanations |
||||||||||||||||||||||
|
||||||||||||||||||||||
 |
||||||||||||||||||||||
 |
||||||||||||||||||||||
Have you finished this pattern?Tag your pictures with #dropspattern #astersweater or submit them to the #dropsfan gallery. Do you need help with this pattern?You'll find 27 tutorial videos, a Comments/Questions area and more by visiting the pattern on garnstudio.com. © 1982-2026 DROPS Design A/S. We reserve all rights. This document, including all its sub-sections, has copyrights. Read more about what you can do with our patterns at the bottom of each pattern on our site. |
||||||||||||||||||||||


With over 40 years in knitting and crochet design, DROPS Design offers one of the most extensive collections of free patterns on the internet - translated to 17 languages. As of today we count 325 catalogues and 12298 patterns translated into English (UK/cm). 12298
We work hard to bring you the best knitting and crochet have to offer, inspiration and advice as well as great quality yarns at incredible prices! Would you like to use our patterns for other than personal use? You can read what you are allowed to do in the Copyright text at the bottom of all our patterns. Happy crafting!
Post a comment to pattern DROPS 194-4
We would love to hear what you have to say about this pattern!
If you want to leave a question, please make sure you select the correct category in the form below, to speed up the answering process. Required fields are marked *.