
Popular categories
Looking for a yarn?


Comments / Questions (65)
![]() Karen Roed Jensen wrote:
Karen Roed Jensen wrote:
Nej det er ikke godt nok svar. Jeg skrev at jeg skal bruke A5. Så når jeg kommer til A1 hvor der står følgende (=7 masker). A2 (=10 masker), lag 1 kast osv osv er det jeg skal strikke? Eller skal jeg helt ned hvor der står A5(=10 masker), STRIKK A6(=7 masker) OSV Hvor skal jeg starte?????
14.02.2018 - 12:23
![]() Karen Roed Jensen wrote:
Karen Roed Jensen wrote:
Jeg forstår simpelthen ikke bærestykketjeg har str. A5. Etter de 5 stplpemasker ved jeg ikke hvor jeg skal fortsætte. Hjelp meg - tak
13.02.2018 - 21:45DROPS Design answered:
Hei Karen, Du skal strikke A.1 - A.6 på pinnen i den rekkefølge beskrevet i oppskriften, med kast og glattstrikk imellom. Etter første omgang med mønster skal du fortsette med samme rekkefølgen og øke til raglan samtidig, som beskrevet på toppen av oppskriften. Når du er ferdig med A.1 - A.6 skal du fortsette mønsteret slik og strikke kastene i glattstrikk til lengden du trenger i din størrelse. Håper dette hjelper og god fornøyelse!
14.02.2018 - 06:20
![]() Marielle wrote:
Marielle wrote:
Ik hoop dat dit patroon snel online komt! Ik zou er zo graag al mee willen starten!
02.02.2018 - 12:11
![]() Anette Bo Nissen wrote:
Anette Bo Nissen wrote:
Hvor er den flot hvornår kommer opskriften vil helt sikkert strikke den Kh anette
28.01.2018 - 15:50
![]() Fanfan wrote:
Fanfan wrote:
Vivement les explications pour le faire
22.01.2018 - 21:56
![]() Bodin Ghislaine wrote:
Bodin Ghislaine wrote:
Magnifique!!!j 'ai hâte d'avoir les explications Ghislaine
19.01.2018 - 19:06
![]() Desirée Forsman Strömner wrote:
Desirée Forsman Strömner wrote:
Så jättefin, hoppas den kommer med för denna vill jag sticka!!
14.01.2018 - 18:16
![]() Jen wrote:
Jen wrote:
Please release this pattern, it's beautiful
11.01.2018 - 12:47
![]() Kari Rørtveit wrote:
Kari Rørtveit wrote:
Knallfin! Må med. Også fint med tilsvarende jakke i tynnere garn.
03.01.2018 - 21:54
![]() Tanja wrote:
Tanja wrote:
Heel leuk,
30.12.2017 - 11:54
|
||||||||||||||||||||||||||||
Belle Époque#belleepoquecardigan |
||||||||||||||||||||||||||||
 |
 |
|||||||||||||||||||||||||||
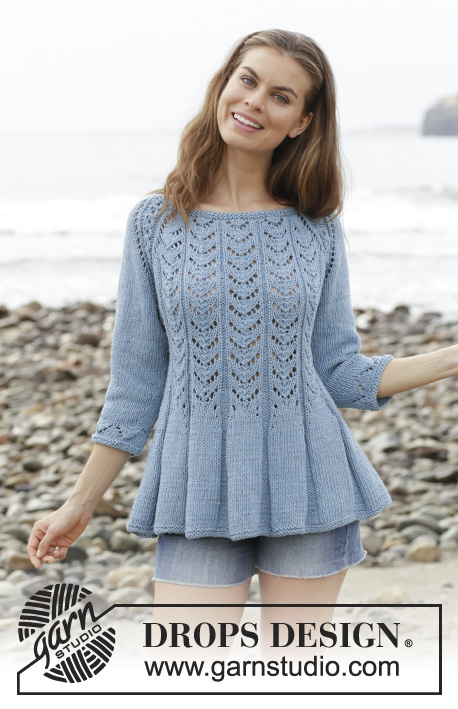
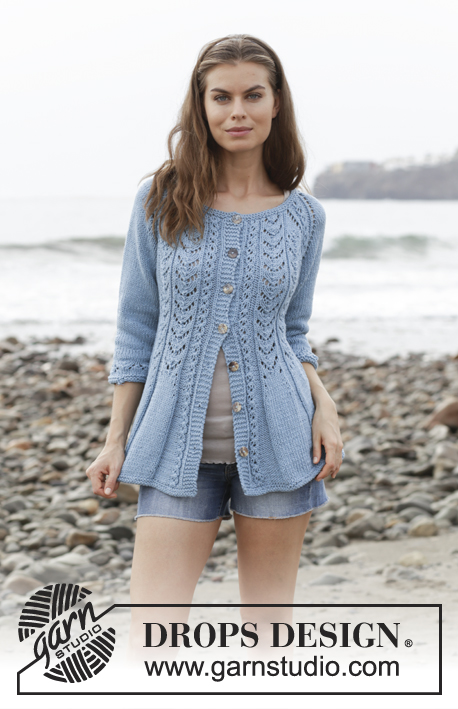
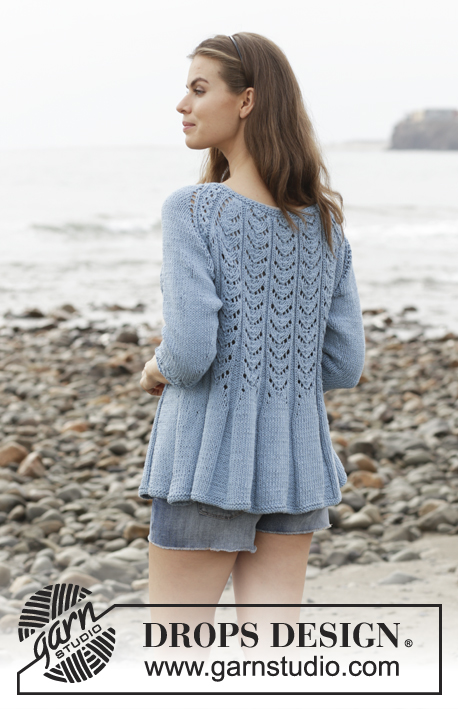
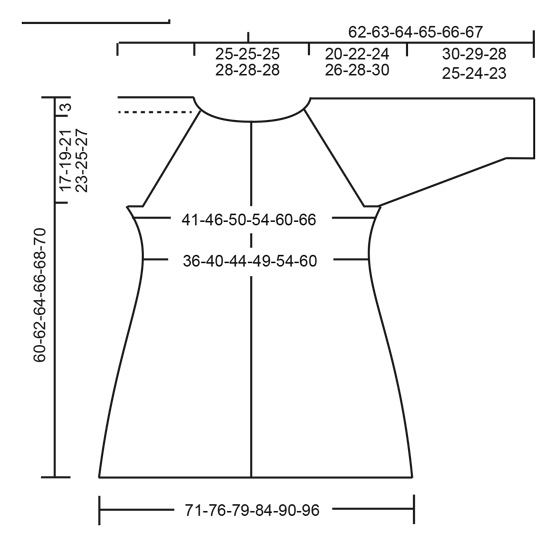
Fitted jacket with lace pattern, raglan and ¾ sleeves, knitted top down. Size: S - XXXL Piece is knitted in DROPS Paris.
DROPS 186-7 |
||||||||||||||||||||||||||||
|
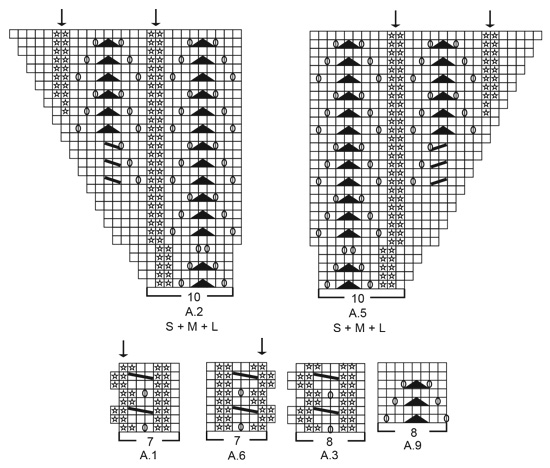
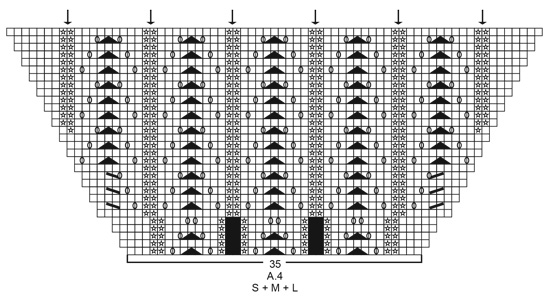
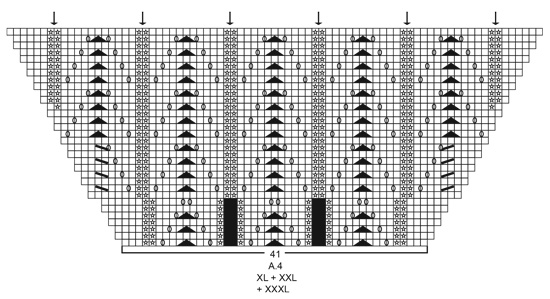
INFORMATION FOR PATTERN: GARTER STITCH (back and forth): 1 ridge = knit 2 rows. GARTER STITCH (worked in the round): 1 ridge = 2 rounds. Knit 1 round and purl 1 round. INCREASE TIP-1: To calculate how to increase evenly, use the total number of stitches on row (e.g. 98 stitches), minus bands (e.g. 10 stitches) and divide the remaining stitches by number of increases to be done (e.g. 17) = 5.2. In this example increase by making 1 yarn over after approx. every 5th stitch (do not increase over bands). On next row work yarn overs twisted to avoid holes. PATTERN: See diagrams A.1 to A.9. Choose diagram for your size (applies to A.2, A.4, A.5, A.7 and A.8). Diagrams show all rows in pattern seen from the right side. RAGLAN: All increases are done from the right side. Increase for raglan on each side of A.3 in every transition between body and sleeves (= 8 stitches increased on every increase row). Increase 1 stitch by making 1 yarn over, on next row (wrong side) purl yarns over to make holes. Work the increased stitches in stocking stitch on sleeves and according to diagram on front and back piece. DECREASE TIP (applies to sides on body and mid under sleeves): All decreases are done from the right side! Begin 4 stitches before marker and knit 2 together, knit 4 (marker is between these 4 stitches), slip 1 stitch knitwise, knit 1, pass slipped stitch over stitch worked (= 2 stitches decreased). INCREASE TIP-2 (applies to purl sections on body): All increases are done from the right side. Increase 1 stitch in every purl section by making 1 yarn over before all 2 purl stitches. On next row (wrong side) knit yarn over twisted to avoid hole. On next increase make 1 yarn over after every 3 purl stitches. Continue increase by alternately increasing at beginning and end of purl section. INCREASE TIP-3 (applies to sides of body): All increases are done from the right side. Begin 3 stitches before marker thread, make 1 yarn over, knit 6 (marker thread is in the middle of these 6 stitches), make 1 yarn over (= 2 stitches increased). On next row (wrong side) purl yarn overs twisted to avoid holes. INCREASE TIP-4 (applies to sections in stocking stitch over A.7/A.8 on body): All increases are done from the right side. When A.7/A.8 has been done, work in stocking stitch over the 9-9-9-11-11-11 stitches with lace pattern. Increase over these 9-9-9-11-11-11 stitches as follows: Work 1 stitch in stocking stitch, make 1 yarn over, work in stocking stitch until 1 stitch in stocking stitch remains, make 1 yarn over, work 1 stitch in stocking stitch. On next row (wrong side) purl yarn overs twisted to avoid holes. BUTTONHOLES: Decrease for buttonholes on right band (when garment is worn). 1 buttonhole = work from right side until 3 stitches remain on needle, make 1 yarn over, knit 2 together and finish by knitting 1. On next row (wrong side) knit the yarn over to make a hole. Decrease for first buttonhole on first row from right side after edge in garter stitch in neck. Then decrease the next 6-6-6-7-7-7 buttonholes, approx. 7-7-7½-7-7½-7½ cm between each. ---------------------------------------------------------- JACKET: Work back and forth on circular needle from mid front, work top down. Work sleeves in the round on double pointed needles/a short circular needle, top down. NECK EDGE: Cast on 98-102-106-110-114-118 stitches (including 5 band stitches in each side towards mid front) on circular needle size 4 mm with Paris. Work 2 ridges in GARTER STITCH - see explanation above. Knit 1 row from right side while increasing 17-13-9-15-11-7 stitches evenly - read INCREASE TIP-1 and remember BUTTONHOLES on right band - see explanation above = 115-115-115-125-125-125 stitches. Purl 1 row from wrong side inside 5 band stitches in garter stitch in each side towards mid front. Switch to circular needle size 5 mm and work yoke as explained below. YOKE: Work first row as follows from right side: Work 5 band stitches in garter stitch, A.1 (= 7 stitches), A.2 (= 10-10-10-12-12-12 stitches), make 1 yarn over, work A.3 (= 8 stitches), make 1 yarn over, work 2 stitches in stocking stitch (= sleeve cap), make 1 yarn over, work A.3, make 1 yarn over, work A.4 (= 35-35-35-41-41-41 stitches), make 1 yarn over, work A.3, make 1 yarn over, work 2 stitches in stocking stitch (= sleeve cap), make 1 yarn over, work A.3, make 1 yarn over, work A.5 (= 10-10-10-12-12-12 stitches), work A.6 (= 7 stitches) and finish with 5 band stitches in garter stitch towards mid front = 129-129-129-139-139-139 stitches (including yarn overs in A.1/A.3/A.6). Continue pattern like this. AT THE SAME TIME on every row from right side increase for RAGLAN - see explanation above, until increase has been done 14-18-20-21-24-26 times on each side of A.3 (including increases on first row from right side after neck edge). REMEMBER THE KNITTING TENSION! NOTE! When A.2/A.4/A.5 has been worked, continue pattern the same way, but work the next increased stitches on each side of A.3 in stocking stitch. In size S the increases for raglan is done when 3 rows remain in A.2/A.4/A.5, continue pattern without increase as explained below. After last increase for raglan there are 237-269-285-303-327-343 stitches on needle if it is on a row with 7/8/7 stitches in A.1/A.3/A.6 or 243-275-291-309-333-349 stitches if it is on a row with 8/9/8 stitches in A.1/A.3/A.6. Continue pattern as before without increases for raglan until piece measures 17-19-21-23-25-27 cm from cast-on edge mid front, but finish so that last row is a row with 7/8/7 stitches in A.1/A.3/A.6. Work next row as follows from right side: Continue with band, pattern and in stocking stitch as before over the first 37-41-43-47-51-55 stitches (= front piece), slip the next 49-57-61-62-66-66 stitches on 1 stitch holder for sleeve, cast on 6-6-8-8-10-12 new stitches on needle (= in the side under sleeve), continue in stocking stitch and pattern as before over the next 65-73-77-85-93-101 stitches (= back piece), slip the next 49-57-61-62-66-66 stitches on 1 stitch holder for sleeve, cast on 6-6-8-8-10-12 new stitches on needle (= in the side under sleeve) and continue in stocking stitch, pattern and band over the remaining 37-41-43-47-51-55 stitches (= front piece). Finish body and sleeves separately. NOW MEASURE PIECE FROM HERE! BODY: = 153-169-181-197-217-237 stitches (including yarn overs in A.1/A.6). Insert 1 marker thread in the middle of the 6-6-8-8-10-12 stitches cast on under sleeve in each side and move the marker threads upwards when working. Begin from wrong side and work 1 row with garter stitch over garter stitch, purl over purl, knit over knit. Work next row as follows from right side: 5 band stitches in garter stitch, continue A.1 (= 7 or 8 stitches), work A.7 over the next 22-22-22-26-26-26 stitches (= 2 repetitions of 11-11-11-13-13-13 stitches, continue on correct row in diagram where pattern was finished at division), work in stocking stitch over the next 13-21-27-26-36-46 stitches, A.8 over the next 55-55-55-65-65-65 stitches (= 5 repetitions of 11-11-11-13-13-13 stitches, continue on correct diagram), purl 2, 13-21-27-26-36-46 stitches in stocking stitch, A.8 over the next 22-22-22-26-26-26 stitches (= 2 repetitions of 11-11-11-13-13-13 stitches, continue on correct row in diagram), continue A.6 (= 7 or 8 stitches) and finish with 5 band stitches in garter stitch towards mid front. Continue the pattern like this – READ THE REST OF BODY BEFORE CONTINUING! DECREASE IN THE SIDES: When piece measures 1 cm from division, decrease 1 stitch on each side of both marker threads - read DECREASE TIP (= 4 stitches decreased). Decrease like this every other row (i.e. every row from right side) 5 times in total in each side = 131-147-159-175-195-215 stitches (without yarn overs in A.1/A.6). INCREASE IN PURL SECTIONS: When piece measures 6 cm from division, increase 1 stitch in every purl section marked with arrow in diagram (i.e. increase in all purl sections except the one purl section closest mid front in each side = 12 stitches increased) – read INCREASE TIP-2. Increase like this every 5 cm 6 times in total in every purl section (there are now 8 stitches in each of these purl sections). INCREASE IN THE SIDES: AT THE SAME TIME when piece measures 7 cm from division, increase 1 stitch on each side of both marker threads - read INCREASE TIP-3 (= 4 stitches increased). Increase like this every 6 cm 3 times in total in each side. INCREASE IN STOCKING STITCH SECTIONS: AT THE SAME TIME when piece measures approx. 15 cm from division, finish A.7 and A.8 after one whole repetition vertically. Then work knit over knit and purl over purl over these stitches. On next row from right side increase 2 stitches in each stocking stitch section over A.7/A.8 - read INCREASE TIP-4 (= 18 stitches increased). Repeat this increase after 2 cm (= 18 stitches increased). When all increases are done there are 251-267-279-295-315-335 stitches on row (without yarn overs in A.1/A.6). Continue with garter stitch over garter stitch, knit over knit and purl over purl until piece measures approx. 59-61-63-65-67-69 cm from shoulder and down, but adjust so that next row is worked from right side. Switch to circular needle size 4.5 mm. Work 2 ridges back and forth over all stitches. Switch back to circular needle size 5 mm and cast loosely off by knitting from right side. Jacket measures approx. 60-62-64-66-68-70 cm from shoulder and down. SLEEVE: Slip the 49-57-61-62-66-66 stitches from stitch holder in one side of piece on double pointed needles or a short circular needle size 5 mm and pick in addition up 1 stitch in each of the 6-6-8-8-10-12 new stitches cast on under sleeve = 55-63-69-70-76-78 stitches. Insert 1 marker thread in the middle of the 6-6-8-8-10-12 stitches under sleeve and begin round here. Work in stocking stitch in the round. When piece measures 2-2-2-2-3-3 cm from division, decrease 2 stitches mid under sleeve - read DECREASE TIP. Decrease like this every 3½-2½-2-1½-1-1 cm 7-10-12-12-14-14 times in total = 41-43-45-46-48-50 stitches. Continue until sleeve measures 26-25-24-21-20-19 cm (shorter measurements in the larger sizes because of longer yoke). Knit 1 round while adjusting number of stitches to 40-40-40-48-48-48. Work A.9 in the round (= 5-5-5-6-6-6 repetitions of 8 stitches). When A.9 has been worked, switch to double pointed needles size 4 mm. Work 2 ridges in the round. Switch back to double pointed needles size 5 mm and cast off by knitting. Sleeve measures approx. 30-29-28-25-24-23 cm from division. Work the other sleeve the same way. ASSEMBLY: Sew the buttons on to the left band. |
||||||||||||||||||||||||||||
Diagram explanations |
||||||||||||||||||||||||||||
|
||||||||||||||||||||||||||||
 |
||||||||||||||||||||||||||||
 |
||||||||||||||||||||||||||||
 |
||||||||||||||||||||||||||||
 |
||||||||||||||||||||||||||||
 |
||||||||||||||||||||||||||||
Have you finished this pattern?Tag your pictures with #dropspattern #belleepoquecardigan or submit them to the #dropsfan gallery. Do you need help with this pattern?You'll find 29 tutorial videos, a Comments/Questions area and more by visiting the pattern on garnstudio.com. © 1982-2026 DROPS Design A/S. We reserve all rights. This document, including all its sub-sections, has copyrights. Read more about what you can do with our patterns at the bottom of each pattern on our site. |
||||||||||||||||||||||||||||


With over 40 years in knitting and crochet design, DROPS Design offers one of the most extensive collections of free patterns on the internet - translated to 17 languages. As of today we count 324 catalogues and 12245 patterns translated into English (UK/cm). 12245
We work hard to bring you the best knitting and crochet have to offer, inspiration and advice as well as great quality yarns at incredible prices! Would you like to use our patterns for other than personal use? You can read what you are allowed to do in the Copyright text at the bottom of all our patterns. Happy crafting!
Post a comment to pattern DROPS 186-7
We would love to hear what you have to say about this pattern!
If you want to leave a question, please make sure you select the correct category in the form below, to speed up the answering process. Required fields are marked *.