
Popular categories
Looking for a yarn?


Comments / Questions (109)
![]() Marlies Cornips wrote:
Marlies Cornips wrote:
Hallo Ik heb het eerste gedeelte van het voorpand tot na de teltekening A5 t/m A8 gebreid, het werk meet nu de aangegeven 21 cm. patroon ziet exact uit als op de foto, helaas heb ik i.p.v. de aangegeven 79 steken voor de kleinste maat tussen de markeerders 91 steken. hoe is dit mogelijk? ik kan het niet ontdekken, heb alles nagekeken. groetjes marlies
16.08.2016 - 22:31DROPS Design answered:
Ik heb nagerekend en het patroon klopt. Ik vermoed dat u dit gedeelte verkeerd hebt gelezen: Herhaal A.5 tot en met 0A.8 over de 6 st aan elke kant van elke markeerder 2-3-2-3-4-5 keer in totaal, herhaal dan de eerste 0-0-6-4-4-4 nld van A.5 tot en met A.8 nog 1 keer. === > het betekent dat u A.6 en A.7 tussen de markeerders in TOTAAL 2 keer herhaalt. Ik denk dat u begrepen hebt, 1 keer breien en dan NOG 2 keer herhalen - dan zou u op 91 st komen.
16.08.2016 - 23:31
![]() Deborah wrote:
Deborah wrote:
Vorrei segnalare un errore di traduzione. Su Davanti, secondo paragrafo dopo "tutte le taglie" è scritto di lavorare a diritto le prime x maglie mentre è corretto scrivere "chiudere a diritto le prime x maglie" (si tratta della bretella sopra lo scalfo). Ho appena controllato la versione inglese poichè, lavorando proprio quel punto, non riuscivo ad andare avanti. Detto questo la maglia è bellissima, mi sta dando belle soddisfazioni.
14.08.2016 - 19:19DROPS Design answered:
Buonasera Deborah. Abbiamo corretto il testo. La ringraziamo per la segnalazione. Buon lavoro!
14.08.2016 - 22:26
![]() Isabelle wrote:
Isabelle wrote:
Hallo. Was ist gemeint mit "Die Mitte von Vorder- und Rückenteil jeweils zusziehen (d.h. den Anschlagrand)." Wieso zuziehen?
10.08.2016 - 22:10DROPS Design answered:
Liebe Isabelle, damit kein unschönes Loch in der Mitte der Quadrate (bzw. des 3/4 Quadrats) ist, zieht man zum Schluss diese Öffnung zusammen.
17.08.2016 - 14:19
![]() Veera wrote:
Veera wrote:
Suomenkielisessä ohjeessa, etukappaleen lyhennettyjen kerrosten jälkeen, ennen kädentien pääteltyjä silmukoita: "Neulo kummankin reunan ensimmäisillä 42-46-50-52-56-58 s:llä 6 krs ainaoikeaa..." Onko tässä kuitenkin oikea määrä 3 krs ainaoikeaa?
10.08.2016 - 07:30DROPS Design answered:
Tämä pitää paikkansa, ohje on nyt korjattu!
30.08.2016 - 14:13
![]() Karin wrote:
Karin wrote:
Hoi, ik heb problemen met de patronen A5,6,7,8,. A5 en A6 zijn niet hetzelfde. Ik vraag me af waarom. De tekening loopt toch gewoon door langs weerzijden van de markeerder. Waarom verspringt het dan in A6 en A7. Die twee tricotsteken hoeven toch niet te verspringen want dan heb je geen doorlopende lijn . Alvast bedankt voor uw antwoord.
17.07.2016 - 10:09DROPS Design answered:
Hoi Karin. Op deze manier hebben de ontwerpers het topje ontworpen. Het is geen fout in het patroon, maar hun keus om het zo te maken. Als je het graag anders wilt, dan mag je natuurlijk altijd aanpassen.
19.07.2016 - 13:48
![]() Irene wrote:
Irene wrote:
Hallo. Ich stricke gerade drops 170-4 und bin beim Rückenteil. Nachdem ich A.1 beendet habe werde ich aufgefordert, A12/A3/A13 mit je 39 Maschen bzw stricken. Die restlichen 39 Maschen werden für die Halsblende stillgelegt. Dann nimmt man noch A13 11 M. zu für Schulter. Ich bin mir nicht sicher ob das so richtig ist? DIESE STILLGELEGTEN Maschen werden dann zum Schluss mit der Schulter vernäht.? Und das funktioniert so? Habe keine Vorstellung. Danke für eine helfende Antwort in deutsch.
14.06.2016 - 14:20DROPS Design answered:
Liebe Irene, vielleicht hilft Ihnen, wenn Sie einen Blick auf die Schnittübersicht werfen: dort sehen Sie oben quer eine Linie, das ist quasi die 4. Seite des Quadrats, die stillgelegt wird und dann den hinteren Halsausschnitt ergibt. Daneben sind die Stücke für die Schulter (die 11 M, die beidseitig neu angeschlagen werden) zu erkennen.
06.07.2016 - 10:29
![]() Eli Saksgård wrote:
Eli Saksgård wrote:
Hei! Takk for svar, men dere forstår visst ikke hva jeg mener.... jeg har ingen problemer med å lese mønsterraportene, eller forstå hva som står i mønsteret. Problemet er: se på mønster A1 for str L, så er det ikke tre hele blader der. Det er et helt i midten, og to halve på hver side. Fellingene til andre halvdel av disse bladene starter ikke før i mønstereapport A12/A3/A13, altså etter at de 39 maskene for halskant er satt på tråd.
02.06.2016 - 14:12
![]() Eli Saksgård wrote:
Eli Saksgård wrote:
Hei! Jeg har en liten krise her... Strikker denne i str L, og har strikket A1 på bakstykket. Etter hva jeg forstår, skal det deretter strikkes én omgang *A12,A3,A13* over de første 3 117 maskene (3×39), mens de siste 39 m settes på tråd til halskant. Er det meningen at de to løvbladene i ytterkantene ikke skal bli hele? De er jo det på bildet her? Mine er bare halvveis ferdige når det står at maskene skal settes på vent.... håper på kjapt svar! Mvh Eli S
29.05.2016 - 20:08DROPS Design answered:
Hej Eli. Du er faerdig med A.1 (3 hele blomsterblade), du strikker saa A.12 = 39 m, A.3 = 39 m og A.13 = 39 og saetter de sidste 39 m paa en traad = hals. Saet först 11 nye masker op efter A.13, strik frem og tilbage og saet ogsaa 11 nye masker op efter A.12: 12 + 39 + 39 + 39 + 12 m. Du strikker saa één hel gentagelse af mönstrene i höjden. Du skulle ikke have nogle halve mönstre nogensteds.
01.06.2016 - 15:55
![]() Maria Alice Leite Nassar wrote:
Maria Alice Leite Nassar wrote:
Estou sentindo muita dificuldade de visualizar os diagramas. Estão muito pequenos. Sera que vocês poderiam fazer eles individualmente para que eu possa aumentar na hora da impressão
24.05.2016 - 21:50
![]() Tineke wrote:
Tineke wrote:
Ik hoop dat je een fijne vakantie hebt gehad. Wil je mijn vraag van 30-4 nog beantwoorden alvast dank
10.05.2016 - 14:02DROPS Design answered:
Hoi Tineke. Natuurlijk, als ik zo ver ben - je bent niet de enige :-) Fijne dag nog!
10.05.2016 - 16:09
|
|||||||||||||||||||||||||||||||
Butterfly Heart Top#butterflyhearttop |
|||||||||||||||||||||||||||||||
 |
 |
||||||||||||||||||||||||||||||
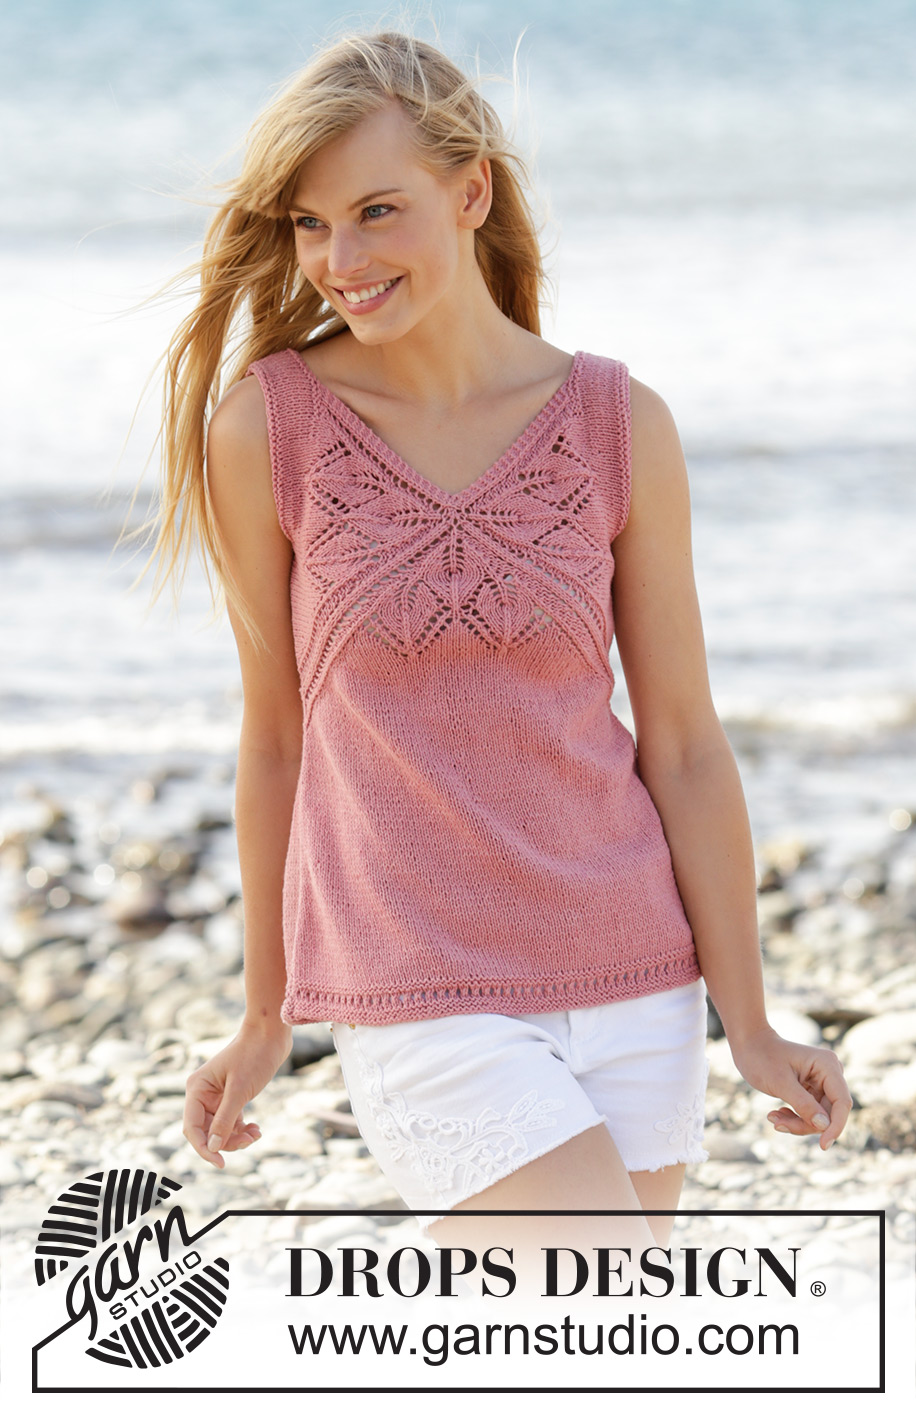
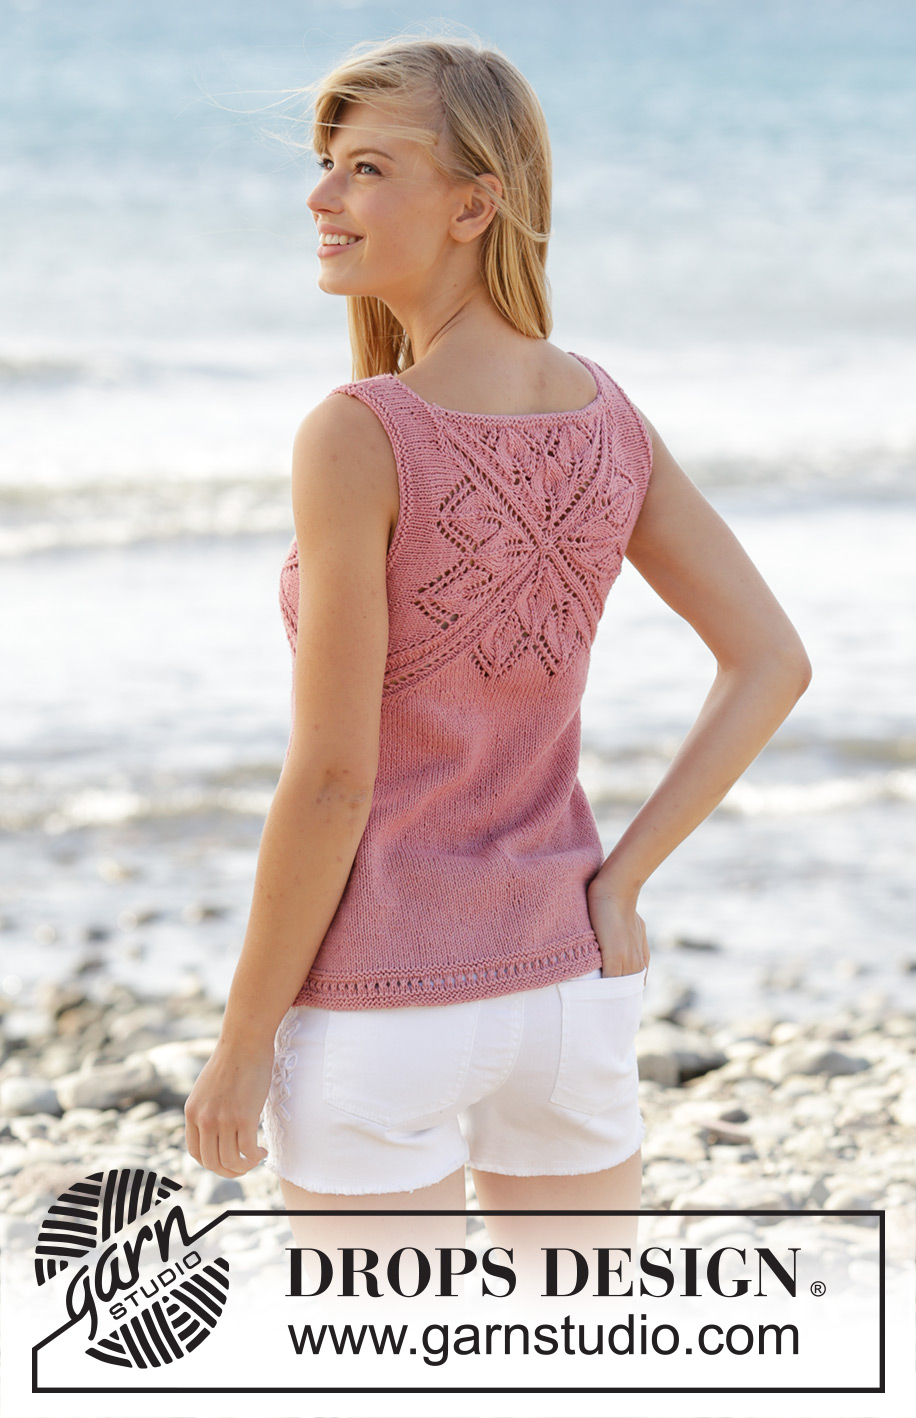
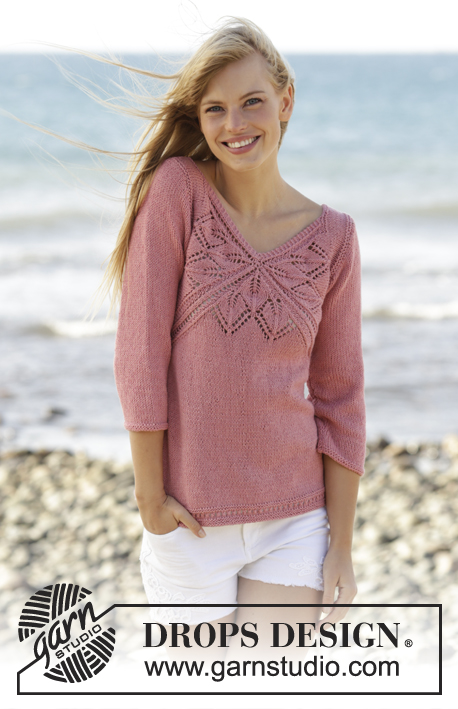
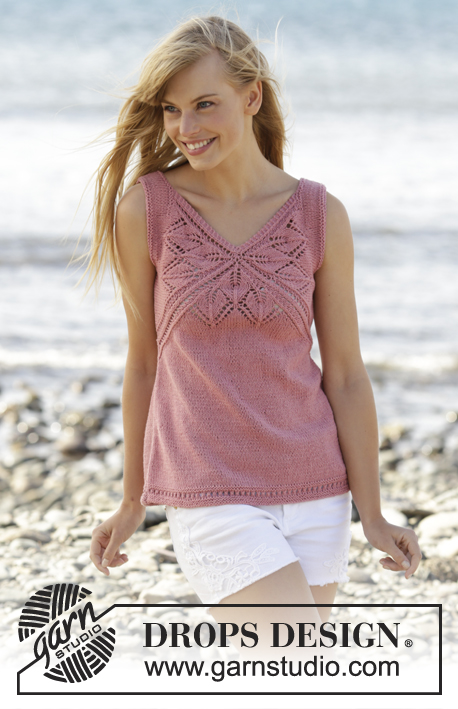
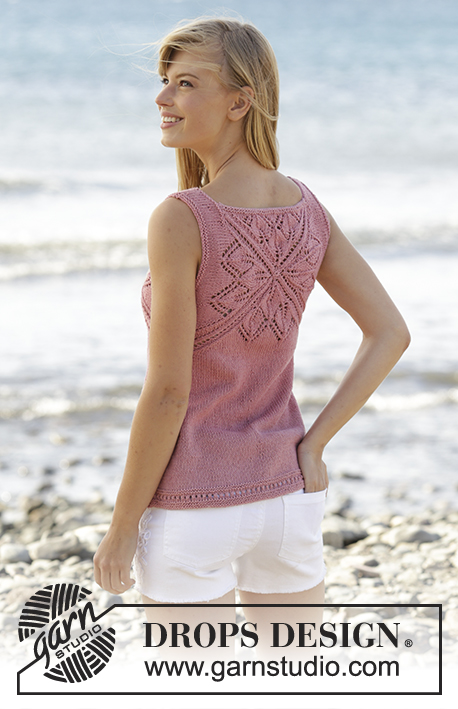
Knitted DROPS top with lace pattern and V-neck in ”Belle”. Worked top down. Size: S - XXXL.
DROPS 170-4 |
|||||||||||||||||||||||||||||||
|
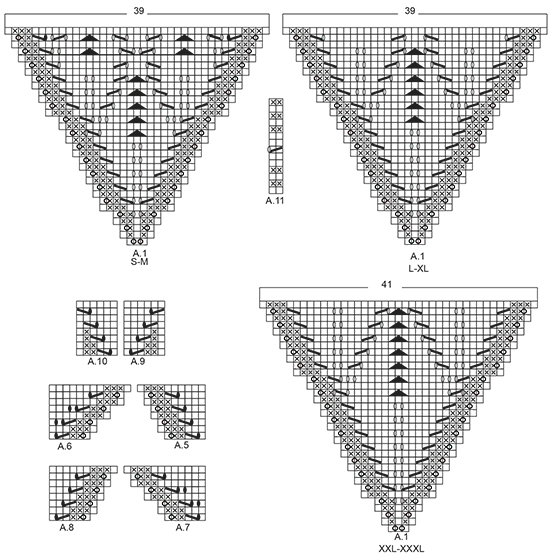
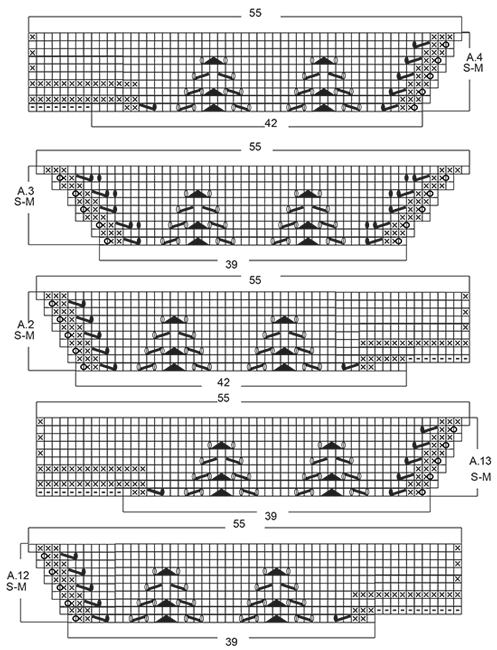
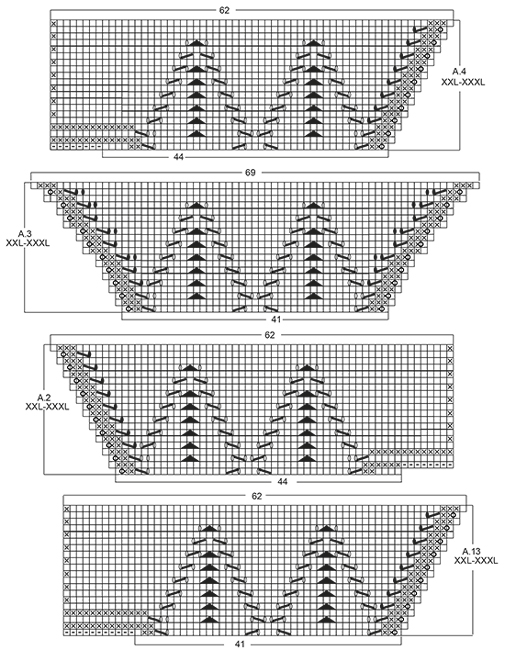
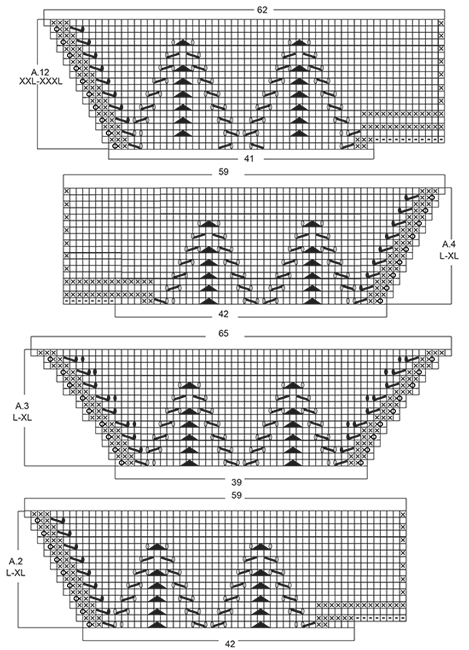
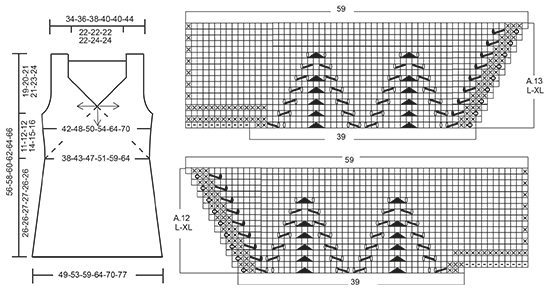
GARTER ST (back and forth): K all rows. 1 ridge = 2 rows K. PATTERN: See diagrams A.1 to A.13. The diagrams show all rows in pattern seen from RS. See diagram for correct size. SHORT ROWS: When turning in short rows, slip first st as if to K. Tighten thread and make sure to avoid big holes. INCREASE TIP: All inc are done from RS. Inc 1 st by making 1 YO, on next row P YO twisted to avoid holes. ---------------------------------------------------------- TOP: Work from the middle of V-neck and out in 3 triangles on front piece and 4 triangles on back piece, then work downwards. FRONT PIECE: Work back and forth from neck and down. Cast on 8 sts on circular needle size 4 mm with Belle. K 1 row. On next row inc as follows: * K 1, 1 YO *, repeat from *-* until 1 st remains and finish with K 1 = 15 sts on needle. Work next row as follows (from RS): Work YOs from previous row twisted, they should not make holes. Work 3 sts in GARTER ST - see explanation above, A.1, insert 1st marker, A.1, insert 2nd marker, A.1 (= repeat A.1 3 times in total on row), finish with 3 sts in garter st. REMEMBER THE KNITTING TENSION When A.1 has been worked 1 time vertically, there are 123-123-123-123-129-129 sts on needle. Piece measures approx. 11-11-11-11-12-12 cm from cast-on edge. Work next row as follows from RS: Work A.2 over the first 42-42-42-42-44-44 sts, A.3 over the next 39-39-39-39-41-41 sts and A.4 over the last 42-42-42-42-44-44 sts, after A.4 cast on 8 sts at the end of row for shoulder (see diagram). Work A.4 to A.2 on next row, after A.2 cast on 8 sts at the end of row for shoulder (see diagram). When A.2 to A.4 have been worked 1 time vertically, there are 165-165-183-183-193-193 sts on needle. Piece measures approx. 15-15-17-17-19-19 cm from cast-on edge. READ ALL OF THE FOLLOWING SECTION BEFORE CONTINUING! WORK PATTERN AS BEFORE WHILE AT THE SAME TIME WORKING SHORT ROWS IN EACH SIDE OF PIECE. PATTERN: Work next row as follows from RS: Work 1 st in garter st, 48-48-52-52-55-55 sts in stocking st, work A.5 over the next 6 sts, (marker), A.6 over the next 6 sts, 43-43-53-53-57-57 sts in stocking st, A.7 over the next 6 sts, (marker), A.8 over the next 6 sts, 48-48-52-52-55-55 sts in stocking st, finish with 1 st in garter st. Repeat A.5 to A.8 over the 6 sts on each side of each marker 2-3-2-3-4-5 times in total, then repeat the first 0-0-6-4-4-4 rows of A.5 to A.8 1 more times. SHORT ROWS: AT THE SAME TIME when 2-6-0-2-0-6 rows of A.5 to A.8 have been worked, work SHORT ROWS - see explanation above - in each side of piece as follows: Work until 26-26-24-23-18-18 sts remain on row (work A.5 to A.8 as before), turn and work until 26-26-24-23-18-18 sts remain, turn piece. Then work short rows in the different sizes as follows: SIZE M: Work 6 sts less for every turn 2 times in each side of piece. SIZE L-XL: Work 6 sts less for every turn 1-2 times in each side of piece, then work 4 sts less on every turn 3-2 times in each side of piece. SIZE XXL-XXXL: Work 6 sts less for every turn 1-1 time in each side of piece, then work 4 sts less for every turn 4-4 times in each side of piece, then work 2 sts less on every turn 4-5 times in each side of piece. ALL SIZES: When the short rows have been worked, work last row from WS, so that next row beg from shoulder. Then work over all sts from RS as follows: Work in garter st over the first 42-44-46-48-50-52 sts AT THE SAME TIME inc 0-2-4-4-6-6 sts evenly, work as before (i.e. A.5 to A.8 and stocking st) until 42-44-46-48-50-52 sts remain, work in garter st over the last sts AT THE SAME TIME inc 0-2-4-4-6-6 sts evenly (= 42-46-50-52-56-58 sts in garter st in each side of piece). Work 3 rows in garter st over the outermost 42-46-50-52-56-58 sts in garter st in each side of piece, pattern and stocking st over the remaining sts. On next row from WS work as follows: Cast off with K over the first 40-44-48-50-54-56 sts for armhole, work 2 sts in garter st, work in stocking st and pattern as before until 42-46-50-52-56-58 sts remain, 2 sts in garter st, cast off with K over the last 40-44-48-50-54-56 sts for armhole. Cut the yarn. 8-8-8-12-12-12 rows of A.5 to A.8 remain. Beg next row from RS. Continue to work in garter st over the first and last 2 sts in each side of piece. When A.5 to A.8 have been worked, there are 23-25-26-27-32-34 sts before 1st marker, 79-91-99-107-123-135 sts between 1st and 2nd marker and 23-25-26-27-32-34 sts after 2nd marker = 125-141-151-161-187-203 sts in total on row. Piece measures approx. 21-24-25-27-32-35 cm on the widest measured from cast-on edge. Insert 1 marker in piece, NOW MEASURE PIECE FROM HERE. On next row from RS loosely cast off the first 22-24-25-26-31-33 sts with K, work 1 edge st in garter st, (marker), work A.9 over the first 6 sts after marker, stocking st over the next 67-79-87-95-111-123 sts, A.10 over the last 6 sts before second marker, (marker), 1 edge st in garter st, loosely cast off the last 22-24-25-26-31-33 sts = 81-93-101-109-125-137 sts remain on needle. Cut the yarn. Work next row from WS over the remaining sts as follows: 1 edge st in garter st, A.10 as before, stocking st over the next 67-79-87-95-111-123 sts, A.9 as before, 1 edge st in garter st. When A.9 and A.10 have been worked 1 time vertically, continue in stocking st with 1 edge st in garter st in each side of piece. When piece measures 3 cm from marker, inc 1 st in each side of piece inside 1 edge st (= 2 sts inc) - READ INCREASE TIP. Repeat inc every 1½-1½-1½-1-1-1 cm 12-10-12-14-12-13 times in total = 105-113-125-137-149-163 sts on needle. When piece measures 23-23-24-24-23-23 cm from marker (piece measures 53-55-57-59-61-63 cm in total from shoulder), adjust so that next row is from RS, switch to circular needle size 3.5 mm. Work next row from RS as follows: Work 1 edge st in garter st, work A.11 (= 2 sts) until 2 sts remain, work first st in A.11, finish with 1 edge st in garter st. On row with holes (i.e. 7th row) work next to last st K. Cast off when A.11 has been worked 1 time vertically. Piece measures 56-58-60-62-64-66 cm in total from shoulder. BACK PIECE: Piece is first worked in the round, then worked as front piece. Cast on 6 sts on double pointed needles size 4 mm with Belle, switch to circular needle when needed. K 1 row. On next row inc as follows: * K 1, 1 YO *, repeat from *-* = 12 sts on row, K YOs twisted on next row, they should not make holes. Work A.1 4 times in total, insert 1 marker between each A.1 (= 4 markers). When A.1 has been worked 1 time vertically, there are 156-156-156-156-164-164 sts on needle. Continue as follows: A.12 over the first 39-39-39-39-41-41 sts, work A.3 over the next 39-39-39-39-41-41 sts and A.13 over the last 39-39-39-39-41-41 sts, slip the remaining sts on a stitch holder for neck edge (= 39-39-39-39-41-41 sts), after A.13 cast on 11 sts at the end of row for shoulder (see diagram). Then work back and forth on needle. Work A.13/A.3/A.12 on next row, after A.12 cast on 11 sts at the end of row for shoulder (see diagram). When A.12/A.3/A.13 have been worked 1 time vertically, there are 165-165-183-183-193-193 sts on needle. Piece measures approx. 15-15-17-17-19-19 cm from cast-on edge. Now continue back piece as front piece. NECK EDGE: Worked back and forth on needle. Slip sts from stitch holder for neck edge on back piece back on circular needle size 3.5 mm. Work 2 ridges. Fasten ridges where sts were cast on for shoulder. Fasten off. ASSEMBLY: Sew the side seams inside 1 edge st in garter st. Sew shoulder seams inside 1 edge st in garter st. Tighten tog the middle (i.e. cast-on edge) on both front and back piece. |
|||||||||||||||||||||||||||||||
Diagram explanations |
|||||||||||||||||||||||||||||||
|
|||||||||||||||||||||||||||||||
 |
|||||||||||||||||||||||||||||||
 |
|||||||||||||||||||||||||||||||
 |
|||||||||||||||||||||||||||||||
 |
|||||||||||||||||||||||||||||||
 |
|||||||||||||||||||||||||||||||
Have you finished this pattern?Tag your pictures with #dropspattern #butterflyhearttop or submit them to the #dropsfan gallery. Do you need help with this pattern?You'll find 23 tutorial videos, a Comments/Questions area and more by visiting the pattern on garnstudio.com. © 1982-2026 DROPS Design A/S. We reserve all rights. This document, including all its sub-sections, has copyrights. Read more about what you can do with our patterns at the bottom of each pattern on our site. |
|||||||||||||||||||||||||||||||


With over 40 years in knitting and crochet design, DROPS Design offers one of the most extensive collections of free patterns on the internet - translated to 17 languages. As of today we count 324 catalogues and 12245 patterns translated into English (UK/cm). 12245
We work hard to bring you the best knitting and crochet have to offer, inspiration and advice as well as great quality yarns at incredible prices! Would you like to use our patterns for other than personal use? You can read what you are allowed to do in the Copyright text at the bottom of all our patterns. Happy crafting!
Post a comment to pattern DROPS 170-4
We would love to hear what you have to say about this pattern!
If you want to leave a question, please make sure you select the correct category in the form below, to speed up the answering process. Required fields are marked *.