
Popular categories
Looking for a yarn?


Comments / Questions (109)
![]() Magliano wrote:
Magliano wrote:
Bonjour, je ne comprends pas le début des explications pour le dos, serai t il possible d en avoir des supplémentaires? Voir une vidéo ou photo? D avance merci
19.07.2018 - 17:55DROPS Design answered:
Bonjour Mme Magliano, le dos se tricote comme le devant, mais cette fois, on commence en rond en répétant A.1 4 fois au total en rond (pas d'encolure V dans le dos), et, après A.1, on continue ensuite en allers et retours. Bon tricot!
20.07.2018 - 14:15
![]() Maria wrote:
Maria wrote:
¡Hola! Estoy parada en las hileras cortas. Para la talla M, se debe reducir 2 veces 6 puntos en cada lado. También hay indicaciones para las demás tallas. ¿Cuál es la disminución a seguir para la talla S? ¡Muchas gracias!
18.07.2018 - 19:33DROPS Design answered:
Hola Maria. Las explicaciones en el texto son para la talla S. Para el resto de las tallas los siguientes párrafos especifican que se debe añadir o no trabajar de la explicación general para la talla S.
21.07.2018 - 20:39
![]() Ludmilla wrote:
Ludmilla wrote:
Upplösningen är för dålig på diagrammen. Missade ett omslag pga detta och fick repa upp. Men jättefint mönster och roligt att sticka! The resolution of the diagrams is too low. I didn't make one of the yo because of this. But really nice pattern and fun to knit!
10.07.2018 - 00:49
![]() Linda wrote:
Linda wrote:
Bonjour, j\'ai du mal comprendre à la fin des rangs raccourcis. on débute 1 rang sur endroit en laissant 26 de chaque coté puis 6 x 2 fois. à la fin de 2e fois on se retrouve sur un rang endroit puisqu\'on tourne, que fait -on ? doit-on faire un rang endroit et un envers sur tout le travail ou bien continuer jusqu\'à la 2e diminution et puis tourner et faire un autre rand envers jusqu\'à l\'épaule? merci de l\'aide
29.06.2018 - 17:34DROPS Design answered:
Bonjour Linda, tricotez un rang sur l'endroit jusqu'à l'épaule puis le rang suivant sur l'envers jusqu'à l'épaule et continuez comme indiqué (avec 46 m point mousse de chaque côté). Bon tricot!
02.07.2018 - 08:45Susan Tighe wrote:
Thank you for the answer to my last question . The front has worked out well . Now for the back ... probably a silly question but you say to knit in the round to start and then talk of rows rather than rounds . Do you join after first round to knit the piece in the round like you would a hat or a sock or work in rows back and forth ?? Many thanks
28.06.2018 - 08:54DROPS Design answered:
Dear Mrs Tighe, back piece is first worked in the round, ie you will cast on 6 sts and repeat A.1 4 times in total in the round (while you have repeated A.1 only 3 times on back piece worked back and forth). After you have worked A.1 one time in height, you will now work back and forth. Happy knitting!
28.06.2018 - 09:01Susan Tighe wrote:
When doing short rows and turning 6 less stitches in subsequent rows does this mean you knit 6 more stitches before you turn or 6 less stitches ? For example in the first and second turn I had to knit until there were 26 stitches left on the row on the next row do I knit till there are 20 stitches left and turn or when there are 32 left and then turn ?? Thank you
19.06.2018 - 21:26DROPS Design answered:
Dear Mrs Tighe, you will work 6 sts less for every turn, ie on next row after the 26 sts, you will work until 32 sts remain. Happy knitting!
20.06.2018 - 08:05
![]() Bettina wrote:
Bettina wrote:
A.5 bis A.8 über die 6 M beidseitig jedes Markierers insgesamt 2-3-2-3-4-5 x arb, bedeutet das, das man innerhalb der Markierer einschließlich der 6 M rechts und links die Muster stricken soll?
01.05.2018 - 16:34DROPS Design answered:
Liebe Bettina, auf beiden Seiten der beiden Markierung werden Sie A.5-A.6 und A.7-A.8 stricken (wie zuvor beschrieben). Viel Spaß beim stricken!
02.05.2018 - 10:24
![]() Marilyn Farnell wrote:
Marilyn Farnell wrote:
I have been trying for 2 days to get A-1, L-XL to work out and I cannot get it. For one thing the graph is so small the yo\'s are lost. Anyhow I cannot get the right amount of stitches. Please help
24.03.2018 - 16:08
![]() Judit Csapo wrote:
Judit Csapo wrote:
Enligt beskrivningen i slutet av framstycke ska man sticka mönster A.11 men jag hittar inget A.11 i beskrivningen.
06.08.2017 - 23:09DROPS Design answered:
Det stämmer att det inte finns något diagram A.11, vi ska snarast korrigera detta!
14.08.2017 - 13:54
![]() Veronique wrote:
Veronique wrote:
Lorsque l'on fait les raccourcis faut'il rabattre les mailles que l'on ne tricote pas à la fin ou on les met en attendre e on les reprend plus tard. Merci à l'avance
02.08.2017 - 18:00DROPS Design answered:
Bonjour Véronique, les mailles non tricotées en fin de rang pour les rangs raccourcis ne sont pas rabattues, on les reprend plus tard, quand les rangs raccourcis sont terminés. Bon tricot!
03.08.2017 - 08:24
|
|||||||||||||||||||||||||||||||
Butterfly Heart Top#butterflyhearttop |
|||||||||||||||||||||||||||||||
 |
 |
||||||||||||||||||||||||||||||
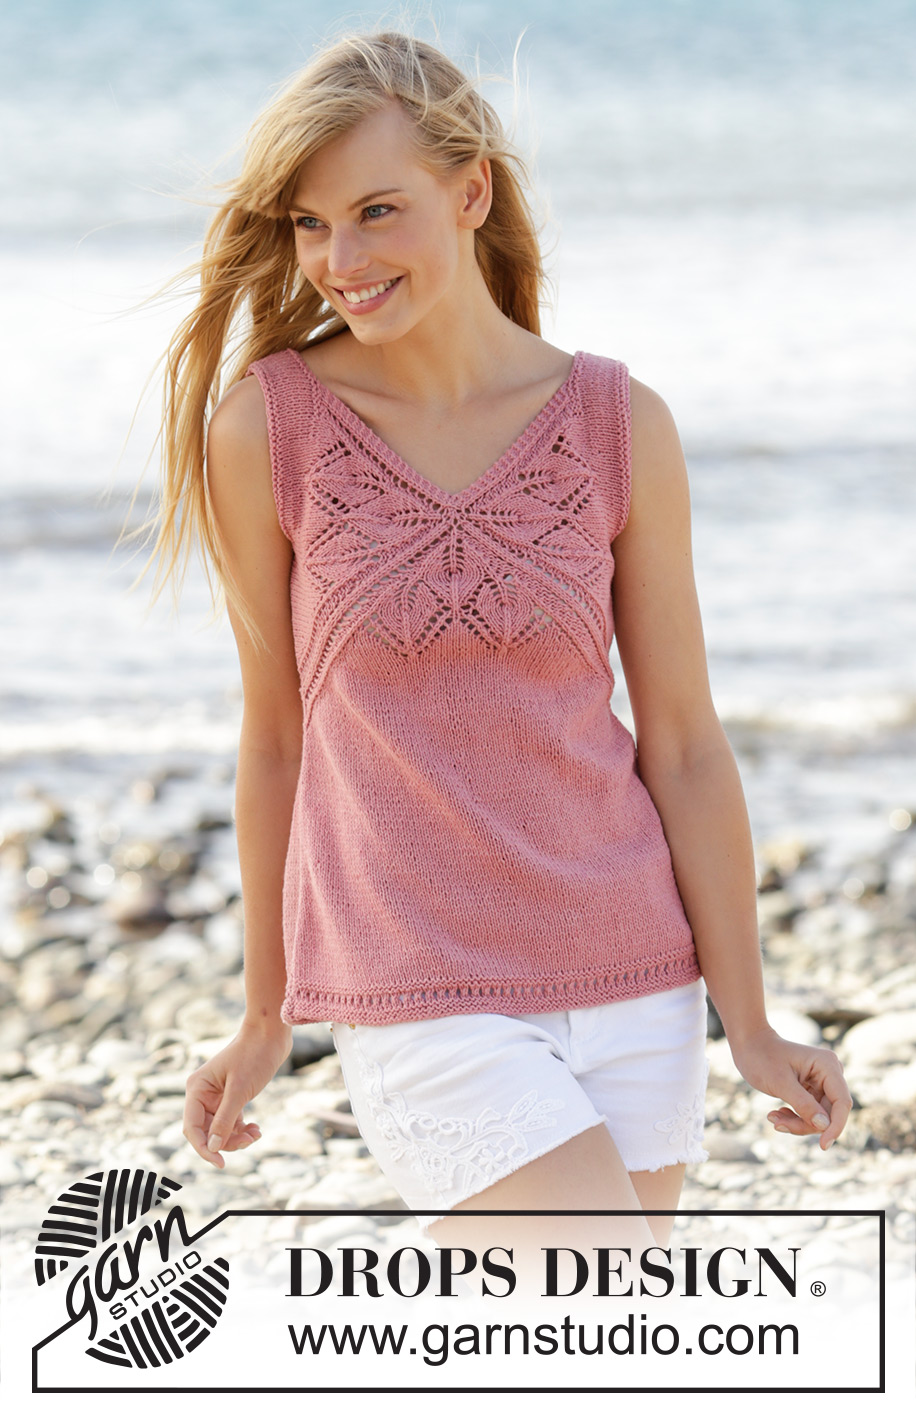
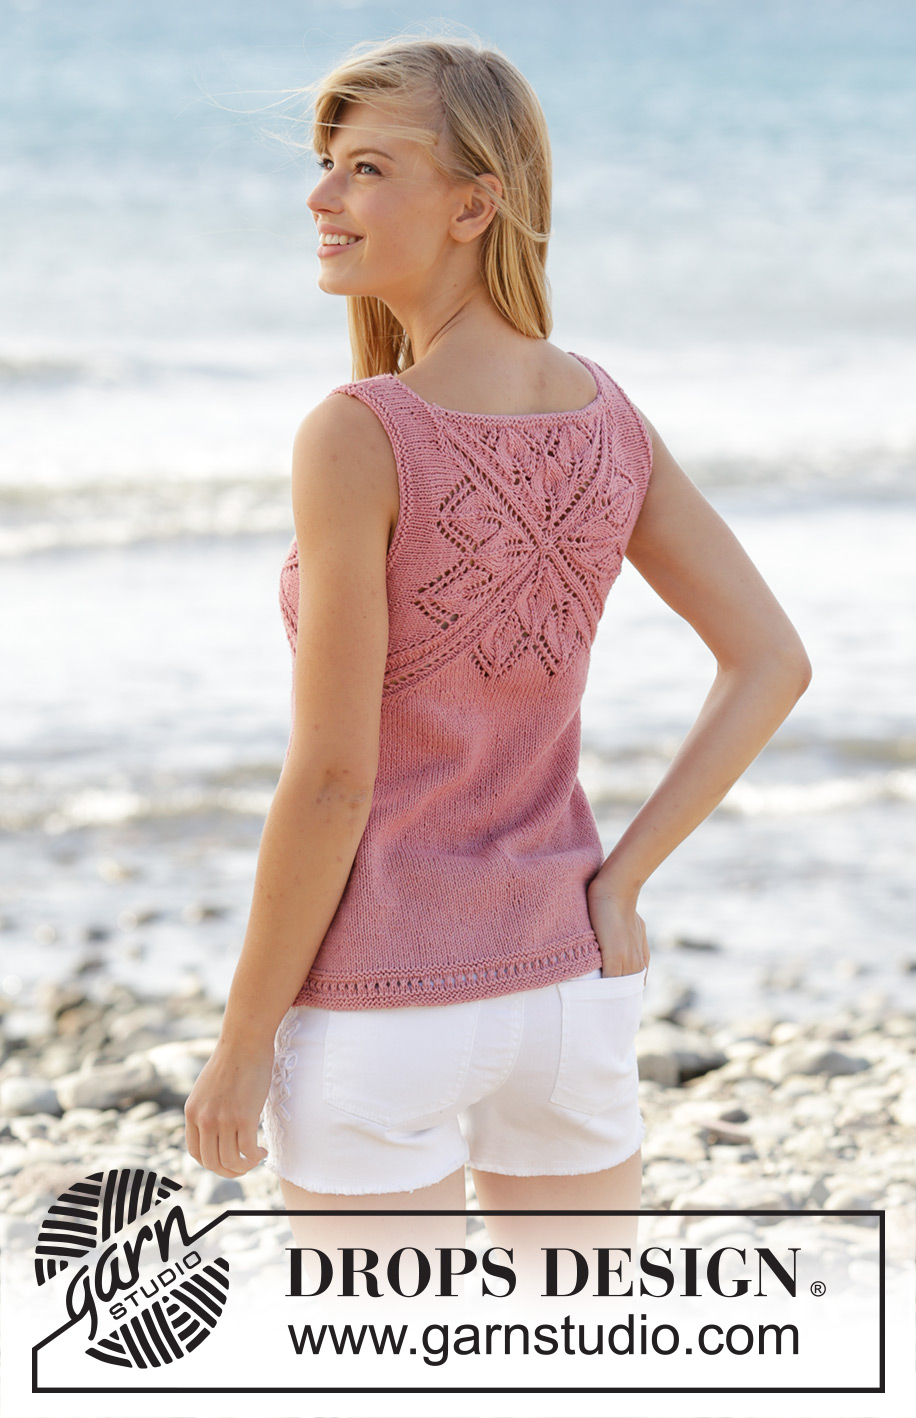
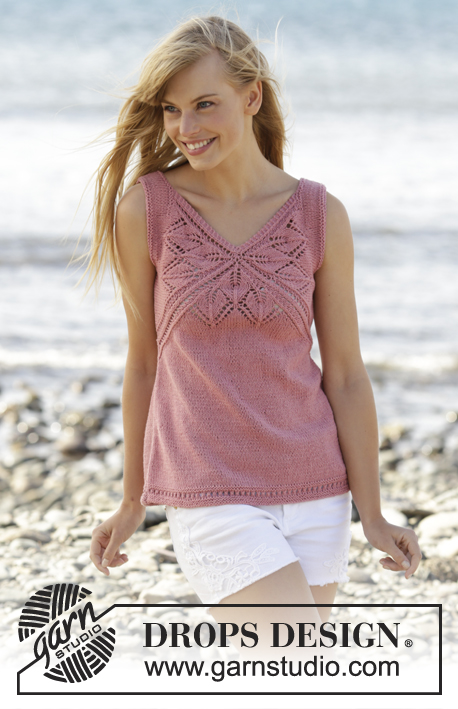
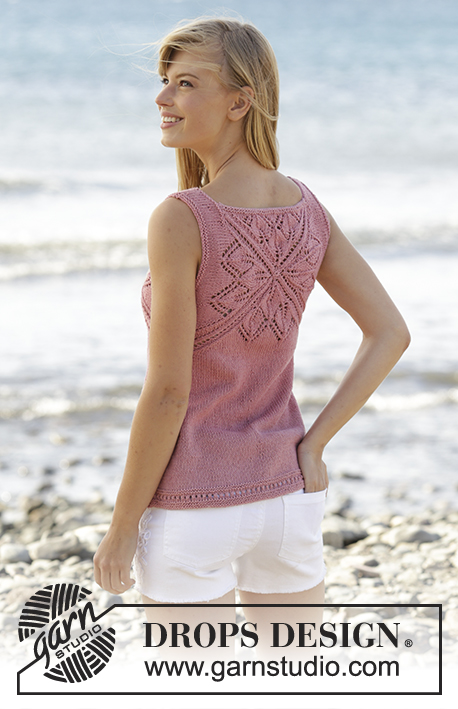
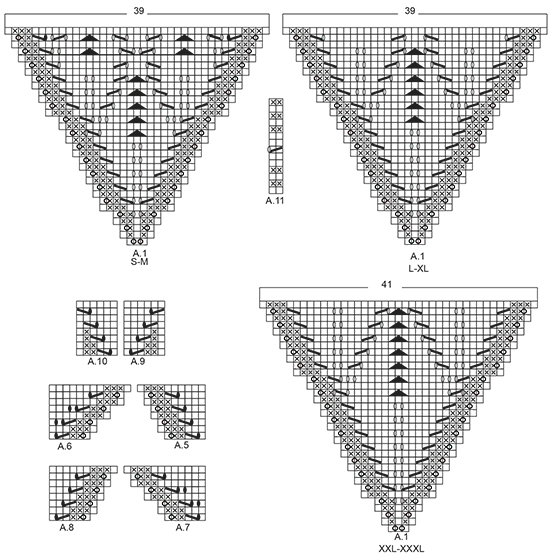
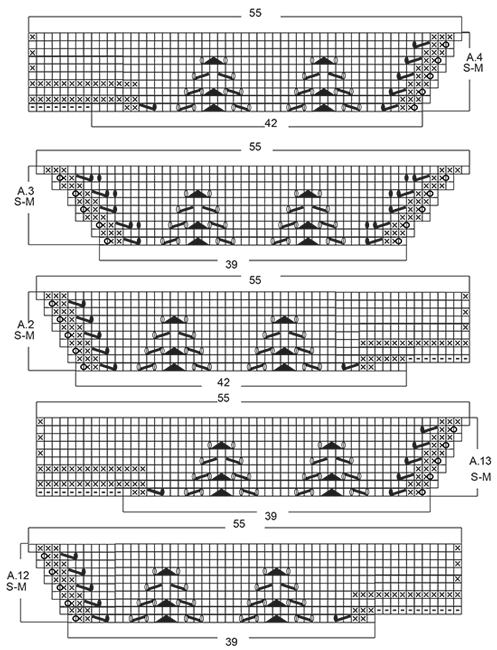
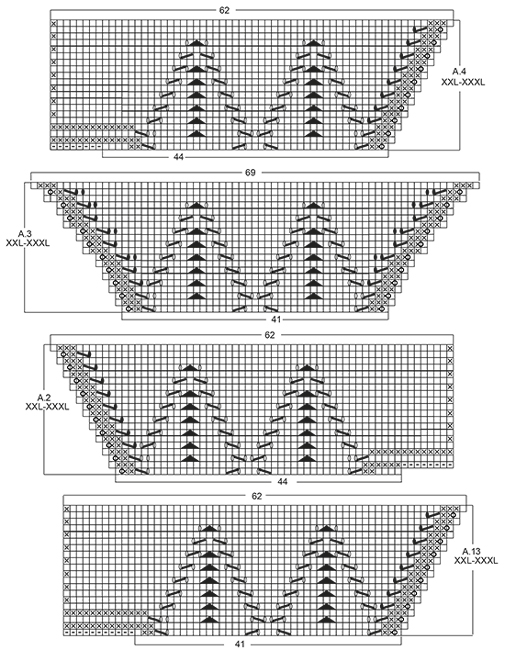
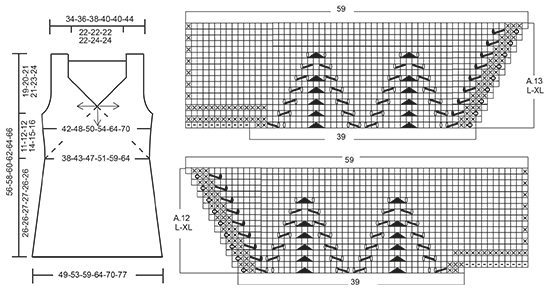
Knitted DROPS top with lace pattern and V-neck in ”Belle”. Worked top down. Size: S - XXXL.
DROPS 170-4 |
|||||||||||||||||||||||||||||||
|
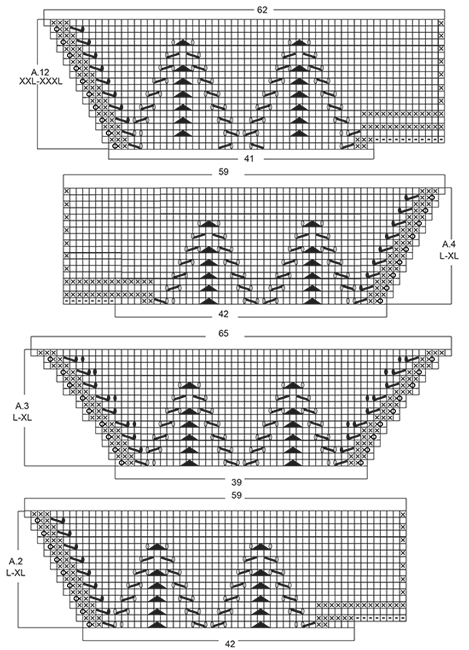
GARTER ST (back and forth): K all rows. 1 ridge = 2 rows K. PATTERN: See diagrams A.1 to A.13. The diagrams show all rows in pattern seen from RS. See diagram for correct size. SHORT ROWS: When turning in short rows, slip first st as if to K. Tighten thread and make sure to avoid big holes. INCREASE TIP: All inc are done from RS. Inc 1 st by making 1 YO, on next row P YO twisted to avoid holes. ---------------------------------------------------------- TOP: Work from the middle of V-neck and out in 3 triangles on front piece and 4 triangles on back piece, then work downwards. FRONT PIECE: Work back and forth from neck and down. Cast on 8 sts on circular needle size 4 mm with Belle. K 1 row. On next row inc as follows: * K 1, 1 YO *, repeat from *-* until 1 st remains and finish with K 1 = 15 sts on needle. Work next row as follows (from RS): Work YOs from previous row twisted, they should not make holes. Work 3 sts in GARTER ST - see explanation above, A.1, insert 1st marker, A.1, insert 2nd marker, A.1 (= repeat A.1 3 times in total on row), finish with 3 sts in garter st. REMEMBER THE KNITTING TENSION When A.1 has been worked 1 time vertically, there are 123-123-123-123-129-129 sts on needle. Piece measures approx. 11-11-11-11-12-12 cm from cast-on edge. Work next row as follows from RS: Work A.2 over the first 42-42-42-42-44-44 sts, A.3 over the next 39-39-39-39-41-41 sts and A.4 over the last 42-42-42-42-44-44 sts, after A.4 cast on 8 sts at the end of row for shoulder (see diagram). Work A.4 to A.2 on next row, after A.2 cast on 8 sts at the end of row for shoulder (see diagram). When A.2 to A.4 have been worked 1 time vertically, there are 165-165-183-183-193-193 sts on needle. Piece measures approx. 15-15-17-17-19-19 cm from cast-on edge. READ ALL OF THE FOLLOWING SECTION BEFORE CONTINUING! WORK PATTERN AS BEFORE WHILE AT THE SAME TIME WORKING SHORT ROWS IN EACH SIDE OF PIECE. PATTERN: Work next row as follows from RS: Work 1 st in garter st, 48-48-52-52-55-55 sts in stocking st, work A.5 over the next 6 sts, (marker), A.6 over the next 6 sts, 43-43-53-53-57-57 sts in stocking st, A.7 over the next 6 sts, (marker), A.8 over the next 6 sts, 48-48-52-52-55-55 sts in stocking st, finish with 1 st in garter st. Repeat A.5 to A.8 over the 6 sts on each side of each marker 2-3-2-3-4-5 times in total, then repeat the first 0-0-6-4-4-4 rows of A.5 to A.8 1 more times. SHORT ROWS: AT THE SAME TIME when 2-6-0-2-0-6 rows of A.5 to A.8 have been worked, work SHORT ROWS - see explanation above - in each side of piece as follows: Work until 26-26-24-23-18-18 sts remain on row (work A.5 to A.8 as before), turn and work until 26-26-24-23-18-18 sts remain, turn piece. Then work short rows in the different sizes as follows: SIZE M: Work 6 sts less for every turn 2 times in each side of piece. SIZE L-XL: Work 6 sts less for every turn 1-2 times in each side of piece, then work 4 sts less on every turn 3-2 times in each side of piece. SIZE XXL-XXXL: Work 6 sts less for every turn 1-1 time in each side of piece, then work 4 sts less for every turn 4-4 times in each side of piece, then work 2 sts less on every turn 4-5 times in each side of piece. ALL SIZES: When the short rows have been worked, work last row from WS, so that next row beg from shoulder. Then work over all sts from RS as follows: Work in garter st over the first 42-44-46-48-50-52 sts AT THE SAME TIME inc 0-2-4-4-6-6 sts evenly, work as before (i.e. A.5 to A.8 and stocking st) until 42-44-46-48-50-52 sts remain, work in garter st over the last sts AT THE SAME TIME inc 0-2-4-4-6-6 sts evenly (= 42-46-50-52-56-58 sts in garter st in each side of piece). Work 3 rows in garter st over the outermost 42-46-50-52-56-58 sts in garter st in each side of piece, pattern and stocking st over the remaining sts. On next row from WS work as follows: Cast off with K over the first 40-44-48-50-54-56 sts for armhole, work 2 sts in garter st, work in stocking st and pattern as before until 42-46-50-52-56-58 sts remain, 2 sts in garter st, cast off with K over the last 40-44-48-50-54-56 sts for armhole. Cut the yarn. 8-8-8-12-12-12 rows of A.5 to A.8 remain. Beg next row from RS. Continue to work in garter st over the first and last 2 sts in each side of piece. When A.5 to A.8 have been worked, there are 23-25-26-27-32-34 sts before 1st marker, 79-91-99-107-123-135 sts between 1st and 2nd marker and 23-25-26-27-32-34 sts after 2nd marker = 125-141-151-161-187-203 sts in total on row. Piece measures approx. 21-24-25-27-32-35 cm on the widest measured from cast-on edge. Insert 1 marker in piece, NOW MEASURE PIECE FROM HERE. On next row from RS loosely cast off the first 22-24-25-26-31-33 sts with K, work 1 edge st in garter st, (marker), work A.9 over the first 6 sts after marker, stocking st over the next 67-79-87-95-111-123 sts, A.10 over the last 6 sts before second marker, (marker), 1 edge st in garter st, loosely cast off the last 22-24-25-26-31-33 sts = 81-93-101-109-125-137 sts remain on needle. Cut the yarn. Work next row from WS over the remaining sts as follows: 1 edge st in garter st, A.10 as before, stocking st over the next 67-79-87-95-111-123 sts, A.9 as before, 1 edge st in garter st. When A.9 and A.10 have been worked 1 time vertically, continue in stocking st with 1 edge st in garter st in each side of piece. When piece measures 3 cm from marker, inc 1 st in each side of piece inside 1 edge st (= 2 sts inc) - READ INCREASE TIP. Repeat inc every 1½-1½-1½-1-1-1 cm 12-10-12-14-12-13 times in total = 105-113-125-137-149-163 sts on needle. When piece measures 23-23-24-24-23-23 cm from marker (piece measures 53-55-57-59-61-63 cm in total from shoulder), adjust so that next row is from RS, switch to circular needle size 3.5 mm. Work next row from RS as follows: Work 1 edge st in garter st, work A.11 (= 2 sts) until 2 sts remain, work first st in A.11, finish with 1 edge st in garter st. On row with holes (i.e. 7th row) work next to last st K. Cast off when A.11 has been worked 1 time vertically. Piece measures 56-58-60-62-64-66 cm in total from shoulder. BACK PIECE: Piece is first worked in the round, then worked as front piece. Cast on 6 sts on double pointed needles size 4 mm with Belle, switch to circular needle when needed. K 1 row. On next row inc as follows: * K 1, 1 YO *, repeat from *-* = 12 sts on row, K YOs twisted on next row, they should not make holes. Work A.1 4 times in total, insert 1 marker between each A.1 (= 4 markers). When A.1 has been worked 1 time vertically, there are 156-156-156-156-164-164 sts on needle. Continue as follows: A.12 over the first 39-39-39-39-41-41 sts, work A.3 over the next 39-39-39-39-41-41 sts and A.13 over the last 39-39-39-39-41-41 sts, slip the remaining sts on a stitch holder for neck edge (= 39-39-39-39-41-41 sts), after A.13 cast on 11 sts at the end of row for shoulder (see diagram). Then work back and forth on needle. Work A.13/A.3/A.12 on next row, after A.12 cast on 11 sts at the end of row for shoulder (see diagram). When A.12/A.3/A.13 have been worked 1 time vertically, there are 165-165-183-183-193-193 sts on needle. Piece measures approx. 15-15-17-17-19-19 cm from cast-on edge. Now continue back piece as front piece. NECK EDGE: Worked back and forth on needle. Slip sts from stitch holder for neck edge on back piece back on circular needle size 3.5 mm. Work 2 ridges. Fasten ridges where sts were cast on for shoulder. Fasten off. ASSEMBLY: Sew the side seams inside 1 edge st in garter st. Sew shoulder seams inside 1 edge st in garter st. Tighten tog the middle (i.e. cast-on edge) on both front and back piece. |
|||||||||||||||||||||||||||||||
Diagram explanations |
|||||||||||||||||||||||||||||||
|
|||||||||||||||||||||||||||||||
 |
|||||||||||||||||||||||||||||||
 |
|||||||||||||||||||||||||||||||
 |
|||||||||||||||||||||||||||||||
 |
|||||||||||||||||||||||||||||||
 |
|||||||||||||||||||||||||||||||
Have you finished this pattern?Tag your pictures with #dropspattern #butterflyhearttop or submit them to the #dropsfan gallery. Do you need help with this pattern?You'll find 23 tutorial videos, a Comments/Questions area and more by visiting the pattern on garnstudio.com. © 1982-2026 DROPS Design A/S. We reserve all rights. This document, including all its sub-sections, has copyrights. Read more about what you can do with our patterns at the bottom of each pattern on our site. |
|||||||||||||||||||||||||||||||


With over 40 years in knitting and crochet design, DROPS Design offers one of the most extensive collections of free patterns on the internet - translated to 17 languages. As of today we count 324 catalogues and 12245 patterns translated into English (UK/cm). 12245
We work hard to bring you the best knitting and crochet have to offer, inspiration and advice as well as great quality yarns at incredible prices! Would you like to use our patterns for other than personal use? You can read what you are allowed to do in the Copyright text at the bottom of all our patterns. Happy crafting!
Post a comment to pattern DROPS 170-4
We would love to hear what you have to say about this pattern!
If you want to leave a question, please make sure you select the correct category in the form below, to speed up the answering process. Required fields are marked *.