
Popular categories
Looking for a yarn?


Comments / Questions (166)
![]() Veerle Van Coillie wrote:
Veerle Van Coillie wrote:
Tot nu toe alles prima gegaan, als laatste staat er bij het achterpand “ga nu verder op het achterpand als op het voorpand” ? Waar ga ik dan precies verder ?
14.03.2019 - 17:12DROPS Design answered:
Dag Veerle,
Als je op dat punt bent brei je het achterpand verder zoals je het voorpand ook vanaf dat punt gebreid hebt. Dus als je 165-165-183-183-193-193 st op de nld hebt en het werk meet ongeveer 15-15-17-17-19-19 cm vanaf de opzetrand, dan brei je het achterpand zoals beschreven staat onder LEES ALLE ONDERST.... bij het voorpand.
15.03.2019 - 18:25
![]() Raquel wrote:
Raquel wrote:
Hola estoy con la espalda y no entiendo cuando dice ahora seguir como con el frente pero a partir de dónde se debe seguir? Gracias
05.09.2018 - 13:52DROPS Design answered:
Hola Raquel, se debe seguir desde donde el frente mide 15-15-17-17-19-19 cm desde la orilla de montaje.
09.09.2018 - 18:42
![]() Mirjam Vermeulen wrote:
Mirjam Vermeulen wrote:
Voor maat XL brei ik 28 pennen in totaal over patroon A5 t/m A8. Eerst 2 pennen in patroon dan 10 pennen verkorte toeren =12 pennen. Als de verkorte toeren klaar zijn, brei dan de laatste nld aan de verkeerde kant zodat de volgende nld begint bij de schouder = 14 pennen. Brei dan over alle st aan de goede kant als volgt…=16 pennen. Dan 3nld ribbelsteek in totaal dus 2 pennen erbij is 18 pennen. Dan houd ik 10 pennen over ipv 12. pennen. Waar ga ik in de fout? Alvast bedankt voor uw hulp
04.09.2018 - 21:16DROPS Design answered:
Dag Mirjam, Als de verkorte toeren klaar zijn hoef je niet nog 2 extra naalden te breien, het gaat erom dat je weer op de goede kant begint. Volgens mij zitten hier de 2 extra naalden, waardoor je 10 over houdt, ipv 12.
19.09.2018 - 20:20Marjan wrote:
Can I use a regular long tail cast on for the beginning? Also, after the intial yo's, do I have to purl everything twisted or just the yo's? Thanks!
02.09.2018 - 18:17DROPS Design answered:
Dear Marja, you can use your usual cast on technique to start front piece, On next row after YO's work following pattern: 3 sts in garter st, A.1 a total of 3 times, 3 sts in garter stich, working the Yos from previous row twisted to avoid holes.Then work YO as explained in diagram key. Happy knitting!
03.09.2018 - 15:54
![]() Mirjam Vermeulen wrote:
Mirjam Vermeulen wrote:
Als ik het goed begrijp moet je A5 tot en met A8 herhalen. Hoe brei ik de herhaling? 1ste naald is 6 steken, maar de laatste naald meer door het meerderen. Ik hou dus steken over als ik weet met naald 1 begin. Alvast bedankt voor de hulp.
31.08.2018 - 20:42DROPS Design answered:
Dag Mirjam, Je herhaalt deze telpatronen over de 6 steken aan beide kanten van de markeerdraden en je zorgt ervoor dat de telpatronen mooi boven elkaar komen. Het aantal steken tussen de markeerdraden wordt uiteindelijk groter, door de meerderingen die in de betreffende telpatonen verwerkt zijn.
01.09.2018 - 11:18
![]() Berit wrote:
Berit wrote:
Ich bin am verzweifeln. Stricke den Pullover mit Arm. Bin bei Größe XL A5-A8 3x stricken + 4R von A5-A8. Macht 28 Reihen. Ich soll ab der 2. Reihe verkürzt stricken bis noch 23 M beim glatt re Teil übrig sind dass ist dann immer 1M weniger und schon 30 Reihen. Dann brauche ich bei XL nochmal 4 Reihen. Wo bekomme ich die 6 fehlenden Reihen her? Oder wo ist mein Denkfehler? Vielen Dank.
18.08.2018 - 04:28DROPS Design answered:
Liebe Berit, die 1. verkürzte Reihe besteht darin, dass Sie stricken, bis noch 23 M auf der Nadel sind - Sie stricken also in dieser ersten verkürzten Reihe 23 Maschen weniger. In der nächsten verkürzten Reihe lassen Sie ebenfalls die letzten 23 Maschen der Reihe übrig. Dann lassen Sie die letzten 6 Maschen der nächsten Reihe übrig, das machen Sie an beiden Seiten 2 x, danach lassen Sie an beiden Seiten nochmals je 4 M übrig. Sie stricken also nicht immer 1 Masche weniger, sondern hören anfangs bereits vor den letzten 23 Maschen auf, dann vor den letzten 6 Maschen und zuletzt vor den letzten 4 Maschen. Gutes Gelingen!
24.08.2018 - 09:54
![]() Suse wrote:
Suse wrote:
Hallo, ich stricke den Pullover in Größe S. Am Ende des Vorderteils soll 1x A.11 in der Höhe gestrickt werden. Ich kann A.11 als Diagramm nicht finden. Hab ich irgendetwas übersehen und wenn ja, wo ? Vielen Dank und freundliche Grüße
14.08.2018 - 16:53DROPS Design answered:
Liebe Suse, A.11 ist ganz oben zwischen A.1 (S-M) und A.1 (L-XL), es ist über 2 M und 14 Reihe gestrickt. Viel Spaß beim stricken!
16.08.2018 - 08:43
![]() Mélanie wrote:
Mélanie wrote:
Bonjour je suis entrain de faire le dos, Dans les instructions on dit: continuer maintenant le dos comme pour le devant. Je voudrais savoir à partir de quelle partie des explications doit on reprendre comme le devant? Après les rangs raccourcis? Merci d'avance.
02.08.2018 - 00:09DROPS Design answered:
Bonjour Mélanie, vous continuez comme pour le devant quand vous avez 165-193 m (cf taille) et que l'ouvrage mesure environ 15-19 cm, c'est-à-dire à partir du paragraphe "LISEZ ATTENTIVEMENT...." sous le devant. Bon tricot!
02.08.2018 - 09:18
![]() Mélanie wrote:
Mélanie wrote:
Bonjour,Je me suis trompée, j\'ai tricoté le début du dos en aller retour!Pouvez vous m\'aider à comprendre la construction du dos, qui commence par être tricoté en rond?Je n\'arrive pas à comprendre comment cela peut être possible, si on construit un tube!Je vous remercie de votre aide, bonne journée!
24.07.2018 - 15:07DROPS Design answered:
Bonjour Mélanie, pour le dos, on tricote A.1 comme pour le devant, mais on va le répéter 4 fois tout le tour (au lieu de 3 pour le devant), on va ainsi obtenir un carré comme on le voit sur la 2ème photo. QuandA.1 est fait, on continue comme indiqué, on tricote désormais en rangs, en aller-retour. Comme on augmente tous les 2 tours, on n'obtient pas un tube mais bien un carré. Bon tricot!
24.07.2018 - 16:06
![]() Figueras Evelyne wrote:
Figueras Evelyne wrote:
Bonjour besoin d\'explications pour le dos du modele 170-3 en xl,6m mais quand je commence avec les jetés je n\'ai que 11m et il faut faire 4 fois a1 d\'avance merci
24.05.2018 - 13:23DROPS Design answered:
Bonjour Mme Figueras, pour le dos, on tricote d'abord en rond: montez 6 m et tricotez 1 tour endroit, puis *1 m end, 1 jeté* et répétez de *-* 6 fois au total = vous aurez 12 mailles au total (= la dernière m du tour est un jeté). Répartissez ces 12 m sur 4 aiguilles (= 3 m par aiguille). Le 1er rang de A.1 se tricote ensuite sur 3 m (= 1 m end, 1 jeté, 1 m end, 1 jeté, 1 m end au 1er rang). Bon tricot!
24.05.2018 - 13:42
|
|||||||||||||||||||||||||||||||
Butterfly Heart#butterflyheartsweater |
|||||||||||||||||||||||||||||||
 |
 |
||||||||||||||||||||||||||||||
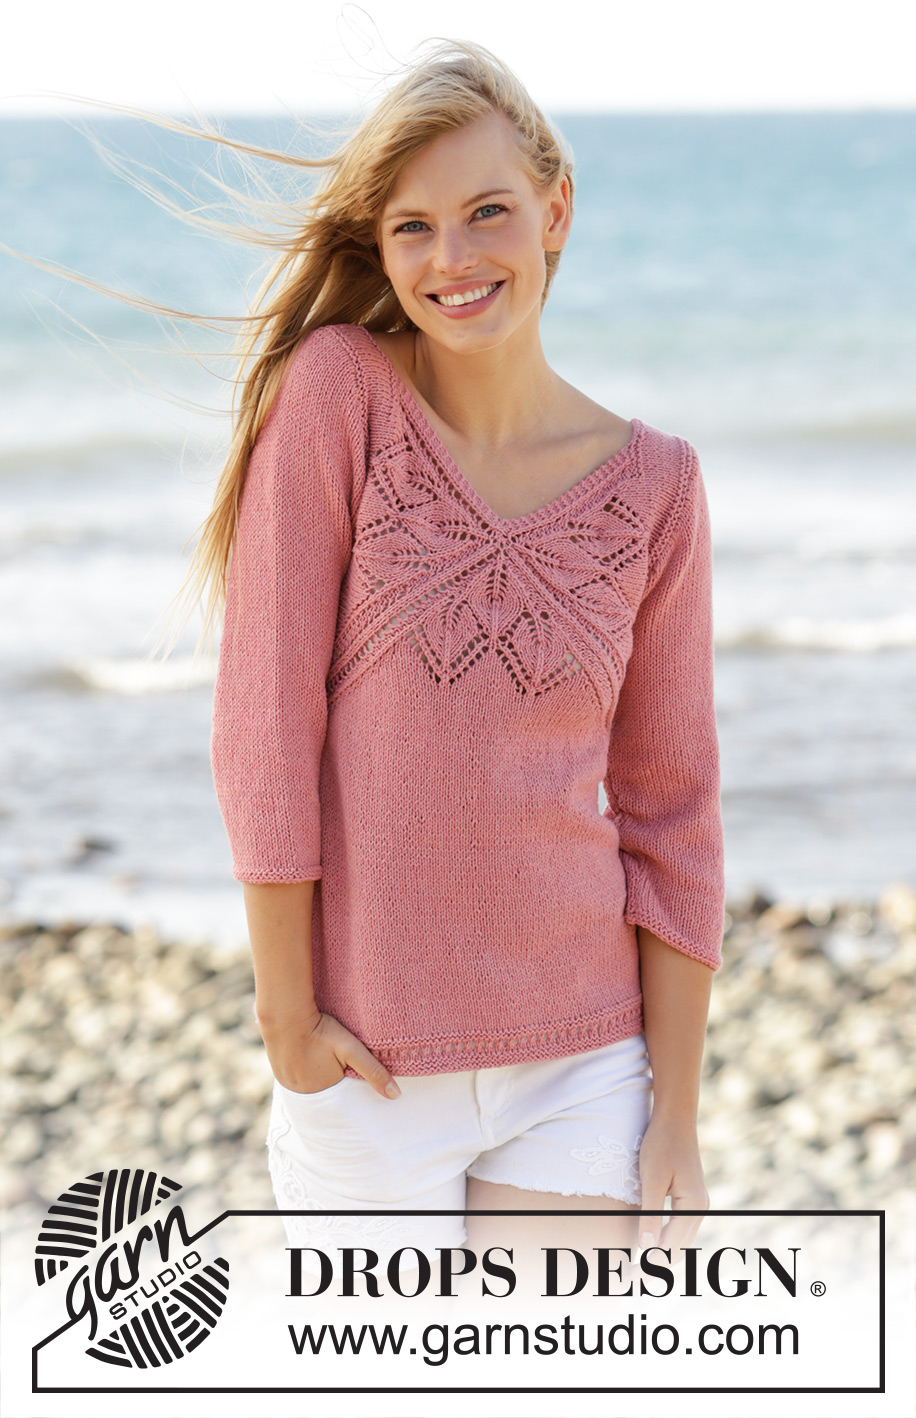
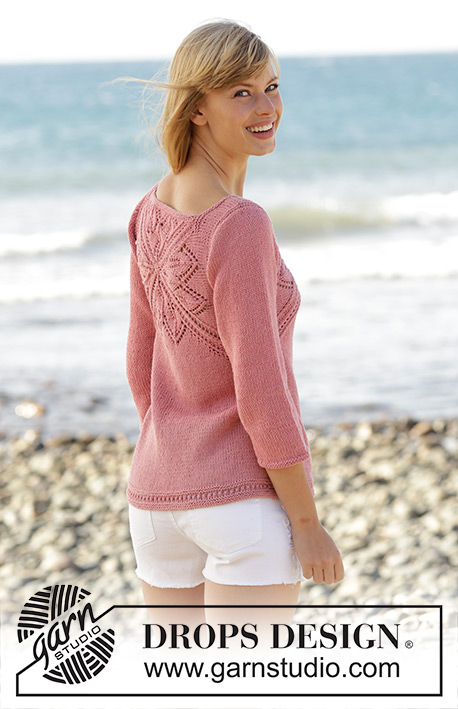
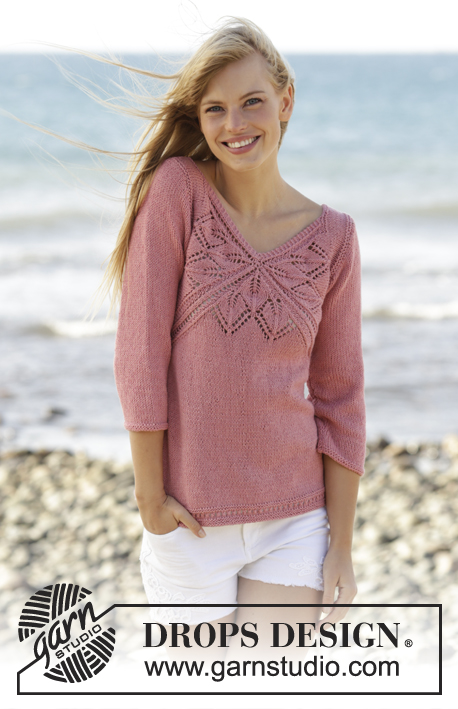
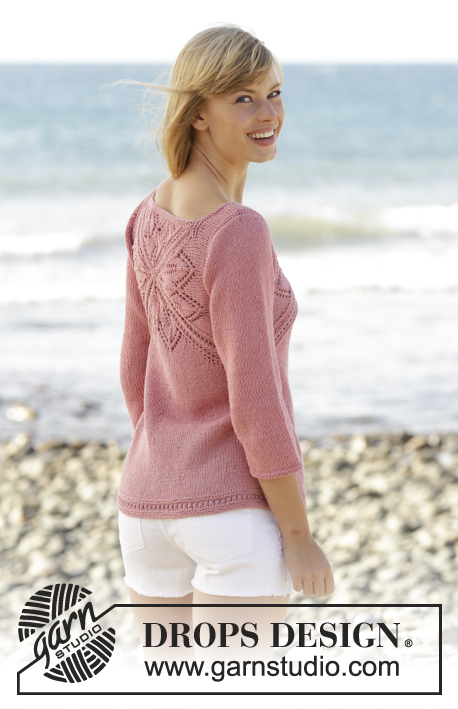
Knitted DROPS jumper with lace pattern and V-neck in ”Belle”. Worked top down. Size: S - XXXL.
DROPS 170-3 |
|||||||||||||||||||||||||||||||
|
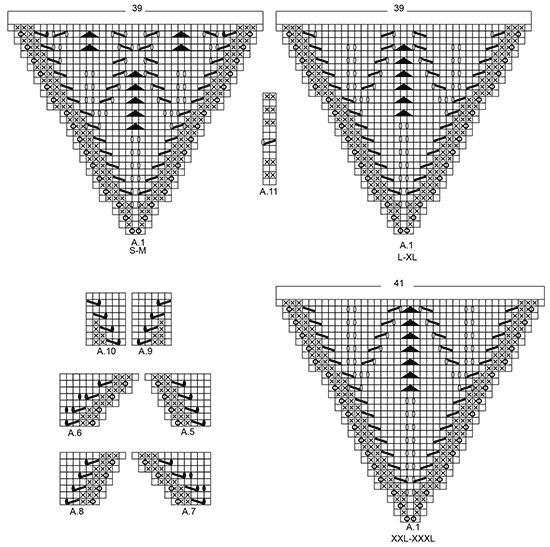
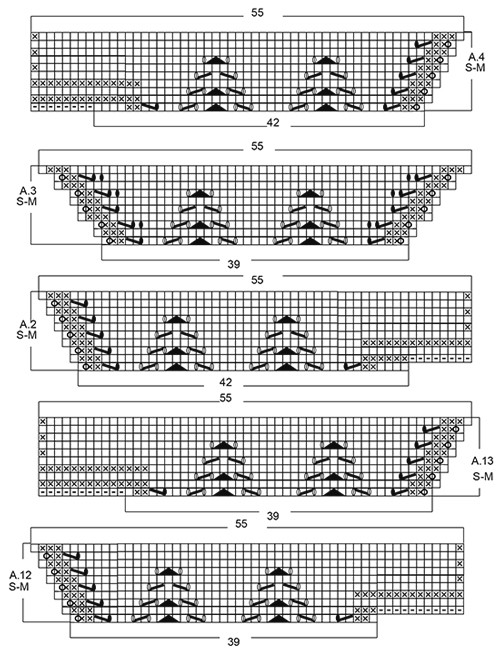
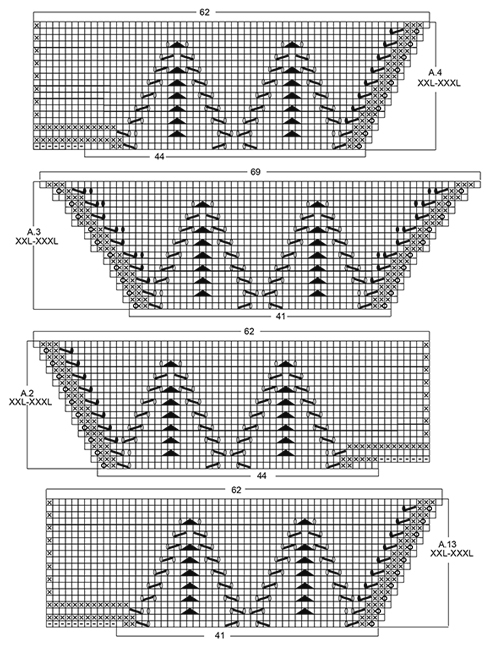
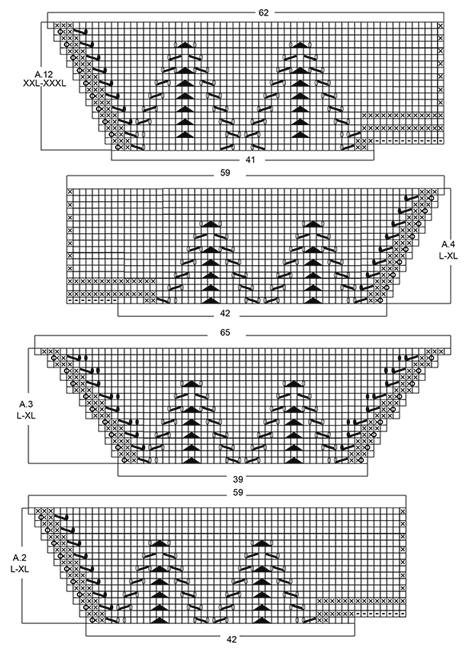
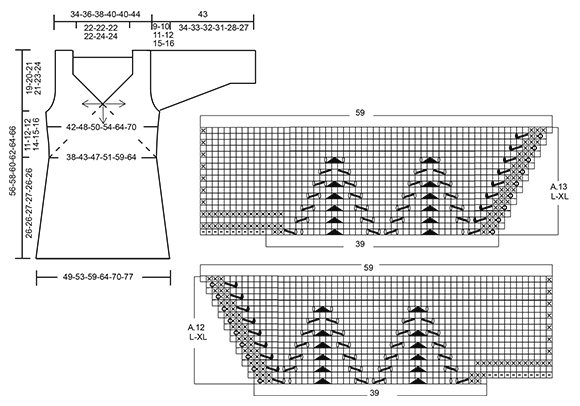
GARTER ST (back and forth): K all rows. 1 ridge = 2 rows K. PATTERN: See diagrams A.1 to A.13. The diagrams show all rows in pattern seen from RS. See diagram for correct size. SHORT ROWS: When turning in short rows, slip first st as if to K. Tighten thread and make sure to avoid big holes. INCREASE TIP: All inc are done from RS. Inc 1 st by making 1 YO, on next row P YO twisted to avoid holes. DECREASE TIP: All dec are done from RS! Dec 1 st at beg of row as follows: K 1, slip 1 st as if to K, K 1, psso Dec 1 st at end of row as follows: Work until 3 sts remain (incl the 2 new sts worked for the first time), K 2 tog. ---------------------------------------------------------- JUMPER: Work from the middle of V-neck and out in 3 triangles on front piece and 4 triangles on back piece, then work downwards. FRONT PIECE: Work back and forth from neck and down. Cast on 8 sts on circular needle size 4 mm with Belle. K 1 row. On next row inc as follows: * K 1, 1 YO *, repeat from *-* until 1 st remains and finish with K 1 = 15 sts on needle. Work next row as follows (from RS): Work YOs from previous row twisted, they should not make holes. Work 3 sts in GARTER ST - see explanation above, A.1, insert 1st marker, A.1, insert 2nd marker, A.1 (= repeat A.1 3 times in total on row), finish with 3 sts in garter st. REMEMBER THE KNITTING TENSION When A.1 has been worked 1 time vertically, there are 123-123-123-123-129-129 sts on needle. Piece measures approx. 11-11-11-11-12-12 cm from cast-on edge. Work next row as follows from RS: Work A.2 over the first 42-42-42-42-44-44 sts, A.3 over the next 39-39-39-39-41-41 sts and A.4 over the last 42-42-42-42-44-44 sts, after A.4 cast on 8 sts at the end of row for shoulder (see diagram). Work A.4 to A.2 on next row, after A.2 cast on 8 sts at the end of row for shoulder (see diagram). When A.2 to A.4 have been worked 1 time vertically, there are 165-165-183-183-193-193 sts on needle. Piece measures approx. 15-15-17-17-19-19 cm from cast-on edge. READ ALL OF THE FOLLOWING SECTION BEFORE CONTINUING! WORK PATTERN AS BEFORE WHILE AT THE SAME TIME WORKING SHORT ROWS IN EACH SIDE OF PIECE. PATTERN: Work next row as follows from RS: Work 1 st in garter st, 48-48-52-52-55-55 sts in stocking st, work A.5 over the next 6 sts, (marker), A.6 over the next 6 sts, 43-43-53-53-57-57 sts in stocking st, A.7 over the next 6 sts, (marker), A.8 over the next 6 sts, 48-48-52-52-55-55 sts in stocking st, finish with 1 st in garter st. Repeat A.5 to A.8 over the 6 sts on each side of each marker 2-3-2-3-4-5 times in total, then repeat the first 0-0-6-4-4-4 rows of A.5 to A.8 1 more times. SHORT ROWS: AT THE SAME TIME when 2-6-0-2-0-6 rows of A.5 to A.8 have been worked, work SHORT ROWS - see explanation above - in each side of piece as follows: Work until 26-26-24-23-18-18 sts remain on row (work A.5 to A.8 as before), turn and work until 26-26-24-23-18-18 sts remain, turn piece. Then work short rows in the different sizes as follows: SIZE M: Work 6 sts less for every turn 2 times in each side of piece. SIZE L-XL: Work 6 sts less for every turn 1-2 times in each side of piece, then work 4 sts less on every turn 3-2 times in each side of piece. SIZE XXL-XXXL: Work 6 sts less for every turn 1-1 time in each side of piece, then work 4 sts less for every turn 4-4 times in each side of piece, then work 2 sts less on every turn 4-5 times in each side of piece. ALL SIZES: When the short rows have been worked, work last row from WS, so that next row beg from shoulder. Then work over all sts from RS as follows: Work in garter st over the first 42-44-46-48-50-52 sts AT THE SAME TIME inc 0-2-4-4-6-6 sts evenly, work as before (i.e. A.5 to A.8 and stocking st) until 42-44-46-48-50-52 sts remain, work in garter st over the last sts AT THE SAME TIME inc 0-2-4-4-6-6 sts evenly (= 42-46-50-52-56-58 sts in garter st in each side of piece). Work 3 rows in garter st over the outermost 42-46-50-52-56-58 sts in garter st in each side of piece, pattern and stocking st over the remaining sts. On next row from WS work as follows: K the first 40-44-48-50-54-56 sts and slip them on a stitch holder for sleeve, work 2 sts in garter st, work in stocking st and pattern as before until 42-46-50-52-56-58 sts remain, 2 sts in garter st, K the next 40-44-48-50-54-56 sts and then slip them on a stitch holder for sleeve. Cut the yarn. 8-8-8-12-12-12 rows of A.5 to A.8 remain. Beg next row from RS. Continue to work in garter st over the first and last 2 sts in each side of piece. When A.5 to A.8 have been worked, there are 23-25-26-27-32-34 sts before 1st marker, 79-91-99-107-123-135 sts between 1st and 2nd marker and 23-25-26-27-32-34 sts after 2nd marker = 125-141-151-161-187-203 sts in total on row. Piece measures approx. 21-24-25-27-32-35 cm on the widest measured from cast-on edge. Insert 1 marker in piece, NOW MEASURE PIECE FROM HERE. On next row from RS loosely cast off the first 22-24-25-26-31-33 sts knitwise, work 1 edge st in garter st, (marker), work A.9 over the first 6 sts after marker, stocking st over the next 67-79-87-95-111-123 sts, A.10 over the last 6 sts before second marker, (marker ), 1 edge st in garter st, loosely cast of the last 22-24-25-26-31-33 sts knitwise = 81-93-101-109-125-137 sts remain on row. Cut the yarn. Work next row from WS over the remaining sts as follows: 1 edge st in garter st, A.10 as before, stocking st over the next 67-79-87-95-111-123 sts, A.9 as before, 1 edge st in garter st. When A.9 and A.10 have been worked 1 time vertically, continue in stocking st with 1 edge st in garter st in each side of piece. When piece measures 3 cm from marker, inc 1 st in each side of piece inside 1 edge st (= 2 sts inc) - READ INCREASE TIP. Repeat inc every 1½-1½-1½-1-1-1 cm 12-10-12-14-12-13 times in total = 105-113-125-137-149-163 sts on needle. When piece measures 23-23-24-24-23-23 cm from marker (piece measures 53-55-57-59-61-63 cm in total from shoulder), adjust so that next row is from RS, switch to circular needle size 3.5 mm. Work next row from RS as follows: Work 1 edge st in garter st, work A.11 (= 2 sts) until 2 sts remain, work first st in A.11, finish with 1 edge st in garter st. On row with holes (i.e. 7th row) work next to last st K. Cast off when A.11 has been worked 1 time vertically. Piece measures 56-58-60-62-64-66 cm in total from shoulder. BACK PIECE: Piece is first worked in the round, then worked as front piece. Cast on 6 sts on double pointed needles size 4 mm with Belle, switch to circular needle when needed. K 1 row. On next row inc as follows: * K 1, 1 YO *, repeat from *-* = 12 sts on row, K YOs twisted on next row, they should not make holes. Work A.1 4 times in total, insert 1 marker between each A.1 (= 4 markers). When A.1 has been worked 1 time vertically, there are 156-156-156-156-164-164 sts on needle. Continue as follows: A.12 over the first 39-39-39-39-41-41 sts, work A.3 over the next 39-39-39-39-41-41 sts and A.13 over the last 39-39-39-39-41-41 sts, slip the remaining sts on a stitch holder for neck edge (= 39-39-39-39-41-41 sts), after A.13 cast on 11 sts at the end of row for shoulder (see diagram). Then work back and forth on needle. Work A.13/A.3/A.12 on next row, after A.12 cast on 11 sts at the end of row for shoulder (see diagram). When A.12/A.3/A.13 have been worked 1 time vertically, there are 165-165-183-183-193-193 sts on needle. Piece measures approx. 15-15-17-17-19-19 cm from cast-on edge. Now continue back piece as front piece. NECK EDGE: Worked back and forth on needle. Slip sts from stitch holder for neck edge on back piece back on circular needle size 3.5 mm. Work 2 ridges. Fasten ridges where sts were cast on for shoulder. Fasten off. ASSEMBLY: Sew the side seams inside 1 edge st in garter st. Sew shoulder seams inside 1 edge st in garter st. Tighten tog the middle (i.e. cast-on edge) on both front and back piece. SLEEVE: Worked back and forth on circular needle in stocking st. Slip sts from the 2 stitch holders (on front and back piece) in one side of piece back on circular needle size 4 mm = 80-88-96-100-108-112 sts. Work short rows for sleeve cap as follows: Beg to work in the 25th-29th-31st-35th-43rd-45th st (i.e. 24-28-30-34-42-44 sts in one side are not worked). Work from RS 34-34-38-34-26-26 sts in stocking st, turn piece (= 22-26-28-32-40-42 sts remain on needle). Work in stocking st over the 36-36-40-36-28-28 sts, turn piece. Work 2 sts more on every turn in each side of piece until all sts have been worked. AT THE SAME TIME dec 1 st in each side of piece (= 2 sts dec), inside 1 st on every 4th-4th-2nd-4th-4th-4th row 4-6-8-8-10-10 times in total – READ DECREASE TIP = 72-76-80-84-88-92 sts on needle. Work 8-8-8-12-12-12 rows in stocking st over all sts, insert 1 marker in piece (sew side seam on sleeve up to here later). NOW MEASURE THE PIECE FROM HERE. Cast on 1 edge st at the end of the next 2 rows = 74-78-82-86-90-94 sts. Work edge sts in garter st until finished measurements. On next row from RS dec 1 st inside 2 sts in each side of piece (= 2 sts dec). Repeat dec every 2½-2-2-1½-1-1 cm 9-10-11-12-13-13 more times = 54-56-58-60-62-66 sts on needle. When sleeve measures 31-30-29-27-24-23 cm, switch to circular needle size 3.5 mm. Work 2 ridges. Cast off. Slip sts from stitch holders in the other side of piece on circular needle size 4 mm and work the same way. ASSEMBLY: Sew sleeve seams up to where 1 edge st in garter st was cast on in each side of piece. Sew the under arm seam. |
|||||||||||||||||||||||||||||||
Diagram explanations |
|||||||||||||||||||||||||||||||
|
|||||||||||||||||||||||||||||||
 |
|||||||||||||||||||||||||||||||
 |
|||||||||||||||||||||||||||||||
 |
|||||||||||||||||||||||||||||||
 |
|||||||||||||||||||||||||||||||
 |
|||||||||||||||||||||||||||||||
Have you finished this pattern?Tag your pictures with #dropspattern #butterflyheartsweater or submit them to the #dropsfan gallery. Do you need help with this pattern?You'll find 29 tutorial videos, a Comments/Questions area and more by visiting the pattern on garnstudio.com. © 1982-2026 DROPS Design A/S. We reserve all rights. This document, including all its sub-sections, has copyrights. Read more about what you can do with our patterns at the bottom of each pattern on our site. |
|||||||||||||||||||||||||||||||


With over 40 years in knitting and crochet design, DROPS Design offers one of the most extensive collections of free patterns on the internet - translated to 17 languages. As of today we count 324 catalogues and 12245 patterns translated into English (UK/cm). 12245
We work hard to bring you the best knitting and crochet have to offer, inspiration and advice as well as great quality yarns at incredible prices! Would you like to use our patterns for other than personal use? You can read what you are allowed to do in the Copyright text at the bottom of all our patterns. Happy crafting!
Post a comment to pattern DROPS 170-3
We would love to hear what you have to say about this pattern!
If you want to leave a question, please make sure you select the correct category in the form below, to speed up the answering process. Required fields are marked *.