
Popular categories
Looking for a yarn?


Comments / Questions (166)
![]() Ams wrote:
Ams wrote:
I am enjoying the challenge of knitting this lovely design, but would find it helpful to have larger diagrams to work from: maybe the patterns could include an option to print each diagram on a single A4 side, with the symbols alongside? This would enable me to follow the pattern by glancing at it, instead of having to use a magnifying glass to decipher some areas.
26.06.2019 - 09:28DROPS Design answered:
Dear Ams, whenever I want to see the diagrams larger than the given size on the page, I just click copy and paste on the individual patterns and resize each on its separate word page. I hope this helps, Happy Knitting!
27.06.2019 - 06:52
![]() Aranka wrote:
Aranka wrote:
Ik kom er nog steeds niet uit. Ik brei maat s. En klopt het dan dat ik maar 1x een verkorte toer brei? Als ik die gebreid heb, begin ik in toer 5 van patroon A5,6,7,8. Gaat het zo goed? Want als ik door brei kom ik uiteindelijk toch halverwege het telpatroon uit. Hopelijk kunnen jullie het mij uitleggen.
19.06.2019 - 17:44DROPS Design answered:
Dag Aranka,
Ja, in maat S brei je inderdaad maar één keer de verkorte toeren. Deze brei je aan de onderkant van het ajourpatroon, gezien wanneer je de trui draagt. Dus niet aan de kant van de zijnaden. De verkorte toer valt in het tricotsteekgedeelte.
23.06.2019 - 20:18
![]() Aranka wrote:
Aranka wrote:
Ik brei maat s. Dan brei ik A 5,6,7,8, 2x. Om daarna verder te gaan zoals staat in ALLE MATEN. Dat doe ik dan, dan staat er er zijn nog 8nld over van A5 - A8. Alleen ik eindig halverwege dat telpatroon. Ook heb ik meer steken zoals staat bij 23 st voor de 1e marker, enz... Waar maakte een fout. Hopelijk is het duidelijk.
15.06.2019 - 21:45DROPS Design answered:
Dag Aranka,
Voor, na en tussen A.5 tm A.8 brei je tricotsteek (dit is op het voorpand en de zijkanten. Het is apart dat je dan halverwege eindigt, want deze telpatronen zitten voor en na de markerdraden. Heb je ook tegelijkertijd de verkorte toeren gebreid.?
17.06.2019 - 14:40
![]() Stefania wrote:
Stefania wrote:
Salve! devo lavorare la manica. ho rimesso le 80m sul ferro, e lavoro a ferri accorciati ogni volta 2m in più fino a lavorarle tutte. Non capisco dove dice "allo stesso tempo diminuire"... vuol dire che devo iniziare a diminuire durante i ferri accorciati? ovvero che la diminuzione non sarà a fine giro ma prima di voltare il lavoro? o devo iniziare a diminuire dopo aver lavorato tutte le maglie a fine ferri accorciati? grazie
30.05.2019 - 00:01DROPS Design answered:
Buongiorno Stefania. Deve diminuire mentre sta lavorando i ferri accorciati, dopo la prima maglia all'inizio del ferro accorciato e prima dell'ultima maglia alla fine del ferro accorciato. Diminuisce così 4 volte ogni 4 ferri: in tutto 8 maglie diminuite. Alla fine dei ferri accorciati ci saranno 72 m. Buon lavoro!
30.05.2019 - 06:53
![]() Vargáné Kara Rozália wrote:
Vargáné Kara Rozália wrote:
A jelmagyarázatnál félre érthető a leírás. A ráhajtásoknál "2 rh két szem között"-et ír. A videóban 1 ráhajtást köt.
27.05.2019 - 17:02
![]() Susy wrote:
Susy wrote:
Liebes Drops-Team, wie so viele andere auch hänge ich bei den verkürzten Reihen fest... 1) Ich stricke S und finde keine Ang, ausser das mit den bis 26 M. Aber dann? Str ich wie für M mit beids über 6 M, beids 2x? Meint das 6 M vor dem 1. Wenden bei 26 M, also bei 32 und dann bei 38? Oder lasse ich das bei S ganz weg? 2) Das ALLE GR ist nur eine Reihe. Wie geht die RückR? 3) Was ist mit dem "Anschlagrand" gemeint? Die Mitte? Vielen Dank für die diversen Antworten!
26.05.2019 - 15:47DROPS Design answered:
Liebe Susy, in der Grösse S gibt es nur 2 verkürzten Reihen (= bis 26 M stricken bei der Hin- sowie der Rückreihe), dann stricken Sie weiter wie unter ALLE GRÖSSE. Mit Anschlagrand bedeudet man, von der Anschlagskante. Viel Spaß beim stricken!
27.05.2019 - 13:12
![]() Bloem wrote:
Bloem wrote:
Al meteen in het begin een vraag over het VOORPAND: Brei de volgende nld als volgt (aan de goede kant): brei omsl van vorige nld gedraaid, er moeten geen gaatjes ontstaan. Brei 3 st in RIBBELST - zie uitleg boven, A.1, plaats 1e markeerder, A.1, plaats 2e markeerder, A.1 (= herhaal A.1 3 keer in totaal op de nld) en eindig met 3 st in ribbelst. Moet dit allemaal in die ene nld gebeuren, of eerst een nld waarin de omsl gedraaid gebreid worden, en daarna een nld met 3 ribbelst, A1, enz?
07.04.2019 - 21:47
![]() Bloem wrote:
Bloem wrote:
Al meteen in het begin een vraag :) VOORPAND: Brei de volgende nld als volgt (aan de goede kant): brei omsl van vorige nld gedraaid, er moeten geen gaatjes ontstaan. Brei 3 st in RIBBELST - zie uitleg boven, A.1, plaats 1e markeerder, A.1, plaats 2e markeerder, A.1 (= herhaal A.1 3 keer in totaal op de nld) en eindig met 3 st in ribbelst. Moet dat allemaal in die ene nld gebeuren, of eerst een nld waarin de omslagen gedraaid gebreid worden, en daarna een nld met 3 ribbelst enz.?
07.04.2019 - 21:40DROPS Design answered:
Dag Bloem,
Dat moet inderdaad allemaal in 1 naald. Dus je breit eerst 3 st. in ribbelsteek, dan A.1, plaats een markeerder en zo verder....Als je omslagen tegen komt van de vorige toer dan brei je die gedraaid zodat er geen gaatje ontstaat.
09.04.2019 - 21:07
![]() Annie BRODA wrote:
Annie BRODA wrote:
Bonjour J'ai réalisé cet ouvrage jusqu’à l'assemblage. ( dos et devant) Je ne comprends pas comment on reprend l'encolure ni les explications des manches. Pouvez-vous détailler ces 2 étapes ? Merci d'avance Bien cordialement
06.04.2019 - 17:44DROPS Design answered:
Bonjour Mme Broda, pour l'encolure dos, vous avez mis en attente 39-41 m (cf taille), vous reprenez ces mailles sur l'aiguille et tricotez 4 rangs endroit (= 2 côtes mousse), rabattez et cousez les bords de ces côtes mousse de chaque côté aux mailles montées pour les épaules. Les manches se tricotent à partir des mailles en attente mais en commençant à la maille indiquée pour la taille pour former l'arrondi de la manche, puis vous tricotez 2 m en plus à la fin de chaque rang (= de chaque côté) tout en diminuant tous les 2 ou 4 rangs. Bonne continuation!
08.04.2019 - 09:24
![]() Veerle Van Coillie wrote:
Veerle Van Coillie wrote:
V.a. de 183 steken en meteen de verkorte toeren in maat L ?
14.03.2019 - 17:24DROPS Design answered:
Dag Veerle,
Als je 183 steken op de naald hebt, brei je A.5 t/m A.8 zoals beschreven in de tekst en tegelijkertijd brei je verkorte toeren. Lees eerst even alles door om te begrijpen wat je precies moet doen en in welke volgorde.
15.03.2019 - 18:22
|
|||||||||||||||||||||||||||||||
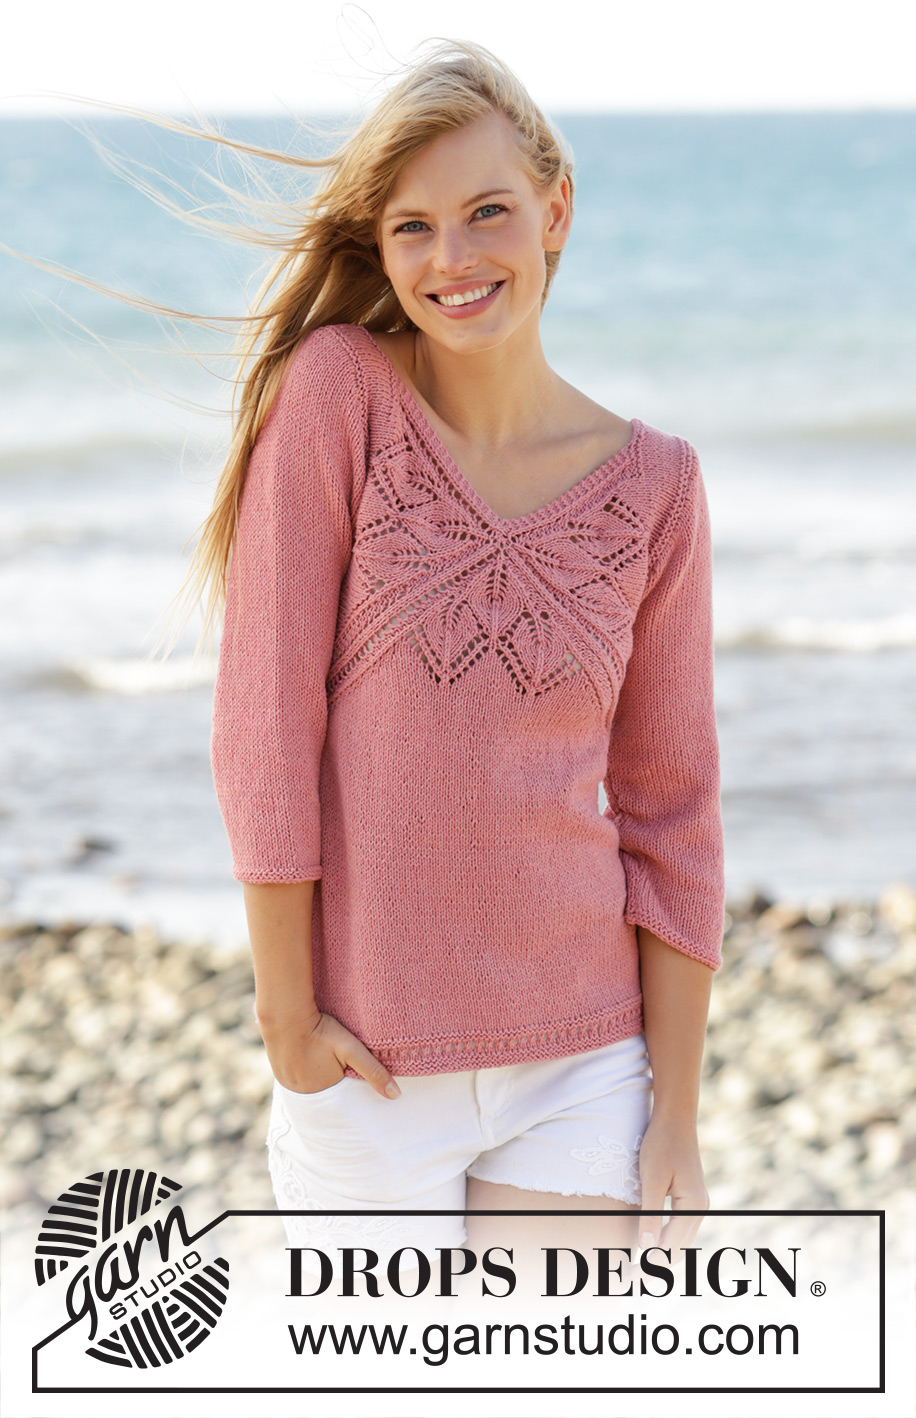
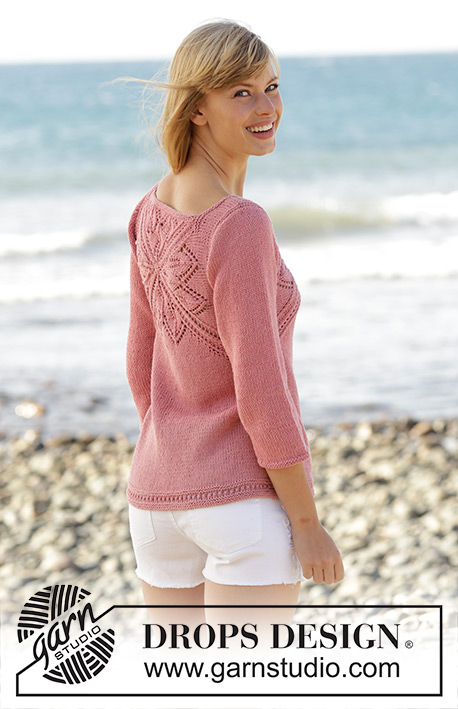
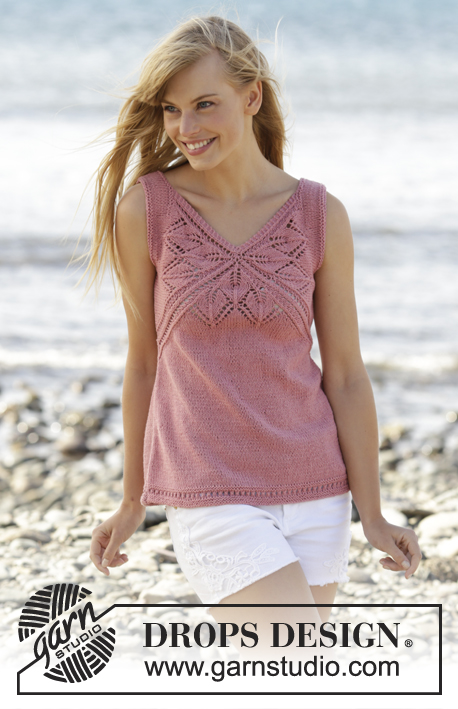
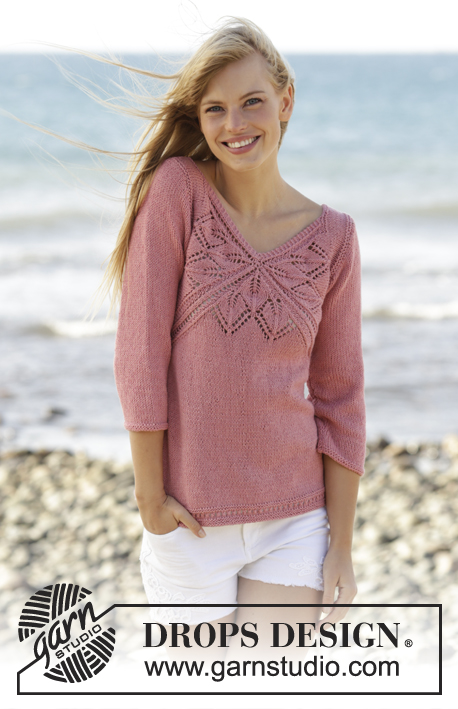
Butterfly Heart#butterflyheartsweater |
|||||||||||||||||||||||||||||||
 |
 |
||||||||||||||||||||||||||||||
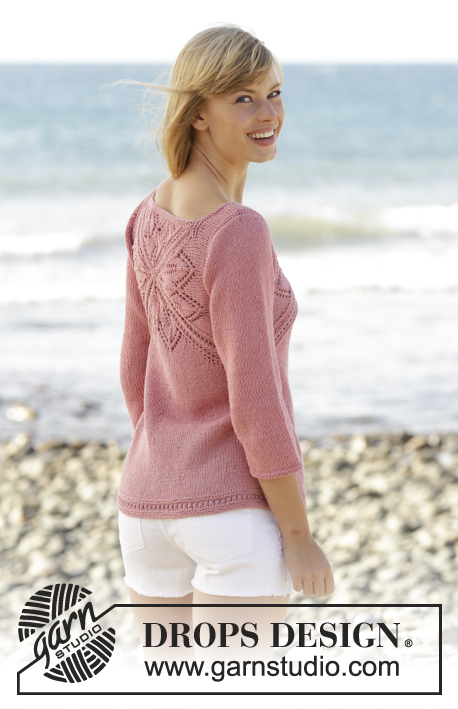
Knitted DROPS jumper with lace pattern and V-neck in ”Belle”. Worked top down. Size: S - XXXL.
DROPS 170-3 |
|||||||||||||||||||||||||||||||
|
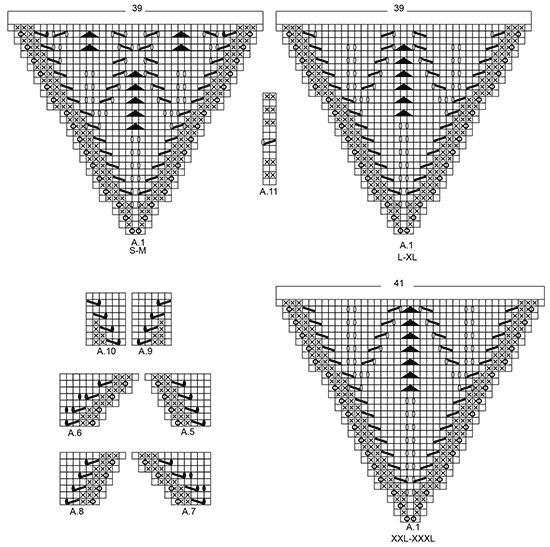
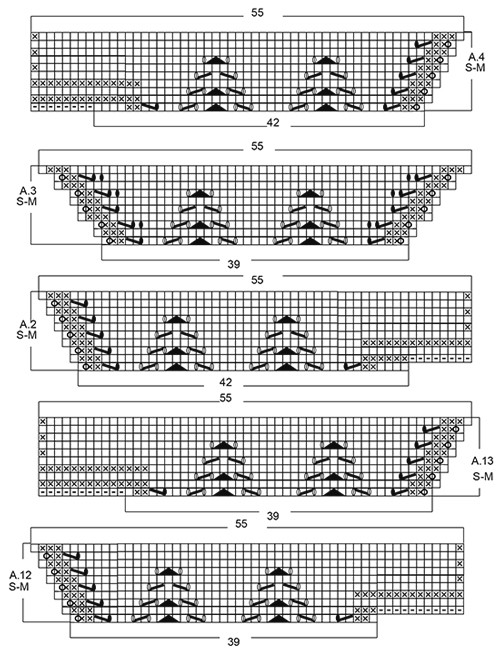
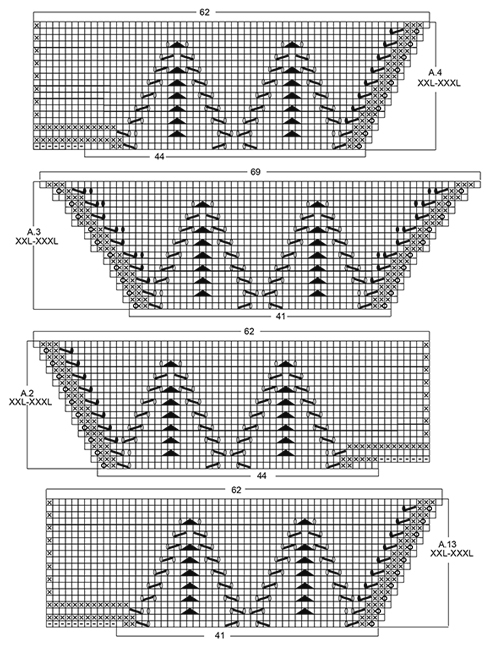
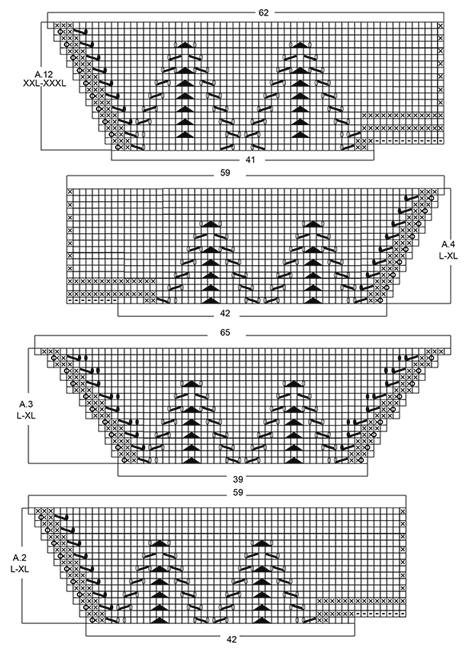
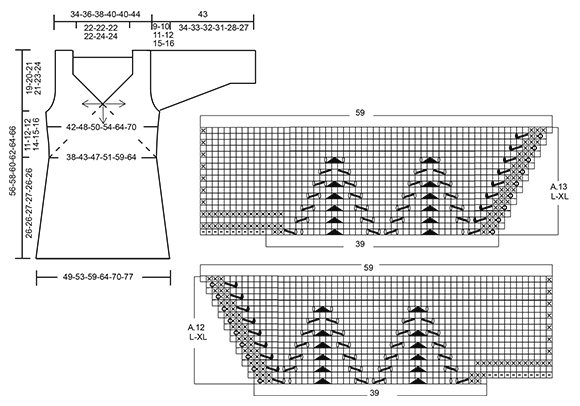
GARTER ST (back and forth): K all rows. 1 ridge = 2 rows K. PATTERN: See diagrams A.1 to A.13. The diagrams show all rows in pattern seen from RS. See diagram for correct size. SHORT ROWS: When turning in short rows, slip first st as if to K. Tighten thread and make sure to avoid big holes. INCREASE TIP: All inc are done from RS. Inc 1 st by making 1 YO, on next row P YO twisted to avoid holes. DECREASE TIP: All dec are done from RS! Dec 1 st at beg of row as follows: K 1, slip 1 st as if to K, K 1, psso Dec 1 st at end of row as follows: Work until 3 sts remain (incl the 2 new sts worked for the first time), K 2 tog. ---------------------------------------------------------- JUMPER: Work from the middle of V-neck and out in 3 triangles on front piece and 4 triangles on back piece, then work downwards. FRONT PIECE: Work back and forth from neck and down. Cast on 8 sts on circular needle size 4 mm with Belle. K 1 row. On next row inc as follows: * K 1, 1 YO *, repeat from *-* until 1 st remains and finish with K 1 = 15 sts on needle. Work next row as follows (from RS): Work YOs from previous row twisted, they should not make holes. Work 3 sts in GARTER ST - see explanation above, A.1, insert 1st marker, A.1, insert 2nd marker, A.1 (= repeat A.1 3 times in total on row), finish with 3 sts in garter st. REMEMBER THE KNITTING TENSION When A.1 has been worked 1 time vertically, there are 123-123-123-123-129-129 sts on needle. Piece measures approx. 11-11-11-11-12-12 cm from cast-on edge. Work next row as follows from RS: Work A.2 over the first 42-42-42-42-44-44 sts, A.3 over the next 39-39-39-39-41-41 sts and A.4 over the last 42-42-42-42-44-44 sts, after A.4 cast on 8 sts at the end of row for shoulder (see diagram). Work A.4 to A.2 on next row, after A.2 cast on 8 sts at the end of row for shoulder (see diagram). When A.2 to A.4 have been worked 1 time vertically, there are 165-165-183-183-193-193 sts on needle. Piece measures approx. 15-15-17-17-19-19 cm from cast-on edge. READ ALL OF THE FOLLOWING SECTION BEFORE CONTINUING! WORK PATTERN AS BEFORE WHILE AT THE SAME TIME WORKING SHORT ROWS IN EACH SIDE OF PIECE. PATTERN: Work next row as follows from RS: Work 1 st in garter st, 48-48-52-52-55-55 sts in stocking st, work A.5 over the next 6 sts, (marker), A.6 over the next 6 sts, 43-43-53-53-57-57 sts in stocking st, A.7 over the next 6 sts, (marker), A.8 over the next 6 sts, 48-48-52-52-55-55 sts in stocking st, finish with 1 st in garter st. Repeat A.5 to A.8 over the 6 sts on each side of each marker 2-3-2-3-4-5 times in total, then repeat the first 0-0-6-4-4-4 rows of A.5 to A.8 1 more times. SHORT ROWS: AT THE SAME TIME when 2-6-0-2-0-6 rows of A.5 to A.8 have been worked, work SHORT ROWS - see explanation above - in each side of piece as follows: Work until 26-26-24-23-18-18 sts remain on row (work A.5 to A.8 as before), turn and work until 26-26-24-23-18-18 sts remain, turn piece. Then work short rows in the different sizes as follows: SIZE M: Work 6 sts less for every turn 2 times in each side of piece. SIZE L-XL: Work 6 sts less for every turn 1-2 times in each side of piece, then work 4 sts less on every turn 3-2 times in each side of piece. SIZE XXL-XXXL: Work 6 sts less for every turn 1-1 time in each side of piece, then work 4 sts less for every turn 4-4 times in each side of piece, then work 2 sts less on every turn 4-5 times in each side of piece. ALL SIZES: When the short rows have been worked, work last row from WS, so that next row beg from shoulder. Then work over all sts from RS as follows: Work in garter st over the first 42-44-46-48-50-52 sts AT THE SAME TIME inc 0-2-4-4-6-6 sts evenly, work as before (i.e. A.5 to A.8 and stocking st) until 42-44-46-48-50-52 sts remain, work in garter st over the last sts AT THE SAME TIME inc 0-2-4-4-6-6 sts evenly (= 42-46-50-52-56-58 sts in garter st in each side of piece). Work 3 rows in garter st over the outermost 42-46-50-52-56-58 sts in garter st in each side of piece, pattern and stocking st over the remaining sts. On next row from WS work as follows: K the first 40-44-48-50-54-56 sts and slip them on a stitch holder for sleeve, work 2 sts in garter st, work in stocking st and pattern as before until 42-46-50-52-56-58 sts remain, 2 sts in garter st, K the next 40-44-48-50-54-56 sts and then slip them on a stitch holder for sleeve. Cut the yarn. 8-8-8-12-12-12 rows of A.5 to A.8 remain. Beg next row from RS. Continue to work in garter st over the first and last 2 sts in each side of piece. When A.5 to A.8 have been worked, there are 23-25-26-27-32-34 sts before 1st marker, 79-91-99-107-123-135 sts between 1st and 2nd marker and 23-25-26-27-32-34 sts after 2nd marker = 125-141-151-161-187-203 sts in total on row. Piece measures approx. 21-24-25-27-32-35 cm on the widest measured from cast-on edge. Insert 1 marker in piece, NOW MEASURE PIECE FROM HERE. On next row from RS loosely cast off the first 22-24-25-26-31-33 sts knitwise, work 1 edge st in garter st, (marker), work A.9 over the first 6 sts after marker, stocking st over the next 67-79-87-95-111-123 sts, A.10 over the last 6 sts before second marker, (marker ), 1 edge st in garter st, loosely cast of the last 22-24-25-26-31-33 sts knitwise = 81-93-101-109-125-137 sts remain on row. Cut the yarn. Work next row from WS over the remaining sts as follows: 1 edge st in garter st, A.10 as before, stocking st over the next 67-79-87-95-111-123 sts, A.9 as before, 1 edge st in garter st. When A.9 and A.10 have been worked 1 time vertically, continue in stocking st with 1 edge st in garter st in each side of piece. When piece measures 3 cm from marker, inc 1 st in each side of piece inside 1 edge st (= 2 sts inc) - READ INCREASE TIP. Repeat inc every 1½-1½-1½-1-1-1 cm 12-10-12-14-12-13 times in total = 105-113-125-137-149-163 sts on needle. When piece measures 23-23-24-24-23-23 cm from marker (piece measures 53-55-57-59-61-63 cm in total from shoulder), adjust so that next row is from RS, switch to circular needle size 3.5 mm. Work next row from RS as follows: Work 1 edge st in garter st, work A.11 (= 2 sts) until 2 sts remain, work first st in A.11, finish with 1 edge st in garter st. On row with holes (i.e. 7th row) work next to last st K. Cast off when A.11 has been worked 1 time vertically. Piece measures 56-58-60-62-64-66 cm in total from shoulder. BACK PIECE: Piece is first worked in the round, then worked as front piece. Cast on 6 sts on double pointed needles size 4 mm with Belle, switch to circular needle when needed. K 1 row. On next row inc as follows: * K 1, 1 YO *, repeat from *-* = 12 sts on row, K YOs twisted on next row, they should not make holes. Work A.1 4 times in total, insert 1 marker between each A.1 (= 4 markers). When A.1 has been worked 1 time vertically, there are 156-156-156-156-164-164 sts on needle. Continue as follows: A.12 over the first 39-39-39-39-41-41 sts, work A.3 over the next 39-39-39-39-41-41 sts and A.13 over the last 39-39-39-39-41-41 sts, slip the remaining sts on a stitch holder for neck edge (= 39-39-39-39-41-41 sts), after A.13 cast on 11 sts at the end of row for shoulder (see diagram). Then work back and forth on needle. Work A.13/A.3/A.12 on next row, after A.12 cast on 11 sts at the end of row for shoulder (see diagram). When A.12/A.3/A.13 have been worked 1 time vertically, there are 165-165-183-183-193-193 sts on needle. Piece measures approx. 15-15-17-17-19-19 cm from cast-on edge. Now continue back piece as front piece. NECK EDGE: Worked back and forth on needle. Slip sts from stitch holder for neck edge on back piece back on circular needle size 3.5 mm. Work 2 ridges. Fasten ridges where sts were cast on for shoulder. Fasten off. ASSEMBLY: Sew the side seams inside 1 edge st in garter st. Sew shoulder seams inside 1 edge st in garter st. Tighten tog the middle (i.e. cast-on edge) on both front and back piece. SLEEVE: Worked back and forth on circular needle in stocking st. Slip sts from the 2 stitch holders (on front and back piece) in one side of piece back on circular needle size 4 mm = 80-88-96-100-108-112 sts. Work short rows for sleeve cap as follows: Beg to work in the 25th-29th-31st-35th-43rd-45th st (i.e. 24-28-30-34-42-44 sts in one side are not worked). Work from RS 34-34-38-34-26-26 sts in stocking st, turn piece (= 22-26-28-32-40-42 sts remain on needle). Work in stocking st over the 36-36-40-36-28-28 sts, turn piece. Work 2 sts more on every turn in each side of piece until all sts have been worked. AT THE SAME TIME dec 1 st in each side of piece (= 2 sts dec), inside 1 st on every 4th-4th-2nd-4th-4th-4th row 4-6-8-8-10-10 times in total – READ DECREASE TIP = 72-76-80-84-88-92 sts on needle. Work 8-8-8-12-12-12 rows in stocking st over all sts, insert 1 marker in piece (sew side seam on sleeve up to here later). NOW MEASURE THE PIECE FROM HERE. Cast on 1 edge st at the end of the next 2 rows = 74-78-82-86-90-94 sts. Work edge sts in garter st until finished measurements. On next row from RS dec 1 st inside 2 sts in each side of piece (= 2 sts dec). Repeat dec every 2½-2-2-1½-1-1 cm 9-10-11-12-13-13 more times = 54-56-58-60-62-66 sts on needle. When sleeve measures 31-30-29-27-24-23 cm, switch to circular needle size 3.5 mm. Work 2 ridges. Cast off. Slip sts from stitch holders in the other side of piece on circular needle size 4 mm and work the same way. ASSEMBLY: Sew sleeve seams up to where 1 edge st in garter st was cast on in each side of piece. Sew the under arm seam. |
|||||||||||||||||||||||||||||||
Diagram explanations |
|||||||||||||||||||||||||||||||
|
|||||||||||||||||||||||||||||||
 |
|||||||||||||||||||||||||||||||
 |
|||||||||||||||||||||||||||||||
 |
|||||||||||||||||||||||||||||||
 |
|||||||||||||||||||||||||||||||
 |
|||||||||||||||||||||||||||||||
Have you finished this pattern?Tag your pictures with #dropspattern #butterflyheartsweater or submit them to the #dropsfan gallery. Do you need help with this pattern?You'll find 29 tutorial videos, a Comments/Questions area and more by visiting the pattern on garnstudio.com. © 1982-2026 DROPS Design A/S. We reserve all rights. This document, including all its sub-sections, has copyrights. Read more about what you can do with our patterns at the bottom of each pattern on our site. |
|||||||||||||||||||||||||||||||


With over 40 years in knitting and crochet design, DROPS Design offers one of the most extensive collections of free patterns on the internet - translated to 17 languages. As of today we count 324 catalogues and 12245 patterns translated into English (UK/cm). 12245
We work hard to bring you the best knitting and crochet have to offer, inspiration and advice as well as great quality yarns at incredible prices! Would you like to use our patterns for other than personal use? You can read what you are allowed to do in the Copyright text at the bottom of all our patterns. Happy crafting!
Post a comment to pattern DROPS 170-3
We would love to hear what you have to say about this pattern!
If you want to leave a question, please make sure you select the correct category in the form below, to speed up the answering process. Required fields are marked *.