
Popular categories
Looking for a yarn?


Comments / Questions (166)
![]() Angeline wrote:
Angeline wrote:
Thanks. I'm sorry, I still don't understand that. Do you mean after 6th turn, carry on until the end of row 5 of A5-A8 diagram, then another full row of all stitches, then start on RS on row 7 of A5-A8 diagram? But how can I do the increase row (row 7, RS), work 3 rows with garter (row 8,1,2 of diagrams) and next instruction is "on next row from WS..."? A RS row + 3 rows will mean next row is RS again, no? Thank you so much
05.10.2020 - 10:45DROPS Design answered:
Dear Angeline, after you have worked all short rows, you turn and work one row from RS over sts on needle to the end of the row then work next row from WS over all sts = from one shoulder to the other shoulder. Happy knitting!
05.10.2020 - 11:30
![]() Angeline wrote:
Angeline wrote:
Hi, another question please, size M, after I do 6 short rows (over rows 7,8,1,2,3,4 of pattern) what does "when short rows have been worked, work last row from WS"? Do I carry on row 4 of pattern so next (increase) row is row 5 of pattern? But if I do, then next doing 3 rows of garter/pattern, the following row (row with slipping sts on holder) is RS (row1 pattern) not WS as pattern states. Thanks for your help.
03.10.2020 - 10:34DROPS Design answered:
Dear Angeline, after the short rows have been worked, you need to work one more row from RS over sts on needle + sts unworked on one side, then turn and work next row over all sts on needle + sts unworked on the other side = all stitches have now been worked and the row start from the beg = towards shoulder. Happy knitting!
05.10.2020 - 09:11
![]() Angeline wrote:
Angeline wrote:
Hi I'm confused. Pattern says repeat A5-A8 over the 6 sts 3 times total (size M). Does that mean the full A5-A8 diagram x3 or just row 1 (which is 6 sts long) repeated 3 times? Thanks
30.09.2020 - 22:55DROPS Design answered:
Dear Angeline, this means to repeat the diagrams A.5 to A.8 in height a total of 3 times in 2nd size (= 8 rows x 3 = 24 rows in total). Happy knitting!
01.10.2020 - 10:15
![]() Crina Petroianu wrote:
Crina Petroianu wrote:
It will be a major change to the look of the pattern if I use regular purl instead of Norwegian purl?
29.07.2020 - 17:40DROPS Design answered:
Dear Mrs Petroianu, Norwegian purl is the regular purl in Norway :) You can work your purl stitches as you are used to, this will not affect the pattern. Happy knitting!
30.07.2020 - 08:43
![]() Sandra Armand wrote:
Sandra Armand wrote:
Bonjour. Pour le dos qd on a tricoté A1 1× on a 156m. Puis vs ns demandé de tricoter A12 39m A3 39m A13 39m. Il reste 39 m on les tricote comment ?
12.06.2020 - 10:59DROPS Design answered:
Bonjour Mme Armand, on ne les tricote pas, on les met en attente pour l'encolure - mais on monte 13 m pour l'épaule à la fin du rang on a donc: A.12, A.3, A.13 (vu sur l'endroit). Bon tricot!
12.06.2020 - 12:28
![]() Birgitte Bjergø wrote:
Birgitte Bjergø wrote:
Jeg er kommet til ærmerne, men jeg forstår ikke helt. Skal de forkortede pinde ikke strikkes henover skuldersøm? Men hvordan tager man så ind i siderne? Alternativt strikkes de forkortede pinde over under armen og der tages ind i midten her, men så bliver der en synlig ærmesøm over armen. Eller skal man først strikke forkortede pinde i den ene side og derefter den anden - jeg har meget svært ved at se det for mig.
03.06.2020 - 13:12DROPS Design answered:
Hej Birgitte, når du har sat maskerne på rundpinden, så starter du midt i den ene side ( i den maske som står ud for din størrelse i opskriften) strikker op langs ærmet over skulderen og ned på den anden side. Vender og strikker over 2 masker mere for hver gang du vender. Det gør du for at forme til ærmekuppel. Til sidst er du kommet ned til midt under ærmet (ærmegabet) og nu strikkes det rundt. Således bliver der ingen søm. God fornøjelse!
05.06.2020 - 11:54
![]() Jenny Strick wrote:
Jenny Strick wrote:
Ich stricke den Pulli in Größe S. Bei den verkürzten Reihen muss ein Fehler in der Anleitung sein. Zuerst heißt es für alle Größen Hin bis noch 26 M auf der Nadel, wenden, Rück bis noch 26 M auf der Nadel sind. Einen Sonderteil für Größe S gibt es nicht. Also geht es weiter mit alle Größen. Dies beginnt mit einer Rückrunde welche bis Ende gestrickt werden soll. Ich befinde mich allerdings gerade in einer Rückreihe welche nur bis 26 vor Ende gehen sollte.
18.05.2020 - 20:38DROPS Design answered:
Liebe Frau Strick, bei Grösse S stricken Sie nur 2 verkürzten Reihen, dann, stricken Sie 1 Hin-Reihe Maschen, 1 Rück-Reihe über alle Maschen und dann stricken die krausrippen über die 42 Maschen auf beiden Seiten. Viel Spaß beim stricken!
19.05.2020 - 07:44
![]() Ellen Black wrote:
Ellen Black wrote:
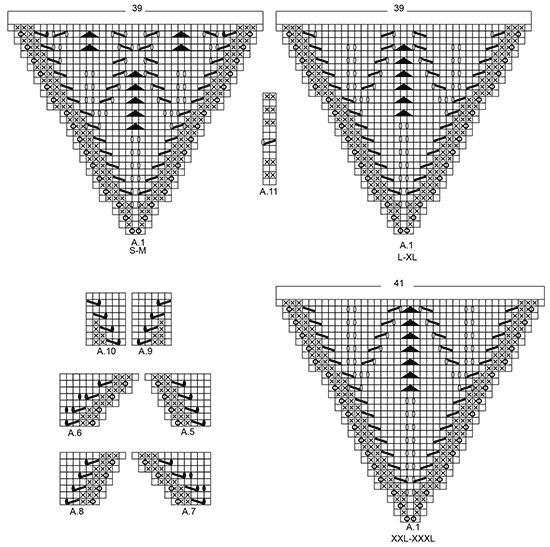
I have progressed to the bottom of the main body of this sweater. The instructions reference chart A.11, however, I cannot find that chart. Based on the instructions, I think I am supposed to work on a set of 2 stitches and do K2TOG, YO. Is that correct? Many thanks!!!
16.04.2020 - 16:10DROPS Design answered:
Dear Mrs Black, you will find A.11 between A.1 size S-M and A.1 size L-XL, ie between both diagrams, it's a small diagram worked over 2 sts and 14 rows. Happy knitting!
16.04.2020 - 16:38
![]() Hedström Eva wrote:
Hedström Eva wrote:
Stickar st M, har stickat A.5 till A.8 en gång. Ska upprepas 3 ggr enl mönstret. Men så står det ”samtidigt när det har stickats 6 p av A.5 till A.8 stickas det förkortade v. ” Vad menas med 6 p? När ska det förkortade v börja?
14.04.2020 - 15:57DROPS Design answered:
Hej Där har det blivit ett skrivfel som nu är rättat. Det ska stå v, du börjar alltså med de förkortade varven när du stickat 6 varv av A.5 till A.8. Mvh DROPS Design
16.04.2020 - 07:52
![]() Bloem wrote:
Bloem wrote:
Goedenavond, ik brei maat M en ben klaar met de verkorte toeren (in A.5 t/m A.8). Mijn vraag is ook door anderen gesteld, maar helaas begrijp ik het antwoord nog steeds niet... Mijn laatste verkorte toer valt aan het (verkorte) eind van een averechte naald (dus aan de verkeerde kant van het werk). Als ik deze helemaal uitbrei zoals in de beschrijving staat, heb ik 1 verkorte toer te weinig gemaakt. Wat is nu precies de bedoeling? Dank voor uw hulp.
01.03.2020 - 20:22DROPS Design answered:
Dag Bloem,
Ik zie inderdaad dat je niet uitkomt op die manier. Ik heb de neiging om te zeggen, begin 2 naalden eerder met de verkorte toeren of brei nog een keer heen en terug. Wellicht zit er een foutje in maat M, ik zal dit even doorgeven aan de design afdeling.
04.03.2020 - 16:03
|
|||||||||||||||||||||||||||||||
Butterfly Heart#butterflyheartsweater |
|||||||||||||||||||||||||||||||
 |
 |
||||||||||||||||||||||||||||||
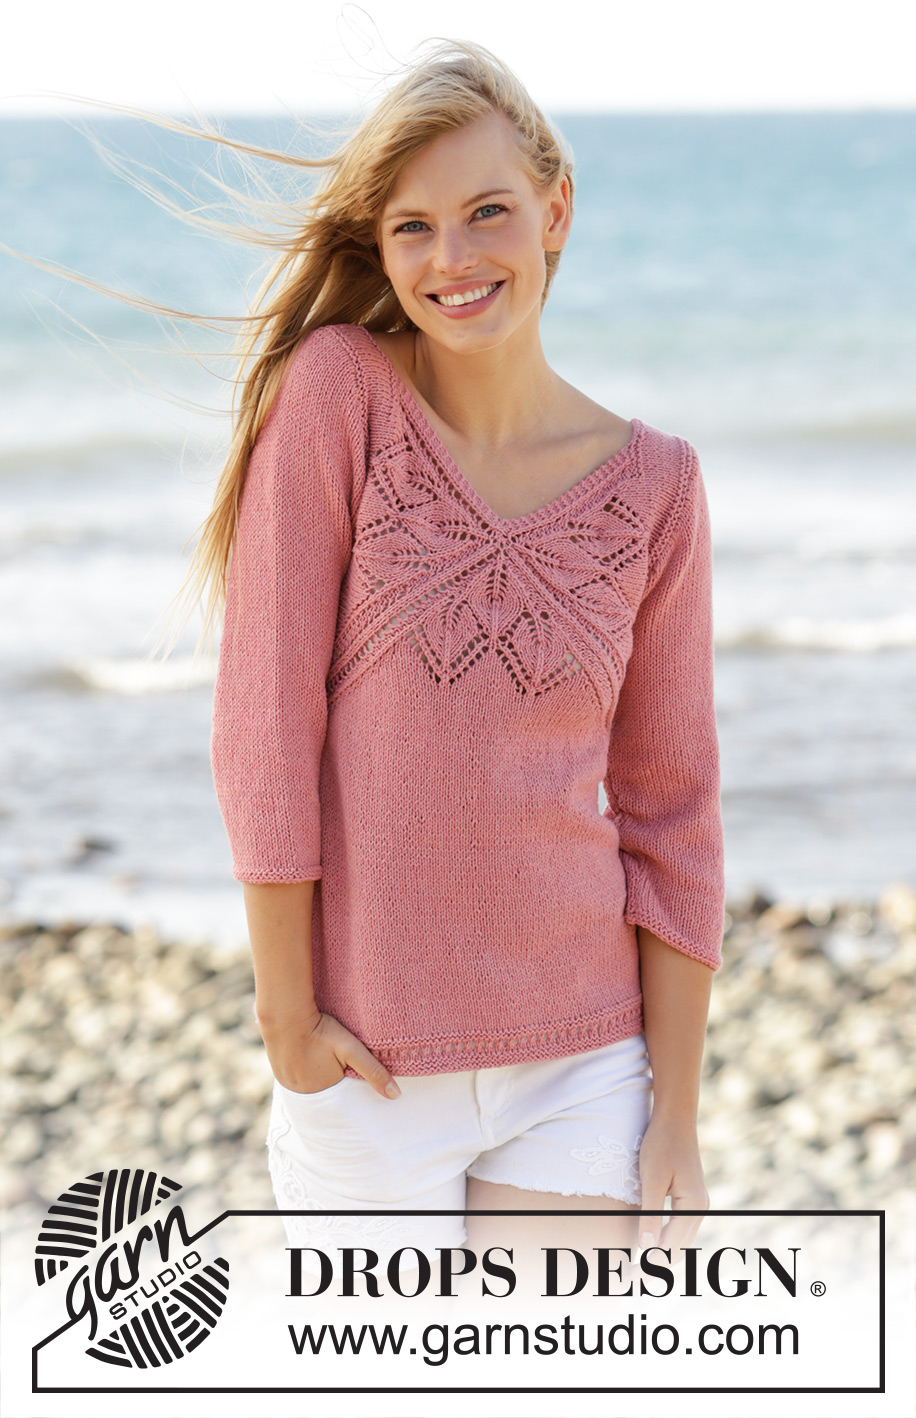
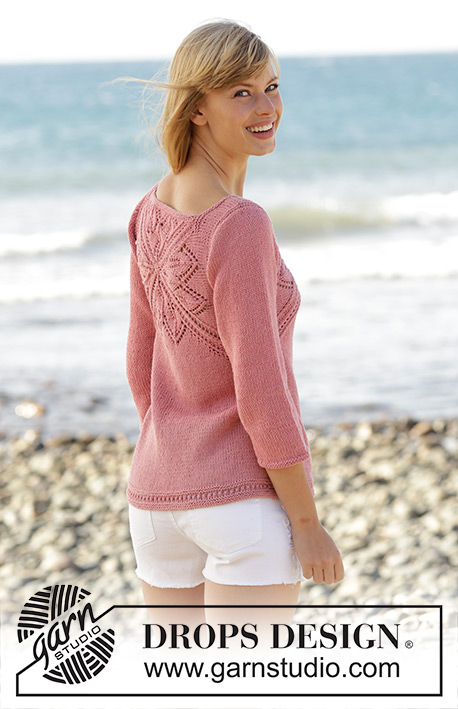
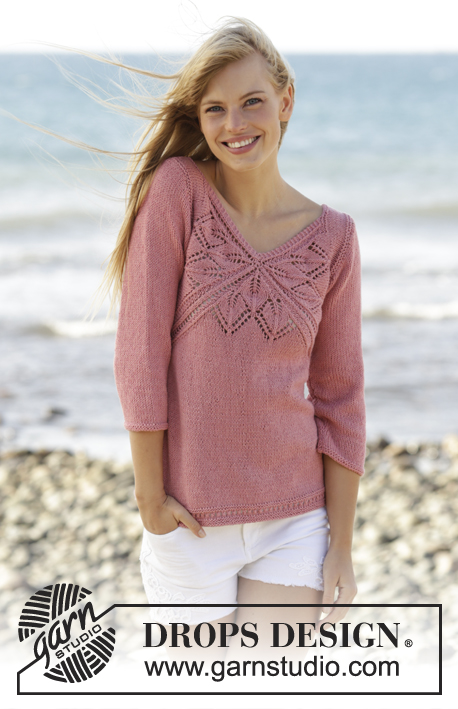
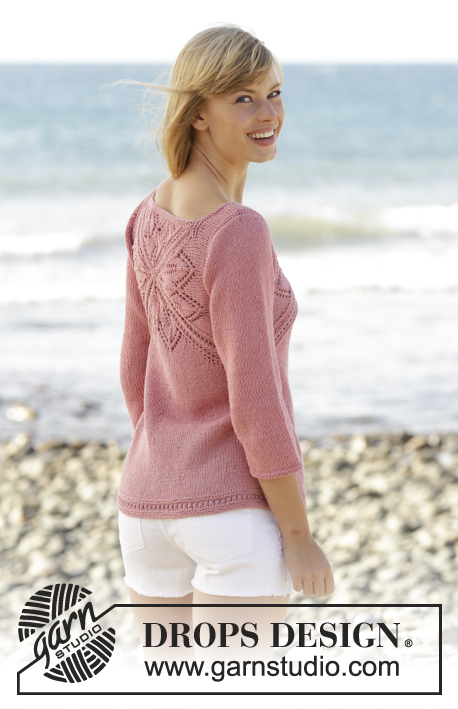
Knitted DROPS jumper with lace pattern and V-neck in ”Belle”. Worked top down. Size: S - XXXL.
DROPS 170-3 |
|||||||||||||||||||||||||||||||
|
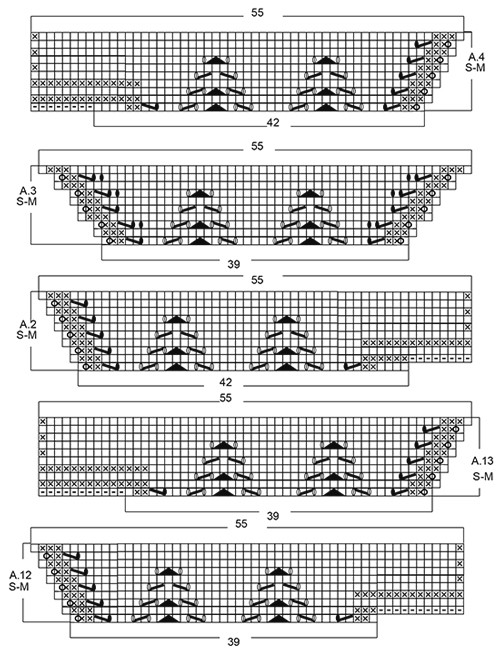
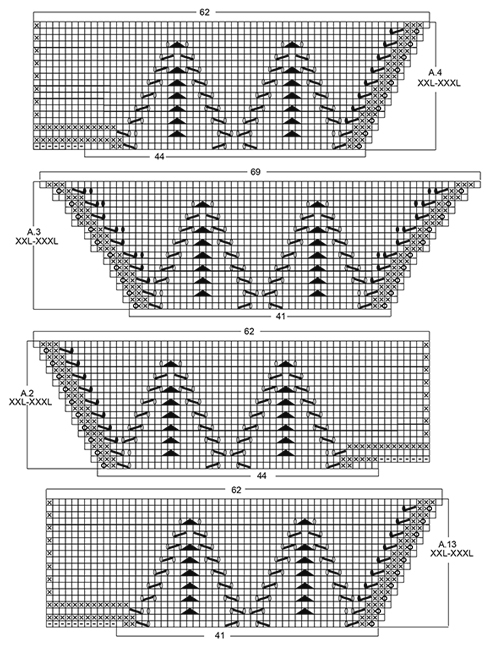
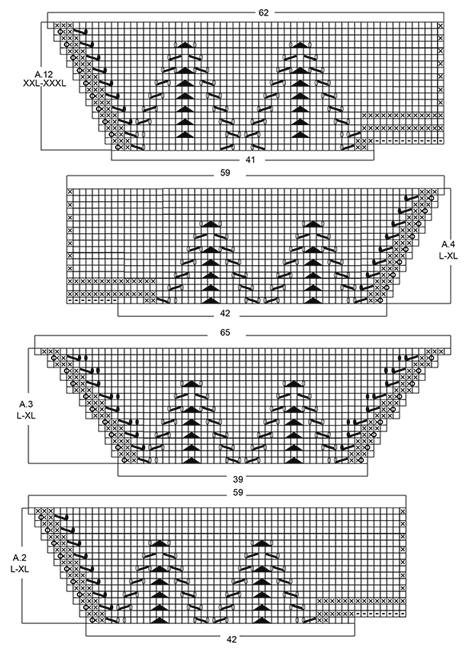
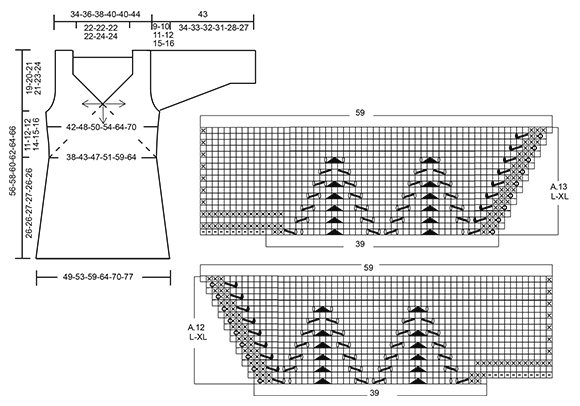
GARTER ST (back and forth): K all rows. 1 ridge = 2 rows K. PATTERN: See diagrams A.1 to A.13. The diagrams show all rows in pattern seen from RS. See diagram for correct size. SHORT ROWS: When turning in short rows, slip first st as if to K. Tighten thread and make sure to avoid big holes. INCREASE TIP: All inc are done from RS. Inc 1 st by making 1 YO, on next row P YO twisted to avoid holes. DECREASE TIP: All dec are done from RS! Dec 1 st at beg of row as follows: K 1, slip 1 st as if to K, K 1, psso Dec 1 st at end of row as follows: Work until 3 sts remain (incl the 2 new sts worked for the first time), K 2 tog. ---------------------------------------------------------- JUMPER: Work from the middle of V-neck and out in 3 triangles on front piece and 4 triangles on back piece, then work downwards. FRONT PIECE: Work back and forth from neck and down. Cast on 8 sts on circular needle size 4 mm with Belle. K 1 row. On next row inc as follows: * K 1, 1 YO *, repeat from *-* until 1 st remains and finish with K 1 = 15 sts on needle. Work next row as follows (from RS): Work YOs from previous row twisted, they should not make holes. Work 3 sts in GARTER ST - see explanation above, A.1, insert 1st marker, A.1, insert 2nd marker, A.1 (= repeat A.1 3 times in total on row), finish with 3 sts in garter st. REMEMBER THE KNITTING TENSION When A.1 has been worked 1 time vertically, there are 123-123-123-123-129-129 sts on needle. Piece measures approx. 11-11-11-11-12-12 cm from cast-on edge. Work next row as follows from RS: Work A.2 over the first 42-42-42-42-44-44 sts, A.3 over the next 39-39-39-39-41-41 sts and A.4 over the last 42-42-42-42-44-44 sts, after A.4 cast on 8 sts at the end of row for shoulder (see diagram). Work A.4 to A.2 on next row, after A.2 cast on 8 sts at the end of row for shoulder (see diagram). When A.2 to A.4 have been worked 1 time vertically, there are 165-165-183-183-193-193 sts on needle. Piece measures approx. 15-15-17-17-19-19 cm from cast-on edge. READ ALL OF THE FOLLOWING SECTION BEFORE CONTINUING! WORK PATTERN AS BEFORE WHILE AT THE SAME TIME WORKING SHORT ROWS IN EACH SIDE OF PIECE. PATTERN: Work next row as follows from RS: Work 1 st in garter st, 48-48-52-52-55-55 sts in stocking st, work A.5 over the next 6 sts, (marker), A.6 over the next 6 sts, 43-43-53-53-57-57 sts in stocking st, A.7 over the next 6 sts, (marker), A.8 over the next 6 sts, 48-48-52-52-55-55 sts in stocking st, finish with 1 st in garter st. Repeat A.5 to A.8 over the 6 sts on each side of each marker 2-3-2-3-4-5 times in total, then repeat the first 0-0-6-4-4-4 rows of A.5 to A.8 1 more times. SHORT ROWS: AT THE SAME TIME when 2-6-0-2-0-6 rows of A.5 to A.8 have been worked, work SHORT ROWS - see explanation above - in each side of piece as follows: Work until 26-26-24-23-18-18 sts remain on row (work A.5 to A.8 as before), turn and work until 26-26-24-23-18-18 sts remain, turn piece. Then work short rows in the different sizes as follows: SIZE M: Work 6 sts less for every turn 2 times in each side of piece. SIZE L-XL: Work 6 sts less for every turn 1-2 times in each side of piece, then work 4 sts less on every turn 3-2 times in each side of piece. SIZE XXL-XXXL: Work 6 sts less for every turn 1-1 time in each side of piece, then work 4 sts less for every turn 4-4 times in each side of piece, then work 2 sts less on every turn 4-5 times in each side of piece. ALL SIZES: When the short rows have been worked, work last row from WS, so that next row beg from shoulder. Then work over all sts from RS as follows: Work in garter st over the first 42-44-46-48-50-52 sts AT THE SAME TIME inc 0-2-4-4-6-6 sts evenly, work as before (i.e. A.5 to A.8 and stocking st) until 42-44-46-48-50-52 sts remain, work in garter st over the last sts AT THE SAME TIME inc 0-2-4-4-6-6 sts evenly (= 42-46-50-52-56-58 sts in garter st in each side of piece). Work 3 rows in garter st over the outermost 42-46-50-52-56-58 sts in garter st in each side of piece, pattern and stocking st over the remaining sts. On next row from WS work as follows: K the first 40-44-48-50-54-56 sts and slip them on a stitch holder for sleeve, work 2 sts in garter st, work in stocking st and pattern as before until 42-46-50-52-56-58 sts remain, 2 sts in garter st, K the next 40-44-48-50-54-56 sts and then slip them on a stitch holder for sleeve. Cut the yarn. 8-8-8-12-12-12 rows of A.5 to A.8 remain. Beg next row from RS. Continue to work in garter st over the first and last 2 sts in each side of piece. When A.5 to A.8 have been worked, there are 23-25-26-27-32-34 sts before 1st marker, 79-91-99-107-123-135 sts between 1st and 2nd marker and 23-25-26-27-32-34 sts after 2nd marker = 125-141-151-161-187-203 sts in total on row. Piece measures approx. 21-24-25-27-32-35 cm on the widest measured from cast-on edge. Insert 1 marker in piece, NOW MEASURE PIECE FROM HERE. On next row from RS loosely cast off the first 22-24-25-26-31-33 sts knitwise, work 1 edge st in garter st, (marker), work A.9 over the first 6 sts after marker, stocking st over the next 67-79-87-95-111-123 sts, A.10 over the last 6 sts before second marker, (marker ), 1 edge st in garter st, loosely cast of the last 22-24-25-26-31-33 sts knitwise = 81-93-101-109-125-137 sts remain on row. Cut the yarn. Work next row from WS over the remaining sts as follows: 1 edge st in garter st, A.10 as before, stocking st over the next 67-79-87-95-111-123 sts, A.9 as before, 1 edge st in garter st. When A.9 and A.10 have been worked 1 time vertically, continue in stocking st with 1 edge st in garter st in each side of piece. When piece measures 3 cm from marker, inc 1 st in each side of piece inside 1 edge st (= 2 sts inc) - READ INCREASE TIP. Repeat inc every 1½-1½-1½-1-1-1 cm 12-10-12-14-12-13 times in total = 105-113-125-137-149-163 sts on needle. When piece measures 23-23-24-24-23-23 cm from marker (piece measures 53-55-57-59-61-63 cm in total from shoulder), adjust so that next row is from RS, switch to circular needle size 3.5 mm. Work next row from RS as follows: Work 1 edge st in garter st, work A.11 (= 2 sts) until 2 sts remain, work first st in A.11, finish with 1 edge st in garter st. On row with holes (i.e. 7th row) work next to last st K. Cast off when A.11 has been worked 1 time vertically. Piece measures 56-58-60-62-64-66 cm in total from shoulder. BACK PIECE: Piece is first worked in the round, then worked as front piece. Cast on 6 sts on double pointed needles size 4 mm with Belle, switch to circular needle when needed. K 1 row. On next row inc as follows: * K 1, 1 YO *, repeat from *-* = 12 sts on row, K YOs twisted on next row, they should not make holes. Work A.1 4 times in total, insert 1 marker between each A.1 (= 4 markers). When A.1 has been worked 1 time vertically, there are 156-156-156-156-164-164 sts on needle. Continue as follows: A.12 over the first 39-39-39-39-41-41 sts, work A.3 over the next 39-39-39-39-41-41 sts and A.13 over the last 39-39-39-39-41-41 sts, slip the remaining sts on a stitch holder for neck edge (= 39-39-39-39-41-41 sts), after A.13 cast on 11 sts at the end of row for shoulder (see diagram). Then work back and forth on needle. Work A.13/A.3/A.12 on next row, after A.12 cast on 11 sts at the end of row for shoulder (see diagram). When A.12/A.3/A.13 have been worked 1 time vertically, there are 165-165-183-183-193-193 sts on needle. Piece measures approx. 15-15-17-17-19-19 cm from cast-on edge. Now continue back piece as front piece. NECK EDGE: Worked back and forth on needle. Slip sts from stitch holder for neck edge on back piece back on circular needle size 3.5 mm. Work 2 ridges. Fasten ridges where sts were cast on for shoulder. Fasten off. ASSEMBLY: Sew the side seams inside 1 edge st in garter st. Sew shoulder seams inside 1 edge st in garter st. Tighten tog the middle (i.e. cast-on edge) on both front and back piece. SLEEVE: Worked back and forth on circular needle in stocking st. Slip sts from the 2 stitch holders (on front and back piece) in one side of piece back on circular needle size 4 mm = 80-88-96-100-108-112 sts. Work short rows for sleeve cap as follows: Beg to work in the 25th-29th-31st-35th-43rd-45th st (i.e. 24-28-30-34-42-44 sts in one side are not worked). Work from RS 34-34-38-34-26-26 sts in stocking st, turn piece (= 22-26-28-32-40-42 sts remain on needle). Work in stocking st over the 36-36-40-36-28-28 sts, turn piece. Work 2 sts more on every turn in each side of piece until all sts have been worked. AT THE SAME TIME dec 1 st in each side of piece (= 2 sts dec), inside 1 st on every 4th-4th-2nd-4th-4th-4th row 4-6-8-8-10-10 times in total – READ DECREASE TIP = 72-76-80-84-88-92 sts on needle. Work 8-8-8-12-12-12 rows in stocking st over all sts, insert 1 marker in piece (sew side seam on sleeve up to here later). NOW MEASURE THE PIECE FROM HERE. Cast on 1 edge st at the end of the next 2 rows = 74-78-82-86-90-94 sts. Work edge sts in garter st until finished measurements. On next row from RS dec 1 st inside 2 sts in each side of piece (= 2 sts dec). Repeat dec every 2½-2-2-1½-1-1 cm 9-10-11-12-13-13 more times = 54-56-58-60-62-66 sts on needle. When sleeve measures 31-30-29-27-24-23 cm, switch to circular needle size 3.5 mm. Work 2 ridges. Cast off. Slip sts from stitch holders in the other side of piece on circular needle size 4 mm and work the same way. ASSEMBLY: Sew sleeve seams up to where 1 edge st in garter st was cast on in each side of piece. Sew the under arm seam. |
|||||||||||||||||||||||||||||||
Diagram explanations |
|||||||||||||||||||||||||||||||
|
|||||||||||||||||||||||||||||||
 |
|||||||||||||||||||||||||||||||
 |
|||||||||||||||||||||||||||||||
 |
|||||||||||||||||||||||||||||||
 |
|||||||||||||||||||||||||||||||
 |
|||||||||||||||||||||||||||||||
Have you finished this pattern?Tag your pictures with #dropspattern #butterflyheartsweater or submit them to the #dropsfan gallery. Do you need help with this pattern?You'll find 29 tutorial videos, a Comments/Questions area and more by visiting the pattern on garnstudio.com. © 1982-2026 DROPS Design A/S. We reserve all rights. This document, including all its sub-sections, has copyrights. Read more about what you can do with our patterns at the bottom of each pattern on our site. |
|||||||||||||||||||||||||||||||


With over 40 years in knitting and crochet design, DROPS Design offers one of the most extensive collections of free patterns on the internet - translated to 17 languages. As of today we count 324 catalogues and 12245 patterns translated into English (UK/cm). 12245
We work hard to bring you the best knitting and crochet have to offer, inspiration and advice as well as great quality yarns at incredible prices! Would you like to use our patterns for other than personal use? You can read what you are allowed to do in the Copyright text at the bottom of all our patterns. Happy crafting!
Post a comment to pattern DROPS 170-3
We would love to hear what you have to say about this pattern!
If you want to leave a question, please make sure you select the correct category in the form below, to speed up the answering process. Required fields are marked *.