
Popular categories
Looking for a yarn?


Comments / Questions (166)
![]() Marianne wrote:
Marianne wrote:
Takk for svar. Begynte på nytt og nå har jeg riktig antall masker, men står fast igjen. Forkortede pinner og xxl. Har strikket til 18 m og snudd, strikket på vrangen til 18 m og snudd. Skal jeg da strikke til over der jeg snudde med 6 m til og så snu og ikke strikke noen pinner helt ut før de forkortede pinnene er ferdig strikket?
03.08.2021 - 10:58DROPS Design answered:
Hei Marianne, Du skal strikke 6 masker mindre hver gang, før du snur, (6 masker før du snudde den forrige gangen). God fornøyelse!
04.08.2021 - 09:07
![]() Sandra Kroon wrote:
Sandra Kroon wrote:
Hallo, ik brei maat M Hoe kan ik bij de mouw tijdens de verkorte toeren tegelijkertijd de mindering uitvoeren? Doe ik dat als ik de 2 steken verder brei dan de vorige toer? Dus eigenlijk 1 steek verder en dan de bij volgende twee een mindering? Ik heb nu de verkorte toeren gebreid en nog alle 88 steken op m'n naald. Dus geen minderingen
30.07.2021 - 23:31DROPS Design answered:
Dag Sandra,
Dit minderen wordt pas na gedaan als de verkorte toeren klaar zijn je over alle steken hebt gebreid. De tekst 'tegelijkertijd' is dus verwarrend en ik zal het doorgeven aan de ontwerpafdeling om aan te passen.
20.08.2021 - 10:56
![]() Mila Georgieva wrote:
Mila Georgieva wrote:
Lieber Drops Team, Ich stricke den Pulli. Die verkürzten Reiehn habe ich gut hingekriegt. Für mich ist aber unklar, wie ich die Ärmel annähen kann, d.h. wie die untere Naht entsteht? LG und danke im voraus!
22.07.2021 - 10:11DROPS Design answered:
Liebe Frau Georgieva, die Ärmel werden dann beim Armloch angenäht, Armloch = die 22 bis 33 Maschen, die nach 21-35 cm abgekettet werden. Viel Spaß beim stricken!
22.07.2021 - 13:23
![]() Marianne wrote:
Marianne wrote:
Hei, strikker str xxl og når jeg skal til å strikke A5 til A8 skal jeg ha 193 m totalt? Jeg har 14 m for mye og lurer på om det er skuldrene for jeg klarer ikke å finne feil i mønsteret mitt. Det måler også 19 cm i høyden som det skal. Uff, håper jeg slipper å begynne på nytt.
07.07.2021 - 18:39DROPS Design answered:
Hej Marianne, har du fulgt diagrammerne for din størrelse... ?
12.07.2021 - 15:32
![]() Iz wrote:
Iz wrote:
Hello, another question about A5-A8 and short rows. I am knitting Size S. 1) Is A5-A8 worked vertically 2 times in total or 3 times in total? 2) The pattern says 'work short rows in the different sizes as follows', but no instruction for Size S there! What am I supposed to do?
05.07.2021 - 00:17DROPS Design answered:
Dear Iz, in S you are working A.5 to A.8 a total of 2 times in total. In S you don't work extra short rows except the one explained (with 26 sts left unworked at the end of the next 2 rows), then you work as explained under ALL SIZES. Happy knitting!
05.07.2021 - 08:20
![]() Nathalie wrote:
Nathalie wrote:
Quante volte bisogna lavorare A.5 -A. 5 sul davanti? Per la S bastano 2 ferri accorciati?
17.02.2021 - 11:33DROPS Design answered:
Buonasera Nathalie, i ferri accorciati per la taglia S sono 2. Buon lavoro!
18.02.2021 - 21:53
![]() Biggi wrote:
Biggi wrote:
Hallo, ich hänge bei den verkürzten Reihen, ich stricke Grösse M, nach den 26 Maschen die verbleiben, soll ich 2 mal 6 Maschen ungestraft lassen. Werden diese 6 Maschen von der kompletten Reihe gewählter von verkürzten?quasi erst 26, dann 32, dann 38 ungestraft lassen? Danke für Ihre Hilfe
16.02.2021 - 22:41DROPS Design answered:
Liebe Biggi, also diese 26 Maschen sind die ersten die nicht gearbeitet werden, dann stricken Sie bis 26+6 = 32 M bleiben, dann 32+6 (= 2 Mal auf beiden Seiten). Viel Spaß beim stricken!
17.02.2021 - 08:02
![]() Jo Morton wrote:
Jo Morton wrote:
Also see my comment. Knitted in size XL. Please check pattern. All sizes section, 2nd paragraph, next to last instruction, ' 8-8-8-12-12-12 rows of A.5 to A.8 remain'. Knitted this and had to undo this part as had 30 stitches too many and it was 4cm too long, from the stated stitch numbers and length on pattern. It also created a step in the knitting at the side. Finished garment without including this instruction. I also had to fully use an additional 50g of yarn.
05.11.2020 - 18:31
![]() Jo Morton wrote:
Jo Morton wrote:
Just completed, very pleased with garment. First item knitted from your designs, which inspire you to knit them. Challenging and very interesting! Realised knitting can be more adventurous! Never realised that you can shape to this extent using short rows! Had to write out pattern row by row for short row sections and sleeves, to understand and keep track of concurrent instructions! Will be looking for another challenge now. Only recently found your website. Thank you for your inspiration.
05.11.2020 - 18:12
![]() Angeline wrote:
Angeline wrote:
Thank you. I did that. Now after the increase row, which is from RS, it says "Work 3 rows of garter" does that include the increase row just done? And then "On the next row from WS" does that refer to the one of these same 3 rows, if so which one? Thank you for your help, really appreciate your time.
07.10.2020 - 10:09DROPS Design answered:
Hi Angeline, The 3 rows of garter stitch are only on both sides of the piece (the other stitches are continued in stocking stitch and pattern as before) and on the 4th row you knit these stitches (which is garter stitch again). All the rows are worked after each other, so don't include new instructions in previous rows. Happy knitting!
08.10.2020 - 08:40
|
|||||||||||||||||||||||||||||||
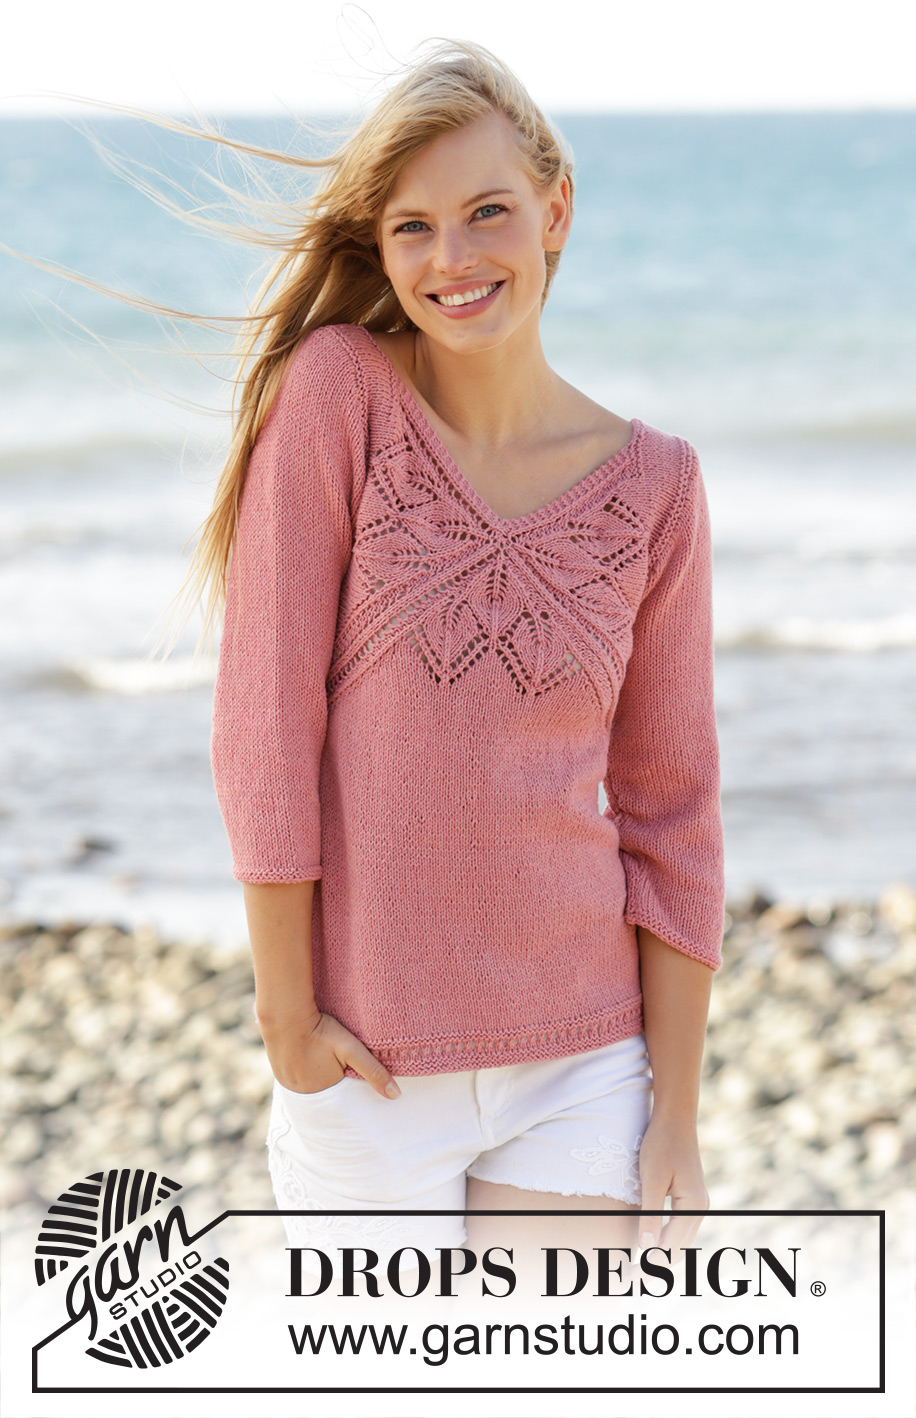
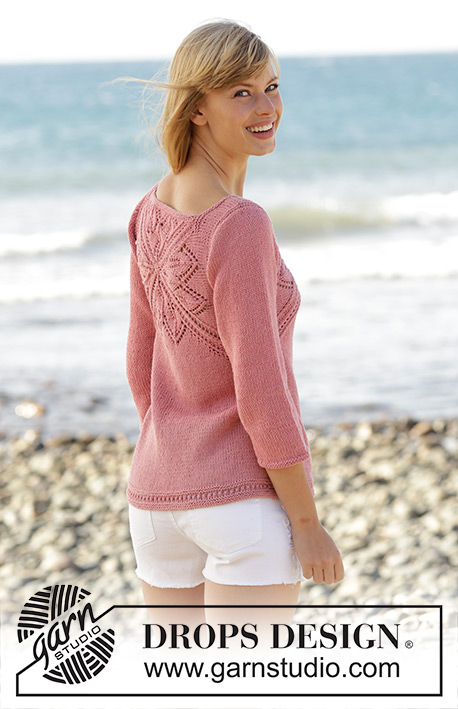
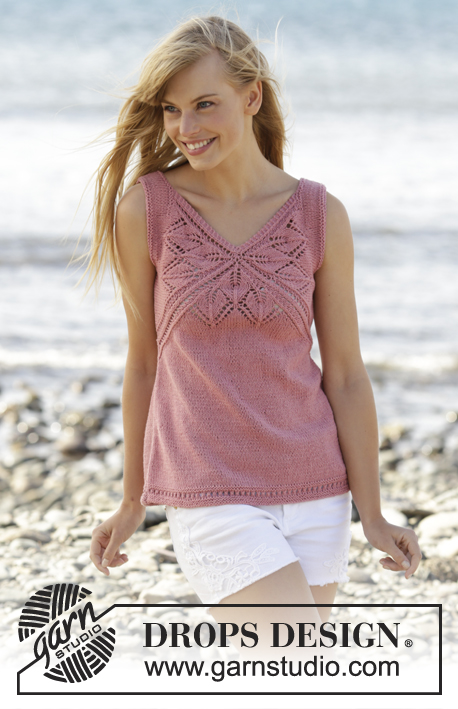
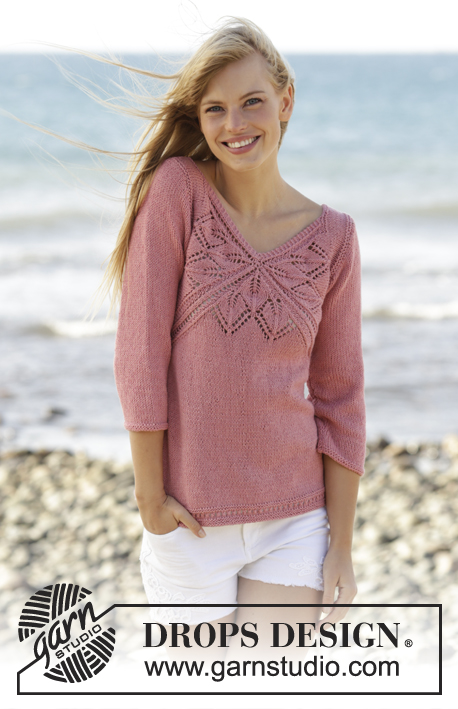
Butterfly Heart#butterflyheartsweater |
|||||||||||||||||||||||||||||||
 |
 |
||||||||||||||||||||||||||||||
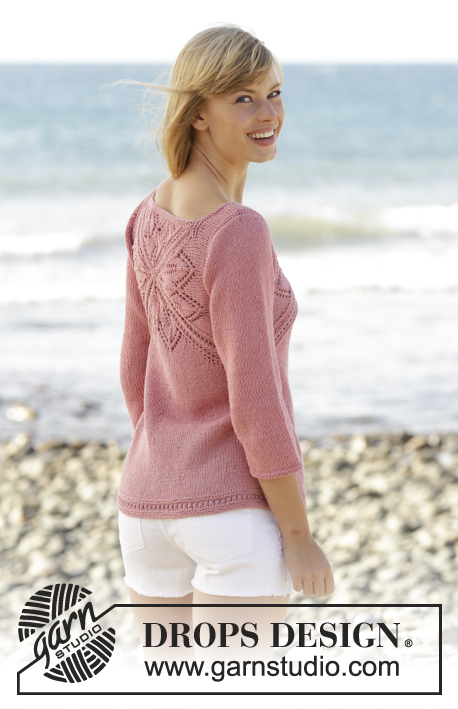
Knitted DROPS jumper with lace pattern and V-neck in ”Belle”. Worked top down. Size: S - XXXL.
DROPS 170-3 |
|||||||||||||||||||||||||||||||
|
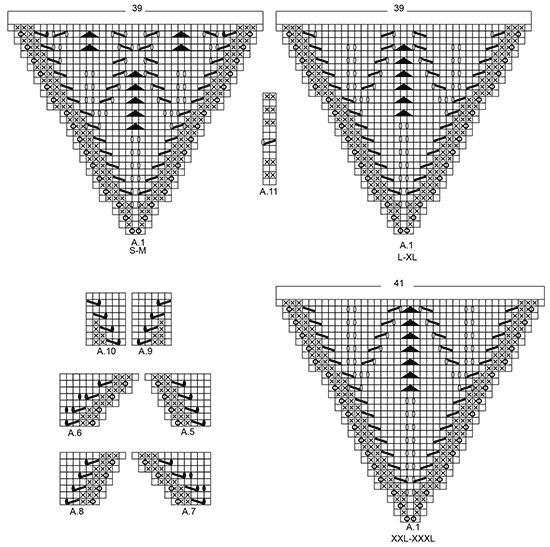
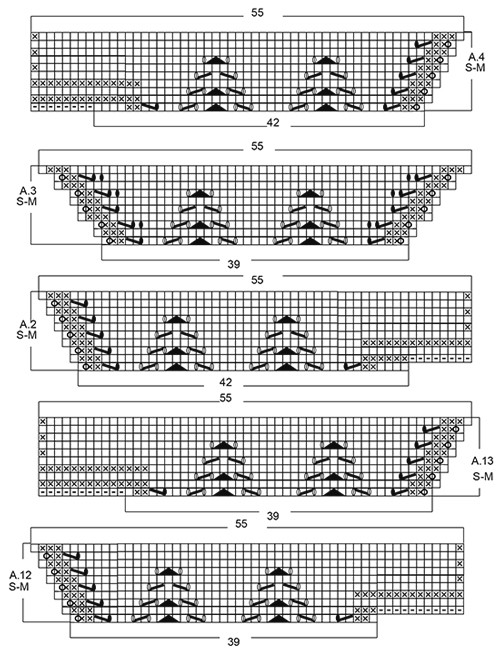
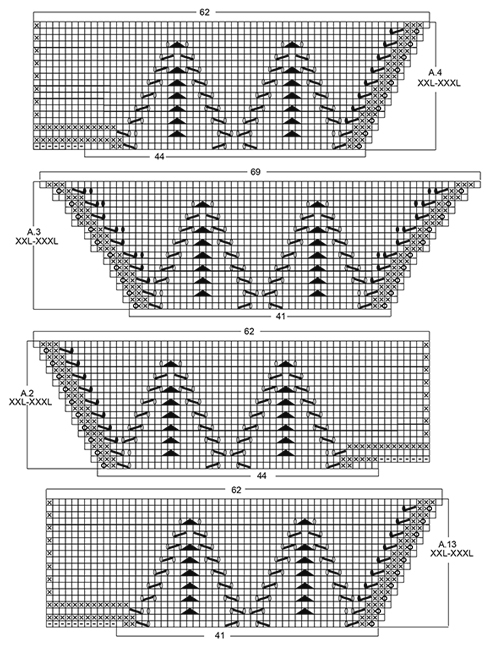
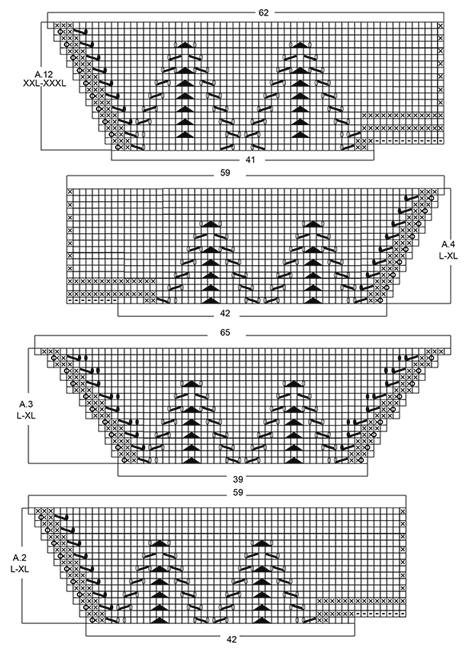
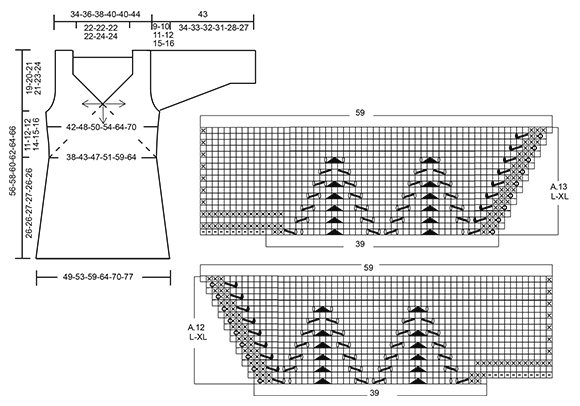
GARTER ST (back and forth): K all rows. 1 ridge = 2 rows K. PATTERN: See diagrams A.1 to A.13. The diagrams show all rows in pattern seen from RS. See diagram for correct size. SHORT ROWS: When turning in short rows, slip first st as if to K. Tighten thread and make sure to avoid big holes. INCREASE TIP: All inc are done from RS. Inc 1 st by making 1 YO, on next row P YO twisted to avoid holes. DECREASE TIP: All dec are done from RS! Dec 1 st at beg of row as follows: K 1, slip 1 st as if to K, K 1, psso Dec 1 st at end of row as follows: Work until 3 sts remain (incl the 2 new sts worked for the first time), K 2 tog. ---------------------------------------------------------- JUMPER: Work from the middle of V-neck and out in 3 triangles on front piece and 4 triangles on back piece, then work downwards. FRONT PIECE: Work back and forth from neck and down. Cast on 8 sts on circular needle size 4 mm with Belle. K 1 row. On next row inc as follows: * K 1, 1 YO *, repeat from *-* until 1 st remains and finish with K 1 = 15 sts on needle. Work next row as follows (from RS): Work YOs from previous row twisted, they should not make holes. Work 3 sts in GARTER ST - see explanation above, A.1, insert 1st marker, A.1, insert 2nd marker, A.1 (= repeat A.1 3 times in total on row), finish with 3 sts in garter st. REMEMBER THE KNITTING TENSION When A.1 has been worked 1 time vertically, there are 123-123-123-123-129-129 sts on needle. Piece measures approx. 11-11-11-11-12-12 cm from cast-on edge. Work next row as follows from RS: Work A.2 over the first 42-42-42-42-44-44 sts, A.3 over the next 39-39-39-39-41-41 sts and A.4 over the last 42-42-42-42-44-44 sts, after A.4 cast on 8 sts at the end of row for shoulder (see diagram). Work A.4 to A.2 on next row, after A.2 cast on 8 sts at the end of row for shoulder (see diagram). When A.2 to A.4 have been worked 1 time vertically, there are 165-165-183-183-193-193 sts on needle. Piece measures approx. 15-15-17-17-19-19 cm from cast-on edge. READ ALL OF THE FOLLOWING SECTION BEFORE CONTINUING! WORK PATTERN AS BEFORE WHILE AT THE SAME TIME WORKING SHORT ROWS IN EACH SIDE OF PIECE. PATTERN: Work next row as follows from RS: Work 1 st in garter st, 48-48-52-52-55-55 sts in stocking st, work A.5 over the next 6 sts, (marker), A.6 over the next 6 sts, 43-43-53-53-57-57 sts in stocking st, A.7 over the next 6 sts, (marker), A.8 over the next 6 sts, 48-48-52-52-55-55 sts in stocking st, finish with 1 st in garter st. Repeat A.5 to A.8 over the 6 sts on each side of each marker 2-3-2-3-4-5 times in total, then repeat the first 0-0-6-4-4-4 rows of A.5 to A.8 1 more times. SHORT ROWS: AT THE SAME TIME when 2-6-0-2-0-6 rows of A.5 to A.8 have been worked, work SHORT ROWS - see explanation above - in each side of piece as follows: Work until 26-26-24-23-18-18 sts remain on row (work A.5 to A.8 as before), turn and work until 26-26-24-23-18-18 sts remain, turn piece. Then work short rows in the different sizes as follows: SIZE M: Work 6 sts less for every turn 2 times in each side of piece. SIZE L-XL: Work 6 sts less for every turn 1-2 times in each side of piece, then work 4 sts less on every turn 3-2 times in each side of piece. SIZE XXL-XXXL: Work 6 sts less for every turn 1-1 time in each side of piece, then work 4 sts less for every turn 4-4 times in each side of piece, then work 2 sts less on every turn 4-5 times in each side of piece. ALL SIZES: When the short rows have been worked, work last row from WS, so that next row beg from shoulder. Then work over all sts from RS as follows: Work in garter st over the first 42-44-46-48-50-52 sts AT THE SAME TIME inc 0-2-4-4-6-6 sts evenly, work as before (i.e. A.5 to A.8 and stocking st) until 42-44-46-48-50-52 sts remain, work in garter st over the last sts AT THE SAME TIME inc 0-2-4-4-6-6 sts evenly (= 42-46-50-52-56-58 sts in garter st in each side of piece). Work 3 rows in garter st over the outermost 42-46-50-52-56-58 sts in garter st in each side of piece, pattern and stocking st over the remaining sts. On next row from WS work as follows: K the first 40-44-48-50-54-56 sts and slip them on a stitch holder for sleeve, work 2 sts in garter st, work in stocking st and pattern as before until 42-46-50-52-56-58 sts remain, 2 sts in garter st, K the next 40-44-48-50-54-56 sts and then slip them on a stitch holder for sleeve. Cut the yarn. 8-8-8-12-12-12 rows of A.5 to A.8 remain. Beg next row from RS. Continue to work in garter st over the first and last 2 sts in each side of piece. When A.5 to A.8 have been worked, there are 23-25-26-27-32-34 sts before 1st marker, 79-91-99-107-123-135 sts between 1st and 2nd marker and 23-25-26-27-32-34 sts after 2nd marker = 125-141-151-161-187-203 sts in total on row. Piece measures approx. 21-24-25-27-32-35 cm on the widest measured from cast-on edge. Insert 1 marker in piece, NOW MEASURE PIECE FROM HERE. On next row from RS loosely cast off the first 22-24-25-26-31-33 sts knitwise, work 1 edge st in garter st, (marker), work A.9 over the first 6 sts after marker, stocking st over the next 67-79-87-95-111-123 sts, A.10 over the last 6 sts before second marker, (marker ), 1 edge st in garter st, loosely cast of the last 22-24-25-26-31-33 sts knitwise = 81-93-101-109-125-137 sts remain on row. Cut the yarn. Work next row from WS over the remaining sts as follows: 1 edge st in garter st, A.10 as before, stocking st over the next 67-79-87-95-111-123 sts, A.9 as before, 1 edge st in garter st. When A.9 and A.10 have been worked 1 time vertically, continue in stocking st with 1 edge st in garter st in each side of piece. When piece measures 3 cm from marker, inc 1 st in each side of piece inside 1 edge st (= 2 sts inc) - READ INCREASE TIP. Repeat inc every 1½-1½-1½-1-1-1 cm 12-10-12-14-12-13 times in total = 105-113-125-137-149-163 sts on needle. When piece measures 23-23-24-24-23-23 cm from marker (piece measures 53-55-57-59-61-63 cm in total from shoulder), adjust so that next row is from RS, switch to circular needle size 3.5 mm. Work next row from RS as follows: Work 1 edge st in garter st, work A.11 (= 2 sts) until 2 sts remain, work first st in A.11, finish with 1 edge st in garter st. On row with holes (i.e. 7th row) work next to last st K. Cast off when A.11 has been worked 1 time vertically. Piece measures 56-58-60-62-64-66 cm in total from shoulder. BACK PIECE: Piece is first worked in the round, then worked as front piece. Cast on 6 sts on double pointed needles size 4 mm with Belle, switch to circular needle when needed. K 1 row. On next row inc as follows: * K 1, 1 YO *, repeat from *-* = 12 sts on row, K YOs twisted on next row, they should not make holes. Work A.1 4 times in total, insert 1 marker between each A.1 (= 4 markers). When A.1 has been worked 1 time vertically, there are 156-156-156-156-164-164 sts on needle. Continue as follows: A.12 over the first 39-39-39-39-41-41 sts, work A.3 over the next 39-39-39-39-41-41 sts and A.13 over the last 39-39-39-39-41-41 sts, slip the remaining sts on a stitch holder for neck edge (= 39-39-39-39-41-41 sts), after A.13 cast on 11 sts at the end of row for shoulder (see diagram). Then work back and forth on needle. Work A.13/A.3/A.12 on next row, after A.12 cast on 11 sts at the end of row for shoulder (see diagram). When A.12/A.3/A.13 have been worked 1 time vertically, there are 165-165-183-183-193-193 sts on needle. Piece measures approx. 15-15-17-17-19-19 cm from cast-on edge. Now continue back piece as front piece. NECK EDGE: Worked back and forth on needle. Slip sts from stitch holder for neck edge on back piece back on circular needle size 3.5 mm. Work 2 ridges. Fasten ridges where sts were cast on for shoulder. Fasten off. ASSEMBLY: Sew the side seams inside 1 edge st in garter st. Sew shoulder seams inside 1 edge st in garter st. Tighten tog the middle (i.e. cast-on edge) on both front and back piece. SLEEVE: Worked back and forth on circular needle in stocking st. Slip sts from the 2 stitch holders (on front and back piece) in one side of piece back on circular needle size 4 mm = 80-88-96-100-108-112 sts. Work short rows for sleeve cap as follows: Beg to work in the 25th-29th-31st-35th-43rd-45th st (i.e. 24-28-30-34-42-44 sts in one side are not worked). Work from RS 34-34-38-34-26-26 sts in stocking st, turn piece (= 22-26-28-32-40-42 sts remain on needle). Work in stocking st over the 36-36-40-36-28-28 sts, turn piece. Work 2 sts more on every turn in each side of piece until all sts have been worked. AT THE SAME TIME dec 1 st in each side of piece (= 2 sts dec), inside 1 st on every 4th-4th-2nd-4th-4th-4th row 4-6-8-8-10-10 times in total – READ DECREASE TIP = 72-76-80-84-88-92 sts on needle. Work 8-8-8-12-12-12 rows in stocking st over all sts, insert 1 marker in piece (sew side seam on sleeve up to here later). NOW MEASURE THE PIECE FROM HERE. Cast on 1 edge st at the end of the next 2 rows = 74-78-82-86-90-94 sts. Work edge sts in garter st until finished measurements. On next row from RS dec 1 st inside 2 sts in each side of piece (= 2 sts dec). Repeat dec every 2½-2-2-1½-1-1 cm 9-10-11-12-13-13 more times = 54-56-58-60-62-66 sts on needle. When sleeve measures 31-30-29-27-24-23 cm, switch to circular needle size 3.5 mm. Work 2 ridges. Cast off. Slip sts from stitch holders in the other side of piece on circular needle size 4 mm and work the same way. ASSEMBLY: Sew sleeve seams up to where 1 edge st in garter st was cast on in each side of piece. Sew the under arm seam. |
|||||||||||||||||||||||||||||||
Diagram explanations |
|||||||||||||||||||||||||||||||
|
|||||||||||||||||||||||||||||||
 |
|||||||||||||||||||||||||||||||
 |
|||||||||||||||||||||||||||||||
 |
|||||||||||||||||||||||||||||||
 |
|||||||||||||||||||||||||||||||
 |
|||||||||||||||||||||||||||||||
Have you finished this pattern?Tag your pictures with #dropspattern #butterflyheartsweater or submit them to the #dropsfan gallery. Do you need help with this pattern?You'll find 29 tutorial videos, a Comments/Questions area and more by visiting the pattern on garnstudio.com. © 1982-2026 DROPS Design A/S. We reserve all rights. This document, including all its sub-sections, has copyrights. Read more about what you can do with our patterns at the bottom of each pattern on our site. |
|||||||||||||||||||||||||||||||


With over 40 years in knitting and crochet design, DROPS Design offers one of the most extensive collections of free patterns on the internet - translated to 17 languages. As of today we count 324 catalogues and 12245 patterns translated into English (UK/cm). 12245
We work hard to bring you the best knitting and crochet have to offer, inspiration and advice as well as great quality yarns at incredible prices! Would you like to use our patterns for other than personal use? You can read what you are allowed to do in the Copyright text at the bottom of all our patterns. Happy crafting!
Post a comment to pattern DROPS 170-3
We would love to hear what you have to say about this pattern!
If you want to leave a question, please make sure you select the correct category in the form below, to speed up the answering process. Required fields are marked *.