
Popular categories
Looking for a yarn?


Comments / Questions (166)
![]() Annika wrote:
Annika wrote:
Hei, pystyisittekö auttamaan minua mittojen hahmotuksessa. Teen kokoa L ja saan etukappaleen olkasaumalta kainaloon työn pituudeksi 27 cm (ohje 21 cm) ja siitä seuraava mitta alaspäin 16 cm (ohje 12 cm). Kun mitataan luomisreunasta 25 cm merkkilankaan ja merkkilangalta 24 cm + helmakuvio 3-4 cm jää luomisreunalta olkapäähän laskujeni mukaan n. 7 cm? Omassa työssäni tämä on n. 18 cm ja koko työn pituus 70 cm. Muut mitat täsmäävät. Kiitos.
20.04.2025 - 18:41DROPS Design answered:
Oletko tarkistanut, että neuletiheytesi vastaa ohjeessa annettua tiheyttä? Sinun tulee saada 21 silmukkaa sileää neuletta ja 28 kerrosta / 10 cm. Vaihda tarvittaessa ohuempiin puikkoihin. Voit myös käydä lähimmässä DROPS lankojen jälleenmyyjäliikkeessä, he pystyvät auttamaan sinua paikan päällä.
29.04.2025 - 16:37
![]() Tina wrote:
Tina wrote:
Hej! Jag stickar storlek m och undrar om de förkortade varven ska göras i slutet av varje rapport, A5-A8, eller om de följer på varandra?
02.04.2025 - 21:37DROPS Design answered:
Hei Tina. De forkortede pinnene strikkes i hver side av arbeidet over de glattstrikkede maskene. A.5 og A.8 strikkes som før/etter diagram. mvh DROPS Design
07.04.2025 - 11:32
![]() Valerie wrote:
Valerie wrote:
Bonjour Je voudrais savoir combien de rang raccourci on doit faire pour la taille S Merci d’avance de votre réponse
18.10.2024 - 12:35DROPS Design answered:
Bonjour Valérie, en taille S, on ne tricote que les 2 rangs raccourcis expliqués: on tricote jusqu'à ce qu'il reste 26 m à la fin du rang sur l'endroit, on tourne et on tricote le rang sur l'envers jusqu'à ce qu'il reste 26 mailles. Continuer ensuite avec le paragraphe "TOUTES LES TAILLES". Bon tricot!
18.10.2024 - 15:50
![]() Julia wrote:
Julia wrote:
Liebes Drops-Team, stricke Größe M. Der Ärmel wird in verkürzten Reihen gestrickt und gleichzeitig soll abgenommen werden, in jeder 4ten R. Wie mache ich das? Stricke ich in der ersten R 34M, nehme dann ab und wende, stricke 36M und wende, stricke 38M und wende, stricke 40M (4te Reihe) nehme ab und wende wieder? Lieben Dank im Voraus
02.03.2024 - 16:00DROPS Design answered:
Liebe Julia, stricken Sie die verkürzten Reihen mit jeweils 2 Maschen mehr am Ende jeder Reihe, und gleichzeitig bei jeder 4. Reihe (Hin-Reihe) nehmen Sie wie unter ABNAHMETIPP: erklärt, so bei der 1. Reihe stricken Sie 36 M (in S), bei der 2. Reihe 38 M, bei der 3. Reihe 40 M, bei der 4. Reihe 42 M, dann abnehmen: bei der nächsten Reihe nehmen Sie 1 M am Anfang der Reihe + 1 M am Ende der Reihe (stricken Sie die verkürzte Reihe bis 1 M + die 2 extra Maschen übrig sind, dann stricken Sie 2 M rechts zusammen, und 1 Masche rechts, wenden = 42 M + 2 Extra Maschen - 2 Abnahmen = 42 M auf der Nadel. Viel Spaß beim stricken!
04.03.2024 - 08:09
![]() Mina wrote:
Mina wrote:
Hey,stricke Größe M.Fragen zu verkürzten Reihen: Es heißt "A.5bis A.8 über die je 6 M beidseitig jedes Markierers insgesamt 3x arbeiten ..." Beim Start bestehen die Rapporte aus jeweils 6M, am Ende sind es 10M (A.5+ A.6)u.12M (A.7+A.8).Wenn ich nun erneut mit A.5 bis A.8 beginne, wie beginne ich? Verschiebe ich alles um die zugenommenen Maschen? Sieht die erste Wiederholung der Hinreihe so aus: 1M kraus re, 52M glatt re,A.5, A.6, 55M glatt re, A.7, A.8, 52M glatt re, 1 kraus re? Danke
15.02.2024 - 15:29DROPS Design answered:
Liebe Mina, die Diagramme wiederholen Sie wie zuvor, dh A5 und A7 über die letzten Maschen vorige Rapporter und A.6 und A.8 über die ersten Maschen vorige Rapporter. Die Zunnahmen davor/danach werden glatt rechts gestrickt, so stricken Sie A.5, Markierung, A.6 und A.7, Markierung, A.8 wie zuvor. Viel Spaß beim stricken!
16.02.2024 - 07:24
![]() Alžběta wrote:
Alžběta wrote:
Dobrý den, chtěla jsem se zeptat jestli budete tento návod překládat i do českého jazyka? Děkuji za odpověď.
13.11.2023 - 10:39DROPS Design answered:
Dobrý den, Alžběto, ano, určitě - během pár dnů českou verzi zveřejníme. Hezký den! Hana
20.11.2023 - 15:49
![]() Kamilla wrote:
Kamilla wrote:
Dzień dobry, utknęłam na rękawach. Wydaje mi się, że rzędy skrócone rozumiem, w każdym rzędzie ( na prawej i lewej stronie) mam robić o dwa oczka dalej niż w rzędzie poprzednim. Niestety nie rozumiem jak W TYM SAMYM czasie mam zamykać oczka na końcu i na początku rzędu bo tak rozumiem "zamykać 4-6-8-8-10-10 razy 1 o. z każdej strony (= 2 zamknięte o.), za/przed 1 o., co 4-4-2-4-4-4 rz." skoro przerabiając rzędy skrócone nie dochodzę do pierwszego/ostatniego oczka.
01.11.2023 - 18:15
![]() Sytske wrote:
Sytske wrote:
Prachtig patroon. Complimenten voor diegene die dit gemaakt heeft.
11.09.2023 - 20:13
![]() Therese Neukomm wrote:
Therese Neukomm wrote:
Wo kann ich die Anleitung zu "Butterfly Heart" kaufen? Danke für Ihre Antwort.
15.07.2023 - 13:58DROPS Design answered:
Liebe Therese. Drops Design-Vorlagen sind kostenlos. Sie können drucken oder als PDF speichern, indem Sie „Drucken“ aktivieren. Viel Spass beim stricken!
20.07.2023 - 11:01
![]() Kamilla wrote:
Kamilla wrote:
Dzień dobry Przerabiam rozmiar XXL. Skończyłam przerabiać rzędy skrócone na lewej stronie. Skończyłam na 2 oczka wcześniej niż poprzednio, obróciłam i jestem na prawej stronie i nie wiem co dalej. Czy mam na prawej stronie przerobić do końca rzędu czy tylko do momentu ostatniego obrotu rzędu skróconego. I czy "zaczynać od ramienia" oznacza od początku rzędu Pozdrawiam
09.07.2023 - 11:51DROPS Design answered:
Witaj Kamilo, ostatni rząd skrócony ( na lewej stronie robótki) przerabiasz do końca rzędu, czyli do góry ramienia. Od ramienia oznacza od początku rzędu. Pozdrawiamy!
09.07.2023 - 21:52
|
|||||||||||||||||||||||||||||||
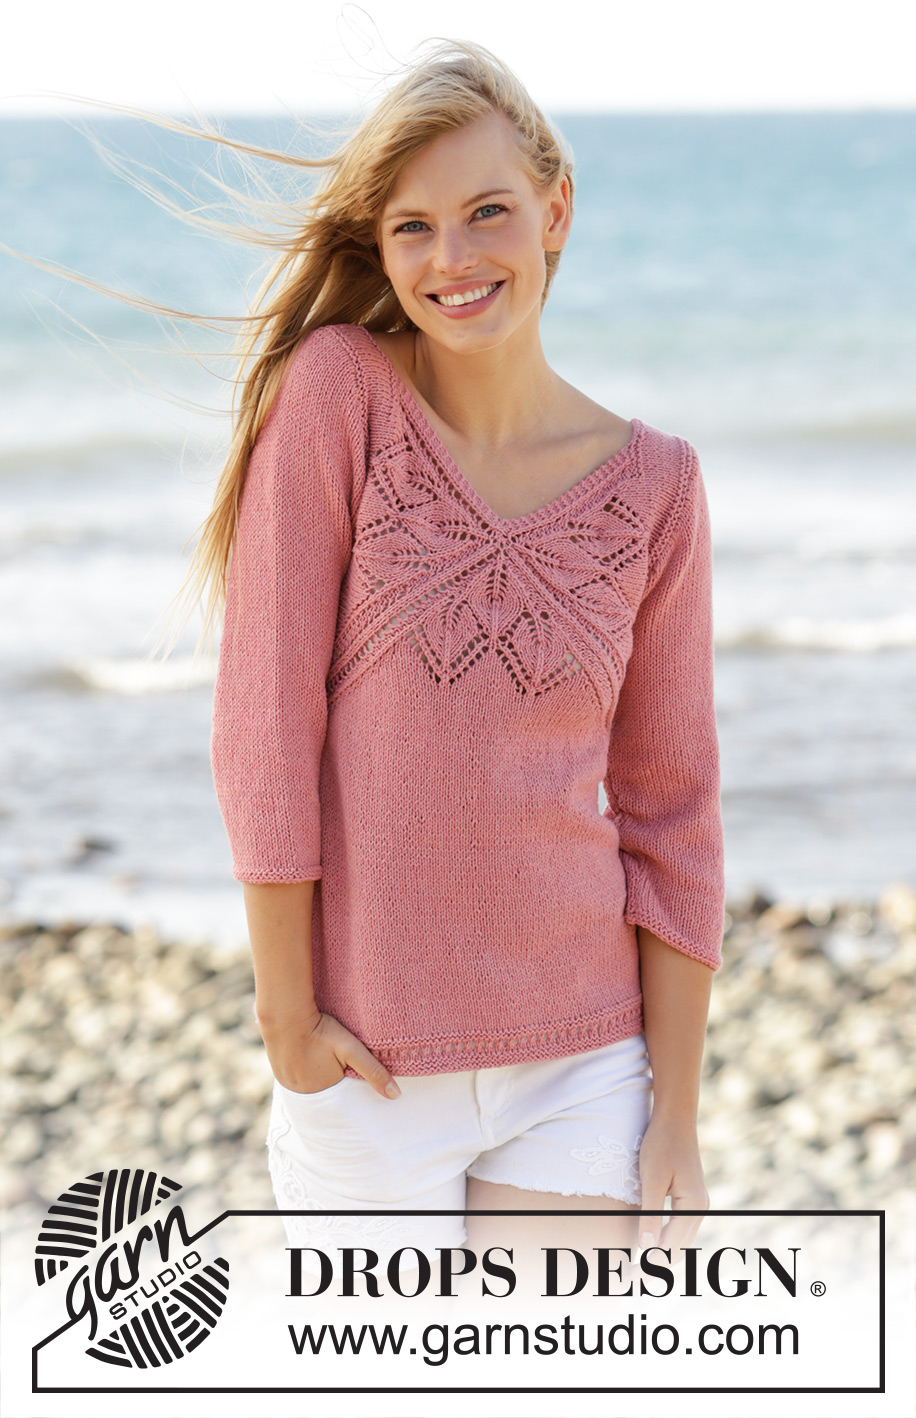
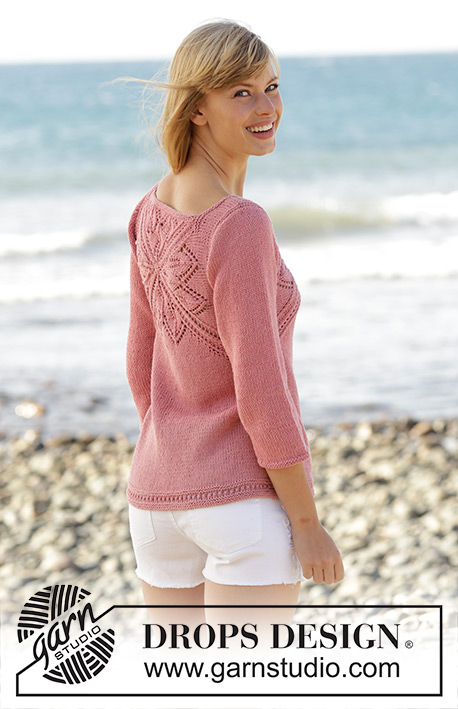
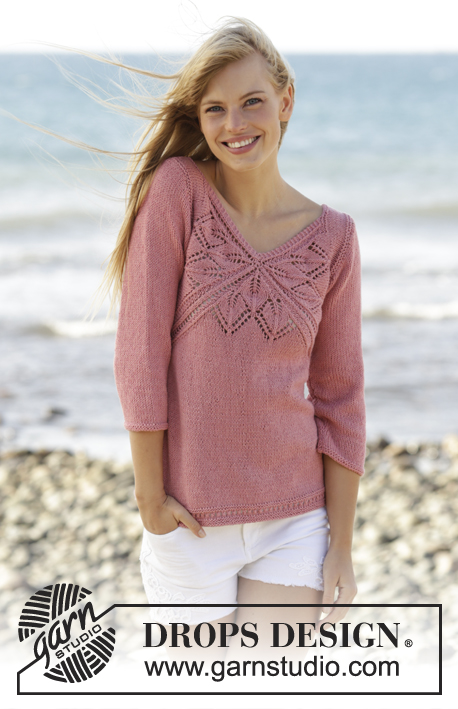
Butterfly Heart#butterflyheartsweater |
|||||||||||||||||||||||||||||||
 |
 |
||||||||||||||||||||||||||||||
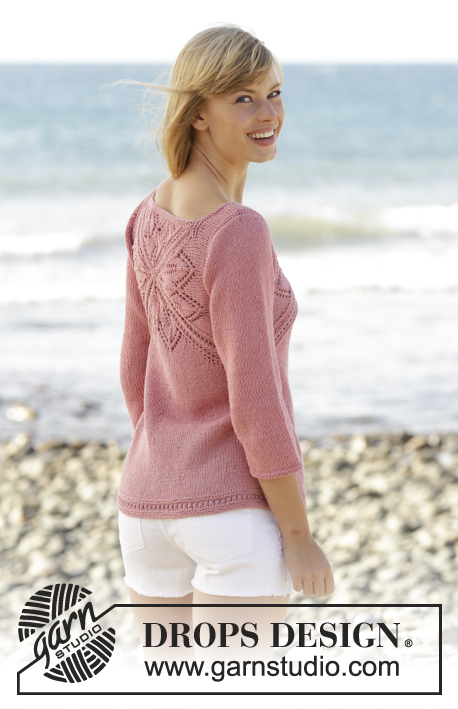
Knitted DROPS jumper with lace pattern and V-neck in ”Belle”. Worked top down. Size: S - XXXL.
DROPS 170-3 |
|||||||||||||||||||||||||||||||
|
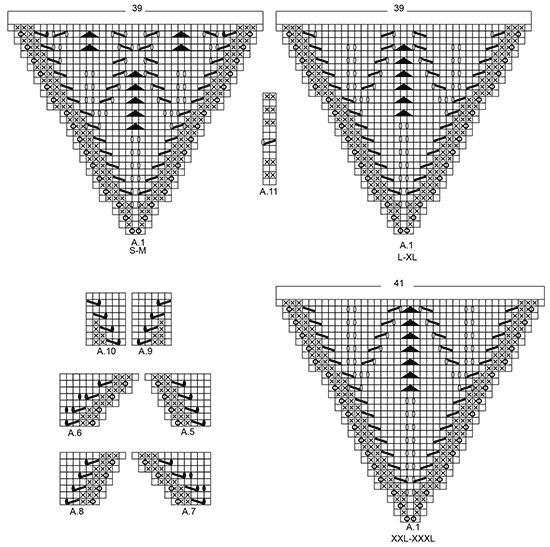
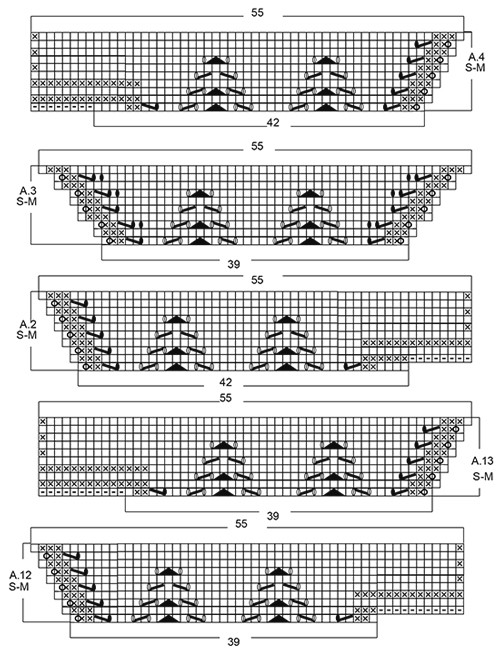
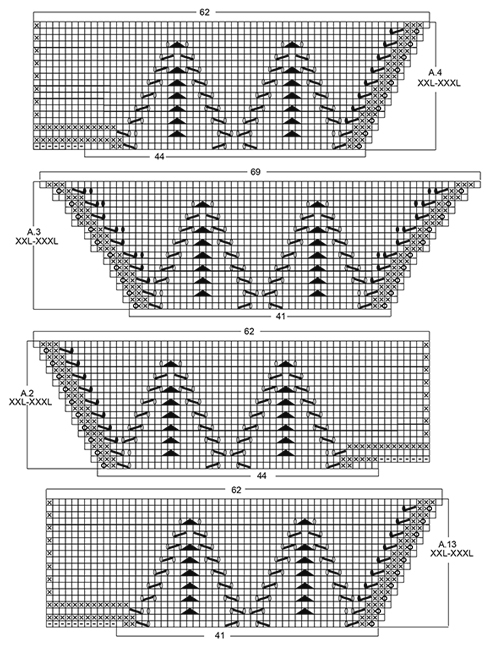
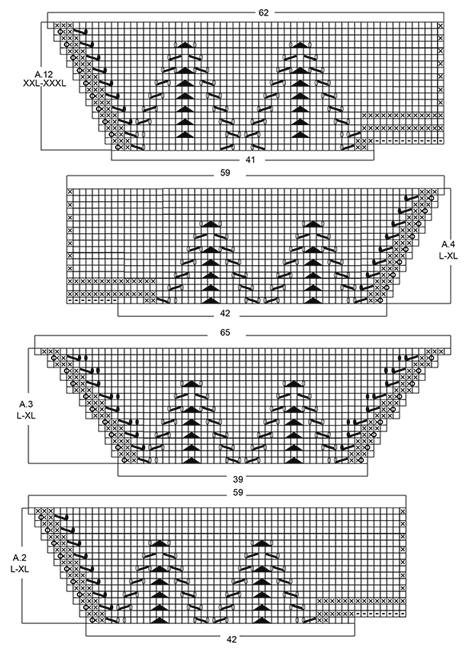
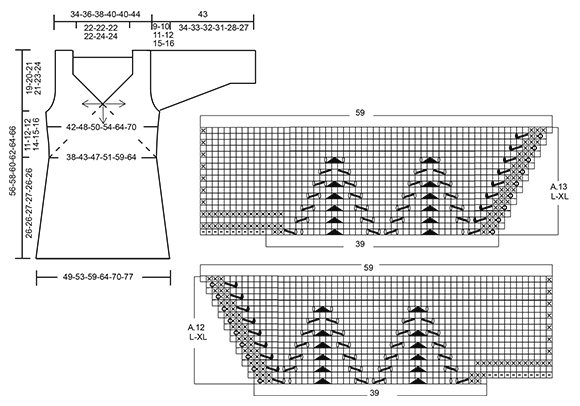
GARTER ST (back and forth): K all rows. 1 ridge = 2 rows K. PATTERN: See diagrams A.1 to A.13. The diagrams show all rows in pattern seen from RS. See diagram for correct size. SHORT ROWS: When turning in short rows, slip first st as if to K. Tighten thread and make sure to avoid big holes. INCREASE TIP: All inc are done from RS. Inc 1 st by making 1 YO, on next row P YO twisted to avoid holes. DECREASE TIP: All dec are done from RS! Dec 1 st at beg of row as follows: K 1, slip 1 st as if to K, K 1, psso Dec 1 st at end of row as follows: Work until 3 sts remain (incl the 2 new sts worked for the first time), K 2 tog. ---------------------------------------------------------- JUMPER: Work from the middle of V-neck and out in 3 triangles on front piece and 4 triangles on back piece, then work downwards. FRONT PIECE: Work back and forth from neck and down. Cast on 8 sts on circular needle size 4 mm with Belle. K 1 row. On next row inc as follows: * K 1, 1 YO *, repeat from *-* until 1 st remains and finish with K 1 = 15 sts on needle. Work next row as follows (from RS): Work YOs from previous row twisted, they should not make holes. Work 3 sts in GARTER ST - see explanation above, A.1, insert 1st marker, A.1, insert 2nd marker, A.1 (= repeat A.1 3 times in total on row), finish with 3 sts in garter st. REMEMBER THE KNITTING TENSION When A.1 has been worked 1 time vertically, there are 123-123-123-123-129-129 sts on needle. Piece measures approx. 11-11-11-11-12-12 cm from cast-on edge. Work next row as follows from RS: Work A.2 over the first 42-42-42-42-44-44 sts, A.3 over the next 39-39-39-39-41-41 sts and A.4 over the last 42-42-42-42-44-44 sts, after A.4 cast on 8 sts at the end of row for shoulder (see diagram). Work A.4 to A.2 on next row, after A.2 cast on 8 sts at the end of row for shoulder (see diagram). When A.2 to A.4 have been worked 1 time vertically, there are 165-165-183-183-193-193 sts on needle. Piece measures approx. 15-15-17-17-19-19 cm from cast-on edge. READ ALL OF THE FOLLOWING SECTION BEFORE CONTINUING! WORK PATTERN AS BEFORE WHILE AT THE SAME TIME WORKING SHORT ROWS IN EACH SIDE OF PIECE. PATTERN: Work next row as follows from RS: Work 1 st in garter st, 48-48-52-52-55-55 sts in stocking st, work A.5 over the next 6 sts, (marker), A.6 over the next 6 sts, 43-43-53-53-57-57 sts in stocking st, A.7 over the next 6 sts, (marker), A.8 over the next 6 sts, 48-48-52-52-55-55 sts in stocking st, finish with 1 st in garter st. Repeat A.5 to A.8 over the 6 sts on each side of each marker 2-3-2-3-4-5 times in total, then repeat the first 0-0-6-4-4-4 rows of A.5 to A.8 1 more times. SHORT ROWS: AT THE SAME TIME when 2-6-0-2-0-6 rows of A.5 to A.8 have been worked, work SHORT ROWS - see explanation above - in each side of piece as follows: Work until 26-26-24-23-18-18 sts remain on row (work A.5 to A.8 as before), turn and work until 26-26-24-23-18-18 sts remain, turn piece. Then work short rows in the different sizes as follows: SIZE M: Work 6 sts less for every turn 2 times in each side of piece. SIZE L-XL: Work 6 sts less for every turn 1-2 times in each side of piece, then work 4 sts less on every turn 3-2 times in each side of piece. SIZE XXL-XXXL: Work 6 sts less for every turn 1-1 time in each side of piece, then work 4 sts less for every turn 4-4 times in each side of piece, then work 2 sts less on every turn 4-5 times in each side of piece. ALL SIZES: When the short rows have been worked, work last row from WS, so that next row beg from shoulder. Then work over all sts from RS as follows: Work in garter st over the first 42-44-46-48-50-52 sts AT THE SAME TIME inc 0-2-4-4-6-6 sts evenly, work as before (i.e. A.5 to A.8 and stocking st) until 42-44-46-48-50-52 sts remain, work in garter st over the last sts AT THE SAME TIME inc 0-2-4-4-6-6 sts evenly (= 42-46-50-52-56-58 sts in garter st in each side of piece). Work 3 rows in garter st over the outermost 42-46-50-52-56-58 sts in garter st in each side of piece, pattern and stocking st over the remaining sts. On next row from WS work as follows: K the first 40-44-48-50-54-56 sts and slip them on a stitch holder for sleeve, work 2 sts in garter st, work in stocking st and pattern as before until 42-46-50-52-56-58 sts remain, 2 sts in garter st, K the next 40-44-48-50-54-56 sts and then slip them on a stitch holder for sleeve. Cut the yarn. 8-8-8-12-12-12 rows of A.5 to A.8 remain. Beg next row from RS. Continue to work in garter st over the first and last 2 sts in each side of piece. When A.5 to A.8 have been worked, there are 23-25-26-27-32-34 sts before 1st marker, 79-91-99-107-123-135 sts between 1st and 2nd marker and 23-25-26-27-32-34 sts after 2nd marker = 125-141-151-161-187-203 sts in total on row. Piece measures approx. 21-24-25-27-32-35 cm on the widest measured from cast-on edge. Insert 1 marker in piece, NOW MEASURE PIECE FROM HERE. On next row from RS loosely cast off the first 22-24-25-26-31-33 sts knitwise, work 1 edge st in garter st, (marker), work A.9 over the first 6 sts after marker, stocking st over the next 67-79-87-95-111-123 sts, A.10 over the last 6 sts before second marker, (marker ), 1 edge st in garter st, loosely cast of the last 22-24-25-26-31-33 sts knitwise = 81-93-101-109-125-137 sts remain on row. Cut the yarn. Work next row from WS over the remaining sts as follows: 1 edge st in garter st, A.10 as before, stocking st over the next 67-79-87-95-111-123 sts, A.9 as before, 1 edge st in garter st. When A.9 and A.10 have been worked 1 time vertically, continue in stocking st with 1 edge st in garter st in each side of piece. When piece measures 3 cm from marker, inc 1 st in each side of piece inside 1 edge st (= 2 sts inc) - READ INCREASE TIP. Repeat inc every 1½-1½-1½-1-1-1 cm 12-10-12-14-12-13 times in total = 105-113-125-137-149-163 sts on needle. When piece measures 23-23-24-24-23-23 cm from marker (piece measures 53-55-57-59-61-63 cm in total from shoulder), adjust so that next row is from RS, switch to circular needle size 3.5 mm. Work next row from RS as follows: Work 1 edge st in garter st, work A.11 (= 2 sts) until 2 sts remain, work first st in A.11, finish with 1 edge st in garter st. On row with holes (i.e. 7th row) work next to last st K. Cast off when A.11 has been worked 1 time vertically. Piece measures 56-58-60-62-64-66 cm in total from shoulder. BACK PIECE: Piece is first worked in the round, then worked as front piece. Cast on 6 sts on double pointed needles size 4 mm with Belle, switch to circular needle when needed. K 1 row. On next row inc as follows: * K 1, 1 YO *, repeat from *-* = 12 sts on row, K YOs twisted on next row, they should not make holes. Work A.1 4 times in total, insert 1 marker between each A.1 (= 4 markers). When A.1 has been worked 1 time vertically, there are 156-156-156-156-164-164 sts on needle. Continue as follows: A.12 over the first 39-39-39-39-41-41 sts, work A.3 over the next 39-39-39-39-41-41 sts and A.13 over the last 39-39-39-39-41-41 sts, slip the remaining sts on a stitch holder for neck edge (= 39-39-39-39-41-41 sts), after A.13 cast on 11 sts at the end of row for shoulder (see diagram). Then work back and forth on needle. Work A.13/A.3/A.12 on next row, after A.12 cast on 11 sts at the end of row for shoulder (see diagram). When A.12/A.3/A.13 have been worked 1 time vertically, there are 165-165-183-183-193-193 sts on needle. Piece measures approx. 15-15-17-17-19-19 cm from cast-on edge. Now continue back piece as front piece. NECK EDGE: Worked back and forth on needle. Slip sts from stitch holder for neck edge on back piece back on circular needle size 3.5 mm. Work 2 ridges. Fasten ridges where sts were cast on for shoulder. Fasten off. ASSEMBLY: Sew the side seams inside 1 edge st in garter st. Sew shoulder seams inside 1 edge st in garter st. Tighten tog the middle (i.e. cast-on edge) on both front and back piece. SLEEVE: Worked back and forth on circular needle in stocking st. Slip sts from the 2 stitch holders (on front and back piece) in one side of piece back on circular needle size 4 mm = 80-88-96-100-108-112 sts. Work short rows for sleeve cap as follows: Beg to work in the 25th-29th-31st-35th-43rd-45th st (i.e. 24-28-30-34-42-44 sts in one side are not worked). Work from RS 34-34-38-34-26-26 sts in stocking st, turn piece (= 22-26-28-32-40-42 sts remain on needle). Work in stocking st over the 36-36-40-36-28-28 sts, turn piece. Work 2 sts more on every turn in each side of piece until all sts have been worked. AT THE SAME TIME dec 1 st in each side of piece (= 2 sts dec), inside 1 st on every 4th-4th-2nd-4th-4th-4th row 4-6-8-8-10-10 times in total – READ DECREASE TIP = 72-76-80-84-88-92 sts on needle. Work 8-8-8-12-12-12 rows in stocking st over all sts, insert 1 marker in piece (sew side seam on sleeve up to here later). NOW MEASURE THE PIECE FROM HERE. Cast on 1 edge st at the end of the next 2 rows = 74-78-82-86-90-94 sts. Work edge sts in garter st until finished measurements. On next row from RS dec 1 st inside 2 sts in each side of piece (= 2 sts dec). Repeat dec every 2½-2-2-1½-1-1 cm 9-10-11-12-13-13 more times = 54-56-58-60-62-66 sts on needle. When sleeve measures 31-30-29-27-24-23 cm, switch to circular needle size 3.5 mm. Work 2 ridges. Cast off. Slip sts from stitch holders in the other side of piece on circular needle size 4 mm and work the same way. ASSEMBLY: Sew sleeve seams up to where 1 edge st in garter st was cast on in each side of piece. Sew the under arm seam. |
|||||||||||||||||||||||||||||||
Diagram explanations |
|||||||||||||||||||||||||||||||
|
|||||||||||||||||||||||||||||||
 |
|||||||||||||||||||||||||||||||
 |
|||||||||||||||||||||||||||||||
 |
|||||||||||||||||||||||||||||||
 |
|||||||||||||||||||||||||||||||
 |
|||||||||||||||||||||||||||||||
Have you finished this pattern?Tag your pictures with #dropspattern #butterflyheartsweater or submit them to the #dropsfan gallery. Do you need help with this pattern?You'll find 29 tutorial videos, a Comments/Questions area and more by visiting the pattern on garnstudio.com. © 1982-2026 DROPS Design A/S. We reserve all rights. This document, including all its sub-sections, has copyrights. Read more about what you can do with our patterns at the bottom of each pattern on our site. |
|||||||||||||||||||||||||||||||


With over 40 years in knitting and crochet design, DROPS Design offers one of the most extensive collections of free patterns on the internet - translated to 17 languages. As of today we count 324 catalogues and 12245 patterns translated into English (UK/cm). 12245
We work hard to bring you the best knitting and crochet have to offer, inspiration and advice as well as great quality yarns at incredible prices! Would you like to use our patterns for other than personal use? You can read what you are allowed to do in the Copyright text at the bottom of all our patterns. Happy crafting!
Post a comment to pattern DROPS 170-3
We would love to hear what you have to say about this pattern!
If you want to leave a question, please make sure you select the correct category in the form below, to speed up the answering process. Required fields are marked *.