
Popular categories
Looking for a yarn?


Comments / Questions (166)
![]() Nicole Desrousseaux wrote:
Nicole Desrousseaux wrote:
Merci! Ce sera nettement plus joli qu'avec une couture en plein dans le motif. J'ai compris un peu tard....
21.04.2016 - 12:29
![]() Nicole wrote:
Nicole wrote:
J'ai compris mon erreur. Il faut pour le dos utiliser dès le départ l'aiguille circulaire. Tout l'empiècement à refaire! La phrase "changer pour l'aiguille circulaire quand nécessaire" n'est pas heureuse. Elle l'est au deuxième rang donc quasiment au départ! Normalement vos patrons sont très bien expliqués, là c'est un tout petit détail mais l'évolution du tricot n'est pas usuelle.
21.04.2016 - 10:54DROPS Design answered:
Bonjour Nicole, pour le dos, on commence en rond sur les aiguilles doubles pointes - on changera pour l'aiguille circulaire quand il n'y aura plus assez de place pour les doubles pointes, après quelques tours du diagramme A.1 - on continue ensuite d'abord en rond sur l'aiguille circulaire, puis en allers et retours. Bon tricot!
21.04.2016 - 11:45
![]() Nicole wrote:
Nicole wrote:
Il n'est pas expliqué que l'empiècement du dos est à refermer sur lui-même, enfin c'est ce que j'ai cru comprendre. On doit semble-t-il coudre les deux moitiés des mailles de montage du dos ensemble. Comment faut -il s'y prendre pour que la couture ressemble aux deux mailles endroits qui séparent les motifs de feuilles dans les autres parties de cet empiècement? A moins que je n'ai pas compris le montage....
21.04.2016 - 10:35DROPS Design answered:
Bonjour Nicole, le dos se tricote en rond jusqu'à la fin du diagramme A.1, puis on continue en allers et retours à partir des diagrammes A.12 - A.13 quand on monte les mailles de l'épaule en fin de rang de chaque côté. Bon tricot!
21.04.2016 - 11:47
![]() Chris wrote:
Chris wrote:
Ich glaube hier ist die Anleitung falsch: '... diese M dann für den Ärmel stilllegen. Den Faden abschneiden. Es sind nun noch 8-8-8-12-12-12 R von A.5 bis A.8 übrig. ... ' Ich stricke Größe XXL (verwende dünneres Garn). In Gr. XXL soll man A.5 bis A.8 insgesamt 4x stricken, dann noch 4 R von A.5. bis A.8. Korrekt, damit man am Ende von A.5/A.8 123 M zwischen den Markierern erhält. Dann blieben noch 6 R von A.5 bis A.8 übrig, wenn die Ärmelmaschen stillgelegt sind.
21.04.2016 - 09:43DROPS Design answered:
Liebe Chris, Danke für Ihre Rückmeldung. Die Anleitung wird derzeit nochmals komplett überprüft.
22.04.2016 - 07:46
![]() Marianne wrote:
Marianne wrote:
Jeg har funnet ut av dette med de seks maskene i A5-8, så dere trenger ikke svare på det :) Jeg synes fortsatt det er noe forvirrende at man i oppskrifter skriver "Fra retten, strikk 40 masker rillestrikk og deretter 50 masker glattstrikk" feks. Det vil jo si rettmasker uansett, så jeg skjønner ikke helt poenget med å skille disse to så lenge det ikke er vrangsiden man snakker om, men dette har vel noe å gjøre med hvordan man er vant til å lese oppskrifter.
20.04.2016 - 11:00DROPS Design answered:
Hej Marianne. Det er sandt ja, men godt du kom videre :-)
20.04.2016 - 15:31
![]() Marianne wrote:
Marianne wrote:
Hei, Jeg står fast når jeg nå er ferdig med A2 til A4. Ettersom jeg strikker str L tolker jeg det dithen at jeg skal begynne m forkortede pinner med en gang. Så skriver dere at man skal strikke A5, 6, 7 og 8 over seks masker X antall ganger, men A5, 6, 7 og 8 består jo av seks masker kun den første gangen. Hver gang man strikker fra retten økes maskeantallet, så hvordan skal man strikke når man kommer til andre runden med A5, 6, 7 og 8? Håper på svar.
19.04.2016 - 21:18
![]() Alice wrote:
Alice wrote:
Bonjour, A la fin des raccourcis, j'ai fait le rang envers pour recommencer sur l'épaule. Par contre il est inscrit de tricoter A5 à A8 mais à partir de où? Faut-continuer là où j'en étais et repartir au début un peu plus bas dans les explications ou repartir du début de A5 tout de suite? Merci d'avance
18.04.2016 - 17:31DROPS Design answered:
Bonjour Alice, continuez A.5-A.8 comme avant en les continuant là où vous étiez arrivés après les rangs raccourcis. Bon tricot!
19.04.2016 - 08:52
![]() Marianne wrote:
Marianne wrote:
En ting til.... På bilder ser det ut til at de tre første og siste maskene strikkes som rillestrikk, men jeg finner ikke info om dette - kun at det skal gjøres på første pinne... Men man skal gjøre det så lenge man strikker A1 eller?
17.04.2016 - 20:11
![]() Marianne wrote:
Marianne wrote:
Hei, Jeg har nettopp begynt på denne lekkerbisken :) Øverste i oppskriften står det at alle økninger skjer fra retten, neste pinne strikkes vrangt. MEN så fort man har lagt opp, strikket en pinne rett og deretter økt for første gang står det "neste p strikkes slik (= fra retten)", men da har man jo nettopp økt på forrige pinne som i følge forklaringen skal være rettsiden....?
17.04.2016 - 19:59DROPS Design answered:
Hej Marianne. Du var videre ogsaa med det her spörgsmaal?
22.04.2016 - 17:37
![]() Nicole Desrousseaux wrote:
Nicole Desrousseaux wrote:
A mon avis la réponse que vous donnez à Lola n'est pas tout à fait exacte.Dans le motif A1 , qui se commence par le bas, il n'y a que peu de jetés à tricoter torses sur l'envers. C'est uniquement à l'avant dernier rang (donc presque en haut du motif sur le patron) qu'apparaît le codage indiquant de tricoter ensuite les jetés en torse.
10.04.2016 - 14:20DROPS Design answered:
Bonjour Mme Desrousseaux, vous avez tout à fait raison, merci de l'avoir souligné. Bon tricot!
11.04.2016 - 12:01
|
|||||||||||||||||||||||||||||||
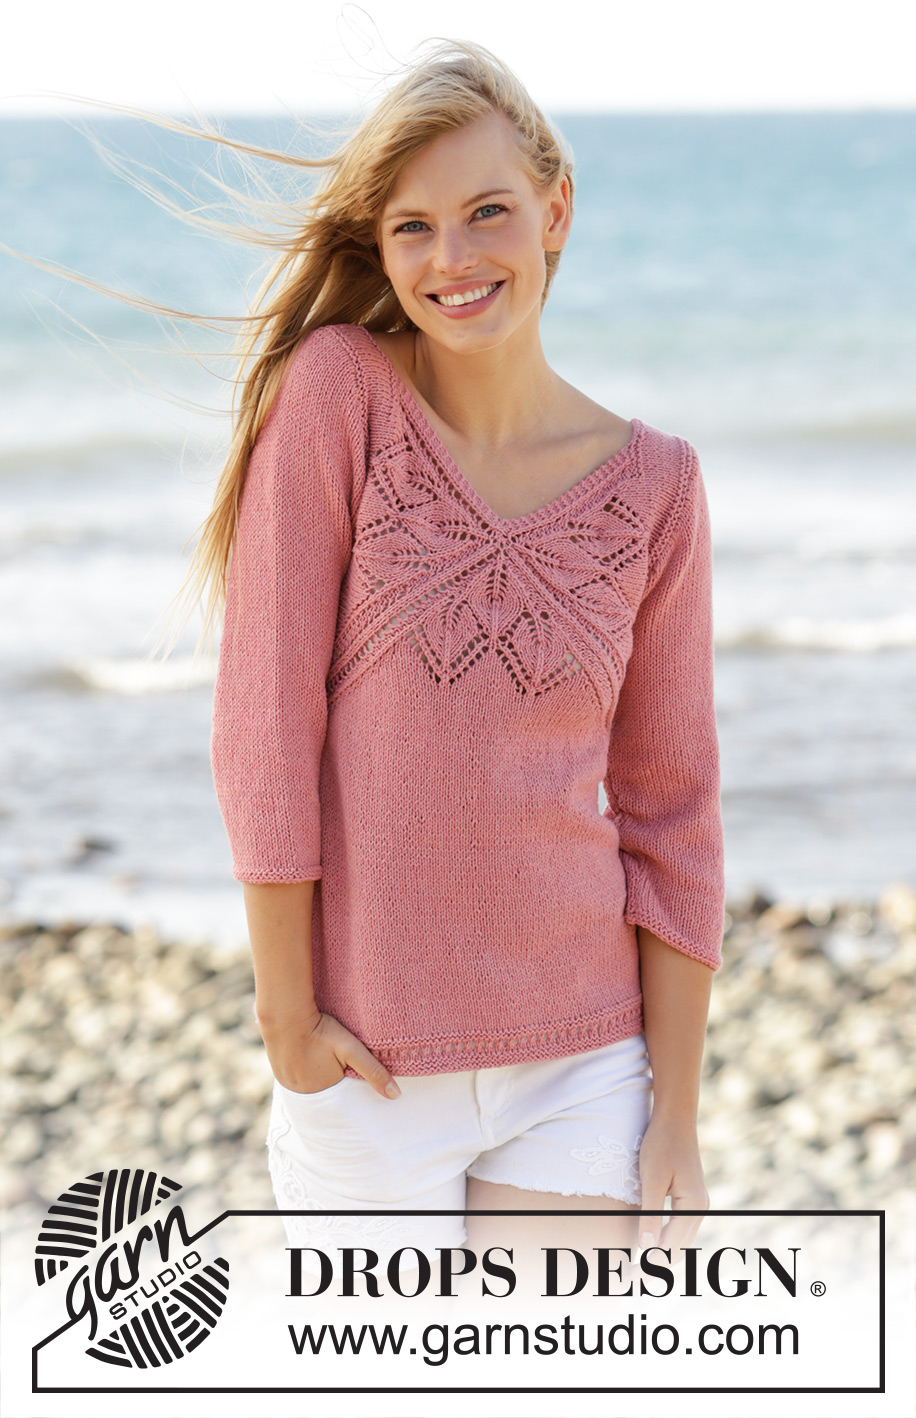
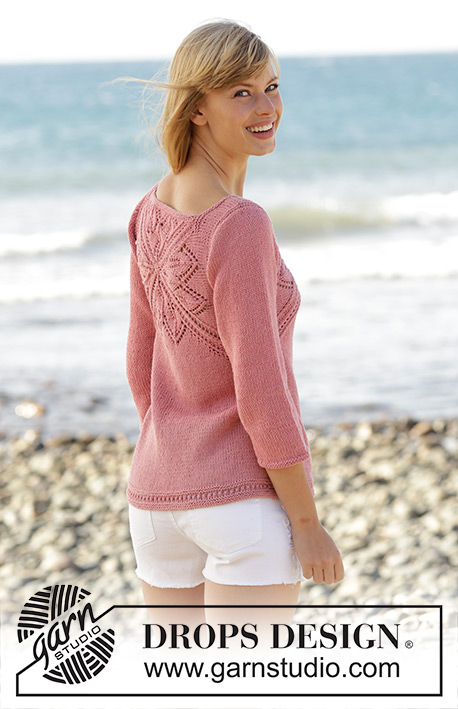
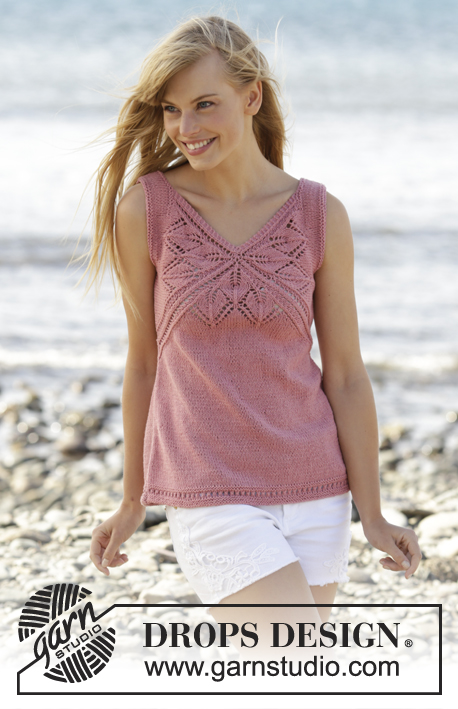
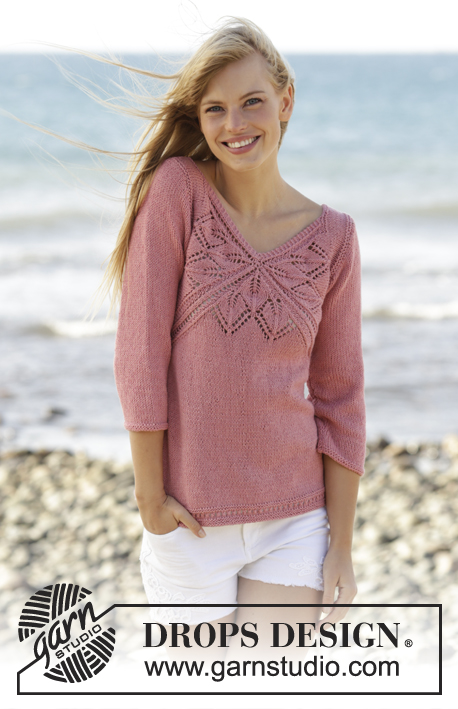
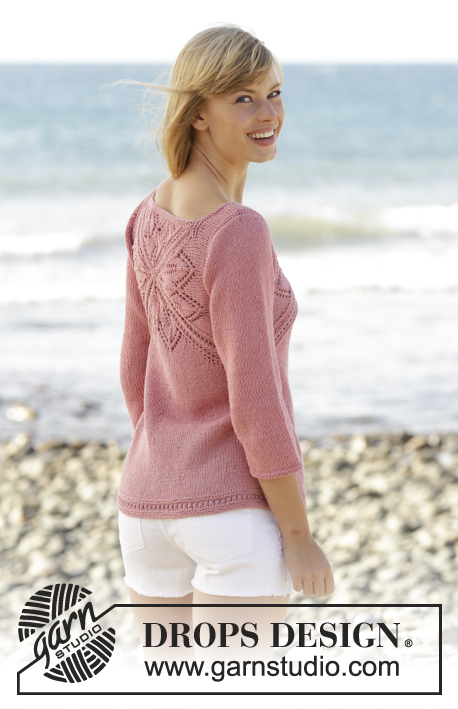
Butterfly Heart#butterflyheartsweater |
|||||||||||||||||||||||||||||||
 |
 |
||||||||||||||||||||||||||||||
Knitted DROPS jumper with lace pattern and V-neck in ”Belle”. Worked top down. Size: S - XXXL.
DROPS 170-3 |
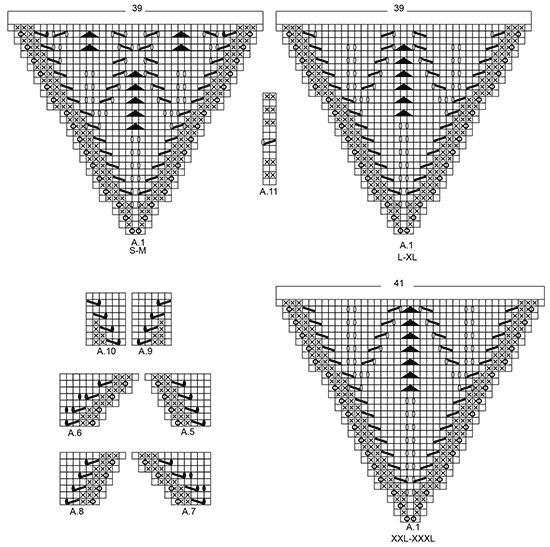
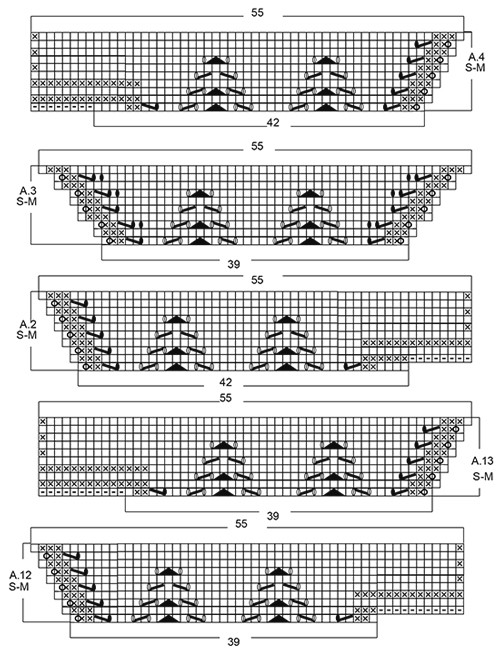
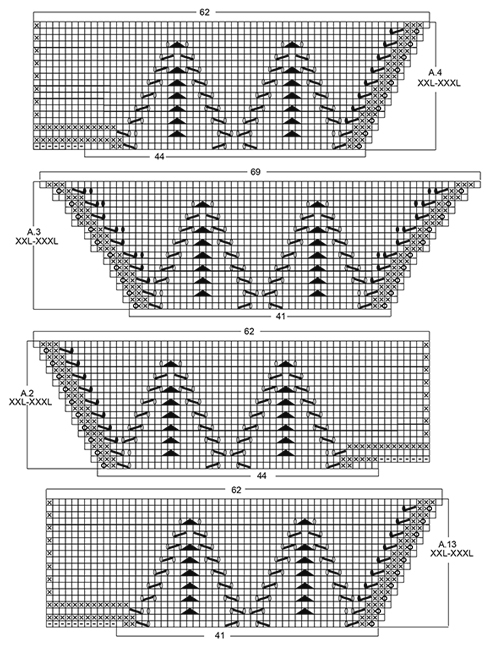
|||||||||||||||||||||||||||||||
|
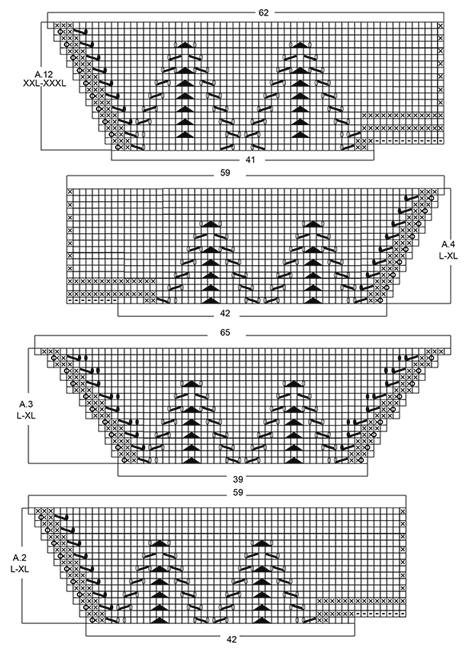
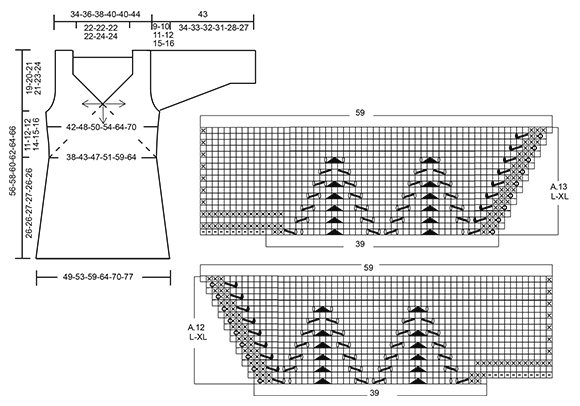
GARTER ST (back and forth): K all rows. 1 ridge = 2 rows K. PATTERN: See diagrams A.1 to A.13. The diagrams show all rows in pattern seen from RS. See diagram for correct size. SHORT ROWS: When turning in short rows, slip first st as if to K. Tighten thread and make sure to avoid big holes. INCREASE TIP: All inc are done from RS. Inc 1 st by making 1 YO, on next row P YO twisted to avoid holes. DECREASE TIP: All dec are done from RS! Dec 1 st at beg of row as follows: K 1, slip 1 st as if to K, K 1, psso Dec 1 st at end of row as follows: Work until 3 sts remain (incl the 2 new sts worked for the first time), K 2 tog. ---------------------------------------------------------- JUMPER: Work from the middle of V-neck and out in 3 triangles on front piece and 4 triangles on back piece, then work downwards. FRONT PIECE: Work back and forth from neck and down. Cast on 8 sts on circular needle size 4 mm with Belle. K 1 row. On next row inc as follows: * K 1, 1 YO *, repeat from *-* until 1 st remains and finish with K 1 = 15 sts on needle. Work next row as follows (from RS): Work YOs from previous row twisted, they should not make holes. Work 3 sts in GARTER ST - see explanation above, A.1, insert 1st marker, A.1, insert 2nd marker, A.1 (= repeat A.1 3 times in total on row), finish with 3 sts in garter st. REMEMBER THE KNITTING TENSION When A.1 has been worked 1 time vertically, there are 123-123-123-123-129-129 sts on needle. Piece measures approx. 11-11-11-11-12-12 cm from cast-on edge. Work next row as follows from RS: Work A.2 over the first 42-42-42-42-44-44 sts, A.3 over the next 39-39-39-39-41-41 sts and A.4 over the last 42-42-42-42-44-44 sts, after A.4 cast on 8 sts at the end of row for shoulder (see diagram). Work A.4 to A.2 on next row, after A.2 cast on 8 sts at the end of row for shoulder (see diagram). When A.2 to A.4 have been worked 1 time vertically, there are 165-165-183-183-193-193 sts on needle. Piece measures approx. 15-15-17-17-19-19 cm from cast-on edge. READ ALL OF THE FOLLOWING SECTION BEFORE CONTINUING! WORK PATTERN AS BEFORE WHILE AT THE SAME TIME WORKING SHORT ROWS IN EACH SIDE OF PIECE. PATTERN: Work next row as follows from RS: Work 1 st in garter st, 48-48-52-52-55-55 sts in stocking st, work A.5 over the next 6 sts, (marker), A.6 over the next 6 sts, 43-43-53-53-57-57 sts in stocking st, A.7 over the next 6 sts, (marker), A.8 over the next 6 sts, 48-48-52-52-55-55 sts in stocking st, finish with 1 st in garter st. Repeat A.5 to A.8 over the 6 sts on each side of each marker 2-3-2-3-4-5 times in total, then repeat the first 0-0-6-4-4-4 rows of A.5 to A.8 1 more times. SHORT ROWS: AT THE SAME TIME when 2-6-0-2-0-6 rows of A.5 to A.8 have been worked, work SHORT ROWS - see explanation above - in each side of piece as follows: Work until 26-26-24-23-18-18 sts remain on row (work A.5 to A.8 as before), turn and work until 26-26-24-23-18-18 sts remain, turn piece. Then work short rows in the different sizes as follows: SIZE M: Work 6 sts less for every turn 2 times in each side of piece. SIZE L-XL: Work 6 sts less for every turn 1-2 times in each side of piece, then work 4 sts less on every turn 3-2 times in each side of piece. SIZE XXL-XXXL: Work 6 sts less for every turn 1-1 time in each side of piece, then work 4 sts less for every turn 4-4 times in each side of piece, then work 2 sts less on every turn 4-5 times in each side of piece. ALL SIZES: When the short rows have been worked, work last row from WS, so that next row beg from shoulder. Then work over all sts from RS as follows: Work in garter st over the first 42-44-46-48-50-52 sts AT THE SAME TIME inc 0-2-4-4-6-6 sts evenly, work as before (i.e. A.5 to A.8 and stocking st) until 42-44-46-48-50-52 sts remain, work in garter st over the last sts AT THE SAME TIME inc 0-2-4-4-6-6 sts evenly (= 42-46-50-52-56-58 sts in garter st in each side of piece). Work 3 rows in garter st over the outermost 42-46-50-52-56-58 sts in garter st in each side of piece, pattern and stocking st over the remaining sts. On next row from WS work as follows: K the first 40-44-48-50-54-56 sts and slip them on a stitch holder for sleeve, work 2 sts in garter st, work in stocking st and pattern as before until 42-46-50-52-56-58 sts remain, 2 sts in garter st, K the next 40-44-48-50-54-56 sts and then slip them on a stitch holder for sleeve. Cut the yarn. 8-8-8-12-12-12 rows of A.5 to A.8 remain. Beg next row from RS. Continue to work in garter st over the first and last 2 sts in each side of piece. When A.5 to A.8 have been worked, there are 23-25-26-27-32-34 sts before 1st marker, 79-91-99-107-123-135 sts between 1st and 2nd marker and 23-25-26-27-32-34 sts after 2nd marker = 125-141-151-161-187-203 sts in total on row. Piece measures approx. 21-24-25-27-32-35 cm on the widest measured from cast-on edge. Insert 1 marker in piece, NOW MEASURE PIECE FROM HERE. On next row from RS loosely cast off the first 22-24-25-26-31-33 sts knitwise, work 1 edge st in garter st, (marker), work A.9 over the first 6 sts after marker, stocking st over the next 67-79-87-95-111-123 sts, A.10 over the last 6 sts before second marker, (marker ), 1 edge st in garter st, loosely cast of the last 22-24-25-26-31-33 sts knitwise = 81-93-101-109-125-137 sts remain on row. Cut the yarn. Work next row from WS over the remaining sts as follows: 1 edge st in garter st, A.10 as before, stocking st over the next 67-79-87-95-111-123 sts, A.9 as before, 1 edge st in garter st. When A.9 and A.10 have been worked 1 time vertically, continue in stocking st with 1 edge st in garter st in each side of piece. When piece measures 3 cm from marker, inc 1 st in each side of piece inside 1 edge st (= 2 sts inc) - READ INCREASE TIP. Repeat inc every 1½-1½-1½-1-1-1 cm 12-10-12-14-12-13 times in total = 105-113-125-137-149-163 sts on needle. When piece measures 23-23-24-24-23-23 cm from marker (piece measures 53-55-57-59-61-63 cm in total from shoulder), adjust so that next row is from RS, switch to circular needle size 3.5 mm. Work next row from RS as follows: Work 1 edge st in garter st, work A.11 (= 2 sts) until 2 sts remain, work first st in A.11, finish with 1 edge st in garter st. On row with holes (i.e. 7th row) work next to last st K. Cast off when A.11 has been worked 1 time vertically. Piece measures 56-58-60-62-64-66 cm in total from shoulder. BACK PIECE: Piece is first worked in the round, then worked as front piece. Cast on 6 sts on double pointed needles size 4 mm with Belle, switch to circular needle when needed. K 1 row. On next row inc as follows: * K 1, 1 YO *, repeat from *-* = 12 sts on row, K YOs twisted on next row, they should not make holes. Work A.1 4 times in total, insert 1 marker between each A.1 (= 4 markers). When A.1 has been worked 1 time vertically, there are 156-156-156-156-164-164 sts on needle. Continue as follows: A.12 over the first 39-39-39-39-41-41 sts, work A.3 over the next 39-39-39-39-41-41 sts and A.13 over the last 39-39-39-39-41-41 sts, slip the remaining sts on a stitch holder for neck edge (= 39-39-39-39-41-41 sts), after A.13 cast on 11 sts at the end of row for shoulder (see diagram). Then work back and forth on needle. Work A.13/A.3/A.12 on next row, after A.12 cast on 11 sts at the end of row for shoulder (see diagram). When A.12/A.3/A.13 have been worked 1 time vertically, there are 165-165-183-183-193-193 sts on needle. Piece measures approx. 15-15-17-17-19-19 cm from cast-on edge. Now continue back piece as front piece. NECK EDGE: Worked back and forth on needle. Slip sts from stitch holder for neck edge on back piece back on circular needle size 3.5 mm. Work 2 ridges. Fasten ridges where sts were cast on for shoulder. Fasten off. ASSEMBLY: Sew the side seams inside 1 edge st in garter st. Sew shoulder seams inside 1 edge st in garter st. Tighten tog the middle (i.e. cast-on edge) on both front and back piece. SLEEVE: Worked back and forth on circular needle in stocking st. Slip sts from the 2 stitch holders (on front and back piece) in one side of piece back on circular needle size 4 mm = 80-88-96-100-108-112 sts. Work short rows for sleeve cap as follows: Beg to work in the 25th-29th-31st-35th-43rd-45th st (i.e. 24-28-30-34-42-44 sts in one side are not worked). Work from RS 34-34-38-34-26-26 sts in stocking st, turn piece (= 22-26-28-32-40-42 sts remain on needle). Work in stocking st over the 36-36-40-36-28-28 sts, turn piece. Work 2 sts more on every turn in each side of piece until all sts have been worked. AT THE SAME TIME dec 1 st in each side of piece (= 2 sts dec), inside 1 st on every 4th-4th-2nd-4th-4th-4th row 4-6-8-8-10-10 times in total – READ DECREASE TIP = 72-76-80-84-88-92 sts on needle. Work 8-8-8-12-12-12 rows in stocking st over all sts, insert 1 marker in piece (sew side seam on sleeve up to here later). NOW MEASURE THE PIECE FROM HERE. Cast on 1 edge st at the end of the next 2 rows = 74-78-82-86-90-94 sts. Work edge sts in garter st until finished measurements. On next row from RS dec 1 st inside 2 sts in each side of piece (= 2 sts dec). Repeat dec every 2½-2-2-1½-1-1 cm 9-10-11-12-13-13 more times = 54-56-58-60-62-66 sts on needle. When sleeve measures 31-30-29-27-24-23 cm, switch to circular needle size 3.5 mm. Work 2 ridges. Cast off. Slip sts from stitch holders in the other side of piece on circular needle size 4 mm and work the same way. ASSEMBLY: Sew sleeve seams up to where 1 edge st in garter st was cast on in each side of piece. Sew the under arm seam. |
|||||||||||||||||||||||||||||||
Diagram explanations |
|||||||||||||||||||||||||||||||
|
|||||||||||||||||||||||||||||||
 |
|||||||||||||||||||||||||||||||
 |
|||||||||||||||||||||||||||||||
 |
|||||||||||||||||||||||||||||||
 |
|||||||||||||||||||||||||||||||
 |
|||||||||||||||||||||||||||||||
Have you finished this pattern?Tag your pictures with #dropspattern #butterflyheartsweater or submit them to the #dropsfan gallery. Do you need help with this pattern?You'll find 29 tutorial videos, a Comments/Questions area and more by visiting the pattern on garnstudio.com. © 1982-2026 DROPS Design A/S. We reserve all rights. This document, including all its sub-sections, has copyrights. Read more about what you can do with our patterns at the bottom of each pattern on our site. |
|||||||||||||||||||||||||||||||


With over 40 years in knitting and crochet design, DROPS Design offers one of the most extensive collections of free patterns on the internet - translated to 17 languages. As of today we count 324 catalogues and 12245 patterns translated into English (UK/cm). 12245
We work hard to bring you the best knitting and crochet have to offer, inspiration and advice as well as great quality yarns at incredible prices! Would you like to use our patterns for other than personal use? You can read what you are allowed to do in the Copyright text at the bottom of all our patterns. Happy crafting!
Post a comment to pattern DROPS 170-3
We would love to hear what you have to say about this pattern!
If you want to leave a question, please make sure you select the correct category in the form below, to speed up the answering process. Required fields are marked *.