
Popular categories
Looking for a yarn?


Comments / Questions (282)
![]() Annie wrote:
Annie wrote:
Bonjour Madame Pouvez vous me dire comment on peut faire une torsade 4x3 mailles sur 8 mailles en effet quand on regarde le diagramme 3 pour faire les trois torsades si je comprends bien : on commence le rang diagramme 6 ensuite 4 et enfin 3 sauf que pour moi il manque des mailles pour réaliser les trois torsades (soit 36 mailles se qui pourrait correspondre si on n avait pas diminue 2 mailles car il reste 34 mailles) le diagramme 3 ne correspond pas au nombre de mailles. Je ne comprends pas
19.10.2019 - 09:13
![]() Veneau wrote:
Veneau wrote:
Svp pouvez vous m expliquer les diminutions qui suivent les cotes taille M 59 mailles comme pour les cotes je ne comprends pas les 8 diminutions sur 32 mailles si je fais comme vous dite je n ai que 6 diminutions ou peut être qu il faut faire deux diminutions sur les 59 mailles et ensuite les 59 mailles je suis donc arrêtée merci pour un rapide réponse
25.09.2019 - 10:21DROPS Design answered:
Bonjour Mme Veneau, vous tricotez les 59 premières mailles comme avant (1 m point mousse, diagrammes etc..), puis vous allez diminuer 8 mailles dans les 32 mailles suivantes, ces 32 mailles sont des côtes; tricotez 8 fois 2 mailles ensemble à l'envers à intervalles réguliers dans les sections en mailles envers des côtes = vous aurez diminué 8 mailles, terminez par les 59 dernières mailles comme indiqué au 3ème rang des diagrammes. Bon tricot!
25.09.2019 - 11:23
![]() Elly wrote:
Elly wrote:
Ik snap het linkervoorpand echt niet. Als ik met A10 begin dan krijg ik niet dezelfde rand als op het voorpand.
12.08.2019 - 20:13DROPS Design answered:
Dag Elly,
Het linker voorpand brei je hetzelfde als het rechter voorpand, maar dan in spiegelbeeld. A.10 is het spiegelbeeld van A.1, dus dan zou het goed moeten komen.
01.09.2019 - 14:10
![]() IsabellA wrote:
IsabellA wrote:
Bonjour, Pour le dos, après les 14 rangs de "côtes" il est indiqué "Continuer maintenant avec l'aiguille circulaire 4 en point fantaisie mais tricoter A.8 sur les 16-24-24-40-40-48 m centrales. " Je tricote la taille L. En mailles centrales entre les deux A3, il me reste 28 mailles centrales. Ne faudrait il pas que je tricote en A8 les 28 mailles ? Sinon, il me restera de part et d'autres 1 m env, 1m end (inversement à l'autre bout) ce que je ne trouve pas très joli. Merci
05.08.2019 - 20:38DROPS Design answered:
Bonjour IsabellA, en taille L vous avez tricoté les 63 premières et dernières mailles en diminuant comme indiqué dans les diagrammes = les 2 dernières et les 2 premières mailles sont 2 m envers, entre ces 2 m env, il reste 24 m, ces 24 m se tricotent en suivant A.8, vous aurez donc: A.3, 2 m env, 24 m en A.8, 2 m env, A.3 au milieu dos; Bon tricot!
07.08.2019 - 11:22
![]() Birgit Berglund wrote:
Birgit Berglund wrote:
Bra att ni finns! Det finns hjälp att hämta här. Tack!
14.07.2019 - 19:31
![]() Tom Erik wrote:
Tom Erik wrote:
Hei. Str XL: Angående felling av 12 m i vrangpartiene etter vrangbord. Skulle det ikke bli slik på fellepinnen: Strikk 61 m som før, fell 12 m i alle vrangpartiene over de neste 56 m (1 vrangparti rett etter A. 3 og før gjentagelse av 3 vr/ 2 r, 10 vrangpartier med 3 vr/2 r og og et vrangparti rett før A. 3. Strikk deretter 61 m som før. Men da vil maskene på vrangpinnen bli rett etter A. 3: 1 r *2 vr, 2 r* 10 ggr totalt, 2 vr, 1 r. Riktig? Mvh Tom Erik
09.07.2019 - 08:27DROPS Design answered:
Hei Tom Erik. Husk fellingene i 3. pinne. Det strikkes i str XL slik: A.6 (= 12 masker) + A.4 (= 8 masker) + A.3 (=34 masker) + 2 vrang + 2 rett = 58 masker, så felles det i 12 masker jevnt fordelt i partiene med vr (vrangparti = 50 masker) = 38 masker, deretter strikkes A.6 (= 12 masker) + A.4 (= 8 masker) + A.3 (=34 masker) + 2 vrang + 2 rett = 58 masker. = 58+38+58 = 154 masker. Mvh DROPS design
23.09.2019 - 07:57
![]() Birgit Berglund wrote:
Birgit Berglund wrote:
Hej! Nu är jag här igen! Jag undrar om det är EFTER alla A1 förflyttningar på sjalkragen som jag ska göra de här vändningarna? Hoppas att jag inte är allt för besvärlig!!! M.v.h Birgit.
11.06.2019 - 15:52DROPS Design answered:
Hei Birigit. Det strikkes vendiger, hver 14. pinne, samtidig som det strikkes A.1. Vendingene strikkes over de retstrikkede maskene mot midt foran. God fornøyelse
12.06.2019 - 07:23
![]() Birgit Berglund wrote:
Birgit Berglund wrote:
Hej! Jag ska just börja med sjalkragen och jag har aldrig stickat någon förut, har du några goda råd och tips för att jag ska lyckas?
09.06.2019 - 19:29DROPS Design answered:
Hej Birgit, det är bara att följa mönstret för SJALKRAGE, så får du den som på bilden. Lycka till :)
10.06.2019 - 13:59
![]() Gabi Zimmer wrote:
Gabi Zimmer wrote:
Hallo, mir gefällt dieses Modell sehr gut. Ich würde es gerne mit Wolle der Stärke 7 bis 8 stricken,da Ich diese bereits habe. Gibt es diesbezüglich vielleicht eine ähnliche Alternative? Ich würde mich sehr über eine positive Antwort freuen. Herzliche Grüße Gabi
02.06.2019 - 21:45DROPS Design answered:
Liebe Frau Zimmer, leider können wir nicht einzelne Modelle auf individuellen Wunsch hin umrechnen. Für weitere persönnliche Hilfen, wenden Sie sich bitte an den Laden, wo die Laden gekauft haben. Oder mehr Jacken für Männer finden Sie hier. Viel Spaß beim stricken!
03.06.2019 - 10:27
![]() Laetitia wrote:
Laetitia wrote:
Bonjour, Je commence le dos, j'ai déjà fait les côtes. J'en suis aux diminutions. Je tricote la taille XL, j'ai donc 178m sur mes aiguilles. Cependant je ne comprends pas comment on peut diminuer 12x dans la portion centrale : je n'ai en effet que 10 sections de 3m envers. Est-ce que je dois aussi diminuer dans les 2 sections adjacentes dans lesquelles il n'y a que 2m envers et donc n'avoir qu'1m envers ensuite à cet endroit-là ? Ça ne me paraît pas logique.
19.05.2019 - 12:48DROPS Design answered:
Bonjour Laetitia, en taille XL vous avez 10 fois (3 m env, 2 m end), puis 1 fois 2 m env (avant A.3) = 11 sections en mailles envers, dans une des sections de 3 m env, vous pouvez tricoter 3 m ens à l'env pour diminuer 2 m et diminuer ainsi 12 m au total. Bon tricot!
20.05.2019 - 12:28
|
|||||||||||||||||||
Finnley |
|||||||||||||||||||
 |
 |
||||||||||||||||||
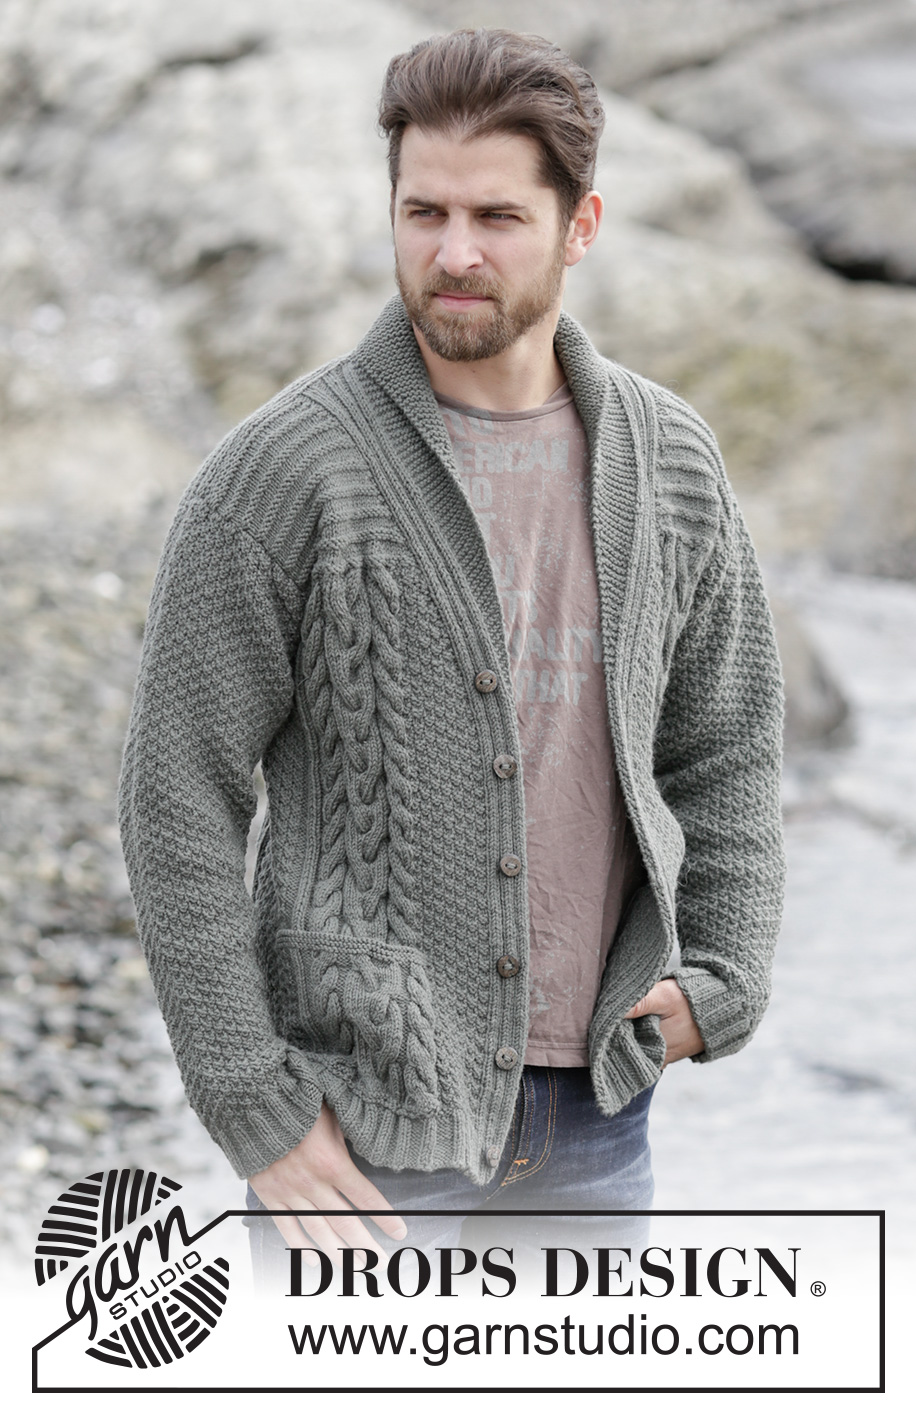
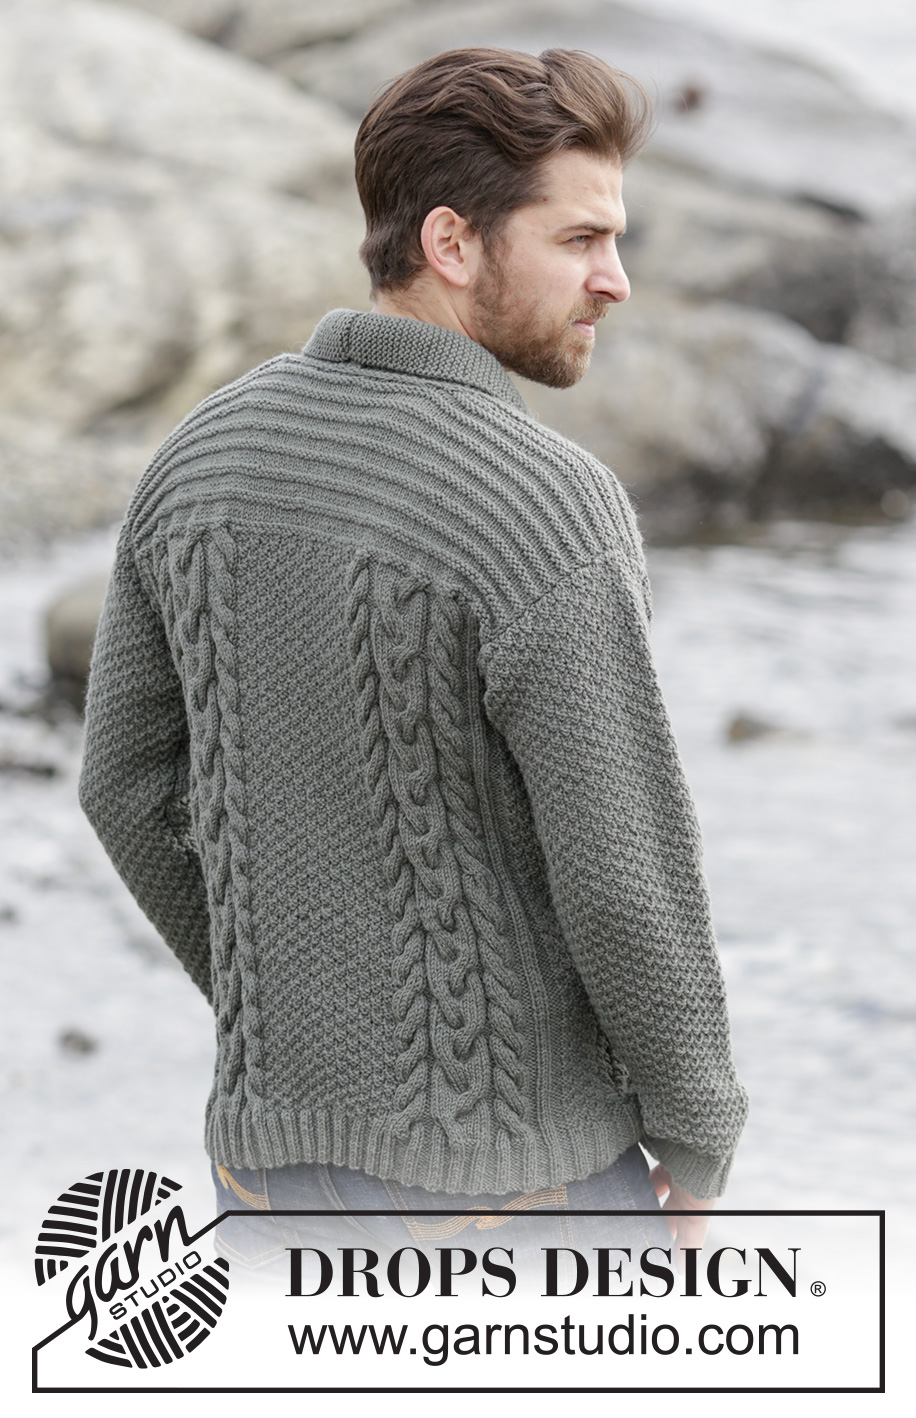
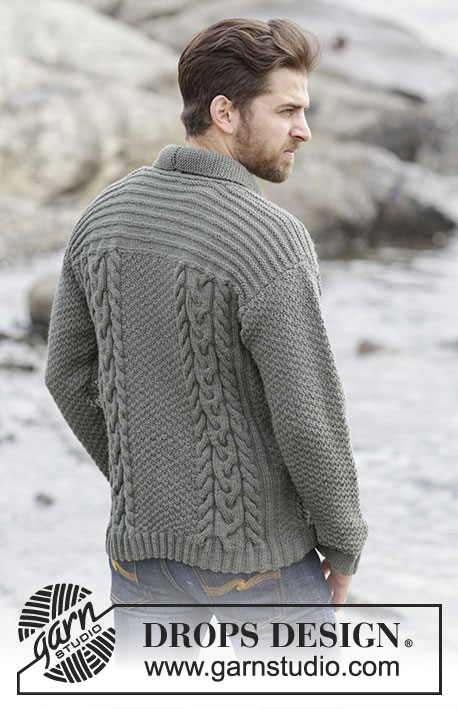
Men's knitted jacket in DROPS Lima, with cables and shawl collar. Size: S - XXXL.
DROPS Extra 0-1132 |
|||||||||||||||||||
|
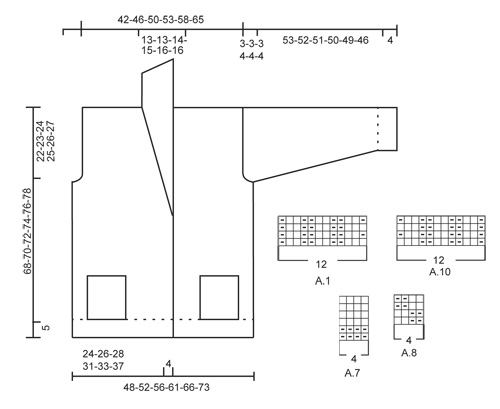
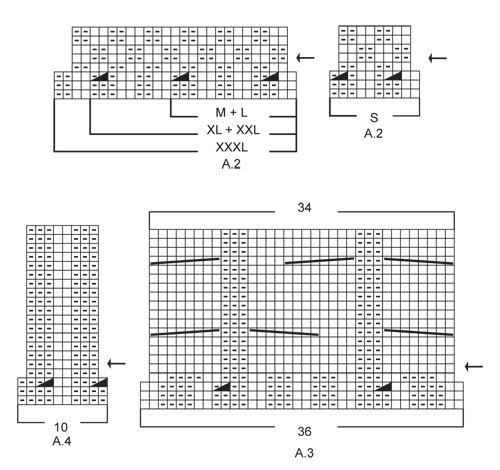
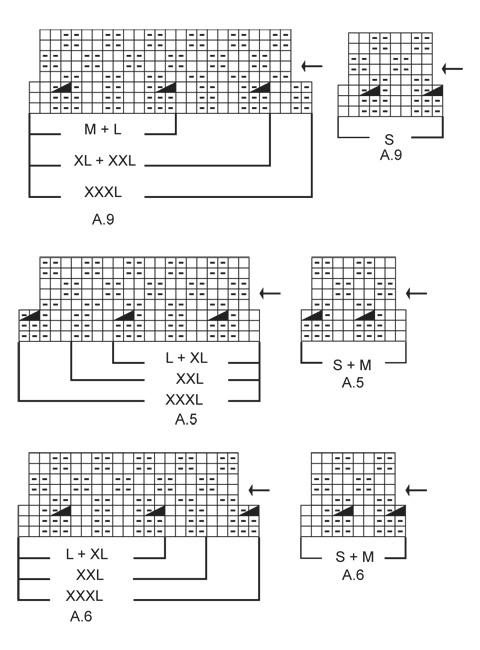
GARTER ST (back and forth): K all rows. 1 ridge = 2 rows K. PATTERN: See diagrams A.1-A.10. The diagrams show all rows in pattern seen from RS. INCREASE TIP: Inc 1 st by making 1 YO, on next row work YO twisted (i.e. work in the back loop of st instead front) to avoid holes. DECREASE TIP: All dec are done from RS! Dec as follows after A.1: P 2 tog Dec as follows before A.1: Work until 2 sts remain before A.1, P 2 tog. BUTTONHOLES: Dec for buttonholes on left band. 1 buttonhole = K tog sixth and seventh st from edge and make 1 YO. Dec for buttonholes when piece measures: SIZE S: 2, 9, 17, 25, 33 and 41 cm. SIZE M: 2, 10, 18, 26, 34 and 42 cm. SIZE L: 3, 11, 19, 27, 35 and 43 cm. SIZE XL: 3, 12, 20, 28, 36 and 44 cm. SIZE XXL: 4, 13, 21, 29, 37 and 45 cm. SIZE XXXL: 5, 14, 22, 30, 38 and 46 cm. SHORT ROWS (applies to shawl collar): Work short rows over sts in garter st from mid front as follows: For every 14th row work as follows (beg from RS): Work over all sts in garter st, turn piece, tighten yarn and K back, turn piece and work as before over all sts. That way the ridges in collar will not contract as much. On left front piece work reversed, i.e. beg short rows from WS. ---------------------------------------------------------- JACKET: Worked back and forth and sewn tog when finished. BACK PIECE: Cast on 145-150-158-178-186-206 sts on circular needle size 3.5 mm with Lima. Work rib as follows: 1 edge st in GARTER ST - see explanation above, A.6 (find diagram for correct size), A.4, A.3, P 2, K 2, * P 3, K 2 *, repeat from *-* 4-5-5-9-9-11 more times, P 2, A.3, A.4, A.5 (find diagram for correct size), 1 edge st in garter st. Continue like this and repeat the first 2 rows in A.3-A.6 until 12 rows have been worked. Now continue pattern from 3rd row in diagram and work as follows: Work the first 59-59-63-63-67-72 sts as before, work the next 27-32-32-52-52-62 sts AT THE SAME TIME dec 11-8-8-12-12-14 sts evenly in sections with P, continue as before over the remaining 59-59-63-63-67-72 sts = 122-130-138-154-162-178 sts. Work 1 row. Now switch to circular needle size 4 mm and continue with pattern but work A.8 over the middle 16-24-24-40-40-48 sts. NOTE: Now repeat A.3- A.6 from arrow in diagram. REMEMBER THE KNITTING TENSION When piece measures 46-47-48-49-50-51 cm, cast off 3-3-3-4-4-4 sts at beg of the next 4 rows for armholes = 110-118-126-138-146-162 sts on needle. When piece measures 53-54-55-56-57-58 cm, work A.7 over all sts inside 1 edge st in garter st in each side AT THE SAME TIME on first row dec 20-20-18-24-22-24 sts evenly in all sizes = 90-98-108-114-124-138 sts. Repeat A.7 until finished measurements. When piece measures 66-68-70-72-74-76 cm, work as follows: Work the first 32-36-40-42-46-53 sts, cast off the next 26-26-28-30-32-32 sts and work the remaining 32-36-40-42-46-53 sts. Then finish each shoulder separately as follows: On next row from the neck, dec 1 st = 31-35-39-41-45-52 sts remain on each shoulder. When piece measures 68-70-72-74-76-78 cm, work 1 ridge over all sts. Cast off. Work the other shoulder the same way. RIGHT FRONT PIECE: Cast on 81-85-89-98-102-111 sts on circular needle size 3.5 mm with Lima. Work rib as follows: A.1 (= 12 sts), A.2 (find diagram for correct size), P 2, A.3, A.4, A.5 (find diagram for correct size), 1 edge st in garter st. Continue like this and repeat the first 2 rows in A.2-A.5 until 12 rows have been worked. Switch to circular needle size 4 mm and continue with pattern = 73-77-81-89-93-101 sts. NOTE: Now repeat diagram from arrow. When piece measures 40-41-42-43-44-46 cm, beg shawl collar while AT THE SAME TIME working shoulder as explained below: READ ALL OF THE FOLLOWING SECTION BEFORE CONTINUING! SHAWL COLLAR: Work first st in A.1, 1 YO, work the remaining 11 sts in A.1, dec 1 st - READ DECREASE TIP, continue over the remaining sts on needle as before. Repeat displacement over A.1 every 1½ cm 0-2-3-3-3-4 times in total and every cm 26-24-23-24-25-24 times = 26-26-26-27-28-28 sts (incl the first st in A.1). Work the inc sts towards mid front in garter st, AT THE SAME TIME work SHORT ROWS - see explanation above. SHOULDER: When piece measures 46-47-48-49-50-51 cm, cast off 3-3-3-4-4-4 sts at beg of the next 2 rows from WS = 67-71-75-81-85-93 sts on needle. When piece measures 53-54-55-56-57-58 cm, work collar sts in garter st and A.1 as before, then work A.7 over the remaining sts on needle, AT THE SAME TIME dec 10-10-10-13-12-13 sts evenly = 57-61-65-68-73-80 sts. Continue pattern until finished measurements. Then work as follows from RS: When piece measures 68-70-72-74-76-78 cm - adjust after back piece - work the first 26-26-26-27-28-28 sts before slipping them on a stitch holder, then work a ridge over the remaining 31-35-39-41-45-52 sts. Cast off. Slip sts back on needle. Then work short rows in garter st as follows, beg from WS: Work over all 26-26-26-27-28-28 sts, * 2 rows back and forth over the first 13-13-14-14-15-15 sts, 2 rows over all sts *, repeat from *-* until piece measures 7-7-7-8-8-8 cm on the shortest. Cast off. LEFT FRONT PIECE: Work as right front piece but reversed. I.e. work A.10 instead of A.1, A.9 instead of A.2 and A.6 instead of A.5. Remember BUTTONHOLES on left band - see explanation above. SLEEVE: The sleeve is worked back and forth on circular needle. Cast on 59-64-64-69-69-74 sts (incl 1 edge st in garter st in each side) on circular needle size 3.5 mm with Lima. Work rib as follows: 1 edge st in garter st, * K 2, P 3 *, repeat from *-* until 3 sts remain, K 2, 1 edge st in garter st. Continue like this until rib measures 4 cm. Switch to circular needle size 4 mm and work 1 row in stocking st while AT THE SAME TIME dec 9-10-10-11-11-12 sts evenly = 50-54-54-58-58-62 sts. Continue with A.8 inside 1 edge st in garter st in each side. When piece measures 14-13-8-8-13-11 cm, inc 1 st inside edge st in garter st in each side - read INCREASE TIP. Repeat inc approx. every 2-2-1½-1½-1½-1½ cm 20-20-22-22-25-25 more times = 92-96-100-104-110-114 sts. When piece measures 57-56-55-54-53-50 cm, cast off at beg of every row in each side: 3 sts 1-1-1-2-2-2 times, 2 sts 1 time and 3 st 2-2-2-3-3-3 times. Cast off. Sleeve measures approx. 60-59-58-58-57-54 cm. Knit another sleeve. POCKETS: Worked back and forth on circular needle. Cast on 42 sts on circular needle size 4 mm with Lima. Work 1 ridge in garter st AT THE SAME TIME inc 6 sts evenly on row from RS = 48 sts. On next row from RS work pattern as follows: NOTE: Beg and repeat pattern in A.3 and A.4 from 5th row in A.3 and A.4. 1 edge sts in garter st, A.3, A.4, A.8, 1 edge st in garter st. Continue like this back and forth until A.3 and A.4 have been worked 2 times vertically. Then continue with the first 6 rows from arrows in diagram 1 more time. Then work and dec as follows: 1 edge st in garter st, K the next 4 sts tog 2 by 2 (= 2 sts dec), continue as before over the next 7 sts, K the next 4 sts tog 2 by 2, continue with pattern as before over the next 15 sts, K the next 4 sts tog 2 by 2, Work remaining sts as before and finish with 1 edge st in garter st. Then switch to needle 3.5 mm and work 2 ridges over all sts, beg from WS. Cast off from WS. Work another pocket the same way but reversed. ASSEMBLY: Sew the shoulder seams tog. Sew sleeves in body. Sew underarm and side seams in one inside 1 edge st in garter st. Sew the buttons on to the right band. Sew cast-off edge on collars tog mid back, sew collar to the back of neck. Fasten pockets on front pieces so that pattern on pocket is placed over pattern on front piece. Sew pocket neatly through both layers in edge st in garter st in each side and at the bottom of pocket. Cut the yarn and fasten. |
|||||||||||||||||||
Diagram explanations |
|||||||||||||||||||
|
|||||||||||||||||||
 |
|||||||||||||||||||
 |
|||||||||||||||||||
 |
|||||||||||||||||||
Have you finished this pattern?Tag your pictures with #dropspattern or submit them to the #dropsfan gallery. Do you need help with this pattern?You'll find 24 tutorial videos, a Comments/Questions area and more by visiting the pattern on garnstudio.com. © 1982-2026 DROPS Design A/S. We reserve all rights. This document, including all its sub-sections, has copyrights. Read more about what you can do with our patterns at the bottom of each pattern on our site. |
|||||||||||||||||||


With over 40 years in knitting and crochet design, DROPS Design offers one of the most extensive collections of free patterns on the internet - translated to 17 languages. As of today we count 324 catalogues and 12245 patterns translated into English (UK/cm). 12245
We work hard to bring you the best knitting and crochet have to offer, inspiration and advice as well as great quality yarns at incredible prices! Would you like to use our patterns for other than personal use? You can read what you are allowed to do in the Copyright text at the bottom of all our patterns. Happy crafting!
Post a comment to pattern DROPS Extra 0-1132
We would love to hear what you have to say about this pattern!
If you want to leave a question, please make sure you select the correct category in the form below, to speed up the answering process. Required fields are marked *.