
Popular categories
Looking for a yarn?


Comments / Questions (282)
![]() Nicole Chapdelaine wrote:
Nicole Chapdelaine wrote:
A un moment donner vous mentionner le A8 Je n'ai pas de A8 dans ce patron Merci
03.11.2020 - 22:07DROPS Design answered:
Bonjour Mme Chapdelaine, après avoir diminué - après les côtes du bas du dos, vous devez tricoter A.8 sur les 16 à 48 m centrales, je cite: Continuer maintenant avec l'aiguille circulaire 4 en point fantaisie mais tricoter A.8 sur les 16-24-24-40-40-48 m centrales.
04.11.2020 - 09:08
![]() Nicole Chapdelaine wrote:
Nicole Chapdelaine wrote:
Pour les deux premiers rang vous dites de faire A.6 (voir diagramme approprié à la taille), A.4, A.3, 2 m env, 2 m end, *3 m env, 2 m end *, répéter de *-* encore 4-5-5-9-9-11 fois, 2 m env, A.3, A.4, A.5 (voir diagramme approprié à la talle. Ensuite, vous dites de répéter les les 2 premiers rangs de A 3 et A 6 Ça fonctionne pas il faut tout répéter les deux premiers Rangs. ? Merci pour votre réponse
03.11.2020 - 20:36DROPS Design answered:
Bonjour Mme Chapdelaine, au tout début, vous tricotez les mailles comme indiqué: en côtes ou bien en suivant les 2 premiers rangs des diagrammes en les répétant 6 fois au total = vous avez tricoté 12 rangs au total. Vous trouverez ici plus d'infos sur les diagrammes. Bon tricot!
04.11.2020 - 09:06
![]() Rick Henson wrote:
Rick Henson wrote:
HI, I have cast on 158 sts for the back section L size. 158 sts in the gauge required (21 sts for 4") =30.09" for the width of the back. The diagram shows the width to be 56cm or 22.02" which seems correct for a large size. I am knitting the correct gauge. What can I be missing? Thanks
12.10.2020 - 01:14DROPS Design answered:
Dear Mr Henson, tension is measured in stocking stitch, piece is worked with rib and textured/cable patterns, you will need more stitches with smaller needles and rib /cables for the same width. If your tension is right, then keep same tension when working and you will get same measurements as shown in chart for your size. Happy knitting!
12.10.2020 - 08:45
![]() Fran wrote:
Fran wrote:
Is there a size guide gor the pattern. What size chest relate to S M & Ĺ? Thanks
10.10.2020 - 00:38DROPS Design answered:
Dear Fran! You will find the schematic drawing for each garment below the patterns. It will have all the measurement for each size we have in this pattern. Also look lesson: https://www.garnstudio.com/lesson.php?id=24&cid=19 Happy knitting!
10.10.2020 - 23:29
![]() Anne-Marie Dick wrote:
Anne-Marie Dick wrote:
Bonjour je fais la grandeur M et je commence le devant droit. Je ne comprends pas comment je dois arriver à 8 diminutions si je repète 6 fois les 2 premiers rangs des diagrammes. Les diminutions sont au 3ième rang! ou alors je fais les diminutions au 11 ième rang? merci de votre aide
04.10.2020 - 05:50DROPS Design answered:
Bonjour Mme Dick, vous répétez d'abord les 2 premiers rangs des diagrammes, puis vous tricotez le 3ème rang de ces mêmes diagrammes et vous allez ainsi diminuer 2 m dans A.2, dans A.3, dans A.4 et dans A.5 = soit 8 m au total. Au rang suivant sur l'envers, tricotez les mailles comme le 4ème rang des diagrammes. Bon tricot!
05.10.2020 - 10:30
![]() Anne-Marie Dick wrote:
Anne-Marie Dick wrote:
Dans la portion Dos, vers la fin, il y a la phrase suivante: "Au rang suivant, à partir de l'encolure, diminuer 1 m = il reste pour chaque épaule.". Je crois qu'il manque de l'information sur le nombre de mailles restantes. J'ai consulté le patron en version anglaise et j'ai trouvé l'information qu'il me manquait. Mais ce serait bien de l'ajouter au patron en version française. Bonne journée!
01.10.2020 - 17:24DROPS Design answered:
Bonjour Mme Dick, vous avez raison, cette information a été ajoutée, merci pour votre retour, bon tricot!
02.10.2020 - 08:08
![]() Ragnhild Instebø wrote:
Ragnhild Instebø wrote:
Strikker en jakke til min mann. Jakken heter Finnley. Finner ikke ut hvordan vrangborden blir slik den ser ut på bildet. A1, A2, A3, A4, A5 lager jo ikke en vrangbord på 4 cm som på armen. Er meget erfaren med strikking, men dette har jeg aldri opplevd. Mvh Ragnhild Instebø ,
12.08.2020 - 19:48DROPS Design answered:
Hej Ragnhild. Du ska fortsätta som förklarat i början av BAKSTK och repetere de 2 første p i A.3 - A.6 til det er strikket 12 p. Du får då en vrangbord på ca 4 cm (vrangborden på bakstycket består inte alltid av 2 r, 3 vr som på armen). Mvh DROPS Design
14.08.2020 - 10:45
![]() Anne-Marie Dick wrote:
Anne-Marie Dick wrote:
Bonjour, je commence ce patron, grandeur M. J'ai monté 150 mailles mais quand je regarde ce qu'on doit tricoter j'arrive à 145 mailles comme pour la grandeur S. Je serais tentée de faire 6 répétitions au lieu de 5 de 3 Env, 2 End qui sont au milieu.... mais est-ce la bonne chose? merci de votre aide!
27.06.2020 - 01:07DROPS Design answered:
Bonjour Mme Dick, en taille M, tricotez ainsi: 1 m lis, A.6 (= 10 m), A.4 (= 10 m), A.3 (=36 m), 2 m env, 2 m end, *3 m env, 2 m end *, répéter de *-* encore 5 fois (= 5 m x 6 = 30m), 2 m env, A.3 (= 36 m), A.4 (= 10 m), A.5 (= 10 m), 1 m lis = 1+10+10+36+4+30+2+36+10+10+1= 150 m. Bon tricot!
29.06.2020 - 07:44
![]() Matthieu wrote:
Matthieu wrote:
Bonjour, Pour le col châle en XL, faut-il faire le décalage de A1 3 fois tous les 1, 5 cm PUIS 24 fois tous les 1 cm, ou bien imbriquer les 3 augmentations dans les 24 autres (c'est à dire faire un jeté à 1cm, puis à 1,5 cm, 2cm, 3cm... Etc) ?
08.06.2020 - 20:08DROPS Design answered:
Bonjour Matthieu, vous faites le décalage 3 fois tous les 1,5 cm (= 43 cm, 44.5 cm, 46 cm) puis 24 fois tous les 1 cm (= 47, 48, 48 ... cm). Bon tricot!
09.06.2020 - 09:47
![]() Julie wrote:
Julie wrote:
Hello, I'm working on the sleeve for an XXXL, and the pattern says to "bind off at beginning of every row in each side: 3 sts 2 times, 2 sts 1 time, and 3 sts 3 times"......I'm not sure what that means, do I bind off only at the beginning of each row, or the beginning and end of each row?
03.06.2020 - 19:06DROPS Design answered:
Hi Julie, You bind off at the beginning of every row; 3 stitches at the beginning of 4 rows, 2 stitches on 2 rows and 3 stitches on 6 rows. I hope this helps and happy knitting!
04.06.2020 - 08:15
|
|||||||||||||||||||
Finnley |
|||||||||||||||||||
 |
 |
||||||||||||||||||
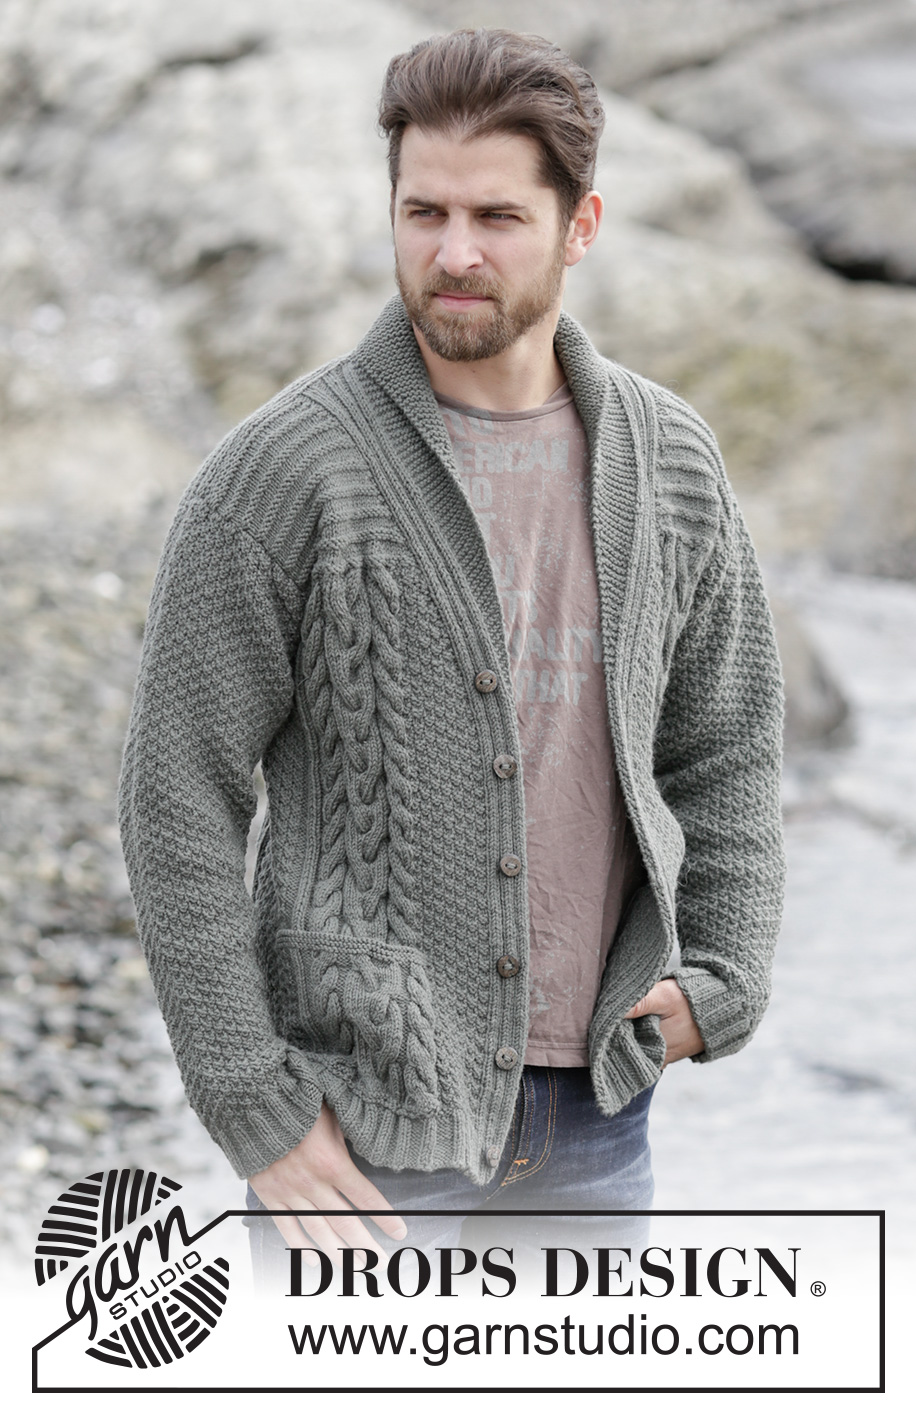
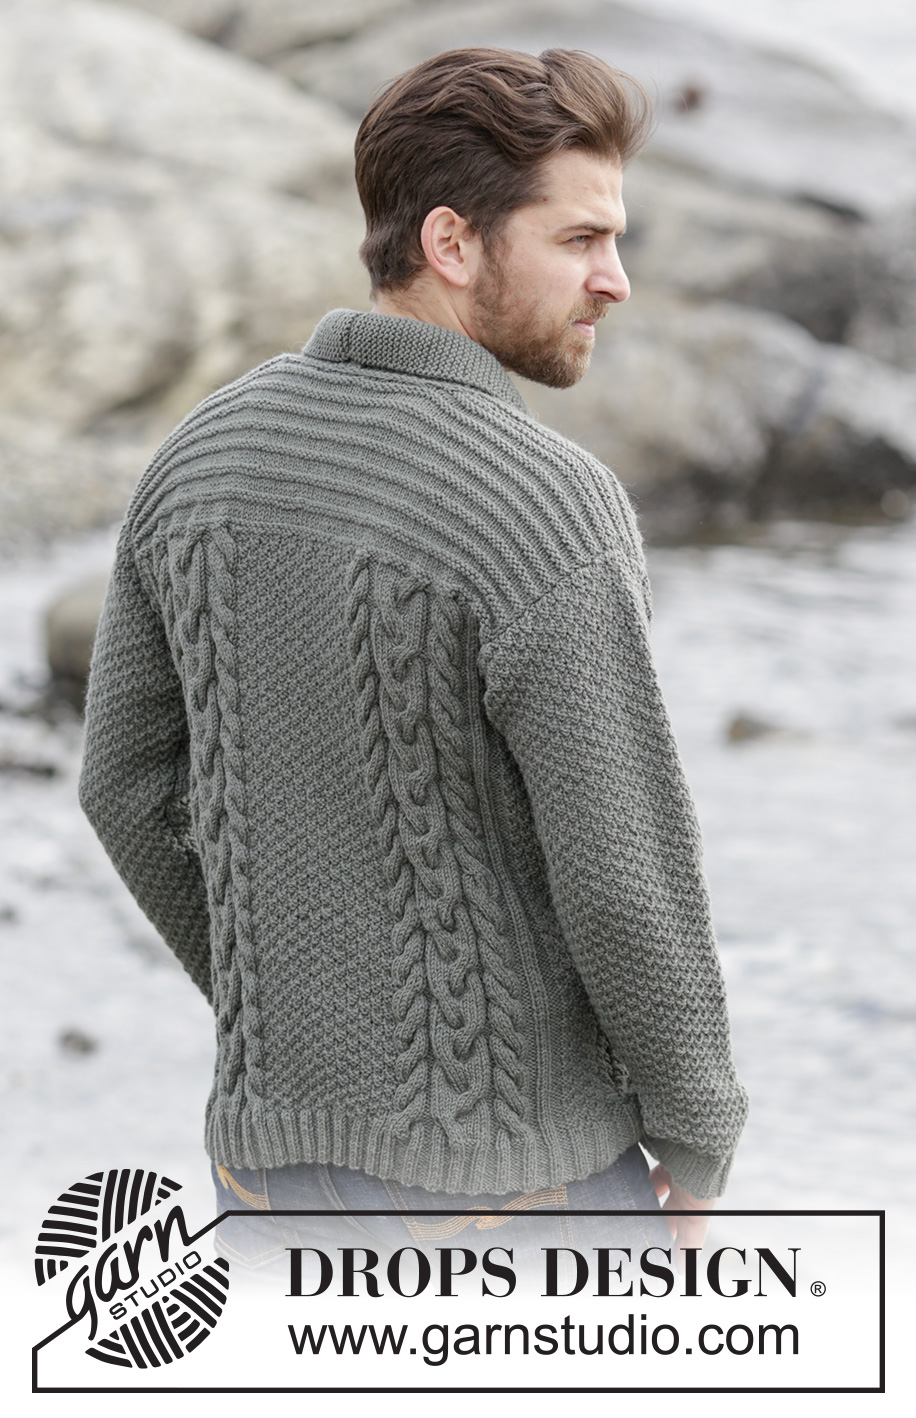
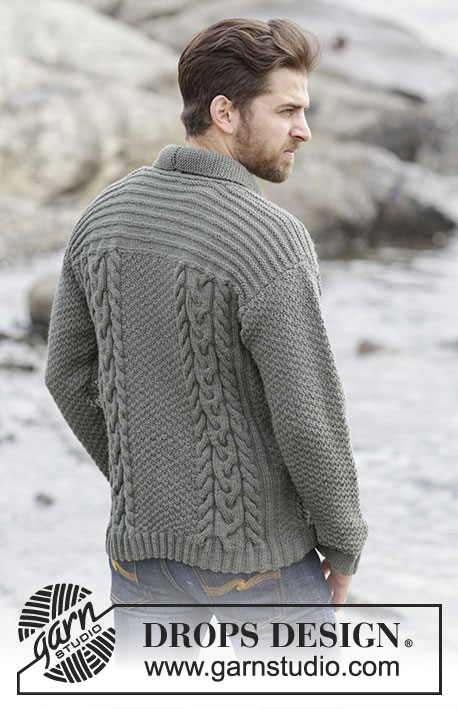
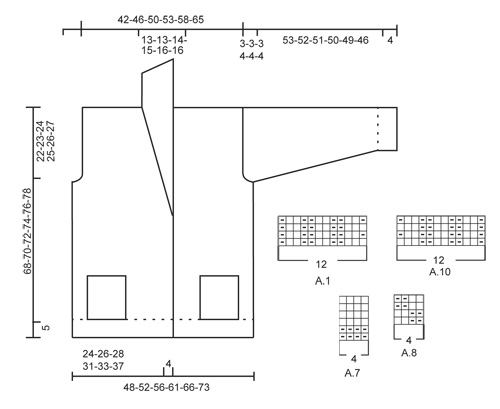
Men's knitted jacket in DROPS Lima, with cables and shawl collar. Size: S - XXXL.
DROPS Extra 0-1132 |
|||||||||||||||||||
|
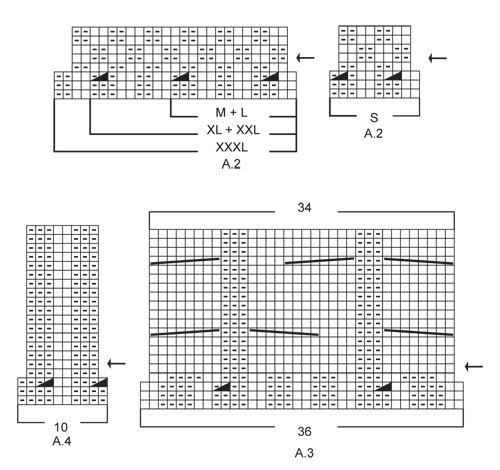
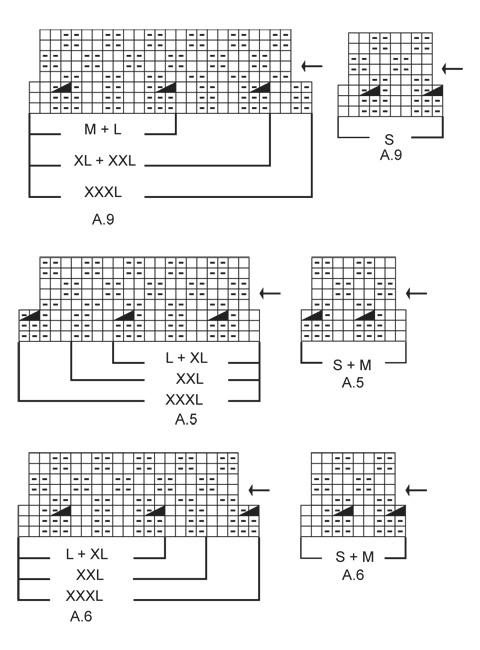
GARTER ST (back and forth): K all rows. 1 ridge = 2 rows K. PATTERN: See diagrams A.1-A.10. The diagrams show all rows in pattern seen from RS. INCREASE TIP: Inc 1 st by making 1 YO, on next row work YO twisted (i.e. work in the back loop of st instead front) to avoid holes. DECREASE TIP: All dec are done from RS! Dec as follows after A.1: P 2 tog Dec as follows before A.1: Work until 2 sts remain before A.1, P 2 tog. BUTTONHOLES: Dec for buttonholes on left band. 1 buttonhole = K tog sixth and seventh st from edge and make 1 YO. Dec for buttonholes when piece measures: SIZE S: 2, 9, 17, 25, 33 and 41 cm. SIZE M: 2, 10, 18, 26, 34 and 42 cm. SIZE L: 3, 11, 19, 27, 35 and 43 cm. SIZE XL: 3, 12, 20, 28, 36 and 44 cm. SIZE XXL: 4, 13, 21, 29, 37 and 45 cm. SIZE XXXL: 5, 14, 22, 30, 38 and 46 cm. SHORT ROWS (applies to shawl collar): Work short rows over sts in garter st from mid front as follows: For every 14th row work as follows (beg from RS): Work over all sts in garter st, turn piece, tighten yarn and K back, turn piece and work as before over all sts. That way the ridges in collar will not contract as much. On left front piece work reversed, i.e. beg short rows from WS. ---------------------------------------------------------- JACKET: Worked back and forth and sewn tog when finished. BACK PIECE: Cast on 145-150-158-178-186-206 sts on circular needle size 3.5 mm with Lima. Work rib as follows: 1 edge st in GARTER ST - see explanation above, A.6 (find diagram for correct size), A.4, A.3, P 2, K 2, * P 3, K 2 *, repeat from *-* 4-5-5-9-9-11 more times, P 2, A.3, A.4, A.5 (find diagram for correct size), 1 edge st in garter st. Continue like this and repeat the first 2 rows in A.3-A.6 until 12 rows have been worked. Now continue pattern from 3rd row in diagram and work as follows: Work the first 59-59-63-63-67-72 sts as before, work the next 27-32-32-52-52-62 sts AT THE SAME TIME dec 11-8-8-12-12-14 sts evenly in sections with P, continue as before over the remaining 59-59-63-63-67-72 sts = 122-130-138-154-162-178 sts. Work 1 row. Now switch to circular needle size 4 mm and continue with pattern but work A.8 over the middle 16-24-24-40-40-48 sts. NOTE: Now repeat A.3- A.6 from arrow in diagram. REMEMBER THE KNITTING TENSION When piece measures 46-47-48-49-50-51 cm, cast off 3-3-3-4-4-4 sts at beg of the next 4 rows for armholes = 110-118-126-138-146-162 sts on needle. When piece measures 53-54-55-56-57-58 cm, work A.7 over all sts inside 1 edge st in garter st in each side AT THE SAME TIME on first row dec 20-20-18-24-22-24 sts evenly in all sizes = 90-98-108-114-124-138 sts. Repeat A.7 until finished measurements. When piece measures 66-68-70-72-74-76 cm, work as follows: Work the first 32-36-40-42-46-53 sts, cast off the next 26-26-28-30-32-32 sts and work the remaining 32-36-40-42-46-53 sts. Then finish each shoulder separately as follows: On next row from the neck, dec 1 st = 31-35-39-41-45-52 sts remain on each shoulder. When piece measures 68-70-72-74-76-78 cm, work 1 ridge over all sts. Cast off. Work the other shoulder the same way. RIGHT FRONT PIECE: Cast on 81-85-89-98-102-111 sts on circular needle size 3.5 mm with Lima. Work rib as follows: A.1 (= 12 sts), A.2 (find diagram for correct size), P 2, A.3, A.4, A.5 (find diagram for correct size), 1 edge st in garter st. Continue like this and repeat the first 2 rows in A.2-A.5 until 12 rows have been worked. Switch to circular needle size 4 mm and continue with pattern = 73-77-81-89-93-101 sts. NOTE: Now repeat diagram from arrow. When piece measures 40-41-42-43-44-46 cm, beg shawl collar while AT THE SAME TIME working shoulder as explained below: READ ALL OF THE FOLLOWING SECTION BEFORE CONTINUING! SHAWL COLLAR: Work first st in A.1, 1 YO, work the remaining 11 sts in A.1, dec 1 st - READ DECREASE TIP, continue over the remaining sts on needle as before. Repeat displacement over A.1 every 1½ cm 0-2-3-3-3-4 times in total and every cm 26-24-23-24-25-24 times = 26-26-26-27-28-28 sts (incl the first st in A.1). Work the inc sts towards mid front in garter st, AT THE SAME TIME work SHORT ROWS - see explanation above. SHOULDER: When piece measures 46-47-48-49-50-51 cm, cast off 3-3-3-4-4-4 sts at beg of the next 2 rows from WS = 67-71-75-81-85-93 sts on needle. When piece measures 53-54-55-56-57-58 cm, work collar sts in garter st and A.1 as before, then work A.7 over the remaining sts on needle, AT THE SAME TIME dec 10-10-10-13-12-13 sts evenly = 57-61-65-68-73-80 sts. Continue pattern until finished measurements. Then work as follows from RS: When piece measures 68-70-72-74-76-78 cm - adjust after back piece - work the first 26-26-26-27-28-28 sts before slipping them on a stitch holder, then work a ridge over the remaining 31-35-39-41-45-52 sts. Cast off. Slip sts back on needle. Then work short rows in garter st as follows, beg from WS: Work over all 26-26-26-27-28-28 sts, * 2 rows back and forth over the first 13-13-14-14-15-15 sts, 2 rows over all sts *, repeat from *-* until piece measures 7-7-7-8-8-8 cm on the shortest. Cast off. LEFT FRONT PIECE: Work as right front piece but reversed. I.e. work A.10 instead of A.1, A.9 instead of A.2 and A.6 instead of A.5. Remember BUTTONHOLES on left band - see explanation above. SLEEVE: The sleeve is worked back and forth on circular needle. Cast on 59-64-64-69-69-74 sts (incl 1 edge st in garter st in each side) on circular needle size 3.5 mm with Lima. Work rib as follows: 1 edge st in garter st, * K 2, P 3 *, repeat from *-* until 3 sts remain, K 2, 1 edge st in garter st. Continue like this until rib measures 4 cm. Switch to circular needle size 4 mm and work 1 row in stocking st while AT THE SAME TIME dec 9-10-10-11-11-12 sts evenly = 50-54-54-58-58-62 sts. Continue with A.8 inside 1 edge st in garter st in each side. When piece measures 14-13-8-8-13-11 cm, inc 1 st inside edge st in garter st in each side - read INCREASE TIP. Repeat inc approx. every 2-2-1½-1½-1½-1½ cm 20-20-22-22-25-25 more times = 92-96-100-104-110-114 sts. When piece measures 57-56-55-54-53-50 cm, cast off at beg of every row in each side: 3 sts 1-1-1-2-2-2 times, 2 sts 1 time and 3 st 2-2-2-3-3-3 times. Cast off. Sleeve measures approx. 60-59-58-58-57-54 cm. Knit another sleeve. POCKETS: Worked back and forth on circular needle. Cast on 42 sts on circular needle size 4 mm with Lima. Work 1 ridge in garter st AT THE SAME TIME inc 6 sts evenly on row from RS = 48 sts. On next row from RS work pattern as follows: NOTE: Beg and repeat pattern in A.3 and A.4 from 5th row in A.3 and A.4. 1 edge sts in garter st, A.3, A.4, A.8, 1 edge st in garter st. Continue like this back and forth until A.3 and A.4 have been worked 2 times vertically. Then continue with the first 6 rows from arrows in diagram 1 more time. Then work and dec as follows: 1 edge st in garter st, K the next 4 sts tog 2 by 2 (= 2 sts dec), continue as before over the next 7 sts, K the next 4 sts tog 2 by 2, continue with pattern as before over the next 15 sts, K the next 4 sts tog 2 by 2, Work remaining sts as before and finish with 1 edge st in garter st. Then switch to needle 3.5 mm and work 2 ridges over all sts, beg from WS. Cast off from WS. Work another pocket the same way but reversed. ASSEMBLY: Sew the shoulder seams tog. Sew sleeves in body. Sew underarm and side seams in one inside 1 edge st in garter st. Sew the buttons on to the right band. Sew cast-off edge on collars tog mid back, sew collar to the back of neck. Fasten pockets on front pieces so that pattern on pocket is placed over pattern on front piece. Sew pocket neatly through both layers in edge st in garter st in each side and at the bottom of pocket. Cut the yarn and fasten. |
|||||||||||||||||||
Diagram explanations |
|||||||||||||||||||
|
|||||||||||||||||||
 |
|||||||||||||||||||
 |
|||||||||||||||||||
 |
|||||||||||||||||||
Have you finished this pattern?Tag your pictures with #dropspattern or submit them to the #dropsfan gallery. Do you need help with this pattern?You'll find 24 tutorial videos, a Comments/Questions area and more by visiting the pattern on garnstudio.com. © 1982-2026 DROPS Design A/S. We reserve all rights. This document, including all its sub-sections, has copyrights. Read more about what you can do with our patterns at the bottom of each pattern on our site. |
|||||||||||||||||||


With over 40 years in knitting and crochet design, DROPS Design offers one of the most extensive collections of free patterns on the internet - translated to 17 languages. As of today we count 324 catalogues and 12245 patterns translated into English (UK/cm). 12245
We work hard to bring you the best knitting and crochet have to offer, inspiration and advice as well as great quality yarns at incredible prices! Would you like to use our patterns for other than personal use? You can read what you are allowed to do in the Copyright text at the bottom of all our patterns. Happy crafting!
Post a comment to pattern DROPS Extra 0-1132
We would love to hear what you have to say about this pattern!
If you want to leave a question, please make sure you select the correct category in the form below, to speed up the answering process. Required fields are marked *.