
Popular categories
Looking for a yarn?


Comments / Questions (65)
![]() Jeanétte Zeybrandt wrote:
Jeanétte Zeybrandt wrote:
En väldigt rolig modell... MEN tyvärr så räckte inte garnet. Beställt 600gram till stl L enl beskrivningen, men fick beställa ett nystan till. stickar enligt beskrivningen och måtten. Blev tyvärr en extrakostnad och väntetid... Mvh Jeanétte
20.04.2016 - 11:16
![]() Marija wrote:
Marija wrote:
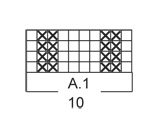
Beidseitig jedes A.1 (= Raglanlinie) 1 M zunehmen, indem je 1 Umschlag gearb wird. In der nächsten Rd die Umschläge re verschränkt str, um Löcher zu vermeiden. Hallo liebes Drops Team! Sorry, aber ich verstehe den Teil oben nicht. Wo genau wird der Umschlag im Diagramm gemacht? In der Mitte? Jeweils eins vor und eins nach dem Diagramm? lg Marija
21.03.2016 - 13:53DROPS Design answered:
Liebe Marija, Sie sehen die 10 Maschen des Rapports A1 unten neben der Schnittzeichnung. Es wird beidseitig neben dem Diagramm zugenommen, vielleicht haben Sie das Wort «indem» falsch interpretiert? Es wird nicht in dem Diagramm zugenommen, sondern indem man einen Umschlag macht.
21.03.2016 - 17:30
![]() Ellen Merethe Rove wrote:
Ellen Merethe Rove wrote:
En fantastisk genser som jeg skal strikke et par stk av. Har allerede kjøpt Belle garn. Skjønner ikke bæret av oppskriften, ønsker meg oppskrift på denne strikket nedenfra og opp. Vedder på at mange flere ville strikket den da.
17.02.2016 - 17:05
![]() Annamaria wrote:
Annamaria wrote:
La ringrazio per la cortesia, buona serata.
15.12.2015 - 17:50
![]() Linda Fischer wrote:
Linda Fischer wrote:
Hallo liebes Drops-Team, ich bin nun bei den Ärmeln angekommen und verstehe leider die Sache mit den Zunahmen und Abnahmen nicht. Da steht beide Raglanmuster im Ärmel also A1 sollen sich dadurch unter dem Arm treffen? Wie geht das, wenn ich ja gleichzeitig vor A1 anschlage und nach A1 abnehme...? Wie oft muss ich das machen? Ich hoffe das ist irgendwie verstänldich. Danke für die Hilfe. LG
13.12.2015 - 13:59DROPS Design answered:
Unter dem Arm machen Sie ja nur die Abnahmen, also jeweils neben A.1, es sind die 8 angeschlagenen M, die Sie nach und nach abnehmen, die Zunahmen machen Sie oben auf dem Arm. Dadurch werden es unter dem Arm immer weniger M und oben auf dem Arm mehr.
20.12.2015 - 10:39
![]() Katharina Ejem wrote:
Katharina Ejem wrote:
Was ich nicht verstehe: wann genau und wie oft werden die verkürzten Reihen am Rücken gestrickt? Gleich nach dem "Bündchen" am Hals, also vor allen zunahmen? Und dann nur einmal? Danke für eine schnelle Antwort
08.12.2015 - 12:31DROPS Design answered:
Die verkürzten R stricken Sie, nachdem Sie die erste R mit der Mustereinteilung gestrickt haben. Sie stricken die verkürzten R so lange, bis Sie über insgesamt 64 M gestrickt haben. Dann stricken Sie normal weiter und beginnen mit den Raglanzunahmen.
12.12.2015 - 21:05
![]() Jonatan M wrote:
Jonatan M wrote:
Har gjort om denna nu flera gånger - men blir aldrig riktigt nöjd. När jag ökar varje varv under de första 4 varven blir det alltid stora hål, oavsett hur hårt jag håller. Tips på hur man kan få bort detta? (händer vid maskorna där omslag + föregående omslag stickas vriden efter varandra)
11.10.2015 - 16:22DROPS Design answered:
Hej Jonatan, vi ökar med omslag och stickar omslagen vriden på nästa varv. Blir du inte nöjd går det även att öka vid att sticka 2 m i én där du skall öka. Lycka till!
12.10.2015 - 11:34
![]() Jenny wrote:
Jenny wrote:
Hallo :), nach anfänglicher Zuversicht verzweifle ich nun schon beim zweiten Absatz ...: Ich habe jetzt 148 (Größe XL) Maschen auf meiner Nadel, Halsrand ist fertig gestrickt. Und ab dann verstehe ich nichts mehr. Werden die Zunahmen für Rumpf und Arm gleichzeitig gemacht und in der ersten Runde 4 Zunahmen, dann 30 Zunahmen in der nächsten Runde. Wie viele Runden muss ich stricken bis ich auf das Endergebnis von 392 Maschen komme? :( Liebe Grüße Jenny
26.09.2015 - 02:51DROPS Design answered:
Die Zunahmen für Rumpf und Ärmel laufen gleichzeitig. Anfänglich müssen Sie beachten, dass Sie in der ersten Zunahme-Rd nur am Rumpf zunehmen (d.h. 4 M zugenommen), dann kommen in der nächsten Runde die Zunahmen für die Ärmel hinzu (dann haben Sie in dieser Rd 8 Zunahmen gemacht). In der nächsten Rd sind es wieder nur die Zunahmen am Rumpfteil, denn Sie nehmen ja am Anfang 4x in JEDER Runde am Rumpf zu, aber bei den Ärmeln nur in jeder 2. Rd. Anschließend nehmen Sie an Rumpf und Ärmeln in jeder 2. Rd zu, dabei bedeutet 30 x, dass es 30 Zunahme-Rd sind. Sie nehmen in jeder Zunahme-Rd nur 8 M zu, an jedem Markierer 2.
10.10.2015 - 09:41
![]() Jiyan wrote:
Jiyan wrote:
Hallo, wie viel Garn benötigt man in etwa für Größe L von 'Belle' ? Danke und viele Grüße
20.09.2015 - 02:36DROPS Design answered:
Die Garnmenge finden Sie im Kopf neben dem Foto unter Material (das steht unter Größe). Für Größe L sind es demnach 600 g. Die Mengenangaben sind durch Gedankenstriche in der gleichen Reihenfolge wie die Größenangaben angegeben, gleiches gilt für die M-Zahlen und die cm-Angaben in der Anleitung.
20.09.2015 - 12:48
![]() Daniel wrote:
Daniel wrote:
Hi I'm a bit confused for the decrease on the first few rounds of the sleeve. Is the YO to be done just the once after the first A1 or is it done before the second as well (i.e. two increases on the main section of the sleeve)? And is the decrease similarly done twice, on either side of the 8 new stitches at the underarm? It seems with the way it is written one side is only being decreased and this could lead to a twist in the pattern.
14.09.2015 - 09:48DROPS Design answered:
Dear Daniel, you will work as follows on mid underarm: work to A.1, 1 YO, work A.1, then work the 8 sts cast on mid underarm as follows: K2 tog, K until 2 sts remain before next A.1 (= work the sts mid under arm), K2 tog, A.1, 1YO. Repeat until both A.1 has disappeared and you have only stocking sts around. Happy knitting!
14.09.2015 - 14:04
|
|||||||
Carter |
|||||||
 |
 |
||||||
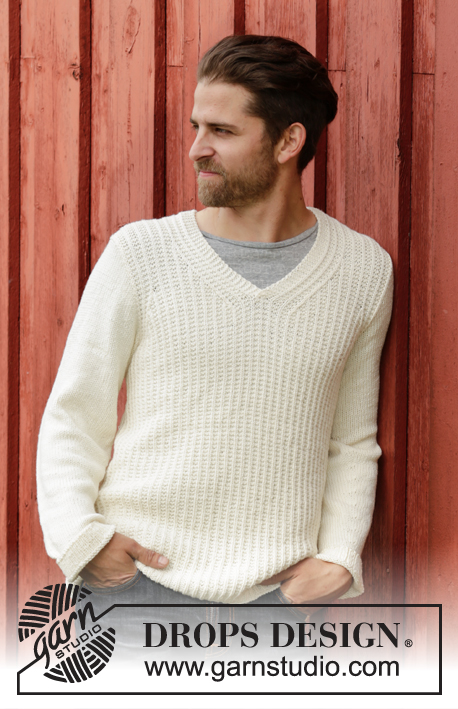
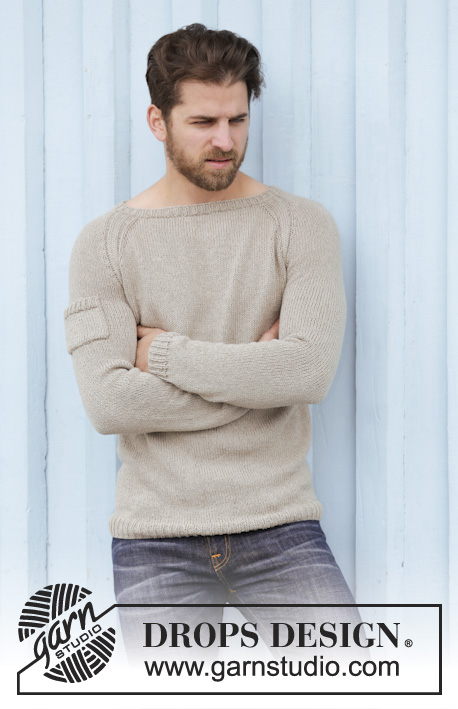
Men's knitted jumper in DROPS Belle, with raglan and worked top down. Size: S - XXXL.
DROPS Extra 0-1131 |
|||||||
|
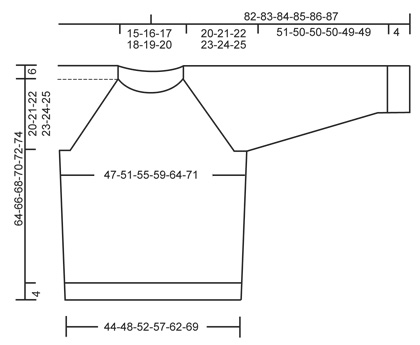
GARTER ST (back and forth): K all rows. 1 ridge = 2 rows K. RAGLAN: Inc for raglan by working a YO on each side of A.1 in every raglan. On next round K YOs twisted to avoid holes. PATTERN: See diagram A.1. DECREASE TIP: Dec 1 st before marker as follows: Work until 2 sts remain before marker, slip 1 st as if to K, K 1, psso. Dec 1 st after marker as follows: K 2 tog. ---------------------------------------------------------- JUMPER: Worked in the round on circular needle, top down. Cast on 114-117-120-123-126-129 sts on circular needle size 3.5 mm with Belle. K 1 round. Then work rib (= K 1/P 2). Switch to circular needle size 4 mm when piece measures 2 cm. Now continue piece in stocking st. On first round dec 18-17-16-15-14-13 sts evenly = 96-100-104-108-112-116 sts (this is done to give the garment better shape). On next round, inc 24-26-30-40-48-70 sts evenly = 120-126-134-148-160-186 sts. Insert 1 marker at beg of round = mid back. On next round work as follows from mid back: K 17-18-20-24-27-33 (= half back piece), A.1, K 6, A.1 (= sleeve), K 34-37-41-48-54-67 (= front piece), A.1, K 6, A.1 (= sleeve ), K 17-19-21-24-27-34 (= half back piece). Continue pattern like this while AT THE SAME TIME working an elevation in the back as follows: Work 8 sts past marker, turn, tighten yarn and work 16 sts back, turn, tighten yarn and work 24 sts, turn, continue to work 8 sts more for every turn until a total of 64 sts have been worked after last turn, turn and work 1 round over all sts until mid back again. On next round start inc for RAGLAN – see explanation above - NOTE: Inc differently on body and sleeves. REMEMBER THE KNITTING TENSION RAGLAN BODY: Inc every round 0-4-4-4-4-4 times in total, then every other round 28-27-29-30-32-33 times. There are 90-99-107-116-126-141 sts on front and back piece. RAGLAN SLEEVE: Inc every other round 16-19-21-22-24-27 times, then every 4th round 6-5-5-5-5-4 times. There are 70-74-78-80-84-88 sts for each sleeve. When all inc are done there are 320-346-370-392-420-458 sts on needle. On next round, work as follows: K 45-49-53-58-63-70, slip the next 70-74-78-80-84-88 sts on a stitch holder for sleeve, cast on 8 new sts under sleeve (insert a marker in the middle of these new sts), K 90-99-107-116-126-141, slip the next 70-74-78-80-84-88 sts on a stitch holder for sleeve, cast on 8 new sts under sleeve (insert a marker in the middle of these new sts), K 45-50-54-58-63-71 = 196-214-230-248-268-298 sts. NOW MEASURE PIECE FROM HERE! BODY: When piece measures 4 cm, dec 1 st on each side of markers in the side - READ DECREASE TIP (= 4 sts dec). Repeat dec every 14-14-14-30-30-30 cm 2-2-2-1-1-1 more times = 184-202-218-240-260-290 sts. When piece measures 42-43-44-45-46-47 cm, K 1 round while AT THE SAME TIME inc 20-17-16-15-16-13 sts evenly = 204-219-234-255-276-303 sts. Switch to circular needle size 3.5 mm. Work rib = K 1/P 2. When rib measures 4 cm, loosely cast off K over K and P over P. SLEEVE: Worked in the round on double pointed needles. Slip the 70-74-78-80-84-88 sts from stitch holder back on double pointed needles size 4 mm. Cast on 8 new sts under sleeve, insert 1 marker in the middle of the new sts = 78-82-86-88-92-96 sts. NOW MEASURE PIECE FROM HERE! Work in stocking st AT THE SAME TIME continue A.1 as follows: Inc 1 YO before A.1 up towards middle of sleeve, K 2 tog after A.1 towards under sleeve (i.e. the 8 new sts cast on under sleeve). This is done so that A.1 meets under sleeve and disappears, repeat dec every other round until all sts in both A.1 are gone. K YO twisted on next round, it should not make holes. When piece measures 4 cm, dec 1 st on each side of marker - READ DECREASE TIP. Repeat dec every 3½-3½-3-3-2½-2½ cm 11-12-13-13-14-15 more times = 54-56-58-60-62-64 sts. Work in stocking st until piece measures 51-50-50-50-49-49 cm. K 1 round while AT THE SAME TIME inc 6-4-5-3-4-2 sts evenly = 60-60-63-63-66-66 sts. Switch to double pointed needles size 3.5 mm and work rib = K 1/P 2. Cast off when piece measures 55-54-54-54-53-53 cm (shorter measurements in the larger sizes because of wider shoulders). Work the other sleeve the same way. POCKET: Cast on 23 sts (incl 1 edge st in each side) on double pointed needles size 4 mm with Belle. Continue in stocking st back and forth with 1 edge st in GARTER ST - see explanation above - in each side of piece. When piece measures 8 cm, adjust so that next row is from WS, inc 4 sts evenly from WS = 27 sts. Switch to double pointed needles size 3.5 mm and work as follows from RS: 1 edge st in garter st, rib = K 1/P 2 until 2 sts remain, finish with K 1 and 1 edge st in garter st. When piece measures 10 cm, cast off K over K and P over P. ASSEMBLY: Sew the openings under the sleeves. Sew the pocket on the left sleeve, approx 45 cm from cast off edge. |
|||||||
Diagram explanations |
|||||||
|
|||||||
 |
|||||||
 |
|||||||
Have you finished this pattern?Tag your pictures with #dropspattern or submit them to the #dropsfan gallery. Do you need help with this pattern?You'll find 25 tutorial videos, a Comments/Questions area and more by visiting the pattern on garnstudio.com. © 1982-2026 DROPS Design A/S. We reserve all rights. This document, including all its sub-sections, has copyrights. Read more about what you can do with our patterns at the bottom of each pattern on our site. |
|||||||


With over 40 years in knitting and crochet design, DROPS Design offers one of the most extensive collections of free patterns on the internet - translated to 17 languages. As of today we count 324 catalogues and 12245 patterns translated into English (UK/cm). 12245
We work hard to bring you the best knitting and crochet have to offer, inspiration and advice as well as great quality yarns at incredible prices! Would you like to use our patterns for other than personal use? You can read what you are allowed to do in the Copyright text at the bottom of all our patterns. Happy crafting!
Post a comment to pattern DROPS Extra 0-1131
We would love to hear what you have to say about this pattern!
If you want to leave a question, please make sure you select the correct category in the form below, to speed up the answering process. Required fields are marked *.