
Popular categories
Looking for a yarn?


Comments / Questions (65)
![]() Isabella wrote:
Isabella wrote:
Sempre sull’alzata: quello che continuo a non capire bene è cosa significhi “allo stesso tempo”. Il lavoro procede in tondo, l’alzata invece richiede di tornare avanti e indietro. Questo non crea due fori ai lati dell’alzata?
28.07.2018 - 09:32
![]() Isabella wrote:
Isabella wrote:
Salve, ho bisogno di aiuto perché non capisco cosa sia l’alzata sul dietro, e come si unisca al resto. Forse potrebbe aiutare un’immagine o uno schizzo del dietro. Grazie
22.07.2018 - 20:26DROPS Design answered:
Buonasera Isabella. Un'alzata consiste nel lavorare alcuni ferri solo sul numero di maglie indicate per rendere lo scollo sul dietro leggermente più alto rispetto allo scollo sul davanti e garantire una vestibilità migliore al capo. Buon lavoro!
22.07.2018 - 20:41
![]() Edw wrote:
Edw wrote:
Bonjour, Super j’ai bien fais ça! 😀 Merci pour vos réponses rapides !
13.04.2018 - 12:15
![]() Edw wrote:
Edw wrote:
Bonjour, Donc pour les manches, on augmente avant et après les 6m endroits qui se trouvent entre les A1?
13.04.2018 - 08:49DROPS Design answered:
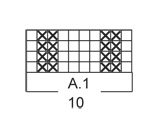
Bonjour Edw, pas exactement, A.1 = 1 m end, 2 m env, 4 m end, 2 m env, 1 m end. Les augmentations se font au début de la manche après A.1 soit après la dernière m de A.1 et à la fin de la manche avant A.1 soit avant la 1ère m de A.1. Vous pouvez placer un marqueur avant et après chaque A.1 pour bien repérer où faire les augmentations. Bon tricot!
13.04.2018 - 11:18
![]() Edw wrote:
Edw wrote:
Bonjour, Je commence le raglan mais j’ai un doute sur ma compréhension... au niveau des manches, faut il faire les augmentations tout de suite après le 1er marqueur de manche (donc début de manche) et juste avant le 2eme marqueur de manche (donc fin de manche) ou faut il les faire juste avant et après A1(c’est a dire tricoter les augmentations précédentes après le 1er marqueur de manche puis arrivé à A1 on fait l’augmentation) ? Merci d’avance pour votre aide
13.04.2018 - 07:25DROPS Design answered:
Bonjour Mme Edw, on augmente pour le raglan après/avant A.1, donc pour les manches, on augmente après A.1 en début de manche et avant A.1 à la fin de la manche (= idem pour le dos et le devant, on augmente après A.1 au début du dos/devant et avant A.1 à la fin du dos/devant). Les augmentations vont juste se faire à un rythme différent sur le dos/devant et sur les manches Bon tricot!
13.04.2018 - 08:21
![]() Rosita wrote:
Rosita wrote:
Salve,ho bisogno di un aiuto in quanto per questo modello che ho iniziato non e ben chiaro dove inserire i marcapunti,ce un video specifico?grazie
30.12.2017 - 12:15DROPS Design answered:
Buonasera Rosita. Sul davanti/dietro, il segno va inserito nel passaggio tra l'ultima maglia avviata e la prima maglia avviata. Quando poi separa il davanti/dietro dalle maniche, deve avviare 8 m per il sottomanica e inserisce un segno al centro di queste 8 maglie. Buon lavoro!
30.12.2017 - 21:26
![]() Peppis wrote:
Peppis wrote:
Jag får hål i ärmen när jag maskar av vid armhålet, vad gör jag för fel?
13.11.2017 - 10:55DROPS Design answered:
Hej Peppis, det syr du ihop när du är klar med tröjan. Lycka till!
13.11.2017 - 14:58Mariia wrote:
Hi, I see all yarn marked with a yarn group. Does this mean that if some pattern suites for yarn group 'B', so I can use any yarn from that group? Thanks.
09.10.2017 - 10:23
![]() Amber wrote:
Amber wrote:
For the front and back raglan body increases (I am using the XL pattern) it says to increase 4 stitches every round, and 30 every other round. Does this mean I increase 4, then 30 on the next row, then 4 then 30; or do I increase 4 then 30 on the next round, then knit one round even, increase 4 on the next round, then 30 again on the next round? Do you increase the 30 in between every 4, or every other time after 4?
31.07.2017 - 19:15DROPS Design answered:
Dear Amber, On body you inc every round a total of 4 times then every other round a total of 30 times. On sleeve you inc every other round a total of 22 times and every 4th round a total of 5 times. Increase as explained under "RAGLAN", ie inc 1 after A.1 at the beg of front/back piece or sleeves and/or inc 1 st before A.1 at the end of front/back piece or sleeves. Happy knitting!
01.08.2017 - 09:09
![]() Peppis wrote:
Peppis wrote:
Nu borde förklara RAGLAN, lite bättre. Så även en nybörjare förstår!
12.07.2017 - 13:53
|
|||||||
Carter |
|||||||
 |
 |
||||||
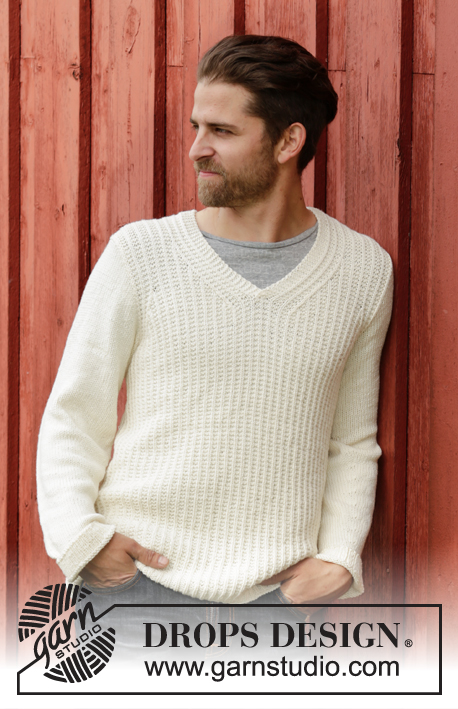
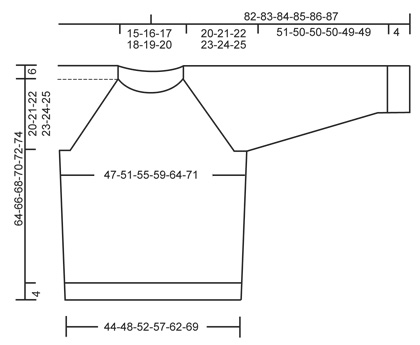
Men's knitted jumper in DROPS Belle, with raglan and worked top down. Size: S - XXXL.
DROPS Extra 0-1131 |
|||||||
|
GARTER ST (back and forth): K all rows. 1 ridge = 2 rows K. RAGLAN: Inc for raglan by working a YO on each side of A.1 in every raglan. On next round K YOs twisted to avoid holes. PATTERN: See diagram A.1. DECREASE TIP: Dec 1 st before marker as follows: Work until 2 sts remain before marker, slip 1 st as if to K, K 1, psso. Dec 1 st after marker as follows: K 2 tog. ---------------------------------------------------------- JUMPER: Worked in the round on circular needle, top down. Cast on 114-117-120-123-126-129 sts on circular needle size 3.5 mm with Belle. K 1 round. Then work rib (= K 1/P 2). Switch to circular needle size 4 mm when piece measures 2 cm. Now continue piece in stocking st. On first round dec 18-17-16-15-14-13 sts evenly = 96-100-104-108-112-116 sts (this is done to give the garment better shape). On next round, inc 24-26-30-40-48-70 sts evenly = 120-126-134-148-160-186 sts. Insert 1 marker at beg of round = mid back. On next round work as follows from mid back: K 17-18-20-24-27-33 (= half back piece), A.1, K 6, A.1 (= sleeve), K 34-37-41-48-54-67 (= front piece), A.1, K 6, A.1 (= sleeve ), K 17-19-21-24-27-34 (= half back piece). Continue pattern like this while AT THE SAME TIME working an elevation in the back as follows: Work 8 sts past marker, turn, tighten yarn and work 16 sts back, turn, tighten yarn and work 24 sts, turn, continue to work 8 sts more for every turn until a total of 64 sts have been worked after last turn, turn and work 1 round over all sts until mid back again. On next round start inc for RAGLAN – see explanation above - NOTE: Inc differently on body and sleeves. REMEMBER THE KNITTING TENSION RAGLAN BODY: Inc every round 0-4-4-4-4-4 times in total, then every other round 28-27-29-30-32-33 times. There are 90-99-107-116-126-141 sts on front and back piece. RAGLAN SLEEVE: Inc every other round 16-19-21-22-24-27 times, then every 4th round 6-5-5-5-5-4 times. There are 70-74-78-80-84-88 sts for each sleeve. When all inc are done there are 320-346-370-392-420-458 sts on needle. On next round, work as follows: K 45-49-53-58-63-70, slip the next 70-74-78-80-84-88 sts on a stitch holder for sleeve, cast on 8 new sts under sleeve (insert a marker in the middle of these new sts), K 90-99-107-116-126-141, slip the next 70-74-78-80-84-88 sts on a stitch holder for sleeve, cast on 8 new sts under sleeve (insert a marker in the middle of these new sts), K 45-50-54-58-63-71 = 196-214-230-248-268-298 sts. NOW MEASURE PIECE FROM HERE! BODY: When piece measures 4 cm, dec 1 st on each side of markers in the side - READ DECREASE TIP (= 4 sts dec). Repeat dec every 14-14-14-30-30-30 cm 2-2-2-1-1-1 more times = 184-202-218-240-260-290 sts. When piece measures 42-43-44-45-46-47 cm, K 1 round while AT THE SAME TIME inc 20-17-16-15-16-13 sts evenly = 204-219-234-255-276-303 sts. Switch to circular needle size 3.5 mm. Work rib = K 1/P 2. When rib measures 4 cm, loosely cast off K over K and P over P. SLEEVE: Worked in the round on double pointed needles. Slip the 70-74-78-80-84-88 sts from stitch holder back on double pointed needles size 4 mm. Cast on 8 new sts under sleeve, insert 1 marker in the middle of the new sts = 78-82-86-88-92-96 sts. NOW MEASURE PIECE FROM HERE! Work in stocking st AT THE SAME TIME continue A.1 as follows: Inc 1 YO before A.1 up towards middle of sleeve, K 2 tog after A.1 towards under sleeve (i.e. the 8 new sts cast on under sleeve). This is done so that A.1 meets under sleeve and disappears, repeat dec every other round until all sts in both A.1 are gone. K YO twisted on next round, it should not make holes. When piece measures 4 cm, dec 1 st on each side of marker - READ DECREASE TIP. Repeat dec every 3½-3½-3-3-2½-2½ cm 11-12-13-13-14-15 more times = 54-56-58-60-62-64 sts. Work in stocking st until piece measures 51-50-50-50-49-49 cm. K 1 round while AT THE SAME TIME inc 6-4-5-3-4-2 sts evenly = 60-60-63-63-66-66 sts. Switch to double pointed needles size 3.5 mm and work rib = K 1/P 2. Cast off when piece measures 55-54-54-54-53-53 cm (shorter measurements in the larger sizes because of wider shoulders). Work the other sleeve the same way. POCKET: Cast on 23 sts (incl 1 edge st in each side) on double pointed needles size 4 mm with Belle. Continue in stocking st back and forth with 1 edge st in GARTER ST - see explanation above - in each side of piece. When piece measures 8 cm, adjust so that next row is from WS, inc 4 sts evenly from WS = 27 sts. Switch to double pointed needles size 3.5 mm and work as follows from RS: 1 edge st in garter st, rib = K 1/P 2 until 2 sts remain, finish with K 1 and 1 edge st in garter st. When piece measures 10 cm, cast off K over K and P over P. ASSEMBLY: Sew the openings under the sleeves. Sew the pocket on the left sleeve, approx 45 cm from cast off edge. |
|||||||
Diagram explanations |
|||||||
|
|||||||
 |
|||||||
 |
|||||||
Have you finished this pattern?Tag your pictures with #dropspattern or submit them to the #dropsfan gallery. Do you need help with this pattern?You'll find 25 tutorial videos, a Comments/Questions area and more by visiting the pattern on garnstudio.com. © 1982-2026 DROPS Design A/S. We reserve all rights. This document, including all its sub-sections, has copyrights. Read more about what you can do with our patterns at the bottom of each pattern on our site. |
|||||||


With over 40 years in knitting and crochet design, DROPS Design offers one of the most extensive collections of free patterns on the internet - translated to 17 languages. As of today we count 324 catalogues and 12245 patterns translated into English (UK/cm). 12245
We work hard to bring you the best knitting and crochet have to offer, inspiration and advice as well as great quality yarns at incredible prices! Would you like to use our patterns for other than personal use? You can read what you are allowed to do in the Copyright text at the bottom of all our patterns. Happy crafting!
Post a comment to pattern DROPS Extra 0-1131
We would love to hear what you have to say about this pattern!
If you want to leave a question, please make sure you select the correct category in the form below, to speed up the answering process. Required fields are marked *.