
Popular categories
Looking for a yarn?


Comments / Questions (47)
![]() Manoa wrote:
Manoa wrote:
Bonjour, Je tricote beaucoup mais n'ai encore jamais crocheté. Je cherche un modèle faisable pour une débutante, sans trop de difficulté : celui-ci est-il complexe à réaliser, svp ? Merci de vos conseils.
29.12.2019 - 21:20DROPS Design answered:
Bonjour Manoa! Ce modele est un peu complexe. Recherchez les modeles gratuites par categories, choisisses ‘modeles basiques’ et ‘crochet’. Commencez par une echarpe ou un bandeau. Chacun de nos modèles a des tutoriels vidéo spécifiques pour vous aider. Bon crochet!
29.12.2019 - 23:40
![]() Suz wrote:
Suz wrote:
Jeg føler meg litt dum nå, men jeg forstår ikke hekleinfoen sett opp mot hvordan alt annet skal hekles. Kan noen forklare meg hvordan jeg implementerer hekleinfoen? Håper jeg er klar nok i spørsmålet mitt. På forhånd takk.
13.12.2019 - 12:13DROPS Design answered:
Hej Suz, jo når du ifølge opskriften skal starte med 1 st, så hækler du istedet for 3 lm (for at komme op til næste række). God fornøjelse!
17.12.2019 - 11:50
![]() Kath wrote:
Kath wrote:
I'm attempting size 9/10 on the yoke when you have to put in markers, at end of row the pattern states you should have 15 sc left ,but I have 19. By pattern I should have 88, but adding 15+12+30+12+15 that the pattern states ,only adds up to 84. Should I then make the left and right back 16sts and armholes 13sts to add up to 88sts.
31.08.2019 - 09:58DROPS Design answered:
Dear Kath, the markers should be inserted in a stitch, not between stitches, so that you will work the increase row as follows: 15 dc, (2dc, 2 ch, 2 dc) in the stitch with marker, 12 dc, (2 dc, 2 ch, 2 dc) in the stitch with marker, 30 dc, (2 dc, 2 ch, 2 dc) in the stitch with marker, 12 dc, (2 dc, 2 ch, 2 dc) in the stitch with marker, 15 dc = 15 + 4 + 12 + 4 + 30 + 4 + 12 +4 + 15= 100 dc (in larger size). Happy crocheting!
02.09.2019 - 09:26
![]() Hanne wrote:
Hanne wrote:
Takk for svar 😊Da blir det som jeg trudde 9 rader totalt 👍😊
04.07.2019 - 11:43
![]() Hanne wrote:
Hanne wrote:
Det er ikke økning med 16 staver på 1.rad, kun 12 staver. Og derfor blir det kun 208 staver totalt etter 8 råder. LES min forrige kommentar! Må hekle 9 råder for å få 224 staver.
04.07.2019 - 08:38DROPS Design answered:
Raden med ökning av 12 st gör du kun 1 gang, efter det har du 96 st. Efter det gör du ökningar med 16 st per rad och detta gör du 8 ganger (den första ökningen av 12 st på raden är alltså inte inräknad när vi skriver att ökningen ska göras totalt 8 ganger). Räknar man med den första raden med ökning av 12 st blir det totalt 9 rader med ökning. Mvh DROPS Design
04.07.2019 - 11:23
![]() Hanne wrote:
Hanne wrote:
Hei Hekler i str 5/6 år. Det skal hekles i alt 8 rader med økning. Står at det etter økning skal være totalt 224 staver. Får ikke dette til å stemme. 1.rad økes med 12 staver, rad 2-8 økes med 7 x 16 staver = 96 pluss 112 = 208 staver. Altså 16 staver mindre. Skal det da hekles en rad til = 9 rader?
04.07.2019 - 05:14DROPS Design answered:
Hej Hanne. Det ökas 16 st på varje rad vid raglanökning (hekle 2 st + 2 lm + 2 st om hver lm-bue i hver raglanlinje). Ökningen gjentas totalt 8 ganger; 96 + (16x8) = 224 st. Lycka till!
04.07.2019 - 07:03
![]() Anna wrote:
Anna wrote:
Hallo, muss ich bei dem Fächermuster in der 3.Rd nur bis zum ersten LM-Bogen KM häkeln und dann immer 3Stb, 2Lm, 3 Stb wiederholen oder nach den 3Stb bis zum nächsten LM-Bogen wieder KM und so weiter? Viele Grüße Anna
11.06.2019 - 07:06DROPS Design answered:
Liebe Anna, bei dem Fächermuster sollen Sie immer die 3. Rd wiederholen = kett-Maschen bis zum ersten Lm-Bogen, dann immer 3 Stb, 2 Lm, 3 Stb um jeden Lm-Bogen herum, und mit 1 Kett-M in das erste Stb enden (= das 1. Stb wird durch 3 Lm ersetzt). Viel Spaß beim häkeln!
11.06.2019 - 12:35
![]() Cathy Allen wrote:
Cathy Allen wrote:
Where you give the size 92 cm ext is that around the chest right around I want to make this for my Gran daughter aged 5 chest is 50cm right around so what size would I go with
21.05.2019 - 06:21DROPS Design answered:
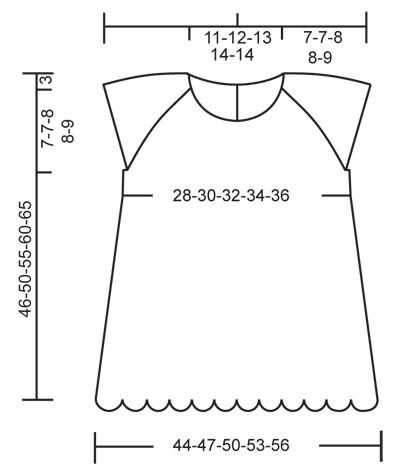
Hi Cathy, There is a diagram with measurements for the different sizes at the bottom of the pattern. The measurements given are width of garment, so for full chest size you need to double these. Happy crocheting!
21.05.2019 - 09:55
![]() Hanna wrote:
Hanna wrote:
Forstår ikke hvordan 2st+2lm+2st (første økning) blir kun 12st økt? Blir det ikke 16? Får ingenting til å gå opp, hjelp! Haha :)
09.05.2019 - 22:52DROPS Design answered:
Hei Hanna. Du hekler i en fastmaske slik: 2 staver + 2 luftmasker + 2 staver. Du har nå 4 staver. Siden du hadde 1 fastmaske fra før (den du hekler i) har du altså økt med 3 masker - den masken du hadde fra før + 3 nye. Du gjør dette ved hvert merke og har 4 merker i arbeidet. Altså 3 masker økt , 4 ganger = 12 masker økt. God fornøyelse
13.05.2019 - 14:04
![]() Laura wrote:
Laura wrote:
Buongiorno, ho iniziato il modello per TG 2 anni ma non mi tornano i conti. Ad esempio il dietro sx si parte con 12 punti e prima di agganciare per le maniche se ne devono avere 28, ma non basta aumentare 6/7 volte...
27.04.2019 - 16:51DROPS Design answered:
Buongiorno Laura. Gli aumenti sono corretti. P.es sul dietro sinistro aumenta 2 m.a nel paragrafo che inizia con: LEGGERE LE INFORMAZIONI PER IL LAVORO ; poi deve aumentare 2 maglie alte per 7 volte. Quindi in tutto aumenta 16 maglie alte che aggiunte alle 12 iniziali, portano a 28 maglie alte. Buon lavoro!
28.04.2019 - 12:09
|
|
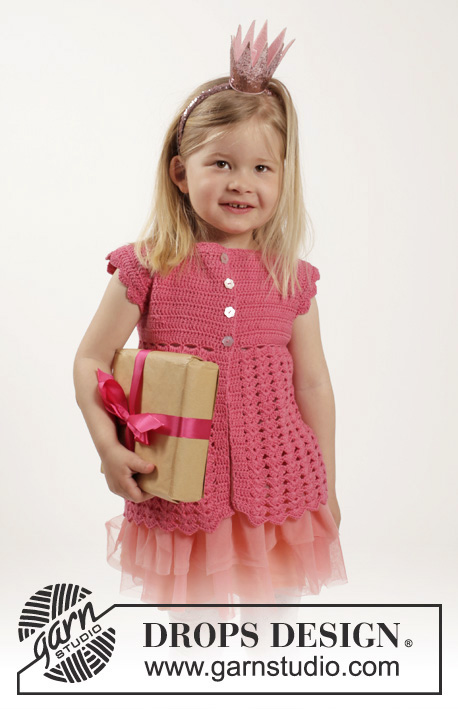
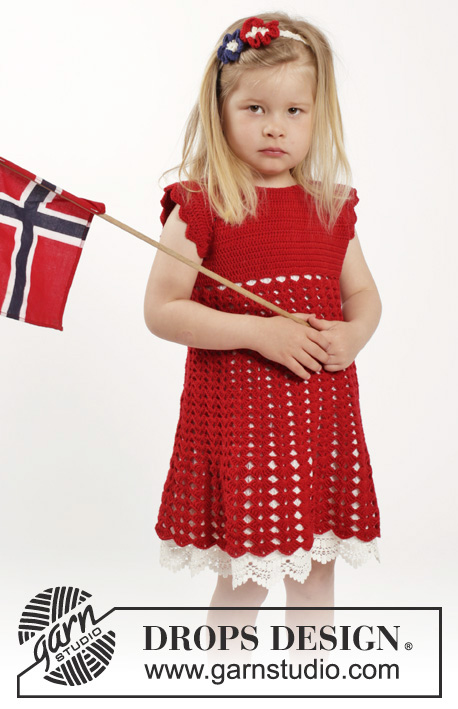
Princess Matilde#princessmatildedress |
|
 |
 |
Crochet dress worked top down with raglan, short sleeves and fan pattern plus hair band with flowers in DROPS BabyMerino, DROPS Safran or DROPS ♥ You #7. Size children 2 - 10 years
DROPS Children 26-5 |
|
|
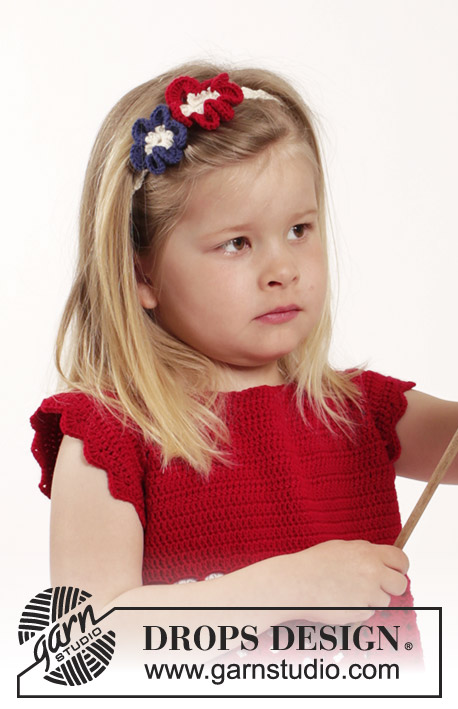
CROCHET INFO: Replace first tr at beg of every tr round/row with 3 ch. Finish round with 1 sl st in 3rd ch from beg of round. Finish row with 1 tr in 3rd ch from beg of previous row. INCREASE TIP: Inc 1 tr by working 2 tr in same st. ---------------------------------------------------------- DRESS: The piece is worked top down. Work back and forth from mid back to after vent mid back, then work piece in the round. YOKE: Work 77-81-85-85-89 loose ch (incl 1 ch to turn with) on hook size 3.5 mm with Baby Merino, Safran or DROPS ♥ You #7. Work 1 dc in 2nd ch from hook, then work 1 dc in every ch the entire row = 76-80-84-84-88 dc on row. Now insert 4 markers in piece for raglan as follows (beg mid back – NOTE: Do NOT work while inserting markers): Skip 12-13-14-14-15 dc (= right back piece), insert 1 marker in next dc, skip 12 dc (= sleeve), insert 1 marker in next dc, skip 24-26-28-28-30 dc (= front piece), insert 1 marker in next dc, skip 12 dc (= sleeve) and insert last marker in next dc (there are now 12-13-14-14-15 dc on left back piece after last marker). READ ALL OF THE FOLLOWING SECTION BEFORE CONTINUING: READ CROCHET INFO and work next row as follows from RS: Work 1 tr in every dc but in every dc with marker work 2 tr + 2 ch + 2 tr = 88-92-96-96-100 tr on row (= 12 tr inc). Then inc for raglan: Continue with tr, and work 2 tr + 2 ch + 2 tr in every ch-space in every raglan line (= 16 tr inc on row). Repeat inc on every row 6-6-7-8-9 more times (= 7-7-8-9-10 times in total) = 200-204-224-240-260 tr on row. REMEMBER THE CROCHET TENSION! Work next row as follows from RS: Work 1 tr in each of the first 28-29-32-34-37 tr (= right back piece), skip the next 44-44-48-52-56 tr (= sleeve), work 8 ch, work 1 tr in each of the next 56-58-64-68-74 tr (= front piece), skip the next 44-44-48-52-56 tr (= sleeve), work 8 ch and work 1 tr in each of the last 28-29-32-34-37 tr (= left back piece). Sleeve caps are now done and piece is worked in the round. BODY: Put piece tog mid back with RS out and work 1 round with tr (work 1 tr in every tr from previous round and 1 tr in every ch under each sleeve – remember CROCHET INFO) = 128-132-144-152-164 sts on round. NOW MEASURE PIECE FROM HERE! Continue with 1 tr in every tr until piece measures 4-4-4-5-5 cm, on last round inc 2-3-1-3-1 tr evenly - READ INCREASE TIP = 130-135-145-155-165 tr. Now work fan pattern as follows: ROUND 1: 1 dc in first tr, *4 ch, skip 4 tr, 1 dc in next tr *, repeat from *-* the entire round and finish with 4 ch, skip 4 tr and 1 sl st in first dc = 26-27-29-31-33 ch-spaces. ROUND 2: 3 tr + 2 ch + 3 tr in every ch-space. ROUND 3: Work sl sts until first ch-space, then work 3 tr + 2 ch + 3 tr in every ch-space. Repeat 3rd round until piece measures 15-17-18-20-21 cm WORK NEXT ROUND AS FOLLOWS: Work sl sts until first ch-space, then work 4 tr + 2 ch + 4 tr in every ch-space. Repeat this round until piece measures 25-28-31-34-36 cm WORK NEXT ROUND AS FOLLOWS: Work sl sts until first ch-space, then work 4 dtr + 2 ch + 4 dtr in every ch-space. Repeat this round until piece measures 35-39-43-48-52 cm Fasten off. ADJUSTING NECKLINE: For better fit work a small elevation at the back of neck. Insert 1 marker in st in each corner in neck, i.e. at beg of every raglan line and 1 marker mid front. Work on hook size 3.5 mm as follows: Beg mid back, work 1 dc in every st until 1 st remains before st with marker, work 1 htr in next st, 1 tr in st with marker and 1 htr in next st, then work 1 dc in every st until 1 st remains before next st with marker, 1 htr in next st, 1 tr in st with marker and 1 htr in next st, the work 1 dc in every st until 4-4-5-5-5 sts remain before marker mid front. Turn piece and work 1 dc in every dc back to mid back but at every marker work 3 dc tog, i.e. work 1 dc in htr but wait with last YO and pull through, work 1 dc in st with marker but wait with last YO and pull through, work 1 dc in next htr but now pull last YO through all 4 sts on hook (= 2 dc dec). Cut the yarn and repeat from mid back to mid front in the other side. BUTTON BAND AT THE BACK: Work along left opening mid back as follows: Work 2 dc in every tr-row and 1 dc in every dc-row. Work 4 rows in total with dc back and forth, fasten off. Along right opening mid back work buttonholes as follows (beg from RS at neck line): Work 4 dc (2 dc in the first two tr-rows), 4 ch (= 1 buttonhole), skip approx. 1 cm, work dc until approx. mid on band, 4 ch, skip approx. 1 cm, work dc until 1 cm remains on band, 4 ch and fasten with 1 dc in last st. Fasten off. Sew the buttons on to button band in the left side. NECK EDGE: Work around the neck as follows: 1 dc in first st, * 2 ch, skip 2 sts, 1 dc in next st *, repeat from *-* the entire row, fasten off. FAN EDGE AROUND SLEEVE CAPS: Work as follows: Work 1 dc in each of the 8 sts mid under sleeve, then work fan edge around the sleeve opening as follows: * Skip approx. 2 cm, in next st work 3 tr + 2 ch + 3 tr, skip approx. 2 cm, 1 dc in next st *, repeat from *-* and finish with 1 sl st in first dc from beg of round (= approx. 9-9-10-10-11 fans along sleeve cap). Fasten off. Repeat at the bottom around the other sleeve cap. ---------------------------------------------------------- HAIR BAND: Work 6 ch on hook size 3.5 mm with off white. Work first row as follows: Work 1 dc in 4th ch from hook, work 1 dc in each of the next 2 ch, turn piece = 3 dc + 3 ch on row. ROW 2: 3 ch, 1 dc in each of the 3 dc from previous row, turn piece. Repeat 2nd row until hair band measures approx. 42-44-46-48 cm (or desired length, subtract approx. 6-8 cm according to the head's circumference). Cut the yarn and sew the 2 short sides tog edge to edge with small stitches. LARGE CROCHET FLOWER: Work 7 ch on hook size 3.5 mm with off white and form a ring with 1 sl st in first ch. ROUND 1: 3 ch (= 1 tr), 2 tr in ch-ring, * 6 ch, 1 dc in last tr made, 3 tr in ch-ring *, repeat from *-* a total of 6 times and finish with 6 ch and 1 sl st in 3rd ch from beg of round = 7 ch-spaces with 3 tr between each. Fasten off. ROUND 2: Switch to red. Work 1 dc in the middle of the first 3 tr on round, * 12 tr in ch-space, skip 1 tr, 1 dc in next tr, skip 1 tr *, repeat from *-* the entire round and finish with 1 sl st in first dc from beg of round. Fasten off. SMALL CROCHET FLOWER: Work 6 ch on hook size 3.5 mm with off white and form a ring with 1 sl st in first ch. ROUND 1: 2 ch (= 1 htr), 2 htr in ch-ring, * 5 ch, 1 dc in last htr made, 3 htr in ch-ring *, repeat from *-* a total of 5 times and finish with 5 ch and 1 sl st in 2nd ch from beg of round = 6 ch-spaces with 3 htr between each. Fasten off. ROUND 2: Switch to blue. Work 1 dc in the middle of the first 3 htr on round, * 10 tr in ch-space, skip 1 htr, 1 dc in next htr, skip 1 htr *, repeat from *-* the entire round and finish with 1 sl st in first dc from beg of round. Fasten off. ASSEMBLY: Sew flowers on hair band with small sts. |
|
 |
|
Have you finished this pattern?Tag your pictures with #dropspattern #princessmatildedress or submit them to the #dropsfan gallery. Do you need help with this pattern?You'll find 14 tutorial videos, a Comments/Questions area and more by visiting the pattern on garnstudio.com. © 1982-2026 DROPS Design A/S. We reserve all rights. This document, including all its sub-sections, has copyrights. Read more about what you can do with our patterns at the bottom of each pattern on our site. |
|


With over 40 years in knitting and crochet design, DROPS Design offers one of the most extensive collections of free patterns on the internet - translated to 17 languages. As of today we count 325 catalogues and 12298 patterns translated into English (UK/cm). 12298
We work hard to bring you the best knitting and crochet have to offer, inspiration and advice as well as great quality yarns at incredible prices! Would you like to use our patterns for other than personal use? You can read what you are allowed to do in the Copyright text at the bottom of all our patterns. Happy crafting!
Post a comment to pattern DROPS Children 26-5
We would love to hear what you have to say about this pattern!
If you want to leave a question, please make sure you select the correct category in the form below, to speed up the answering process. Required fields are marked *.