
Popular categories
Looking for a yarn?


Comments / Questions (47)
![]() Gillian Sansum wrote:
Gillian Sansum wrote:
Hi I have looked at the diagram provided and it looks like it is a round neck....I seem to have ended up with a square neck...your help please thanks Gillian
02.08.2022 - 13:11DROPS Design answered:
Dear Mrs Sansum, at the very end, you will crochet an elevation to make the neck higher on the back so that the neckline will look round - see ADJUSTING NECKLINE. Happy crocheting!
02.08.2022 - 17:15
![]() Jette Brøns wrote:
Jette Brøns wrote:
Hej. Jeg har et spørgsmål angående kjolen. Den hvide underdel er den også hæklet? Venlig hilsen Jette Brøns
12.01.2022 - 08:23DROPS Design answered:
Hej Jette, nej det er kun det røde i kjolen som er hæklet. God fornøjelse!
13.01.2022 - 11:32
![]() Marianne wrote:
Marianne wrote:
Vedr. vifteærme Det passer bedre med at springe over 2masker pr. gang og ikke 2cm.
25.11.2021 - 16:31
![]() Kirstine Rasmussen wrote:
Kirstine Rasmussen wrote:
Lige meget hvad jeg gør, så får jeg aldrig de rigtige antal masker til når jeg har hæklet de første 7 rækker, hvor jeg skal ende med 204 masker. Der mangler mange. Hvad mon jeg gør forkert?
19.11.2021 - 21:35DROPS Design answered:
Hej Kirstine, du har 92 masker, tager 16 masker ud 7 gange = 112 = 204 masker - god fornøjelse!
23.11.2021 - 09:11
![]() Fia Älander wrote:
Fia Älander wrote:
Det står "när arbetet mäter 15 cm.... var ska jag måta från då? jag virkar den minsta storleken
15.06.2021 - 16:55DROPS Design answered:
Hej Fia, du mäter från där det står HERIFRÅN MÄTS NU ARB! Lycka till :)
16.06.2021 - 13:06
![]() Anna wrote:
Anna wrote:
Scusi se insisto ma dopo aver fatto le 84 maglie basse sono costretta a girare il lavoro,a questo punto mi trovo sul diritto o rovescio del lavoro? E se mi trovo sul rovescio come faccio a lavorare sul diritto?
18.05.2021 - 10:22DROPS Design answered:
Buonasera Anna, può considerare quella riga come diritto del lavoro, e da lì imposta tutta la lavorazione. Buon lavoro!
20.05.2021 - 22:03
![]() Anna wrote:
Anna wrote:
Domanda da principiante: sto facendo la taglia 5/6 ho lavorato le 84 maglie basse e messo i 4 segnapunti poi c'è scritto, lavorare la riga successiva come segue dal diritto del lavoro.Cosa si intende per diritto del lavoro?
17.05.2021 - 20:54DROPS Design answered:
Buonasera Anna, i lavori a maglia e uncinetto hanno un diritto e un rovescio del lavoro. In questo caso deve iniziare a lavorare sul diritto del lavoro. Buon lavoro!
17.05.2021 - 22:32
![]() Helena Lentz wrote:
Helena Lentz wrote:
Hej litet problem med att få ihop ökn så att jag har inte 32 stolpar som det står i diagrammet för 5/6 år får efter ökning som det ska vara. jag får29 maskor i bakstycket och 39 i ärm 56 i framstycke...39 i ärm och 29 bak.. Har följt er som det ska i diagrammet?
02.11.2020 - 14:24DROPS Design answered:
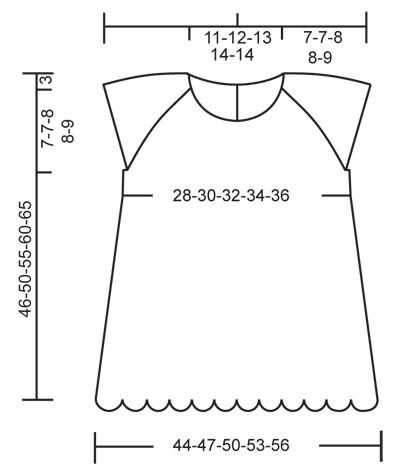
Hej Helena. Om det är måttskissen längst ner du ser på så är det mått i cm som vi uppger där, inte antal stolpar. Mvh DROPS Design
05.11.2020 - 09:13
![]() Erica Quinn wrote:
Erica Quinn wrote:
When increasing at the 4 markers for the first time - my stitches increase with 20 stitches instead of the 12 stitches they say it should. The pattern says to crochet 2dc, 2 chain, 2dc in each marker - so that will be four times.Is the pattern wrong or where am I making my mistake?
11.08.2020 - 20:02DROPS Design answered:
Dear Mrs Quinn, you inserted 4 markers and now work either 1 sc in each dc or 2 dc, 2 ch, 2 dc (instead of 1 sc) in each of the stitch with a marker = you will then work 3 sts (+2 ch that are not counted) instead of only 1 a total of 4 times = you will increase 12 sts in total on this row and should have now 88-92-96-96-100 dc. Happy crocheting!
12.08.2020 - 07:56
![]() Valentina wrote:
Valentina wrote:
Buongiorno volevo fare una domanda da principiante ma il lavoro si unisce e si inizia a lavorare intorno oppure si unirà solo con i bottoni dietro aperto per tutta la lavorazione? E mi sembra di capire che forse bisohna unirlo. Quando si inizia il corpo ma non ne sono sicura... Grazie
18.07.2020 - 09:06DROPS Design answered:
Buongiorno Valentina. Il vestito ha dei bottoni nella parte in alto del dietro. Si inizia a lavorare avanti e indietro; questa prima parte sarà chiusa dai bottoni. Poi prosegue in tondo. Buon lavoro!
18.07.2020 - 10:15
|
|
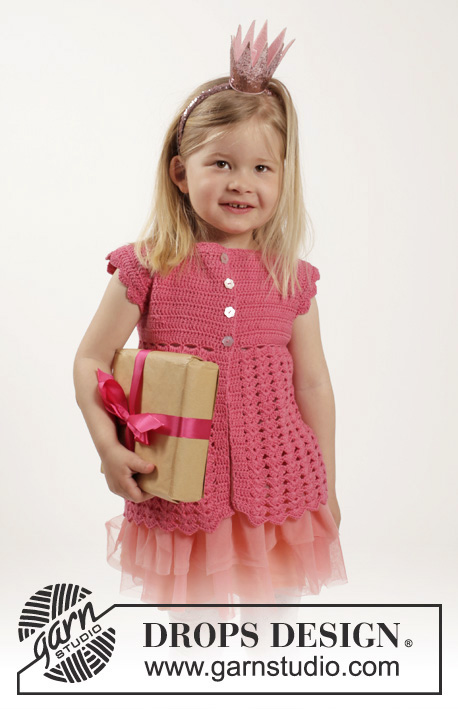
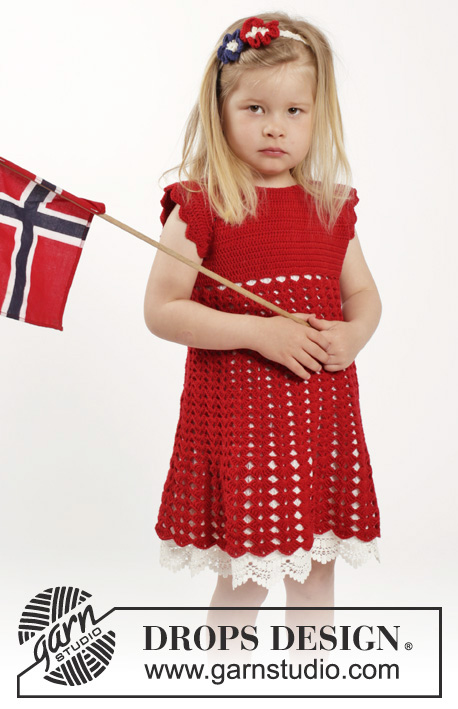
Princess Matilde#princessmatildedress |
|
 |
 |
Crochet dress worked top down with raglan, short sleeves and fan pattern plus hair band with flowers in DROPS BabyMerino, DROPS Safran or DROPS ♥ You #7. Size children 2 - 10 years
DROPS Children 26-5 |
|
|
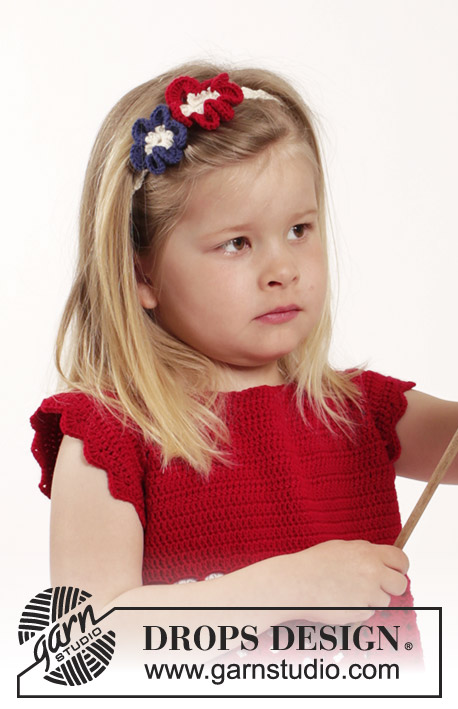
CROCHET INFO: Replace first tr at beg of every tr round/row with 3 ch. Finish round with 1 sl st in 3rd ch from beg of round. Finish row with 1 tr in 3rd ch from beg of previous row. INCREASE TIP: Inc 1 tr by working 2 tr in same st. ---------------------------------------------------------- DRESS: The piece is worked top down. Work back and forth from mid back to after vent mid back, then work piece in the round. YOKE: Work 77-81-85-85-89 loose ch (incl 1 ch to turn with) on hook size 3.5 mm with Baby Merino, Safran or DROPS ♥ You #7. Work 1 dc in 2nd ch from hook, then work 1 dc in every ch the entire row = 76-80-84-84-88 dc on row. Now insert 4 markers in piece for raglan as follows (beg mid back – NOTE: Do NOT work while inserting markers): Skip 12-13-14-14-15 dc (= right back piece), insert 1 marker in next dc, skip 12 dc (= sleeve), insert 1 marker in next dc, skip 24-26-28-28-30 dc (= front piece), insert 1 marker in next dc, skip 12 dc (= sleeve) and insert last marker in next dc (there are now 12-13-14-14-15 dc on left back piece after last marker). READ ALL OF THE FOLLOWING SECTION BEFORE CONTINUING: READ CROCHET INFO and work next row as follows from RS: Work 1 tr in every dc but in every dc with marker work 2 tr + 2 ch + 2 tr = 88-92-96-96-100 tr on row (= 12 tr inc). Then inc for raglan: Continue with tr, and work 2 tr + 2 ch + 2 tr in every ch-space in every raglan line (= 16 tr inc on row). Repeat inc on every row 6-6-7-8-9 more times (= 7-7-8-9-10 times in total) = 200-204-224-240-260 tr on row. REMEMBER THE CROCHET TENSION! Work next row as follows from RS: Work 1 tr in each of the first 28-29-32-34-37 tr (= right back piece), skip the next 44-44-48-52-56 tr (= sleeve), work 8 ch, work 1 tr in each of the next 56-58-64-68-74 tr (= front piece), skip the next 44-44-48-52-56 tr (= sleeve), work 8 ch and work 1 tr in each of the last 28-29-32-34-37 tr (= left back piece). Sleeve caps are now done and piece is worked in the round. BODY: Put piece tog mid back with RS out and work 1 round with tr (work 1 tr in every tr from previous round and 1 tr in every ch under each sleeve – remember CROCHET INFO) = 128-132-144-152-164 sts on round. NOW MEASURE PIECE FROM HERE! Continue with 1 tr in every tr until piece measures 4-4-4-5-5 cm, on last round inc 2-3-1-3-1 tr evenly - READ INCREASE TIP = 130-135-145-155-165 tr. Now work fan pattern as follows: ROUND 1: 1 dc in first tr, *4 ch, skip 4 tr, 1 dc in next tr *, repeat from *-* the entire round and finish with 4 ch, skip 4 tr and 1 sl st in first dc = 26-27-29-31-33 ch-spaces. ROUND 2: 3 tr + 2 ch + 3 tr in every ch-space. ROUND 3: Work sl sts until first ch-space, then work 3 tr + 2 ch + 3 tr in every ch-space. Repeat 3rd round until piece measures 15-17-18-20-21 cm WORK NEXT ROUND AS FOLLOWS: Work sl sts until first ch-space, then work 4 tr + 2 ch + 4 tr in every ch-space. Repeat this round until piece measures 25-28-31-34-36 cm WORK NEXT ROUND AS FOLLOWS: Work sl sts until first ch-space, then work 4 dtr + 2 ch + 4 dtr in every ch-space. Repeat this round until piece measures 35-39-43-48-52 cm Fasten off. ADJUSTING NECKLINE: For better fit work a small elevation at the back of neck. Insert 1 marker in st in each corner in neck, i.e. at beg of every raglan line and 1 marker mid front. Work on hook size 3.5 mm as follows: Beg mid back, work 1 dc in every st until 1 st remains before st with marker, work 1 htr in next st, 1 tr in st with marker and 1 htr in next st, then work 1 dc in every st until 1 st remains before next st with marker, 1 htr in next st, 1 tr in st with marker and 1 htr in next st, the work 1 dc in every st until 4-4-5-5-5 sts remain before marker mid front. Turn piece and work 1 dc in every dc back to mid back but at every marker work 3 dc tog, i.e. work 1 dc in htr but wait with last YO and pull through, work 1 dc in st with marker but wait with last YO and pull through, work 1 dc in next htr but now pull last YO through all 4 sts on hook (= 2 dc dec). Cut the yarn and repeat from mid back to mid front in the other side. BUTTON BAND AT THE BACK: Work along left opening mid back as follows: Work 2 dc in every tr-row and 1 dc in every dc-row. Work 4 rows in total with dc back and forth, fasten off. Along right opening mid back work buttonholes as follows (beg from RS at neck line): Work 4 dc (2 dc in the first two tr-rows), 4 ch (= 1 buttonhole), skip approx. 1 cm, work dc until approx. mid on band, 4 ch, skip approx. 1 cm, work dc until 1 cm remains on band, 4 ch and fasten with 1 dc in last st. Fasten off. Sew the buttons on to button band in the left side. NECK EDGE: Work around the neck as follows: 1 dc in first st, * 2 ch, skip 2 sts, 1 dc in next st *, repeat from *-* the entire row, fasten off. FAN EDGE AROUND SLEEVE CAPS: Work as follows: Work 1 dc in each of the 8 sts mid under sleeve, then work fan edge around the sleeve opening as follows: * Skip approx. 2 cm, in next st work 3 tr + 2 ch + 3 tr, skip approx. 2 cm, 1 dc in next st *, repeat from *-* and finish with 1 sl st in first dc from beg of round (= approx. 9-9-10-10-11 fans along sleeve cap). Fasten off. Repeat at the bottom around the other sleeve cap. ---------------------------------------------------------- HAIR BAND: Work 6 ch on hook size 3.5 mm with off white. Work first row as follows: Work 1 dc in 4th ch from hook, work 1 dc in each of the next 2 ch, turn piece = 3 dc + 3 ch on row. ROW 2: 3 ch, 1 dc in each of the 3 dc from previous row, turn piece. Repeat 2nd row until hair band measures approx. 42-44-46-48 cm (or desired length, subtract approx. 6-8 cm according to the head's circumference). Cut the yarn and sew the 2 short sides tog edge to edge with small stitches. LARGE CROCHET FLOWER: Work 7 ch on hook size 3.5 mm with off white and form a ring with 1 sl st in first ch. ROUND 1: 3 ch (= 1 tr), 2 tr in ch-ring, * 6 ch, 1 dc in last tr made, 3 tr in ch-ring *, repeat from *-* a total of 6 times and finish with 6 ch and 1 sl st in 3rd ch from beg of round = 7 ch-spaces with 3 tr between each. Fasten off. ROUND 2: Switch to red. Work 1 dc in the middle of the first 3 tr on round, * 12 tr in ch-space, skip 1 tr, 1 dc in next tr, skip 1 tr *, repeat from *-* the entire round and finish with 1 sl st in first dc from beg of round. Fasten off. SMALL CROCHET FLOWER: Work 6 ch on hook size 3.5 mm with off white and form a ring with 1 sl st in first ch. ROUND 1: 2 ch (= 1 htr), 2 htr in ch-ring, * 5 ch, 1 dc in last htr made, 3 htr in ch-ring *, repeat from *-* a total of 5 times and finish with 5 ch and 1 sl st in 2nd ch from beg of round = 6 ch-spaces with 3 htr between each. Fasten off. ROUND 2: Switch to blue. Work 1 dc in the middle of the first 3 htr on round, * 10 tr in ch-space, skip 1 htr, 1 dc in next htr, skip 1 htr *, repeat from *-* the entire round and finish with 1 sl st in first dc from beg of round. Fasten off. ASSEMBLY: Sew flowers on hair band with small sts. |
|
 |
|
Have you finished this pattern?Tag your pictures with #dropspattern #princessmatildedress or submit them to the #dropsfan gallery. Do you need help with this pattern?You'll find 14 tutorial videos, a Comments/Questions area and more by visiting the pattern on garnstudio.com. © 1982-2026 DROPS Design A/S. We reserve all rights. This document, including all its sub-sections, has copyrights. Read more about what you can do with our patterns at the bottom of each pattern on our site. |
|


With over 40 years in knitting and crochet design, DROPS Design offers one of the most extensive collections of free patterns on the internet - translated to 17 languages. As of today we count 325 catalogues and 12298 patterns translated into English (UK/cm). 12298
We work hard to bring you the best knitting and crochet have to offer, inspiration and advice as well as great quality yarns at incredible prices! Would you like to use our patterns for other than personal use? You can read what you are allowed to do in the Copyright text at the bottom of all our patterns. Happy crafting!
Post a comment to pattern DROPS Children 26-5
We would love to hear what you have to say about this pattern!
If you want to leave a question, please make sure you select the correct category in the form below, to speed up the answering process. Required fields are marked *.