
Popular categories
Looking for a yarn?


Comments / Questions (237)
![]() Anja wrote:
Anja wrote:
Vielen Dank für die Erläuterungen! Ich werde die Mütze mit der Magic Loop Methode stricken, dann entfällt das Problem mit der passenden Länge des Nadelseil oder eben einem Nadelspiel ;-) LG Anja
15.09.2015 - 08:24
![]() Anaj wrote:
Anaj wrote:
Hallo liebes Drops-Team, ist es auch möglich, diese Mütze gleich rund zu stricken? LG Anja
11.09.2015 - 08:26DROPS Design answered:
Ja, das sollte gehen - lassen Sie dann beim Anschlag die beiden Rand-M weg und beachten Sie, dass Sie diese auch im weiteren Verlauf wegrechnen müssen, der erste Markierer sitzt also in der 1. M und der 7. Markierer in der letzten M der Rd. Am Anfang stricken Sie dann 8 Rd 1 Rd re, 1 Rd li im Wechsel, um 4 Krausrippen zu erhalten. Sie sollten eien kurze Rundnadel und kein Nadelspiel nehmen, da sich die M-Zahl durch die Zu- und Abnahmen auf den einzelnen Nadeln stets verändern würde.
12.09.2015 - 21:21Manou wrote:
Comment mettre un maqueur "dans la deuxième maille" (etc.) et faire une augmentation avant et apres ce marqueur? merci manou
27.03.2015 - 21:50DROPS Design answered:
Bonjour Manou, placez un marqueur comme celui-ci (tout en bas de la page) dans la maille indiquée - augmentez et diminuez comme indiqué au début des explications - voir également onglet "vidéos" à droite de la photo. Bon tricot!
30.03.2015 - 14:48
![]() Dieuwertje wrote:
Dieuwertje wrote:
Leuk patroon, afwisselend en uitdagend om te breien, redelijk snel klaar. Filmpje maakt alles duidelijk. Resultaat is goed gelukt!
09.03.2015 - 18:29
![]() Jacqueline wrote:
Jacqueline wrote:
Ich habe die Mütze mit Baby Merino gestrickt, was eine Maschenprobe von 24x32 hat. Die Maße für die kleinste Größe kamen damit hin.
19.02.2015 - 14:36
![]() Marleen wrote:
Marleen wrote:
Liebes Drops-Team, danke für dieses tolle Strickmuster! Ich kann mich der Bitte von Larissa anschließen: Die angegebene Maschenprobe scheint nicht zu stimmen. Ich komme auf eine Maschenprobe von mind. 32 M x 40 R (anstatt 26 M x 34 R) für 10 x 10 cm. Die Mütze fällt daher in Kopfumfang als auch Weite viel zu klein aus. Vielleicht können Sie die Maschenprobe noch einmal überprüfen? Oder ist die Nadelstärke evtl etwa die amerikanische Größe 2,5? Danke und viele Grüße, Marleen
01.02.2015 - 20:10DROPS Design answered:
Liebe Marleen, allgemein ist für Alpaca eine Maschenprobe von 23 M auf 10 cm angegeben, in vielen Alpaca-Anleitungen werden mit Nadel 3 (3 mm, nicht die amerikanische Größe) 24 M auf 10 cm erreicht. Schaffen Sie es denn, mit einer größeren Nadel (z.B. 3,5) die Maschenprobe zu erreichen? Ich kann Ihre Anfrage gerne noch einmal weiterleiten, aber wie schon bei Larissa erklärt, wurde die Anleitung dahingehend schon geprüft und für richtig befunden...
04.02.2015 - 18:56
![]() Larissa wrote:
Larissa wrote:
Liebes Drops-Team, diese Mütze ist supersüß und die Anleitung an sich toll. Ich stricke professionell und tue mir recht leicht, eine Anleitung genau zu befolgen. Und dennoch wird diese Mütze jedesmal viel, viel zu klein. Wäre es möglich, die Maße nochmals genau zu kontrollieren? Ich möchte nicht immer selbst alles neu berechnen müssen ;-) Viele liebe Grüße und herzlichen Dank! Larissa
06.12.2014 - 14:25DROPS Design answered:
Liebe Larissa, es gibt tatsächlich schon mehrfache Kommentare, die Mütze sei zu klein, das Team hat die Anleitung schon einmal geprüft und bislang keinen Fehler gefunden. Stimmt denn Ihre Maschenprobe genau, auch in der Höhe? Das ist bei dieser Anleitung auch sehr wichtig. Wo genau wird die Mütze zu klein, im Umfang oder in der Höhe oder beides?
07.12.2014 - 18:11
![]() Aneta wrote:
Aneta wrote:
Dobrý den, tato část věty bohužel nedává smysl: následující oko hladce a oko z pomocné jehlice. Znamená to, že mám následující oko slést hladce s okem z pomocné jehlice? Děkuji
25.10.2014 - 21:12DROPS Design answered:
Dobrý den, děkujeme za upozornění - celý návod je zrevidovaný a opravený, věřím, že nyní už bude vše v pořádku. Hodně zdaru! Hana
26.10.2014 - 22:58
![]() Petra Lnge wrote:
Petra Lnge wrote:
Zum Modell ”Alpaca”.Gestrickte DROPS Mütze in ”Alpaca”. Die Zu- und Abnahmen in jeder 2. R (Hin-R) total 6 x arbeiten. Ich komme gut zurecht bis hierhin: Dann in jeder 2. R (weiterhin in der Hin-R) auf beiden Seiten der 2., 4., und 6. Markierung je 1 M. abn. bis noch 15 M. auf der Nadel sind. Das funktioniert nicht - mein Fehler oder ein Fehler in der Beschreibung?
25.10.2014 - 19:19DROPS Design answered:
Es sollte wie beschrieben funktionieren. Die gleichzeitigen Zunahmen und Abnahmen halten sich ja die Waage, die M-Zahl bleibt also konstant, bis Sie zu den Abnahmen in jeder 2. R kommen. Sie nehmen beidseitig von 3 Markierern je 1 M ab, d.h. Sie nehmen in jeder 2. Rd 6 M ab (bei jedem Markierer 2 M). Hier für die einzelnen Größen durchgerechnet: 117 M - 17x 6 M = 15 M, 123 M - 18x 6 M = 15 M, 129 M - 19x 6 M = 15 M, 135 M - 20x 6 M = 15 M, 141 M - 21x 6 M = 15 M.
26.10.2014 - 10:56
![]() Anna-Sophie wrote:
Anna-Sophie wrote:
Eine sehr schöne und leicht verständliche Anleitung. Leider fällt das Muster doch etwas knapp aus. Habe zuerst eine Nummer größer als benötigt gestrickt, aber die Mütze war hoffnungslos zu klein. Also noch einmal größer (also zwei Größen größer als benötigt) mit einer größeren Nadel gestrickt und trotzdem ist die Mütze zu klein. Schade :-(
11.10.2014 - 17:43
|
|
Alladin#alladinhat |
|
|
|
|
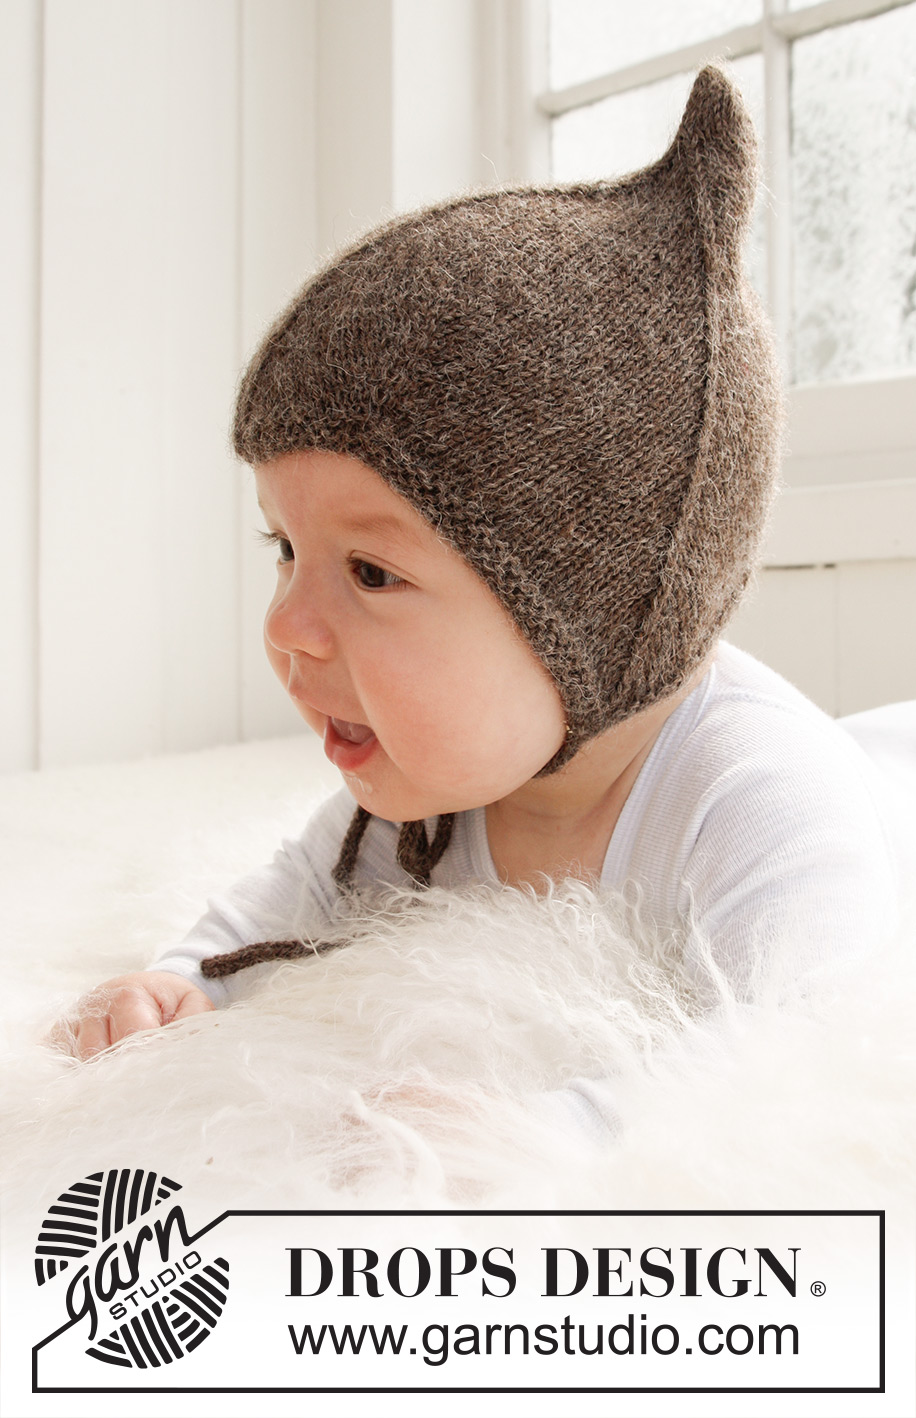
Knitted hat for baby and children in DROPS Alpaca
DROPS Baby 21-34 |
|
|
INCREASE TIP: All inc are done from RS. Inc 1 st before and after st with marker by making 1 YO. On next round P YO twisted (i.e. work in back loop of YO instead of front) to avoid holes. DECREASE TIP: All dec are done from RS. Dec 1 st on each side of st with marker. Beg 1 st before st with marker. Slip 1 st on a cable needle behind the piece, slip 1 st (= st with marker), K next st and st on cable needle tog, psso. -------------------------------------------------------- HAT: Worked back and forth on needle. Cast on 117-123-129 (135-141) sts (incl 1 edge st in each side) on needle size 2.5 mm with Alpaca. K 8 rows (1st row = RS). Insert 7 markers in piece from RS as follows: 1st marker in the 2nd st on needle, 2nd marker in the 24th-25th-26th (27th-28th) st, 3rd marker in the 48th-50th-52nd (54th-56th) st, 4th marker in the 59th-62nd-65th (68th-71st) st, 5th marker in the 70th-74th-78th (82nd-86th) st, 6th marker in the 94th-99th-104th (109th-114th) st, and the 7th marker in the next to last st on the needle. Continue in stocking st with 1 edge st in garter st in each side of piece - AT THE SAME TIME on 1st row beg to inc and dec - Read INCREASE TIP and DECREASE TIP above - on every other row as follows: Inc 1 st after 1st marker. Dec 1 st on each side of 2nd marker. Inc 1 st on each side of 3rd marker. Dec 1 st on each side of 4th marker. Inc 1 st on each side of 5th marker. Dec 1 st on each side of 6th marker. Inc 1 st before 7th marker. Continue to inc and dec from RS like this on every other row (. i.e., on every row from RS) a total of 6 times. The piece measures approx. 6 cm from cst on edge – if the tension in height is not correct you can work as before with the increase/decrease. Then dec on each side of the 2nd, 4thand 6th marker until 15 sts remain on needle (= 17-18-19 (20-21 times). Piece measures approx. 16-17-17 (18-19)cm from the bottom tip at the 2nd or 6th marker = ear flap. Work next row from RS as follows: K 1, K 2 tog, K 9, K 2 tog, K 1 = 13 sts. Repeat dec in each side on every row (from WS P the 2 sts before and after edge st tog) until 5 sts remain. On the last row from WS work 1 edge st, P 3 sts tog and work 1 edge st. Pull thread through the remaining sts. ASSEMBLY: Sew the hat tog mid back inside 1 edge st. The middle of the 3 whole tips on cast on edge goes down to the forehead at the front. TIES: Cast on 4 sts on needle size 2.5 mm. Work as follows: * K 1, place yarn in front of piece (towards you), slip 1 st as if to P, place yarn behind piece (from you) *, repeat from *-* on more time and on all rows. This results in a round ribbon. Cast off when the tie measures approx. 20-22-24 (26-28) cm. Knit a similar tie. Sew one ribbon at the bottom of each tip on ear flap on each side. |
|
Have you finished this pattern?Tag your pictures with #dropspattern #alladinhat or submit them to the #dropsfan gallery. Do you need help with this pattern?You'll find 17 tutorial videos, a Comments/Questions area and more by visiting the pattern on garnstudio.com. © 1982-2026 DROPS Design A/S. We reserve all rights. This document, including all its sub-sections, has copyrights. Read more about what you can do with our patterns at the bottom of each pattern on our site. |


With over 40 years in knitting and crochet design, DROPS Design offers one of the most extensive collections of free patterns on the internet - translated to 17 languages. As of today we count 324 catalogues and 12245 patterns translated into English (UK/cm). 12245
We work hard to bring you the best knitting and crochet have to offer, inspiration and advice as well as great quality yarns at incredible prices! Would you like to use our patterns for other than personal use? You can read what you are allowed to do in the Copyright text at the bottom of all our patterns. Happy crafting!
Post a comment to pattern DROPS Baby 21-34
We would love to hear what you have to say about this pattern!
If you want to leave a question, please make sure you select the correct category in the form below, to speed up the answering process. Required fields are marked *.