
Popular categories
Looking for a yarn?


Comments / Questions (43)
![]() Sabrina wrote:
Sabrina wrote:
Hallo, ich habe eine Frage zu den Vorderteilen. In der Anleitung steht dass in JEDER Reihe 2 Maschen zugenommen werden. Und anschließend steht dass in dieser Weise in jeder 2./3./6. Reihe jeweils eine Masche zugenommen wird. Was heißt das? Werden also zum Beispiel 2 Maschen zugenommen und in der 2. Reihe 3 Maschen zugenommen ? Oder werden auf der hinreihe 2 Maschen zugenommen und auf der Rückreihe 1 Masche?
19.01.2024 - 21:18DROPS Design answered:
Liebe Sabrina, die Zunahmen für den Halsausschnitt werden am Ende einer Hin-Reihe, dh zuerst in jeder 2. Reihe. = bei jeder Hin-Reihe dann in jeder 4. Reihe = in jeder 2. Hin-Reihe dann in jeder 6. Reihe = in jeder 3. Hin-Reihe. Viel Spaß beim stricken!
22.01.2024 - 08:02
![]() Luna wrote:
Luna wrote:
Ciao! Nella porzione del corpo, c’e scritto di aumentare 62 maglie uniformemente (sto lavorando una M). Non capisco se si intende di lavorarla per l’intera lunghezza del corpo o nel primo ferro del corpo. Grazie in anticipo!
16.01.2024 - 20:22DROPS Design answered:
Buonasera Luna, deve aumentare tutte le maglie nel ferro a diritto indicato. Buon lavoro!
17.01.2024 - 16:53
![]() Ka wrote:
Ka wrote:
Hallo! Ich wüsste gern, welche Nadelstärke und -länge ich verwenden muss wenn ich die Ärmel mit einer Rundnadel anstatt mit einem Nadelspiel stricken möchte.
05.01.2024 - 14:06DROPS Design answered:
Liebe Ka, wenn Sie mit einer Rundnadel stricken möchten, stricken Sie dan nmit einer 40 cm am Anfang dann wenn es weniger Maschen sind mit dem Nadelspiel oder mit Magic Loop und 8O cm Rundnadel, siehe hier. Viel Spaß beim stricken!
05.01.2024 - 15:44
![]() MAŁGORZATA wrote:
MAŁGORZATA wrote:
Witam, jak mierzyć długość robótki, dziękuję, pozdrawiam serdecznie i życzę szczęścia w Nowym Roku
02.01.2024 - 12:35DROPS Design answered:
Witaj Małgosiu, również najlepsze życzenia na Nowy Rok. Napisz dokładnie o jaki wymiar Ci chodzi?
02.01.2024 - 13:09
![]() Ilka Müller wrote:
Ilka Müller wrote:
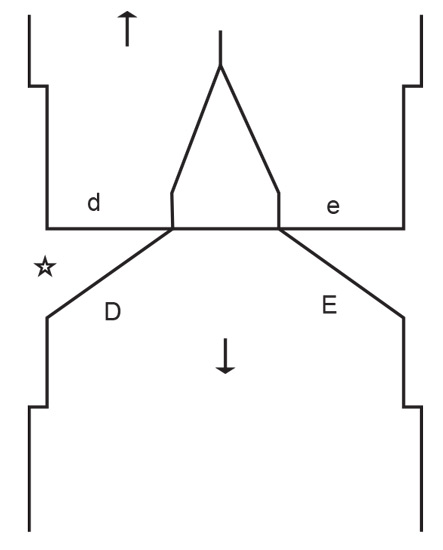
Hallo, ich bin jetzt bei den Ärmeln des Elodie Cardigan. Ich verstehe nicht, warum die waagrechten Maschen des Armauschnitts nicht mit aufgefasst werden. Sie werden zu keinem Zeitpunkt danach in der Anleitung erwähnt ? Und es wird auch nicht in Runde gestrickt. Ich habe gerade gesehen, dass es eine "neue Anleitung" für den Ärmel existiert, ersetzt diese komplett den Text in ihrer Anleitung ? und werden die Maschenanzahl dann zu denen in der Anleitung gezählt ?
15.12.2023 - 22:50DROPS Design answered:
Liebe Frau Müller, die ersten cm von dem Ärmel werden in Hin- und Rückreihen gestrickt, dann diese Reihen werden zu den angeschlagenen Maschen für das Armloch zusammengenäht - wie beim Figur - siehe schwarzes Sternchen. Dann wird der Ärmel in Runden gestrickt. Viel Spaß beim stricken!
18.12.2023 - 08:15
![]() Michelle wrote:
Michelle wrote:
Hallo ich habe ein paar Probleme mit den Vorderteilen. Wie ich Maschen aus dem Rückenteil aufnehme ist mir bewusst aber die extra 7 Maschen sind mein Problem. Sollen diese nach innen gehen? Also wenn Mann die Jacke trägt Richtung Knöpfe oder sollen diese außen sein Richtung Schulter? Lg
14.12.2023 - 11:41
![]() Therese Björntorp wrote:
Therese Björntorp wrote:
Hej! Jag får inte ihop beskrivningen för ärm och armhåla. Jag plockar upp 68 maskor (m), stickar fram och tillbaka i 2 cm och sedan stickar jag runt. Det blir ju ingen skillnad på om jag hade stickat runt direkt. Jag hade förstått bättre om jag skulle ha stickat slätstickning t ex 60 maskor i 2 cm och sedan börjat sticka runt med de 8 som är mitt under armen. ?? Eller ??? Tacksam för hjälp!
16.09.2023 - 15:19DROPS Design answered:
Hei Therese. Husk at du skal strikke frem og tilbake med forkortede pinner over ermetoppen. Dette gjøres for at ermet skal få en bedre passform. Se forklaringen til varv 1 - 7. mvh DROPS Design
26.09.2023 - 11:40
![]() Nikoline wrote:
Nikoline wrote:
Skal det være én, to eller ingen masker masker mellom økningene på ryggen?
09.09.2023 - 20:08DROPS Design answered:
Hei Nikoline LItt usikker på hva du mener. Du øker i hver side og det økes før/etter de 3 ytterste maskene. Mellom økningene er det et maskeantall (24-26-28-30-30-32) avhengig av hvilken str. du strikker etter. Ta gjerne titt på hjelpevideoene til Europeisk skulder, som du finner under målskissene. mvh DROPS Design
18.09.2023 - 10:13
![]() Nicole wrote:
Nicole wrote:
Entschuldigung. Autokorrektur. Die Frage bezieht sich auf die Hin- und Rückreihen.
06.09.2023 - 12:34
![]() Nicole wrote:
Nicole wrote:
Hallo, ich habe eine Frage. Bei den Vorderteilen soll in jeder 2. , jeder 4. bzw. jeder 6. Reihe zugenommen werden. Bezieht sich das jeweils auf die Hinreißen? Also soll in jeder 2., 4. bzw. 6. Hinreihe zugenommen werden? Oder werden die Rückseiten mitgezählt? Ich bedanke mich im Voraus für Ihre Mühe und Antwort.
06.09.2023 - 12:16DROPS Design answered:
Liebe Nicole, wenn man in jeder 2. Reihe / jeder 4. Reihe /jeder 6. Reihe zunimmt, wird man in jeder Hin-Reihe / in jeder 2. Hin-Reihe / in jeder 3. Hin-Reihe zunehmen. Viel Spaß beim stricken!
06.09.2023 - 15:56
|
||||||||||
Elodie Cardigan#elodiecardigan |
||||||||||
 |
 |
|||||||||
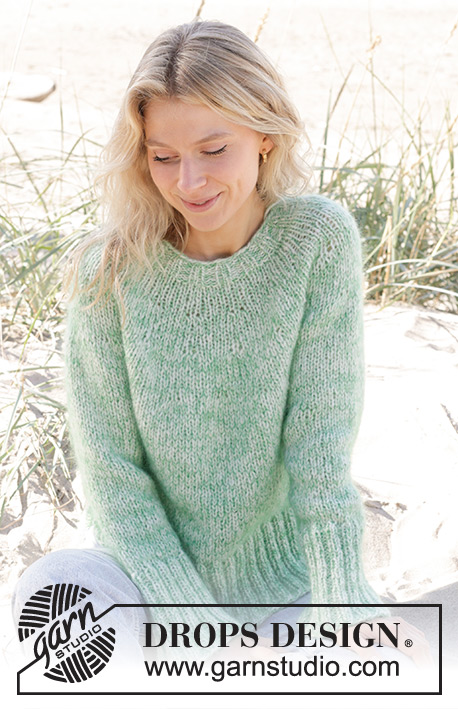
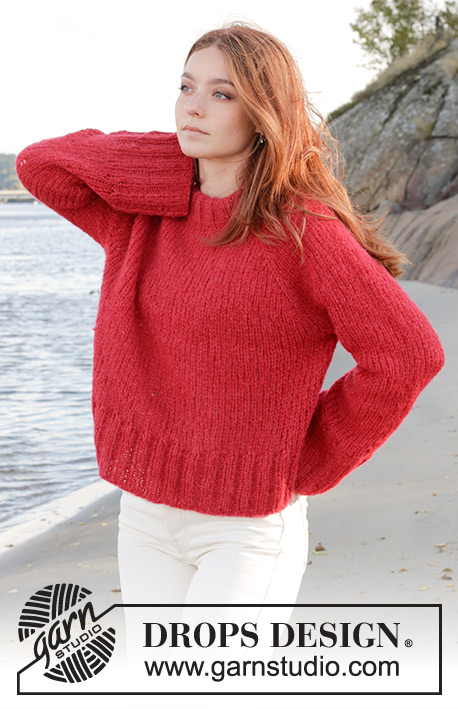
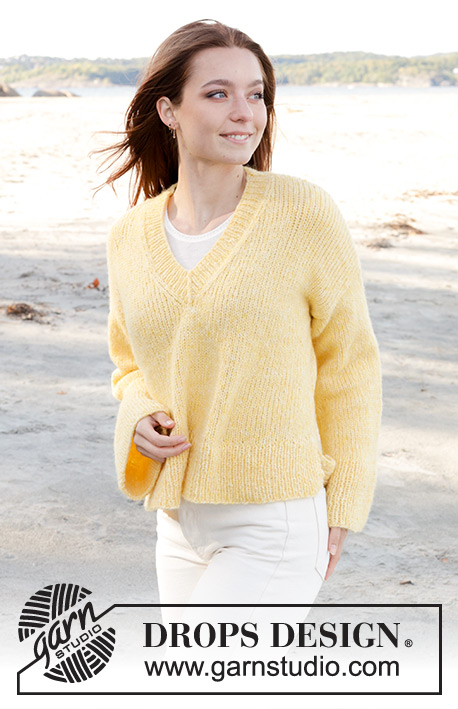
Knitted jacket in DROPS Air. The piece is worked top down with European/diagonal shoulders and V-neck. Sizes S - XXXL.
DROPS 240-29 |
||||||||||
|
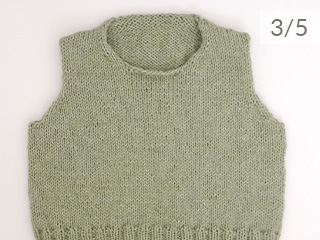
------------------------------------------------------- EXPLANATIONS FOR THE PATTERN: ------------------------------------------------------- RIDGE/GARTER STITCH (worked back and forth): Knit all rows. 1 ridge = knit 2 rows. INCREASE TIP FROM RIGHT SIDE Increase towards the left AFTER MARKER: Use left needle to pick up thread between 2 stitches from row below, pick up thread from front and knit stitch in back loop. Increase towards the right BEFORE MARKER: Use left needle to pick up thread between 2 stitches from row below, pick up thread from behind and knit stitch in front loop. INCREASE TIP FROM WRONG SIDE: Increase towards the left AFTER MARKER: Use left needle to pick up thread between 2 stitches from row below, pick up thread from behind and purl stitch in front loop. Increase towards the right BEFORE MARKER: Use left needle to pick up thread between 2 stitches from row below, pick up thread from front and purl stitch in back loop. BUTTONHOLES: Work buttonholes on the right band (when the garment is worn). Work from the right side when there are 4 stitches left on the row as follows: Make 1 yarn over, knit 2 together and knit 2. On the next row (wrong side), knit the yarn over to leave a hole. Work buttonholes when the piece measures: S: 27, 34 and 41 cm. M: 27, 35 and 43 cm. L: 29, 37 and 45 cm. XL: 30, 38 and 47 cm. XXL: 32, 40 and 49 cm. XXXL: 33, 42 and 51 cm. DECREASE TIP (for sleeves): Decrease 1 stitch on either side of the marker-thread as follows: Work until there are 3 stitches left before the marker-thread, knit 2 together, knit 2 (marker-thread sits between these 2 stitches), slip 1 stitch as if to knit, knit 1 and pass the slipped stitch over the knitted stitch. ------------------------------------------------------- START THE PIECE HERE: ------------------------------------------------------- JACKET – SHORT OVERVIEW OF THE PIECE. The pattern uses both long and short needles; start with the length which fits the number of stitches and change when necessary. The piece is started by casting on stitches at the back of the neck and working the back piece top down, while increasing stitches on each side for the shoulders, which become slightly diagonal. The back piece is worked as far as the armholes. The front pieces are started by knitting up stitches along the back shoulders, working downwards while increasing for the neck and working until the armholes are finished. The front and back pieces are joined on the same circular needle and the body finished, working back and forth. Stitches are knitted up around the armholes for the sleeves, which are started back and forth for the sleeve cap, then finished in the round. Then work an edge for neck on back piece. BACK PIECE: Cast on 30-32-34-36-36-38 stitches with circular needle size 5 mm and DROPS Air. Purl 1 row from the wrong side. Insert 1 marker inside the 3 outermost stitches on each side. Keep the markers inside these 3 stitches onwards. Work stocking stitch back and forth. AT THE SAME TIME, increase AFTER the marker at the beginning of the row (seen from the right side) and BEFORE the marker at the end of the row – read INCREASE FROM RIGHT SIDE. On the next row (wrong side) increase in the same way – read INCREASE FROM WRONG SIDE. Increase from both the right and wrong side a total of 26-28-28-30-32-36 times. After the last increase there are 82-88-90-96-100-110 stitches. THE PIECE IS NOW MEASURED FROM HERE! Continue working until the piece measures 14-15-16-17-17-18 cm. Cut the yarn, put stitches on a thread or on an extra needle and work the front pieces as explained below. LEFT FRONT PIECE: Start on the left shoulder (when the garment is worn). Cast on 7 stitches (band), knit up 26-28-28-30-32-36 stitches inside 1 stitch along the left shoulder on the back piece (knit up 1 stitch in each row) = 33-35-35-37-39-43 stitches. Work stocking stitch with 7 stitches in GARTER STITCH-see description above, mid-front. When the piece measures 4 cm, increase at the beginning of each row from the right side for the neck, after the 7 garter stitches + 2 stocking stitches – remember INCREASE FROM RIGHT SIDE. Increase 1 stitch every 2nd row 10-11-12-13-13-14 times, every 4th row 3 times and every 6th row 2 times = 48-51-52-55-57-62 stitches. When the piece measures 24-25-26-27-29-30 cm, put stitches on a thread or on an extra needle after working the last row from the right side. Cut the yarn. Work the right front piece as explained below. RIGHT FRONT PIECE: Knit up 26-28-28-30-32-36 stitches inside 1 stitch along the right shoulder on the back piece then cast on 7 stitches at the end of the row (band) = 33-35-35-37-39-43 stitches. Work stocking stitch with 7 stitches in garter stitch mid-front. When the piece measures 4 cm increase at the end of each row from the right side for the neck, before 2 stocking stitches + 7 garter stitches – remember INCREASE FROM RIGHT SIDE. Increase 1 stitch every 2nd row 10-11-12-13-13-14 times, every 4th row 3 times and every 6th row 2 times = 48-51-52-55-57-62 stitches. When the piece measures 24-25-26-27-29-30 cm, work as follows from the wrong side: Work the 48-51-52-55-57-62 stitches on the right front piece, cast on 6-8-12-14-20-20 stitches work the 82-88-90-96-100-110 stitches on the back piece, cast on 6-8-12-14-20-20 stitches, work the 48-51-52-55-57-62 stitches on the left front piece. BODY: = 190-206-218-234-254-274 stitches. Continue back and forth with stocking stitch and garter stitch - REMEMBER THE BUTTONHOLES – see description above, for a further 42-44-46-48-50-52 cm. Knit 1 row from the right side and increase 62-62-70-74-82-90 stitches evenly spaced (do not increase over the bands) = 252-268-288-308-336-364 stitches. Change to circular needle size 4 mm. Work rib as follows from the wrong side: 7 garter stitches, * purl 2, knit 2 *, work from *-* until there are 9 stitches left, purl 2 and 7 garter stitches. Continue this rib for 10 cm. Cast off. LEFT SLEEVE: Using circular needle size 5 mm, knit up from the right side 40-42-45-45-49-51 stitches from the bottom of the armhole and up the front piece to the shoulder, then 24-26-27-29-29-31 stitches from the shoulder to the bottom of the armhole down the back piece = 64-68-72-74-78-82 stitches. Insert 1 marker in the middle of the stitches picked up. Work now back and forth in stocking stitch with short rows for the sleeve cap, to gives a better shape to the sleeve. 1st row (from wrong side): work to 16 stitches after marker, turn. 2nd row (from right side): work to 16 stitches after marker, turn. 3rd row (from wrong side): work to 20 stitches after marker, turn. 4th row (from right side): work to 20 stitches after marker, turn. 5th row (from wrong side): work to 24 stitches after marker, turn. 6th row (from right side): work to 24 stitches after marker, turn. 7th row (from wrong side): work to the beginning of the row. Work stocking stitch back and forth for 5-5-7-7-9-9 cm, measure from where the stitches were picked up (all length are measured mid on top of sleeve). Join the sleeve, using short circular needle/double pointed needles size 5 mm and continue in the round. Insert 1 marker thread at the beginning of the round (mid-under sleeve). Allow the thread to follow your work onwards. Start at the marker-thread and continue with stocking stitch until the sleeve measures 7-7-9-9-11-11 cm from the knitted-up stitches. Decrease 2 stitches under the sleeve – read DECREASE TIP. Decrease like this every 5½-4½-3½-3½-2½-2 cm a total of 6-7-8-8-9-10 times = 52-54-56-58-60-62 stitches. Continue working until the sleeve measures 38-37-38-37-37-35 cm. There is approx. 10 cm left; try the jacket on and work to desired length before the rib. Knit 1 round and increase 16-18-16-18-20-18 stitches evenly spaced = 68-72-72-76-80-80 stitches. Change to double pointed needles size 4 mm and work rib (knit 2, purl 2) for 10 cm. Cast off a little loosely. The sleeve measures approx. 48-47-48-47-47-45 cm. RIGHT SLEEVE: Work the same way as the left sleeve, but first knit up 24-26-27-29-29-31 stitches from the bottom of the armhole up the back piece to the shoulder, then 40-42-45-45-49-51 stitches from the shoulder down the front piece. Sew the bottom of the armholes. NECK Knit up 1 stitch in each of the 7 garter stitches at the top of the right front piece, work garter stitch back and forth for 8-9-9-10-10-10 cm; check that the band reaches approx. midway at the back of the neck when stretched slightly. Cast off. Work in the same way from the band on the left front piece. Sew the bands together mid-back and sew the neck to the neckline. ASSEMBLY: Sew the buttons onto the left band. |
||||||||||
Diagram explanations |
||||||||||
|
||||||||||
|
||||||||||

|
||||||||||

|
||||||||||
Have you finished this pattern?Tag your pictures with #dropspattern #elodiecardigan or submit them to the #dropsfan gallery. Do you need help with this pattern?You'll find 31 tutorial videos, a Comments/Questions area and more by visiting the pattern on garnstudio.com. © 1982-2025 DROPS Design A/S. We reserve all rights. This document, including all its sub-sections, has copyrights. Read more about what you can do with our patterns at the bottom of each pattern on our site. |
||||||||||


With over 40 years in knitting and crochet design, DROPS Design offers one of the most extensive collections of free patterns on the internet - translated to 17 languages. As of today we count 314 catalogues and 11820 patterns translated into English (UK/cm). 11820
We work hard to bring you the best knitting and crochet have to offer, inspiration and advice as well as great quality yarns at incredible prices! Would you like to use our patterns for other than personal use? You can read what you are allowed to do in the Copyright text at the bottom of all our patterns. Happy crafting!
Post a comment to pattern DROPS 240-29
We would love to hear what you have to say about this pattern!
If you want to leave a question, please make sure you select the correct category in the form below, to speed up the answering process. Required fields are marked *.