
Looking for a yarn?


Comments / Questions (167)
![]() Maryvonne GUIOT wrote:
Maryvonne GUIOT wrote:
Pour réaliser ce pull en brushed alpaga s'il il me faudrait combien de pelotes? merci
15.01.2025 - 18:32DROPS Design answered:
Bonjour Mme Guiot, utilisez le convertisseur pour calculer la quantité requise pour votre taille en Brushed Alpaca Silk, notez qu'il vous faudra tricoter avec 2 fils Brushed Alpaca Silk. Pensez (comme d'habitude) à bien vérifier votre tension et rappelez-vous que la texture sera différente car ces 2 laines ont différente. Bon tricot!
16.01.2025 - 08:55
![]() MEUNIER wrote:
MEUNIER wrote:
Est il possible de tricoter ce modèle avec des aiguilles droites ?
13.01.2025 - 14:39DROPS Design answered:
Bonjour Mme Meunier, le dos et le devant peuvent etre tricotes avec des aiguilles droites. Le col et les manches sont tricotes en rond, donc les aiguilles double pointes/circulaires seront plus adaptees. Bon tricot!
13.01.2025 - 16:16
![]() Meunier wrote:
Meunier wrote:
Bonsoir, Est il posible de tricoter ce modèle avec des aiguilles droites?
11.01.2025 - 22:59DROPS Design answered:
Bonjour Mme Meunier, tout à fait, le dos et le devant se tricotent en allers et retours sur aiguille circulaire; pour les manches, cette leçon pourra vous aider; pour le col, faites d'abord la couture de l'une des épaules seulement, relevez les mailles autour de l'encolure, tricotez le col et terminez par la couture de l'autre épaules + celle du col. Bon tricot!
13.01.2025 - 09:00
![]() Lydie wrote:
Lydie wrote:
Pourrais-je avoir l'explication du point A2, je ne comprends pas Merci beaucoup
07.01.2025 - 20:39DROPS Design answered:
Bonjour Lydie, la 2ème maille de A.2 (vu sur l'endroit) est une maille en côtes anglaises tricotée comme dans cette vidéo; la 1ère maille de A.2 est une maille en jersey envers (tricotée à l'envers sur l'endroit et à l'endroit sur l'envers). Vu sur l'endroit, vous devez avoir 1 maille en côtes anglaises de chaque côté (à 1 maille lisière des bords). Bon tricot!
08.01.2025 - 07:15
![]() Beatrice Dietzel wrote:
Beatrice Dietzel wrote:
Hi, ich habe leider ein kleines problem die Anleitung ganz zu verstehen. Bei A.2 werden da nun immer die zwischenmaschen links gestrickt? Bzw ist es einfach ein patentmuster? Oder werden die Maschen komplett im halpatent gestrickt? Ich bin gerade echt überfordert. Ist das Diagram von vorne gezeigt? Oder in der jeweiligen Richtung? Danke schonmal im voraus. LG
31.12.2024 - 14:50DROPS Design answered:
Liebe Frau Dietzel, A.2 ist wie ein Patentmuster aber mit linken Maschen (von der Vorderseite gesehen) dazwischen, die 1. Reihe A.2 ist eine Rückreihe = lesen Die A.2 von links nach rechts und enden Sie mit der 1. Masche A.2 (von der Rückseite gesehen), so wird das Patentmuster eine Masche im Patentmuster beidseitig haben. Viel Spaß beim Stricken!
02.01.2025 - 15:27
![]() Bea wrote:
Bea wrote:
Hi, ich habe leider ein kleines problem die Anleitung ganz zu verstehen. Bei A.2 werden da nun immer die zwischenmaschen links gestrickt? Bzw ist es einfach ein patentmuster? Oder werden die Maschen komplett im halpatent gestrickt? Ich bin gerade echt überfordert. Ist das Diagram von vorne gezeigt? Oder in der jeweiligen Richtung? Danke schonmal im voraus. LG
31.12.2024 - 14:49
![]() Margo Kool wrote:
Margo Kool wrote:
Bij het rugpand staat dat boord 10 cm hoog us, maar uit de algemene beschrijving van de trui staat dat achterpand 8 cm langer is dan het voorpand. Dit kun je ook in de schematekening zien. Moet het boord van het achterpand dan niet 18 cm zijn. Op de foto lijkt het boord achter ook langer te zijn dan het boord aan de voorkant.
24.12.2024 - 00:19DROPS Design answered:
Dag Margo,
Op het achterpand loopt het patroon en de ribbelsteken nog een stukje naar beneden door en dan komt pas de boord. De boord van het achterpand is dus 10 cm, maar de split begint waar het einde van de boord op het voorpand is. Op het achterpand ben je dan al verder.
02.01.2025 - 20:45
![]() Helga wrote:
Helga wrote:
Har forsøgt at finde drops wish søgrøn er den udgået ?
05.12.2024 - 08:49DROPS Design answered:
Hej Helga, ja desværre, DROPS Wish er udgået, men du kan bruge 2 tråde DROPS Air og få samme strikkefasthed :)
06.12.2024 - 15:01
![]() Lapeyssonnie wrote:
Lapeyssonnie wrote:
A quelle taille correspond XXL?
01.12.2024 - 18:43DROPS Design answered:
Bonjour Mme Lapeyssonnie, regardez la video ICI. Bon tricot!
02.12.2024 - 09:31
![]() Eli wrote:
Eli wrote:
Bonjour, le schéma A2 se tricote-t-il bien comme des "false english ribs" comme dans votre vidéo youtube du 24/05/2022 ?
18.11.2024 - 20:04DROPS Design answered:
Bonjour Eli, tricotez les mailles en côtes anglaises (la 2ème maille de A.2) comme dans les "vraies" côtes anglaises avec jeté (cf vidéo, et entre chaque maille en côtes anglaises, vous devez avoir 1 maille jersey envers (à tricoter à l'endroit sur l'envers et à l'envers sur l'endroit). Bon tricot!
19.11.2024 - 07:53
|
||||||||||||||||
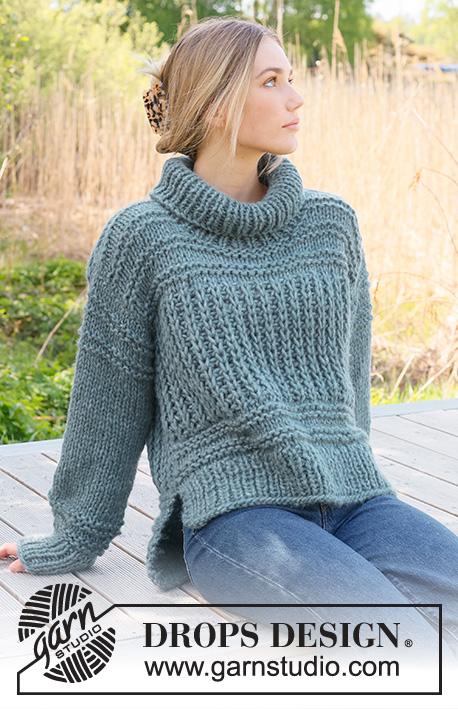
Rain Chain#rainchainsweater |
||||||||||||||||
 |
 |
|||||||||||||||
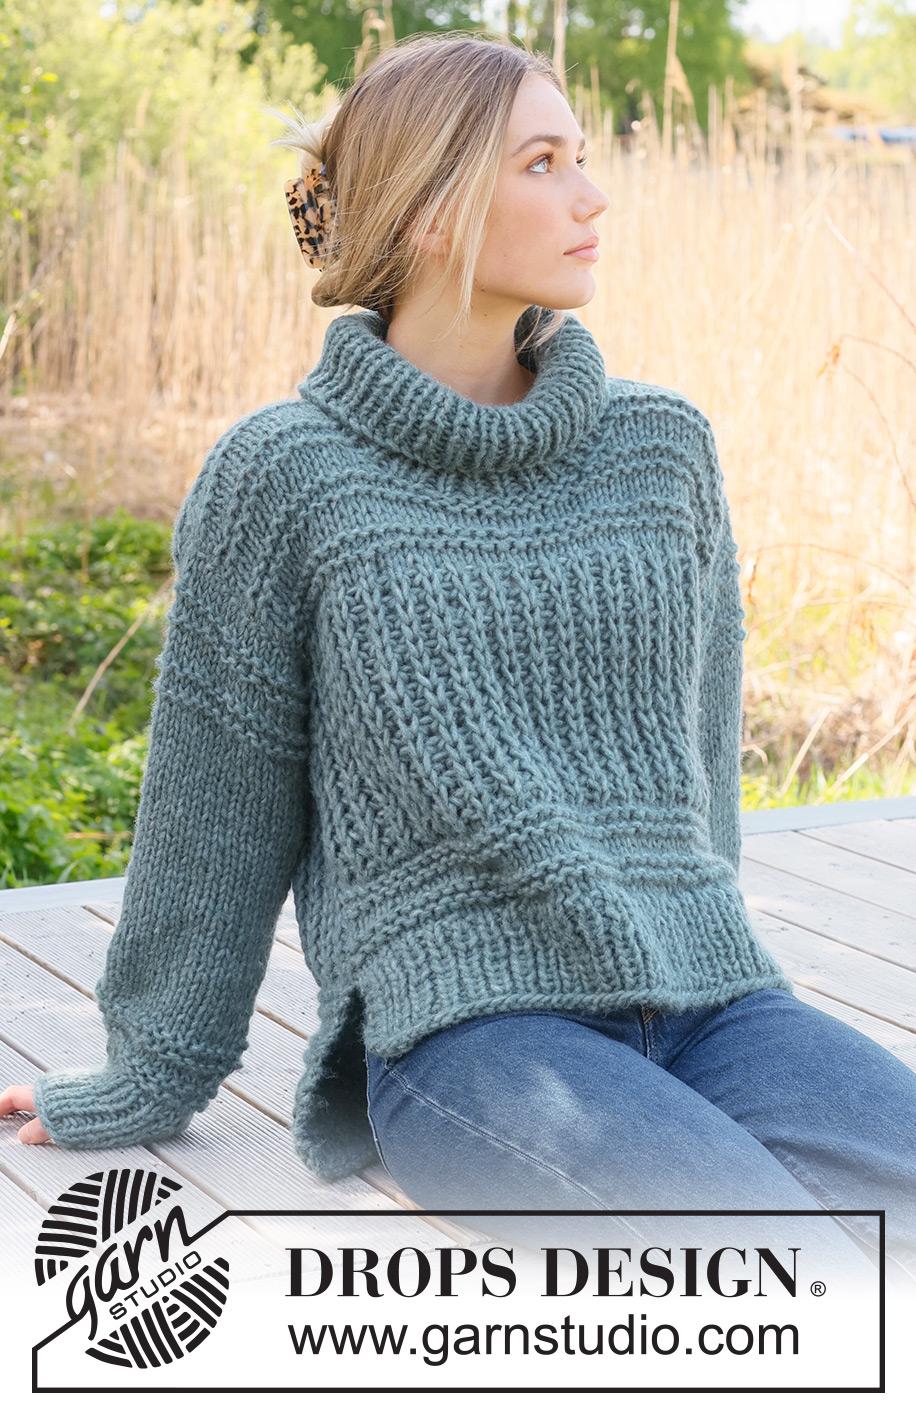
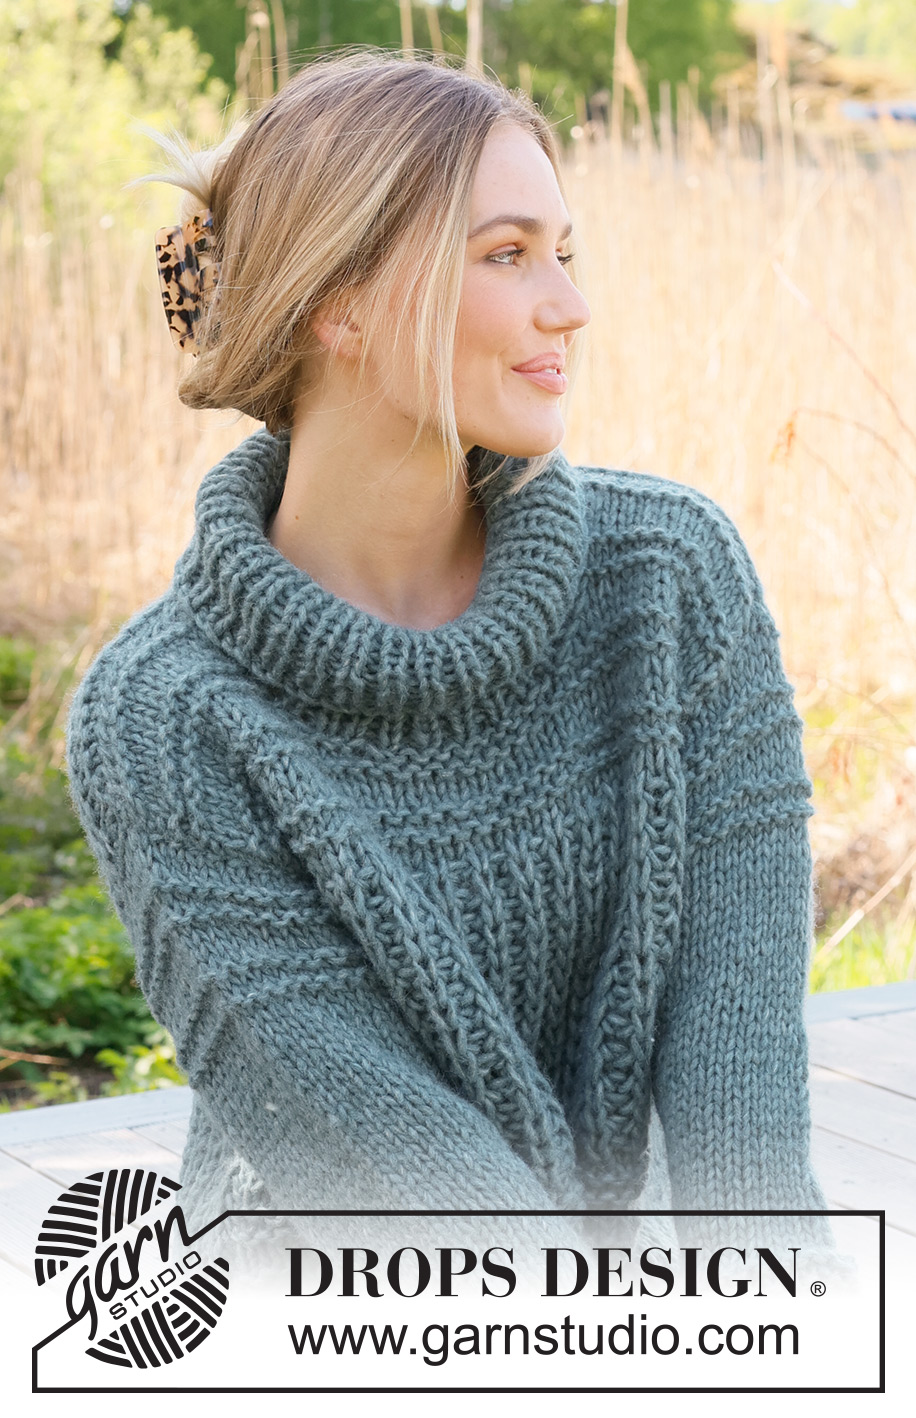
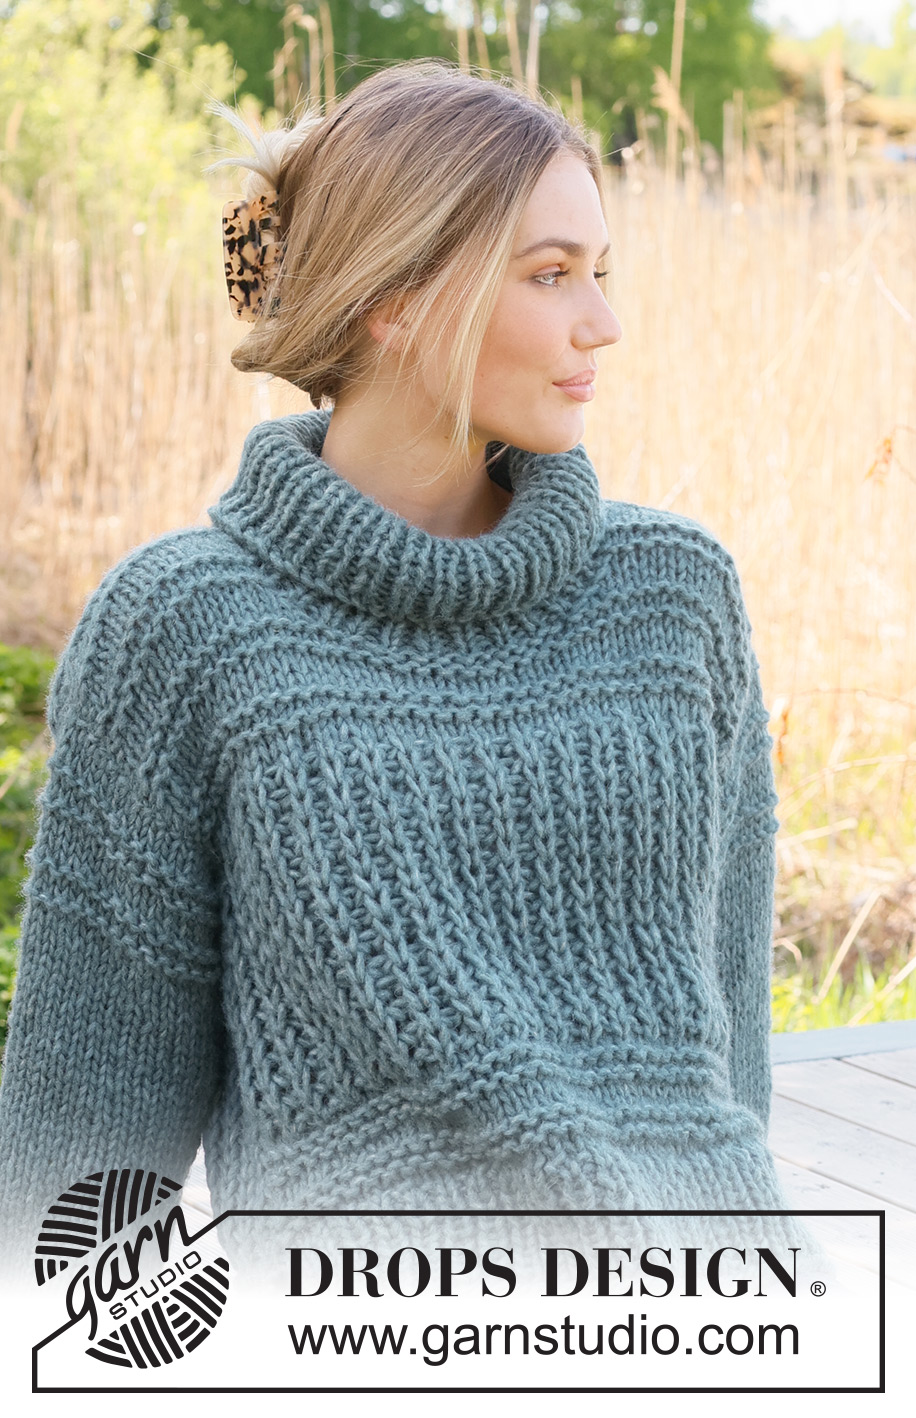
Knitted jumper in 1 strand DROPS Wish or 2 strands DROPS Air. The piece is worked bottom up with English rib, open garter stitch and split in the sides. Sizes S - XXXL.
DROPS 236-9 |
||||||||||||||||
|
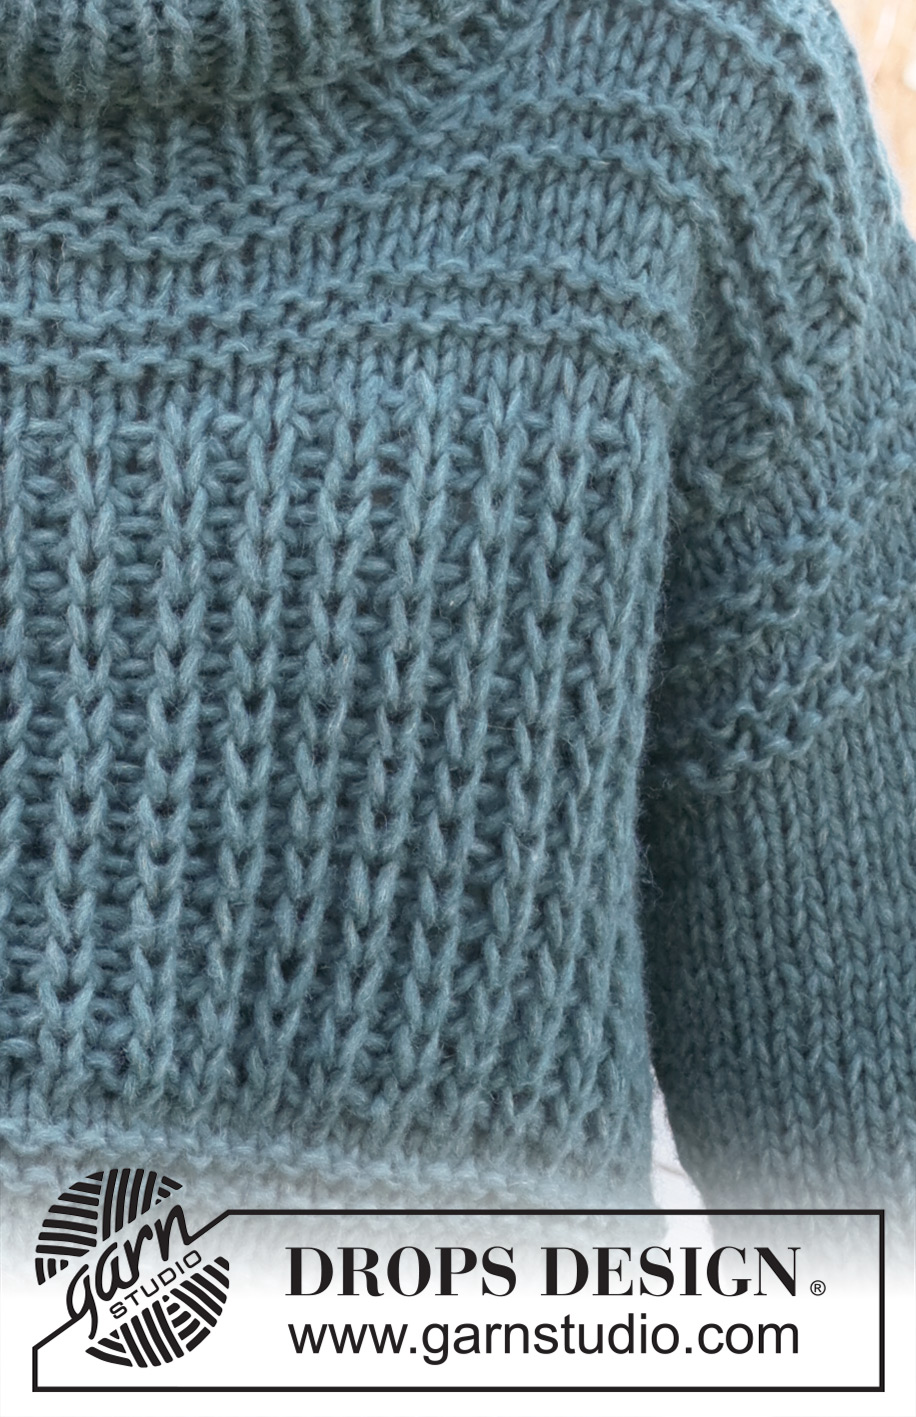
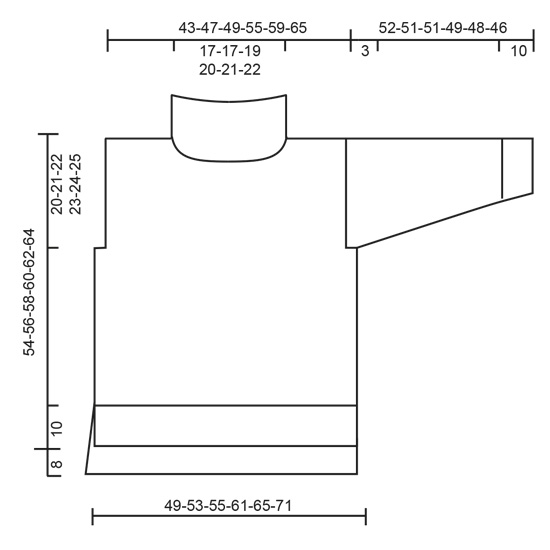
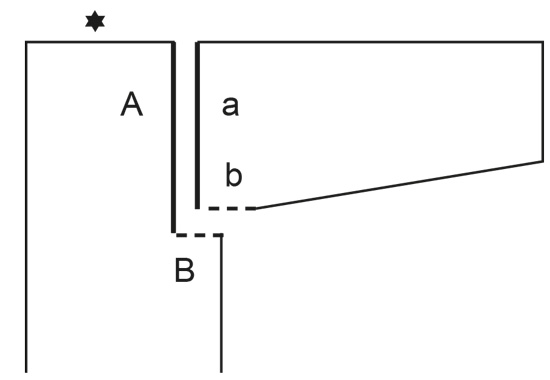
------------------------------------------------------- EXPLANATIONS FOR THE PATTERN: ------------------------------------------------------- PATTERN: See diagrams A.1 and A.2. The diagrams show all rows in the pattern from the right side. RIDGE/GARTER STITCH (worked back and forth): Knit all rows. 1 ridge = knit 2 rows. INCREASE TIP (for sleeves): Work until there is 1 stitch left before the marker thread, 1 yarn over, knit 2 (marker thread sits between these stitches), 1 yarn over. On the next round knit the yarn overs twisted to avoid holes. Then work the new stitches in stocking stitch. ------------------------------------------------------- JUMPER – SHORT OVERVIEW OF THE PIECE: The piece is worked in sections, back and forth and bottom up, then sewn together. The sleeves are worked in the round with double pointed needles/short circular needle bottom up. The back piece is 8 cm longer than the front. BACK PIECE: Cast on 59-63-67-73-79-85 stitches with circular needle size 8 mm and 1 strand DROPS Wish or 2 strands DROPS Air. Purl 1 row from the wrong side then work rib as follows from the right side: 2 edge stitches in GARTER STITCH – read description above, * knit 1, purl 1 *, work from *-* until there are 3 stitches left, knit 1 and 2 edge stitches in garter stitch. Continue this rib for 10 cm. Purl 1 row from the wrong side and decrease 10-10-12-12-14-14 stitches evenly spaced = 49-53-55-61-65-71 stitches. Change to circular needle size 9 mm. REMEMBER THE KNITTING TENSION! Work A.1, 2-2-2-3-3-3 times in height. Now work 1 row as follows from the right side: 1 edge stitch in garter stitch, * knit 1, purl 1 *, work from *-* until there are 2 stitches left, knit 1 and 1 edge stitch in garter stitch. Work A.2 (first row from the wrong side, reading the diagram from left to right and the pattern beginning and ending with 1 knitted stitch in English rib inside 1 edge stitch in garter stitch, seen from the right side). Continue A.2 onwards. When the piece measures 42-43-44-45-46-47 cm, cast off 3 stitches at the beginning of the next 2 rows for the armholes = 43-47-49-55-59-65 stitches. Continue A.2. When the piece measures 44-46-48-50-52-54 cm, purl the next row from the wrong side. Then work according to A.1. When the piece measures 60-62-64-66-68-70 cm, cast off the middle 13-13-15-15-17-17 stitches for the neck and finish each shoulder separately. Cast off 1 stitch on the next row from the neck = 14-16-16-19-20-23 stitches on the shoulder. Cast off when the piece measures 62-64-66-68-70-72 cm. Work the other shoulder in the same way. FRONT PIECE: Cast on and work in the same way as the back piece until the front measures 34-35-36-37-38-39 cm. Cast off 3 stitches at the beginning of the next 2 rows for the armholes = 43-47-49-55-59-65 stitches. Continue A.2. When the piece measures 36-38-40-42-44-46 cm, purl the next row from the wrong side. Then work according to A.1. When the piece measures 47-49-51-53-55-57 cm, work the neck as follows: Place the middle 9-9-11-11-13-13 stitches on a thread and finish each shoulder separately. Cast off for the neck every 2nd row as follows: 2 stitches 1 time, 1 stitch 1 time = 14-16-16-19-20-23 stitches on the shoulder. Cast off when the piece measures 54-56-58-60-62-64 cm. Work the other shoulder in the same way. SLEEVES: Cast on 30-32-32-34-34-36 stitches with double pointed needles size 8 mm and 1 strand DROPS Wish or 2 strands DROPS Air. Insert 1 marker-thread at the beginning of the round (mid-under sleeve). Knit 1 round, then work rib in the round (knit 1, purl 1) for 10 cm. Knit 1 round and decrease 3-3-3-3-3-3-3 stitches evenly spaced = 27-29-29-31-31-33 stitches. Change to double pointed needles size 9 mm. Work A.1, 2 times in height then continue with stocking stitch. AT THE SAME TIME when the sleeve measures 12 cm, increase 1 stitch on each side of the marker-thread – read INCREASE TIP. Increase like this every 5½-5½-5-4-3½-3½ cm a total of 7-7-7-8-9-9 times = 41-43-43-47-49-51 stitches. When the sleeve measures 43-42-42-40-39-37 cm, continue with A.1. When the sleeve measures 49-48-48-46-45-43 cm, work the sleeve cap back and forth (from mid-under sleeve) to finished length. Cast off when the sleeve measures 52-51-51-49-48-46 cm. Work the other sleeve in the same way. ASSEMBLY: Sew the shoulder seams. Sew in the sleeves, inside the 1 edge stitch and sew the bottom of the armholes – see sketch. Sew the side seams as far as the rib (= 10 cm split on the front piece, 18 cm on the back), sew in the outermost loop of the outermost stitch so the seam is flat. NECK: Start at the top of the right shoulder and knit up (including the stitches on the thread) 60 to 72 stitches with short circular needle size 8 mm and 1 strand DROPS Wish or 2 strands DROPS Air. The number of stitches should be divisible by 2. Work rib in the round (knit 1, purl 1) for 20-20-20-22-22-22 cm. Cast off. |
||||||||||||||||
Diagram explanations |
||||||||||||||||
|
||||||||||||||||
 |
||||||||||||||||
 |
||||||||||||||||
 |
||||||||||||||||
Have you finished this pattern?Tag your pictures with #dropspattern #rainchainsweater or submit them to the #dropsfan gallery. Do you need help with this pattern?You'll find 34 tutorial videos, a Comments/Questions area and more by visiting the pattern on garnstudio.com. © 1982-2025 DROPS Design A/S. We reserve all rights. This document, including all its sub-sections, has copyrights. Read more about what you can do with our patterns at the bottom of each pattern on our site. |
||||||||||||||||


With over 40 years in knitting and crochet design, DROPS Design offers one of the most extensive collections of free patterns on the internet - translated to 17 languages. As of today we count 320 catalogues and 12094 patterns translated into English (UK/cm). 12094
We work hard to bring you the best knitting and crochet have to offer, inspiration and advice as well as great quality yarns at incredible prices! Would you like to use our patterns for other than personal use? You can read what you are allowed to do in the Copyright text at the bottom of all our patterns. Happy crafting!
Post a comment to pattern DROPS 236-9
We would love to hear what you have to say about this pattern!
If you want to leave a question, please make sure you select the correct category in the form below, to speed up the answering process. Required fields are marked *.