
Looking for a yarn?


Comments / Questions (22)
![]() VUILLOT Maryline wrote:
VUILLOT Maryline wrote:
Empiecement , extrait du texte "Rabattre les 3 premières mailles et tricoter jusqu'à la fin du rang. Quand le rang est terminé, continuer en rond en jersey sur toutes les mailles. Décaler le début des tours au milieu du devant.\" Je ne comprends pas ce que vous voulez dire, par \" décaler \" est ce que c\'est le fait d\'avoir rabattu les 3 mailles ( patte de boutonnage) qui fait que le début du tour est décalé ? Merci pour vos précisions
07.02.2023 - 16:00DROPS Design answered:
Bonjour Mme Vuillot, tout à fait, vous avez maintenant réuni l'ouvrage pour pouvoir tricoter en rond, le début des tours se trouve automatiquement avant les mailles de la bordure devant, continuer en rond, mais considérez maintenant que le milieu du devant est le début des tours (ainsi, la répartition des mailles lors de la division tombera juste). Bon tricot!
07.02.2023 - 17:04
![]() Emilie wrote:
Emilie wrote:
Hvordan strikker man stolpemasker i rille?
27.01.2023 - 18:38DROPS Design answered:
Hei Emilie, Rillestrikk er å strikke rett på alle pinner, så stolpene strikkes rett både fra retten og vrangen. God fornøyelse!
30.01.2023 - 06:50
![]() Petra wrote:
Petra wrote:
Dobrý večer, začínám plést trup, a v návodu je napsáno, že kruhová řada začíná nově u značek v podpaží. Znamená to, že nebudu plést od začátku legy ( tyto oka vynechám) ale přesunu novou řadu pletení až od těchto značek. Rozumím tomu dobře? Děkuji za odpověď. Petra
09.10.2022 - 19:56DROPS Design answered:
Dobrý den, Petro, ano, přesně tak - značky umístíme do podpaží a kruhovou řadu začneme plést od jedné z těchto značek (tam bude nyní začátek/konec). Hodně zdaru! Hana
09.10.2022 - 22:53
![]() Willeke wrote:
Willeke wrote:
Er staat een fout in deze vertaling: Meerder voor de raglan in totaal 10-12-13-14 (15-16-18) keer = 158-178-190-202 (214-226-246) steken. Ga zo verder met meerderingen tot het werk 9-10-11-12 (13-14-15) cm meet. In het deense en noorse patroon staat dat je na de meerderingen ZONDER meerderingen verder breit tot het werk 10 cm meet
22.06.2022 - 22:04
![]() Valeria wrote:
Valeria wrote:
Hola! Hice este patrón y el extremo inferior se enrosca hacia arriba ¿por qué sucede esto? ¿Qué se puede hacer para evitarlo? Gracias!
26.05.2022 - 16:14DROPS Design answered:
Hola Valeria, puedes usar una plancha de vapor, de forma ligera, para evitar estropear el dibujo; suele aplanarlo sin problemas. Este enrollamiento suele deberse a un problema con la tensión del tejido.
26.05.2022 - 22:58
![]() Petra wrote:
Petra wrote:
Dobrý den, nerozumím tomu, jak mám v první lícové řadě současně přidat nad oky rovnoměrně 4 nová oka. Konkrétní Text ( 1× nahodíme, 6 ok lícovým žerzejem - Současně nad těmito oky přidáme rovnoměrně 4 nová oka = 10 ok rukávu) nenašla jsem žádné video, které by mi toto ukázalo. Prosím o radu. Moc děkuji.
24.04.2022 - 08:28DROPS Design answered:
Dobrý den Petro, v úseku 6 ok, která pletete lícovým žerzejem, budete plést třeba takto: 1 hladce, 1x nahodit, 1 hladce, 1x nahodit, 2 hladce, 1x nahodit, 1 hladce, 1x nahodit, 1 hladce. Tím přidáte rovnoměrně na požadovaných 10 ok. Ať se daří!
24.04.2022 - 09:49
![]() Walburga Fetzer wrote:
Walburga Fetzer wrote:
Bin gewohnt, alle Sachen von unten nach oben zu stricken und nicht umgekehrt. Wie ändert man das?
21.03.2022 - 10:01DROPS Design answered:
Liebe Frau Fetzer, vielleicht können Sie dann die Anleitung umgekehrt stricken? Dh von unten (die abgekettene Maschen anschlagen anstatt abktetten) bis oben. Sonnst kann Ihnen dieses Video und auch diese Lektion damit helfen, den Pullover von oben nach unten zu stricken. Viel Spaß beim stricken!
21.03.2022 - 11:47
![]() Maria Grimaldi wrote:
Maria Grimaldi wrote:
Modelli
06.03.2022 - 18:03
![]() Ilja Bos wrote:
Ilja Bos wrote:
In het Nederlandse patroon staat: "Meerder voor de raglan in totaal 10-12-13-14 (15-16-18) keer = 158-178-190-202 (214-226-246) steken. Ga zo verder met meerderingen tot het werk 9-10-11-12 (13-14-15) cm meet." Ik heb even in het Noorse patroon gekeken en daar staat in de tweede zin ipv met meerderingen, zonder meerderingen. Ik kwam namelijk nog niet aan de 10 cm nadat ik alle meerderingen had gedaan.
06.03.2022 - 15:51
![]() Elisabeth wrote:
Elisabeth wrote:
Hallo und danke für das schöne Muster! Leider wellt sich nach dem Abketten der Saum unten. Ich hab schon mehrmals wieder aufgetrennt und mal lockerer, mal fester abgekettet. Aber nichts hilft. Wissen Sie, woran das liegt und was ich dagegen tun kann?
02.03.2022 - 10:52DROPS Design answered:
Liebe Elisabeth, Sie können den Pullover mit Stecknadeln auf einer geeigneten Unterlage spannen, anfeuchten (z.B. mit einer Sprühflasche für Blumen) und trocknen lassen, danach entfernen Sie die Stecknadeln, dann sollte sich der Rand nicht mehr rollen. Viel Spaß beim stricken!
02.03.2022 - 12:04
|
|||||||||||||
Little Pea#littlepeasweater |
|||||||||||||
 |
 |
||||||||||||
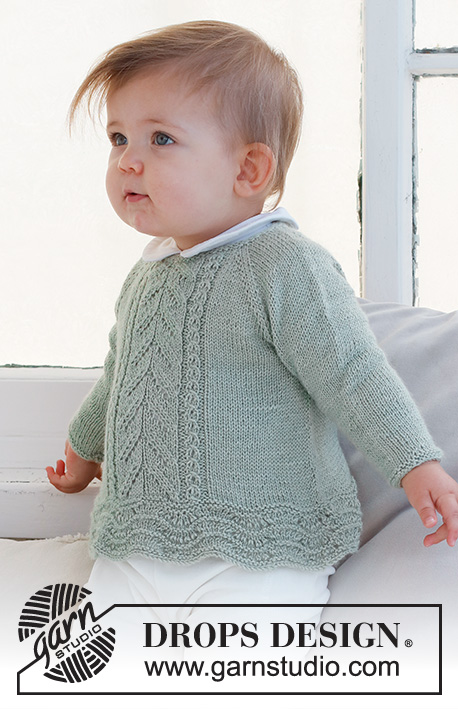
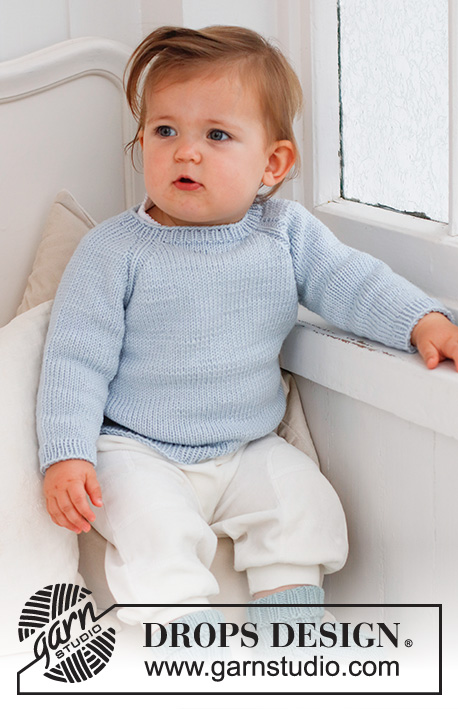
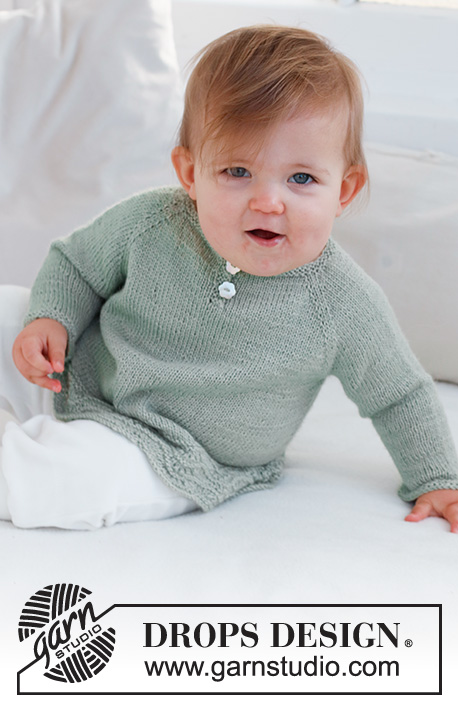
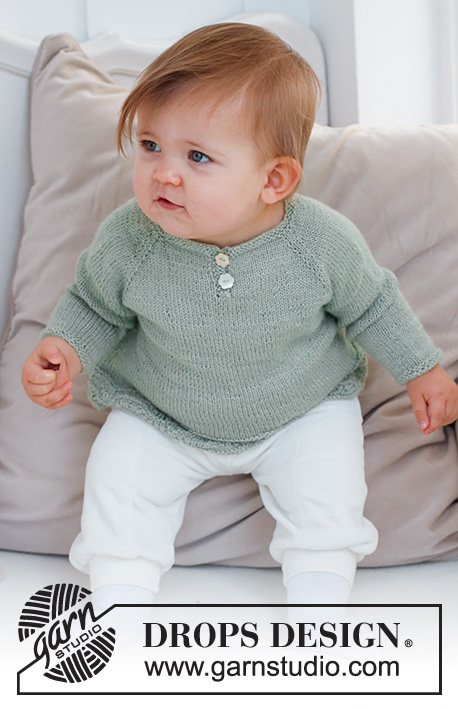
Knitted jumper for babies and children in DROPS Safran. The piece is worked top down with raglan and wave-pattern. Sizes 0 - 6 years.
DROPS Baby 42-8 |
|||||||||||||
|
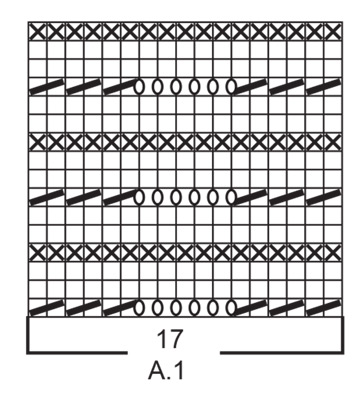
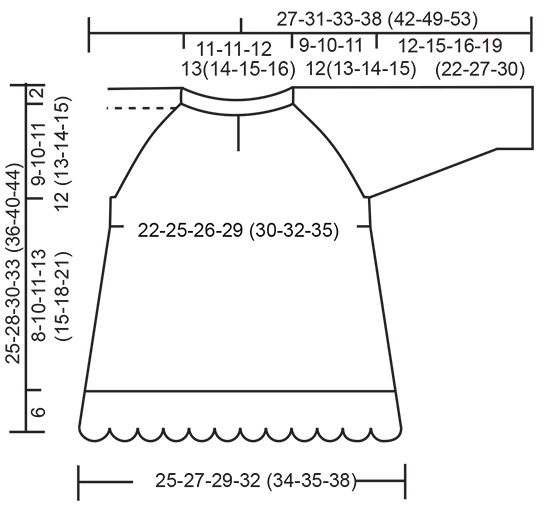
------------------------------------------------------- EXPLANATIONS FOR THE PATTERN: ------------------------------------------------------- RIDGE/GARTER STITCH (worked in the round): 1 ridge in height = 2 rounds; Knit 1 round and purl 1 round. RIDGE/GARTER STITCH (worked back and forth): Knit all rows. 1 ridge = knit 2 rows. PATTERN: See diagram A.1. INCREASE TIP (for sides of body): Work until there are 2 stitches left before the marker, make 1 yarn over, knit 4 (marker thread sits between these 4 stitches), make 1 yarn over. On the next round work the yarn overs twisted to avoid holes. Then work the new stitches in stocking stitch. RAGLAN: Increase 1 stitch on each side of the 2 stocking stitches in each transition between body and sleeves (8 stitches increase on row/round). Increase 1 stitch by making 1 yarn over. On the next row (wrong side) purl the yarn overs twisted to avoid holes. On the next round (i.e. when working in the round) knit the yarn overs twisted to avoid holes. Then work the new stitches in stocking stitch. DECREASE TIP (sleeves): Decrease 1 stitch on either side of the marker as follows: Work until there are 3 stitches left before the marker, knit 2 together, knit 2 (marker sits between these 2 stitches), slip 1 stitch as if to knit, knit 1 and pass the slipped stitch over the knitted stitch (2 stitches decreased). BUTTONHOLES: Work from the right side when there are 3 stitches left on the row as follows: Make 1 yarn over, knit 2 together and knit 1. On the next row, knit the yarn over to leave a hole. The first buttonhole is worked when the neck measures 1½ cm. Then work the other buttonhole after 4 cm. ------------------------------------------------------- START THE PIECE HERE: ------------------------------------------------------- JUMPER – SHORT OVERVIEW OF THE PIECE: The piece is first worked back and forth from mid-front and top down. When the split is finished, it is continued in the round. The yoke is divided for the body and sleeves and the body continued in the round. The sleeves are worked in the round with double pointed needles. NECK: Cast on 73-77-81-85 (89-93-97) stitches with circular needle size 2.5 mm and DROPS Safran. Work 2 RIDGES back and forth – read description above. Change to circular needle size 3 mm. YOKE: READ THE NEXT SECTION BEFORE CONTINUING! The first row is worked as follows from the right side: 3 band stitches in garter stitch, 11-12-13-14 (15-16-17) stitches in stocking stitch (half front piece), 1 yarn over, 2 stitches in stocking stitch (raglan-line), 1 yarn over, 6 stitches in stocking stitch and increase 4 stitches evenly over these stitches (10 stitches on the sleeve), 1 yarn over, 2 stitches in stocking stitch (raglan-line), 1 yarn over, 25-27-29-31 (33-35-37) stitches in stocking stitch (back piece), 1 yarn over, 2 stitches in stocking stitch (raglan-line), 1 yarn over, 6 stitches in stocking stitch and increase 4 stitches evenly over these stitches (10 stitches on the sleeve), 1 yarn over, 2 stitches in stocking stitch (raglan-line), 1 yarn over, 11-12-13-14 (15-16-17) stitches in stocking stitch and 3 band stitches in garter stitch (half front piece). The first increase to RAGLAN – read description above, is now finished and there are 89-93-97-101 (105-109-113) stitches on the row. Continue with stocking stitch and 3 band stitches in garter stitch on each side and continue increasing to raglan every 2nd row (each row from the right side) – REMEMBER THE KNITTING TENSION and the BUTTONHOLES – read description above. AT THE SAME TIME when the piece measures 6 cm from the cast-on edge, join the piece as follows on the next row from the right side: Cast off the first 3 stitches and work to the end of the row. When the row is finished, continue in the round with stocking stitch over all stitches. Move the beginning of the round to mid-front. Increase to raglan a total of 10-12-13-14 (15-16-18) times = 158-178-190-202 (214-226-246) stitches. Continue without further increases until the piece measures 9-10-11-12 (13-14-15) cm. Work the next round as follows: Knit 24-27-29-31 (33-35-38), place the next 32-36-38-40 (42-44-48) stitches on a thread for the sleeve, cast on 6-6-6-8 (8-8-8) stitches (in side under sleeve), knit 47-53-57-61 (65-69-75) place the next 32-36-38-40 (42-44-48) stitches on a thread for the sleeve, cast on 6-6-6-8 (8-8-8) stitches (in side under sleeve), knit the last 23-26-28-30 (32-34-37) stitches. The body and sleeves are finished separately. BODY: = 106-118-126-138 (146-154-166) stitches. Insert 1 marker in each side, in the middle of the new stitches cast on under each sleeve. Move the beginning of the round to one marker. When the piece measures 2 cm from the division, increase 1 stitch on each side of both markers - read INCREASE TIP. Increase like this every 3 cm a total of 3-3-3-4 (4-4-4) times = 118-130-138-154 (162-170-182) stitches. When the piece measures 8-10-11-13 (15-18-21) cm from the division, work 2 ridges over all stitches. Knit 1 round where you increase 18-23-32-33 (42-34-39) stitches evenly spaced = 136-153-170-187 (204-204-221) stitches. Knit 1 round; the yarn overs are knitted twisted to avoid holes. Now work A.1 over all stitches. When A.1 has been completed in height, loosely cast off. SLEEVES: Place the 32-36-38-40 (42-44-48) stitches from the thread on the one side of the piece on double pointed needles size 3 mm and knit up 1 stitch in each of the 6-6-6-8 (8-8-8) stitches cast on under the sleeve = 38-42-44-48 (50-52-56) stitches. Insert a marker in the middle of the new stitches under the sleeve. Work stocking stitch in the round. When the sleeve measures 3 cm from the division, decrease 1 stitch on each side of the marker - read DECREASE TIP! Decrease like this every 5-4-3-3 (4-5-3 ½) cm a total of 2-3-4-5 (5-5-7) times = 34-36-36-38 (40-42-42) stitches. When the sleeve measures 11-14-15-18 (21-26-29) cm, change to double pointed needles size 2.5 mm. Work 2 ridges over all stitches. Cast off with knit. Work the other sleeve in the same way. ASSEMBLY: Sew the buttons onto the band without buttonholes. Lay the button-band under the buttonhole-band and sew together at the bottom. |
|||||||||||||
Diagram explanations |
|||||||||||||
|
|||||||||||||
 |
|||||||||||||
 |
|||||||||||||
Have you finished this pattern?Tag your pictures with #dropspattern #littlepeasweater or submit them to the #dropsfan gallery. Do you need help with this pattern?You'll find 26 tutorial videos, a Comments/Questions area and more by visiting the pattern on garnstudio.com. © 1982-2025 DROPS Design A/S. We reserve all rights. This document, including all its sub-sections, has copyrights. Read more about what you can do with our patterns at the bottom of each pattern on our site. |
|||||||||||||


With over 40 years in knitting and crochet design, DROPS Design offers one of the most extensive collections of free patterns on the internet - translated to 17 languages. As of today we count 320 catalogues and 12093 patterns translated into English (UK/cm). 12093
We work hard to bring you the best knitting and crochet have to offer, inspiration and advice as well as great quality yarns at incredible prices! Would you like to use our patterns for other than personal use? You can read what you are allowed to do in the Copyright text at the bottom of all our patterns. Happy crafting!
Post a comment to pattern DROPS Baby 42-8
We would love to hear what you have to say about this pattern!
If you want to leave a question, please make sure you select the correct category in the form below, to speed up the answering process. Required fields are marked *.