
Popular categories
Looking for a yarn?


Comments / Questions (115)
![]() Ans wrote:
Ans wrote:
Kan ik het patroon ook met gewone naalden breien, met apart voorpand en achterpand? ik zie alleen rondbreinaald staan
16.01.2023 - 08:37DROPS Design answered:
Dag Ans,
Ja, dat zou kunnen bij dit patroon. Om een patroon aan te passen om op rechte naalden te breien hebben we een instructie gemaakt. Deze vind je hier.
18.01.2023 - 20:57
![]() Elissa K Paquette wrote:
Elissa K Paquette wrote:
Do you offer a set of pattern directions using inches?
07.01.2023 - 17:07DROPS Design answered:
Dear Elissa, you can check here the pattern with US terms, which uses inches. https://www.garnstudio.com/pattern.php?id=10190&cid=17. Happy knitting!
07.01.2023 - 17:38
![]() Barbara McCluskey wrote:
Barbara McCluskey wrote:
Love the Audrey sleev top but would like to knit on straight needle.can this be altered
22.11.2022 - 19:35DROPS Design answered:
Hi Audrey, The problem with straight needles is the number of stitches in this pattern, which will probably be too many for straight needles. Happy knitting!
23.11.2022 - 06:47
![]() Annie Serrano wrote:
Annie Serrano wrote:
Ik ben patroon van drops 228-5 aan het breien. Bij het achterpand staat:brei nu A2 over iedere herhaling van A1.Maar dan worden er toch teveel geminderd.? Het zouden er voor maat S maar 4 mogen minderen? Elk patroon wordt er een geminderd. Volgens mij zijn dat er 9 elke naald. Ik kom er niet uit
03.11.2022 - 16:22DROPS Design answered:
Dag Annie,
Je begint met 104 steken in totaal en na A.2 heb je in totaal 9 steken geminderd, dus dan kom je op 95 steken.
06.11.2022 - 13:40
![]() Brigitte Schreiber wrote:
Brigitte Schreiber wrote:
Guten Morgen, ich danke Ihnen vielmals für die rasche Beantwortung meiner Frage.Ich wünsche eine gute Woche. brigitte
31.10.2022 - 09:23
![]() Brigitte Schreiber wrote:
Brigitte Schreiber wrote:
Guten Morgen,warum muss ich Maschen nach dem Bündchen Stricken abnehmen?Das verstehe ich nicht-bin Anfängerin-.Freundlichen Gruß brigitte
30.10.2022 - 11:11DROPS Design answered:
Liebe Frau Schreiber, man braucht mehr Maschen um Bünchen mit den kleineren Nadeln als glatt rechts mit den grösseren Nadeln (für die selbe Breite), deshalb muss man nach dem Bündchen abnehmen. Viel Spaß beim stricken!
31.10.2022 - 08:48
![]() Brigitte Schreiber wrote:
Brigitte Schreiber wrote:
Guten Tag, ich kann nicht erkennen,wiewviel Wolle ich für den Pullunder DROPS 220-43 in XXl benötige.Für eine Antwort bedanke ich mich.
25.10.2022 - 15:37DROPS Design answered:
Liebe Frau Schreiber, die Garnmenge finden Sie unter Kopfzeilen oben zusammen mit den Grössen und Maschenprobe sowie Nadelgrösse, so in XXL brauchen Sie 250 g DROPS Sky/50 g das Knäuel = 5 Knäuel. Viel Spaß beim stricken!
25.10.2022 - 16:02
![]() Wanda wrote:
Wanda wrote:
Nie wiem jak zrobić „wykończenie dekoltu” Jak nabieram oczka wokół dekoltu na drut z żyłką to robię na okrągło i nie wiem jak zrobić szpic na dole żeby dekolt był V a nie okrągły?
09.10.2022 - 04:34DROPS Design answered:
Witaj Wando, nabierasz oczka zaczynając od dołu dekoltu na przodzie i kończysz nabieranie oczek w tym samym miejscu. Robisz to na drutach z żyłką, ale nie łączysz robótki na okrągło, tylko przerabiasz w rzędach, w tę i z powrotem. Jak zakończysz wykończenie dekoltu, to układasz obie części na sobie na dole dekoltu z przodu i zszywasz. Zobacz zdjęcie. Pozdrawiamy!
10.10.2022 - 10:12
![]() Jette Larsen wrote:
Jette Larsen wrote:
Ups det var forkerte opskrift jeg skrev kommentar til, det er op skrift nr196-15
13.09.2022 - 12:31
![]() Jette Larsen wrote:
Jette Larsen wrote:
Tænker der skal en lille rettelse til. Strikker str L og når mønster og udtagning er færdig passer masketal med de 276 der står i opskrift. Problemet er bare at 276 m ikke passer med det antal masker der så skal være mellem mærketråde før raglan. De passer med inddeling til str m. 276-(45+60+90+60+45)=-24 dette er str L 276-(41+56+82+56+41)=0 dette er mærker i str M God fornøjelse 😉
13.09.2022 - 12:30
|
|
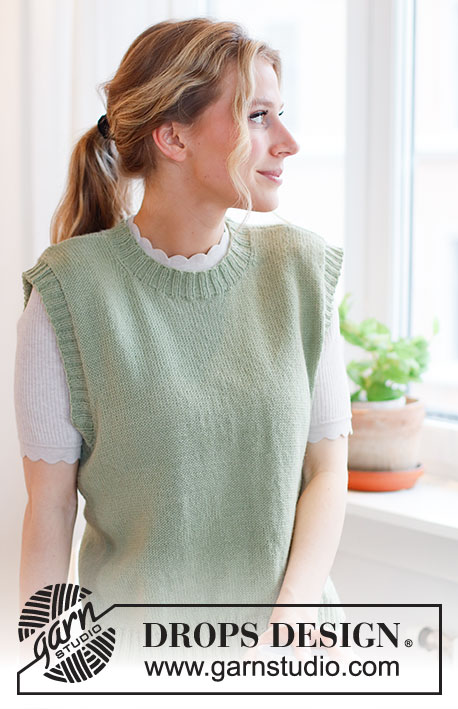
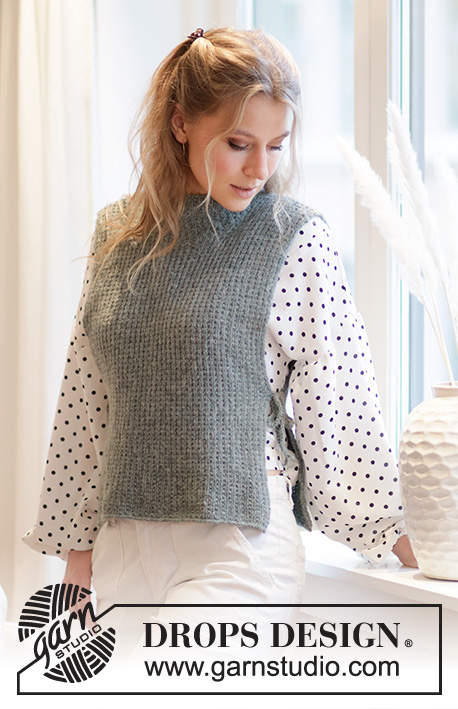
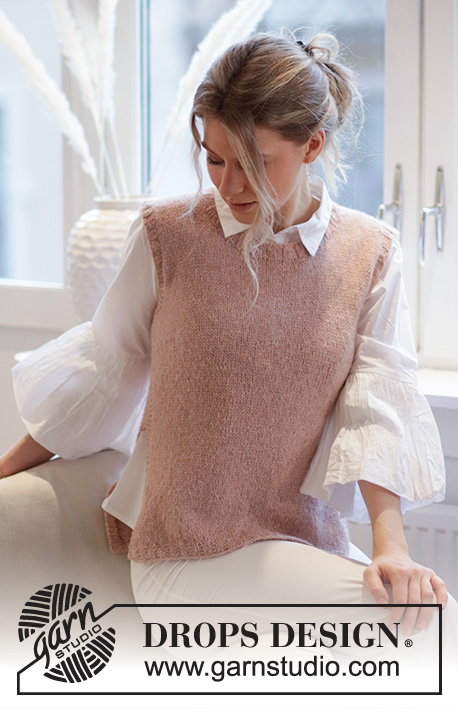
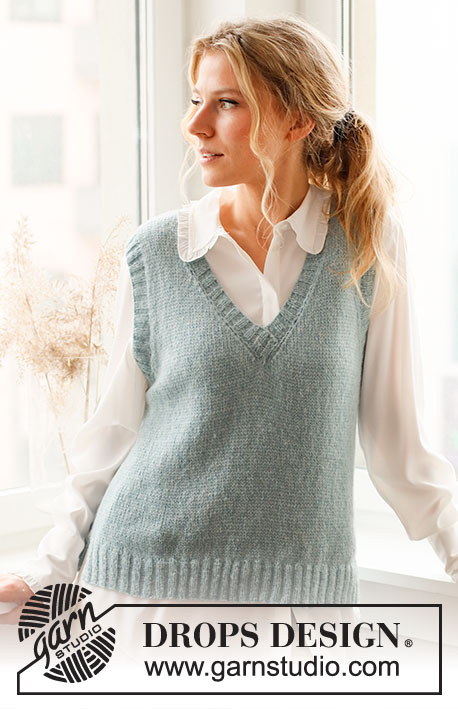
Audrey Vest#audreyvest |
|
 |
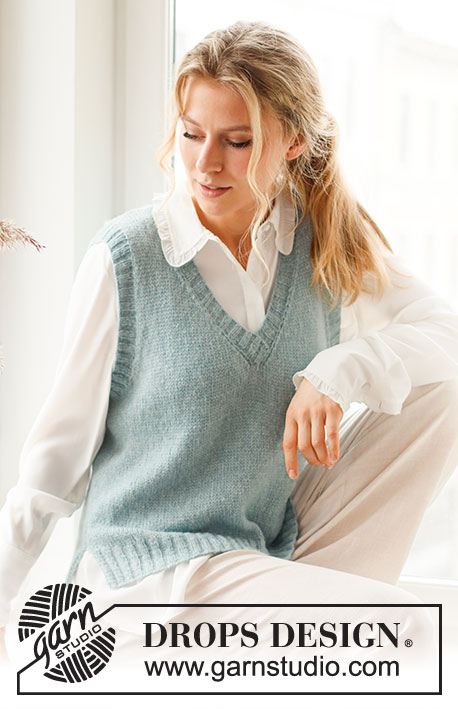 |
Knitted vest / slipover in DROPS Sky. The piece is worked in stocking stitch with ribbed edges, V-neck and split in the sides. Sizes S - XXXL.
DROPS 220-43 |
|
|
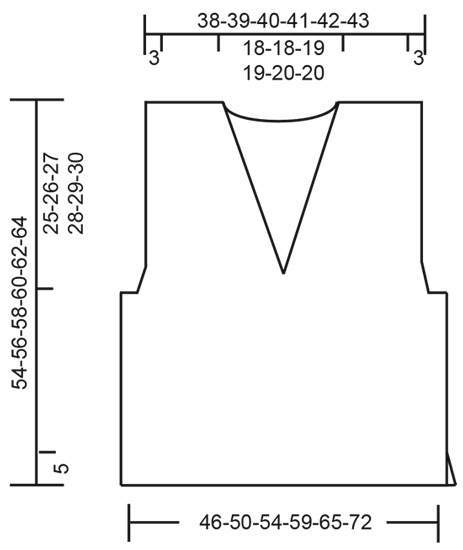
------------------------------------------------------- EXPLANATIONS FOR THE PATTERN: ------------------------------------------------------- RIDGE/GARTER STITCH (worked back and forth): Knit all rows. 1 ridge in height = Knit 2 rows. DECREASE TIP (evenly spaced): To work out how to decrease evenly, count the total number of stitches on the needle (e.g. 118 stitches) and divide by the number of decreases to be made (e.g. 24) = 4.9. In this example, decrease by knitting together approx. each 4th and 5th stitch. DECREASE TIP-2 (for armholes): Decrease on the inside of 2 stitches. All decreases are worked from the right side. Decrease as follows at the beginning of the row: Knit 2, slip 1 stitch as if to knit, knit 1 and pass the slipped stitch over the knitted stitch. Decrease as follows at the end of the row: Work until there are 4 stitches left, knit 2 together and knit the last 2 stitches. ------------------------------------------------------- START THE PIECE HERE: ------------------------------------------------------- VEST – SHORT OVERVIEW OF THE PIECE: The piece is worked back and forth, in sections and sewn together to finish. The V-neck and armhole edges are worked in the round to finish. BACK PIECE: Cast on 118-130-138-150-166-182 stitches with circular needle size 3.5 mm and Sky. Purl 1 row (= wrong side). Then work the next row from the right side as follows: 2 edge stitches in GARTER STITCH – read description above, * knit 2, purl 2 *, work from *-* until there are 4 stitches left, knit 2 and finish with 2 edge stitches in garter stitch. Continue this rib for 6 cm. Knit 1 row from the wrong side then knit 1 row from the right side where you decrease 24-28-28-30-34-36 stitches evenly spaced – read DECREASE TIP = 94-102-110-120-132-146 stitches. Change to circular needle size 4.5 mm. Work stocking stitch back and forth, with 1 edge stitch in garter stitch on each side. REMEMBER THE KNITTING TENSION! When the piece measures 29-30-31-32-33-34 cm, cast off for the armholes at the beginning of each row as follows: Cast off 3 stitches 1 time, then 2 stitches 2-2-2-3-3-3 times on each side. Then decrease inside 2 stitches, decreasing 1 stitch on each side 8-11-14-16-21-27 times – read DECREASE TIP-2 = 64-66-68-70-72-74 stitches. Continue with stocking stitch. When the piece measures 52-54-56-58-60-62 cm, cast off the middle 34-34-36-36-38-38 stitches for the neck and each shoulder is finished separately. Cast off 1 stitch on the next row from the neck = 14-15-15-16-16-17 stitches on the shoulder. Continue working stocking stitch until the piece measures 54-56-58-60-62-64 cm (25-26-27-28-29-30 cm from the bottom of the armhole). Cast off with knit from the right side (making sure the cast-off edge is not tight). Work the other shoulder in the same way. FRONT PIECE: Cast on 118-130-138-150-166-182 stitches with circular needle size 3.5 mm and Sky. Purl 1 row (= wrong side). Then work the next row from the right side as follows: 2 edge stitches in garter stitch, * knit 2, purl 2 *, work from *-* until there are 4 stitches left, knit 2 and finish with 2 edge stitches in garter stitch. Continue this rib for 6 cm. Knit 1 row from the wrong side then knit 1 row from the right side where you decrease 24-28-28-30-34-36 stitches evenly spaced = 94-102-110-120-132-146 stitches. Change to circular needle size 4.5 mm. Work stocking stitch back and forth with 1 edge stitch in garter stitch on each side until the piece measures 29-30-31-32-33-34 cm. Insert 1 marker in the middle of the row, with 47-51-55-60-66-73 stitches on each side (this marker is used when working the V-neck). READ THE WHOLE OF THE NEXT SECTION BEFORE CONTINUING! Continue with stocking stitch and cast off for the armholes at the beginning of each row as follows: 3 stitches 1 time, then 2 stitches 2-2-2-3-3-3 times on each side. Then decrease inside 2 stitches, decreasing 1 stitch on each side 8-11-14-16-21-27 times = 64-66-68-70-72-74 stitches. V-NECK: At the same time when the piece measures 31-33-34-36-37-39 cm start to decrease for the V-neck. Start from the right side and work as before until there are 3 stitches left before the marker, knit 2 together and work 1 edge stitch in garter stitch. Place the remaining stitches on a thread without working them. Each shoulder is finished separately; do not cut the strand. The left shoulder is continued from here, working back from the wrong side. LEFT SHOULDER (front piece): Continue with stocking stitch and 1 edge stitch in garter stitch towards the neck, decreasing inside this edge stitch at the end of each row from the right side. Decrease every 2nd row 17-17-18-18-19-19 more times (a total of 18-18-19-19-20-20 decreases, decrease by knitting 2 together, the first decrease was made when the front piece was divided) = 14-15-15-16-16-17 stitches on the shoulder. Continue with stocking stitch and 1 edge stitch in garter stitch towards the neck until the piece measures a total of 54-56-58-60-62-64 cm. Cast off with knit from the right side. RIGHT SHOULDER (front piece): Place the stitches from the thread back on the needle. Continue with stocking stitch and 1 edge stitch in garter stitch towards the neck (the first row is worked from the right side), decreasing for the neck inside the edge stitch at the beginning of each row from the right side. Decrease every 2nd row (slipping 1 stitch, knitting 1 and passing the slipped stitch over the knitted stitch) a total of 18-18-19-19-20-20 times = 14-15-15-16-16-17 stitches left on the shoulder. NOTE! The first decrease is on the first row worked). Continue with stocking stitch and 1 edge stitch in garter stitch towards the neck until the piece measures a total of 54-56-58-60-62-64 cm. Cast off with knit from the right side. ASSEMBLY: Sew the shoulder seams with grafting stitches, inside the cast-off edges. Start under the armholes and sew the side seams inside the 1 edge stitch – leave approx. 6 cm open for the split on each side. NECK: Start from the right side, at the bottom of the V-neck using short circular needle size 3.5 mm and knit up 168 to 184 stitches (number of stitches must be divisible by 4 and the stitches are knitted up inside the 1 edge stitch), first along the right side, then around the back of the neck and down the left side. Work the first row from the wrong side as follows; 1 edge stitch in garter stitch, * purl 2, knit 2 *, work from *-* until there are 3 stitches left, purl 2 and finish with 1 edge stitch in garter stitch. Work this rib back and forth for 3 cm. Cast off with knit over knit and purl over purl. At the bottom of the V-neck, mid-front, lay the right side over the left side and sew down neatly in the outermost stitch on the neck-edge. Repeat in the same way on the inside of the neck, so the left side is sewn onto the right side. ARMHOLE-EDGE: Start from the right side by the side seam under the armhole. Using short circular needle size 3.5 mm, knit up 124 to 152 stitches around the armhole (number of stitches must be divisible by 4). Work rib in the round (knit 2, purl 2) for 3 cm. Cast off with knit over knit and purl over purl. Work the other armhole in the same way. |
|
 |
|
Have you finished this pattern?Tag your pictures with #dropspattern #audreyvest or submit them to the #dropsfan gallery. Do you need help with this pattern?You'll find 27 tutorial videos, a Comments/Questions area and more by visiting the pattern on garnstudio.com. © 1982-2026 DROPS Design A/S. We reserve all rights. This document, including all its sub-sections, has copyrights. Read more about what you can do with our patterns at the bottom of each pattern on our site. |
|


With over 40 years in knitting and crochet design, DROPS Design offers one of the most extensive collections of free patterns on the internet - translated to 17 languages. As of today we count 324 catalogues and 12245 patterns translated into English (UK/cm). 12245
We work hard to bring you the best knitting and crochet have to offer, inspiration and advice as well as great quality yarns at incredible prices! Would you like to use our patterns for other than personal use? You can read what you are allowed to do in the Copyright text at the bottom of all our patterns. Happy crafting!
Post a comment to pattern DROPS 220-43
We would love to hear what you have to say about this pattern!
If you want to leave a question, please make sure you select the correct category in the form below, to speed up the answering process. Required fields are marked *.