
Popular categories
Looking for a yarn?


Comments / Questions (107)
![]() Lisa wrote:
Lisa wrote:
Hej, skal man kun tage 11 masker ind i A2 (de 25 masker) i bunden af ærmet eller fordelt på alle masker (både A2 og retmaskerne hele vejen rundt)?
05.04.2021 - 15:05DROPS Design answered:
Hei Lisa. Det felles 11 masker jevnt fordelt kun over maskene i A.2. mvh DROPS design
19.04.2021 - 14:27
![]() Mari wrote:
Mari wrote:
Hei igjen! Jeg fant min egen feil. Diagram A1 gir 4 økninger i hver side, altså 8 m totalt. Da får jeg det til å stemme😊Gitt at kantmaskene også telles med i arbeidet?
05.04.2021 - 12:33DROPS Design answered:
Hei Mari, Ja, kantmaskene er telt med. God fornøyelse!
06.04.2021 - 07:37
![]() Mari wrote:
Mari wrote:
Hei, jeg får ikke maskeantallet til å stemme. Strikker i str S. 70 m (lagt opp, inkl kantmaske) 4 m (etter økningene i diagram A1) 22 x 8 = 176 m (raglanøkning) 2 x 4 = 8 m (raglanøkning for- og bakstykket) (2x4 )+ (2x3) = 14 (V-halsøkning) Dette gir mg 272 masker inkludert to kantmasker, hva gjør jeg feil? Og skal man telle med kantmaskene når man teller? Hvis ikke mangler jeg 6 masker. Takker så mye på forhånd!
05.04.2021 - 12:22DROPS Design answered:
Hei Mari. Husk at du strikker A.1 2 ganger, altså du øker med 4+4 masker på første pinne av A.1. Da blir det: 70 m + 8 m (økningene i A.1) + 176 m (raglanøkningene) + 8 m (raglanøkning for-og bakstykket) + 14 m (V-hals) = 276 masker på pinnen. mvh DROPS design
19.04.2021 - 15:01
![]() Julia wrote:
Julia wrote:
Guten Tag, müsste nach dem Muster A1 bei einer Größe M nicht 106 Maschen auf der Nadel sein? 72 Anfangsmaschen + 3x8 Raglan-Zunahmen + 8 A1-Zunahmen + 2 V-Ausschnitt-Zunahmen in der 3. Hinreihe? Oder habe ich mit den Zunahmen etwas falsch verstanden? Danke und Grüße!
27.03.2021 - 22:48DROPS Design answered:
Liebe Julia, ja stimmt es sind 2 Maschen mehr = die 2 ersten V-Ausschnitt-Zunahmen in der 3. Hinreihe. Viel Spaß beim stricken!
06.04.2021 - 07:55
![]() Dea wrote:
Dea wrote:
Hallo, ich glaube in der Anleitung ist ein Fehler: Nach den Ärmelabnahmen habe ich in M 59 Maschen auf der Nadel. Nach 36 cm Länge soll ich über Muster A2 11 Maschen ZUnehmen und dann 48 Maschen haben ??? Ich nehme an, ich muss 11 Maschen abnehmen?
25.03.2021 - 21:49DROPS Design answered:
Liebe Dea, herzlichen Dank für den Hinweis, Sie sind ja recht, die deutsche Anleitung wird korrigiert, hier sollen Sie 11 Maschen abnehmen und nicht zunehmen. Viel Spaß beim stricken!
26.03.2021 - 08:13
![]() Mareike wrote:
Mareike wrote:
Hallo, die Zunahmen für den V-Ausschnitt sind meiner Meinung nach vor den raglan Zunahmen fertig, aber in der Beschreibung sind die V-ausschnitt Zunahmen gleichzeitig mit den raglan Zunahmen fertig. Habe ich den V-Ausschnitt falsch zugenommen?
23.03.2021 - 19:38DROPS Design answered:
Liebe Mareike, wenn die Zunahmen für den V-Ausschnitt fertig sind, sind die Zunahmen für den Raglan noch nicht zur Ende, es ist ja richtig, es fehlen nur noch einpaar Raglanzunahmen. Viel Spaß beim stricken!
24.03.2021 - 07:42
![]() Lisa wrote:
Lisa wrote:
Der står: "SAMTIDIG på 6. pind tages ud til v-hals." Samtidigt med hvilket sted? Jeg har gjort det på hver tredje ret pind fra at jeg begyndte på A2, men er meget i tvivl om det er korrekt forstået. Det vil sige, at jeg tager ud til v-hals på de første 7 gange A2 og ud til Raglan de første 8 gange A2. Det er en noget kryptisk tekst. Men jeg håber da det lykkes, for den er flot.
23.03.2021 - 09:04DROPS Design answered:
Hej Lisa, du starter med udtagningerne til både raglan og til v-hals samtidigt, så allerede på 6.pind (3. fra retsiden) starter v-halsen. God fornøjelse!
23.03.2021 - 13:08
![]() Lisa wrote:
Lisa wrote:
Sikke en fin trøje. Jeg har kastet mig over den i en stor M. Efter A1 skal der være 104 masker. Jeg skal herefter tage ud til Raglan (8 masker) i alt 25 gange (+200) OG ekstra 2 gange på bag og forstykke (+8) samt V hals i alt 10 gange (+20). Det giver 332 masker. Misforstår jeg eller er der en fejl? Hvis det er en fejl, så kan man ikke følge opskriften herfra.
21.03.2021 - 09:33DROPS Design answered:
Hei Lisa. Du starter med 72 masker, strikker A.1 1 gang i høyden (her øker du med 8 masker på 1. omgang + 3 (x8) ganger til raglan) = 72+8+24 = 104 masker. Fortsett økningen til raglan på hver 2.pinne til det er økt TOTALT 25 ganger på hver side (husk du har allerede økt 3 ganger, så nå skal du øke 22 ganger, 22 x 8 = 176). 104 masker + 176 masker = 280 masker. Så øker du kun på bakstykket og på forstykkene 2 ganger til (4 masker x 2 ganger = 8 masker ). 280 masker + 8 masker = 288 masker. Deretter til hals (2 masker x 8 ganger = 16 masker). 288 + 16 = 304 masker på pinnen. mvh DROPS design
22.03.2021 - 15:34
![]() Anita59 wrote:
Anita59 wrote:
Y aurait il la possibilité de faire ce magnifique gilet avec des aiguilles droites ? et si oui, comment transformer le patron et les explications ????
19.03.2021 - 16:47DROPS Design answered:
Bonjour Anita59, on tricote l'empiècement et le dos/le devant sur aiguille circulaire pour avoir suffisamment de place pour y loger toutes les mailles, vous pouvez donc utiliser des aiguilles droites mais vos mailles seront plus serrées (on a entre 274 et 408 m à la fin de l'empiècement). Cette leçon vous en apprendra davantage sur les aiguilles circulaires. Bon tricot!
22.03.2021 - 07:11
![]() Anja wrote:
Anja wrote:
When I have knitted A1 once in height, I end up with 106 stitches instead of 108 as described for size L. Somewhere I miss 2 stitches. I started with 74 stitches including 2 edge stitches
27.02.2021 - 15:07
|
|||||||||||||||||||||||||
Bronze Summer#bronzesummercardigan |
|||||||||||||||||||||||||
 |
 |
||||||||||||||||||||||||
Knitted jacket in DROPS Air. Piece is knitted top down with raglan, lace pattern and V-neck. Size: S - XXXL
DROPS 221-4 |
|||||||||||||||||||||||||
|
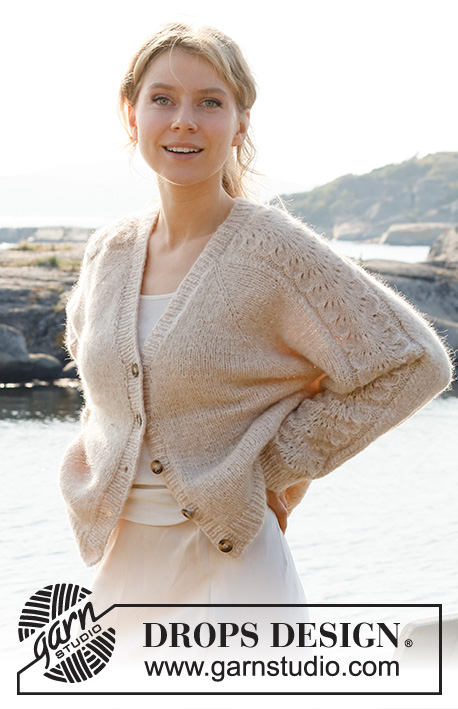
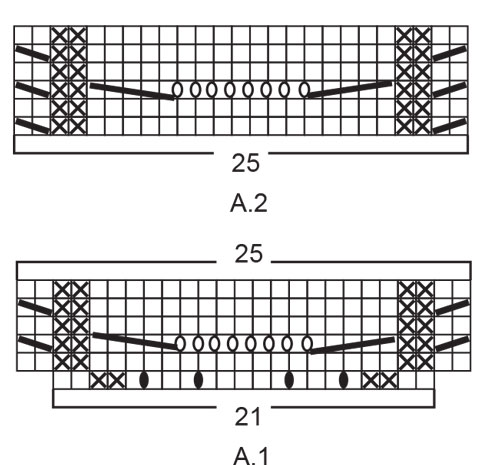
------------------------------------------------------- EXPLANATION FOR THE PATTERN: ------------------------------------------------------- GARTER STITCH (back and forth): Knit all rows. 1 ridge vertically = knit 2 rows. PATTERN: See diagrams A.1 and A.2. RAGLAN: Increase 1 stitch on each side of 1 stitch in stocking stitch (stitch with marker thread) in every transition between body and sleeves (= 8 stitches increased on row). Increase 1 stitch by making 1 yarn over. On next row purl yarn overs twisted to avoid holes. Then work the new stitches in stocking stitch. V-NECK: All increases are done from the right side. Make 1 yarn over inside 1 edge stitch in garter stitch (= 1 stitch increased) in each side. On next row (wrong side) purl yarn over twisted to avoid holes. Then work the new stitches in stocking stitch. Increase 2 stitches in total on every increase row (1 stitch in each side). DECREASE TIP (applies to sleeves): Decrease 1 stitch on each side of marker thread as follows: Work until 3 stitches remain before marker thread and knit 2 together, knit 2 (marker thread is between these stitches), slip 1 stitch knitwise, knit 1, pass slipped stitch over stitch worked. CAST-OFF TIP: To avoid a tight cast-off edge you may use a larger needle size. If this also is too tight, work a 1 yarn over after approx. every 4th stitch while casting off (cast off yarn overs as regular stitches). BUTTONHOLES (applies to right band when garment is worn): Decrease for 5 buttonholes on right band. 1 buttonhole = work 2 stitches together and make 1 yarn over. On next row knit yarn over to make holes. Bottom buttonhole should be approx. 2 cm from bottom edge and top buttonhole where V-neck begins. Place the remaining 3 buttonholes evenly, approx. 8-8-8-7½-7½-7½ cm between each buttonhole. ------------------------------------------------------- START THE PIECE HERE: ------------------------------------------------------- JACKET - SHORT OVERVIEW OF THE PIECE: Work yoke back and forth on circular needle from mid front, work top down. AT THE SAME TIME increase V-neck and raglan. Now divide yoke for body and sleeves. Work body back and forth on circular needle, top down. Work sleeves in the round on double pointed needles/short circular needle, top down. At the end work a neck edge/band around the opening on jacket. YOKE: Cast on 70-72-74-76-78-80 stitches (including 1 edge stitch in each side towards mid front) on circular needle size 5 mm with Air. Purl 1 row from wrong side. OVERVIEW OF THE NEXT SECTION: Now start the pattern on the sleeves, at the same time increase for raglan and V-neck – therefore read the entire next section before starting. Insert 4 marker threads in piece as follows (without working the stitches): Count 3 stitches (= front piece), insert 1 marker thread in next stitch, count 21 stitches (= sleeve), insert 1 marker thread in next stitch, count 18-20-22-24-26-28 stitches (= back piece), insert 1 marker thread in next stitch, count 21 stitches (= sleeve), insert 1 marker thread in next stitch, 3 stitches remain on row after last marker thread (= front piece). Then work in stocking stitch on stitches on front pieces and on back piece, and A.1 (= 21 stitches) over stitches on each sleeve, AT THE SAME TIME on first row from right side increase for RAGLAN in every transition between body and sleeves – read explanation above. When A.1 has been worked 1 time vertically continue with A.2 (= 25 stitches) over stitches in A.1 and continue increase for raglan every other row (i.e. on every row from right side) until increase has been done 22-25-27-29-33-36 times in total on each side of the 4 stitches with marker threads. Now continue increase on back piece and on front pieces 2 more times (do not increase on sleeves, increase has been done 24-27-29-31-35-38 times on back piece/front pieces). AT THE SAME TIME on 6th row (i.e. on 3rd row from right side) increase for V-NECK in each side towards mid front – read explanation above, as follows: Increase every 6th row 4-5-6-7-8-9 times, every 4th row 3 times in total (= 7-8-9-10-11-12 stitches in total increased in each side towards mid front). REMEMBER THE KNITTING TENSION! After last increase for raglan continue without increases until piece measures 22-25-27-29-33-36 cm, increases for V-neck should now be finished. There are now 276-304-324-344-380-408 stitches on needle. Work next row as follows: Work the first 35-39-42-45-50-54 stitches (= front piece), slip the next 69-75-79-83-91-97 stitches on a stitch holder for sleeve, cast on 6-6-6-8-10-12 new stitches on row (= in the side under sleeve), work the next 68-76-82-88-98-106 stitches (= back piece), slip the next 69-75-79-83-91-97 stitches on a stitch holder for sleeve, cast on 6-6-6-8-10-12 new stitches on needle (= in the side under sleeve), and work the remaining 35-39-42-45-50-54 stitches (= front piece). NOW MEASURE PIECE FROM HERE! BODY: = 150-166-178-194-218-238 stitches. Continue with stocking stitch and 1 edge stitch in garter stitch in each side. When piece measures 25-24-24-24-22-21 cm from division, knit 1 row from right side while increasing 1 stitch = 151-167-179-195-219-239 stitches. Switch to circular needle size 4 mm. Work next row as follows from wrong side: 1 edge stitch in garter stitch, * purl 1, knit 1 *, repeat from *-* until 2 stitches remain on needle, purl 1 and finish with 1 edge stitch in garter stitch. Continue rib like this for 4 cm. Loosely cast off with knit over knit and purl over purl, read CAST-OFF TIP. Jacket measures approx. 56-58-60-62-64-66 cm from shoulder. SLEEVE: Slip the 69-75-79-83-91-97 stitches from stitch holder in one side of piece on a short circular needle/double pointed needles size 5 mm and pick in addition up 1 stitch in each of the 6-6-6-8-10-12 stitches cast on in the side under sleeve = 75-81-85-91-101-109 stitches. Insert 1 marker thread in the middle of the 6-6-6-8-10-12 stitches under sleeve and move the marker thread upwards when working, it is used for decrease later. Begin round at the marker thread and continue with A.2 and stocking stitch in the round. When piece measures 3 cm from division, decrease 2 stitches mid under sleeve - read DECREASE TIP. Decrease like this every 3½-3-2-1½-1-1 cm 10-11-13-16-19-21 times in total = 55-59-59-59-63-67 stitches. Continue until piece measures 38-36-34-33-29-26 cm from division - or desired length (shorter measurements in the larger sizes because of longer yoke). Work 1 round while decreasing 11 stitches evenly over stitches in A.2 = 44-48-48-48-52-56 stitches. Switch to double pointed needles size 4 mm and work rib in the round = knit 1/purl 1 for 4 cm. Loosely cast off with knit over knit and purl over purl – remember CAST-OFF TIP. Work the other sleeve the same way. BAND + NECK EDGE: Insert 1 marker mid back of neck on back piece, marker should be used to calculate half the stitches on band/neck edge. Pick up band inside 1 edge stitch in garter stitch on front pieces, and in the 1st row worked around the neck. Begin at the bottom on right front piece from right side and pick up approx. 119-125-131-137-143-149 stitches along the entire front edge up to marker in the neck, on circular needle size 4 mm – leave the marker here. Continue to pick up approx. 120-126-132-138-144-150 stitches along the entire front edge on left front piece, total number of stitches should be divisible by 2 + 1 = approx. 239-251-263-275-287-299 stitches. It is important that the rib is not too loose with too many stitches but it should not be too tight either with tight front edges. Work next row as follows from wrong side: 2 stitches in garter stitch, * purl 1, knit 1 *, repeat from *-* until 3 stitches remain, purl 1 and finish with 2 stitches in garter stitch. Continue rib like this. When piece measures 1 ½ cm decrease for BUTTONHOLES on right band - read explanation above. Continue like this until rib measures 3 cm. Loosely cast off with knit over knit and purl over purl, remember cast-off tip. ASSEMBLY Sew the buttons on to the left band. |
|||||||||||||||||||||||||
Diagram explanations |
|||||||||||||||||||||||||
|
|||||||||||||||||||||||||
|
|||||||||||||||||||||||||

|
|||||||||||||||||||||||||
Have you finished this pattern?Tag your pictures with #dropspattern #bronzesummercardigan or submit them to the #dropsfan gallery. Do you need help with this pattern?You'll find 32 tutorial videos, a Comments/Questions area and more by visiting the pattern on garnstudio.com. © 1982-2025 DROPS Design A/S. We reserve all rights. This document, including all its sub-sections, has copyrights. Read more about what you can do with our patterns at the bottom of each pattern on our site. |
|||||||||||||||||||||||||


With over 40 years in knitting and crochet design, DROPS Design offers one of the most extensive collections of free patterns on the internet - translated to 17 languages. As of today we count 314 catalogues and 11820 patterns translated into English (UK/cm). 11820
We work hard to bring you the best knitting and crochet have to offer, inspiration and advice as well as great quality yarns at incredible prices! Would you like to use our patterns for other than personal use? You can read what you are allowed to do in the Copyright text at the bottom of all our patterns. Happy crafting!
Post a comment to pattern DROPS 221-4
We would love to hear what you have to say about this pattern!
If you want to leave a question, please make sure you select the correct category in the form below, to speed up the answering process. Required fields are marked *.