
Popularne kategorie
Szukasz włóczki?


Komentarze / Pytania (168)
Debbie napisała::
I understand where the markers are placed but what I don't understand is how you can knit 2 tog. when there is only one stitch before the marker because this is the beginning of the round
21.10.2014 - 16:07Odpowiedź DROPS Design :
Dear Debbie, to decrease 1 st before marker, work until 2 sts remain before marker and work K2 tog, so that you will work last st on round tog with 1st st next round at the beg of round. Happy knitting!
21.10.2014 - 17:07Debbie napisała::
My problem is with the decrease round. You say to decrease 1 stitch before the first marker by knitting 2 together but the 1st stitch before the marker is the beginning of the round (beginning ofA3 pattern). I am not sure how I should be decreasing.
20.10.2014 - 22:17Odpowiedź DROPS Design :
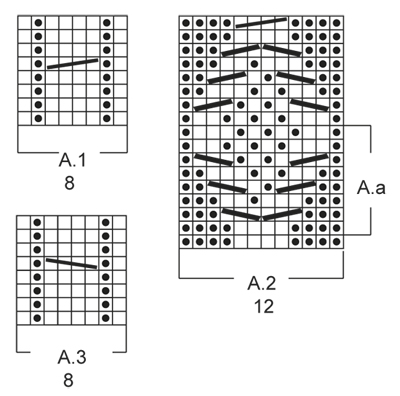
Dear Debbie, markers are place here to work the dec for toe, 1st marker will be between 1st and 2nd st in A.3, and you will dec 1st before 1st marker (see next paragraph where decreases are explained). Happy knitting!
21.10.2014 - 09:58
![]() Bev napisała::
Bev napisała::
What is meant by A.a in the pattern. It is mentioned after working in the round after A.2 has ben worked 1 time vertically. " work A.a until piece measures 61/2/ 71/2, 81/2 inches. I have read over this pattern multiple times and I cannot find what this refers to. Please respond as I am at that point in the construction
20.10.2014 - 02:56Odpowiedź DROPS Design :
Dear Bev, when you have worked diagram A.2 1 time vertically (all rows in diagram), start again on 2nd row in A.2 working the A.a part (framed on the side). Happy knitting!
20.10.2014 - 10:37
![]() Barb napisała::
Barb napisała::
I am having trouble going from straight to in the round. Could you tell me exactly where in the pattern Is the first stitch in the beginning of the round and are the 12 stitches in chart A2 all worked together? Sorry if this is obvious but I just can't get my head around this.
14.10.2014 - 18:04Odpowiedź DROPS Design :
Dear Barb, when working straight, row from RS starts and ends with P4, join in the round on a RS row casting on 4 sts between the first and last P4 = you get P12 for the upper foot. Rounds will then start there (after cast on), continue then in the round in pattern as before and work A.2 over the P12 (end of round). Happy knitting!
15.10.2014 - 08:33
![]() Debbie napisała::
Debbie napisała::
Do you have a video for this slipper?
14.10.2014 - 16:31Odpowiedź DROPS Design :
Dear Debbie, you will find all relevant videos to these slippers under the tab "videos" at the right side of the picture. Remember you can ask any question here or contact your DROPS store for any individual assistance. Happy knitting!
14.10.2014 - 16:57
![]() Debbie napisała::
Debbie napisała::
What do you mean by work one row vertically?
12.10.2014 - 19:58Odpowiedź DROPS Design :
Dear Debbie, when it says "When A.2 has been worked 1 time vertically" it means you have to work 1 time in height all rows of diagram A.2. Happy knitting!
13.10.2014 - 10:12
![]() Debbie Clarke napisała::
Debbie Clarke napisała::
When you say to cast on 4 stitches and then work them, are the purled or knitted? Also I am not sure where you should join for in the round. Is the start of the round before or after the 4 stitches?
12.10.2014 - 17:27Odpowiedź DROPS Design :
Dear Mrs Clarke, the 4 sts are cast on at the end of a row from RS and then continue in the round - beg of round will be then after the new 4 sts. Happy knitting!
13.10.2014 - 10:03
![]() Sue napisała::
Sue napisała::
I love the pictures but your patterns are so hard to follow! They are not clearly written. Maybe if you write it out by rows instead of a paragraph?
06.09.2014 - 14:33
![]() Corinna napisała::
Corinna napisała::
Hallo liebes Drops Team, wenn im Muster A2 steht: "1 M auf eine Hilfsnadel hinter die Arbeit legen, 2 M re, 1 M li/re von der Hilfsnadel" bzw. "2 M auf eine Hilfsnadel vor die Arbeit legen, 1 M li/re, 2 M re von der Hilfsnadel" was ist dann mit li/re gemeint. Woher weiß ich, ob ich links oder rechts stricken soll? Vielen Dank vorab :)
20.08.2014 - 22:22Odpowiedź DROPS Design :
Liebe Corinna, das ergibt sich aus dem Muster. Sie stricken die M so, wie sie erscheinen. Also je nachdem, ob Sie eine linke oder rechte M auf die Hilfsnadel gelegt haben, stricken Sie diese links oder rechts.
21.08.2014 - 09:30
![]() Johanna napisała::
Johanna napisała::
I finished my pair a few weeks ago and I love them! My husband wants me to make a pair for him and two friends have asked for the pattern, so that they can make their own =) It seems like Drops have created another winner!
07.08.2014 - 14:48
|
|||||||||||||||||||
Celtic Dancer#celticdancerslippers |
|||||||||||||||||||
 |
 |
||||||||||||||||||
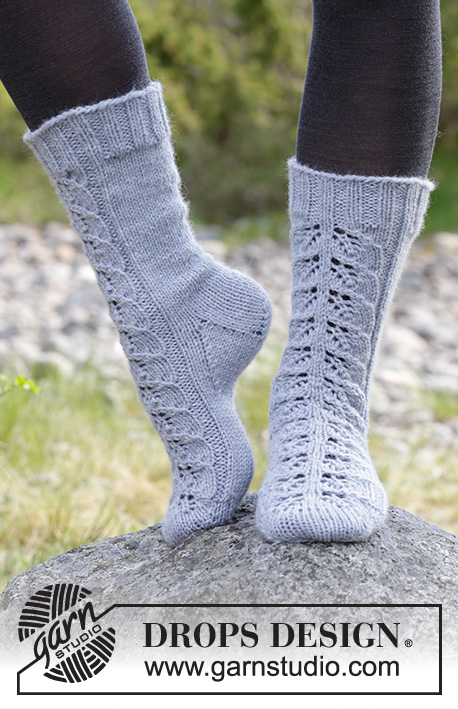
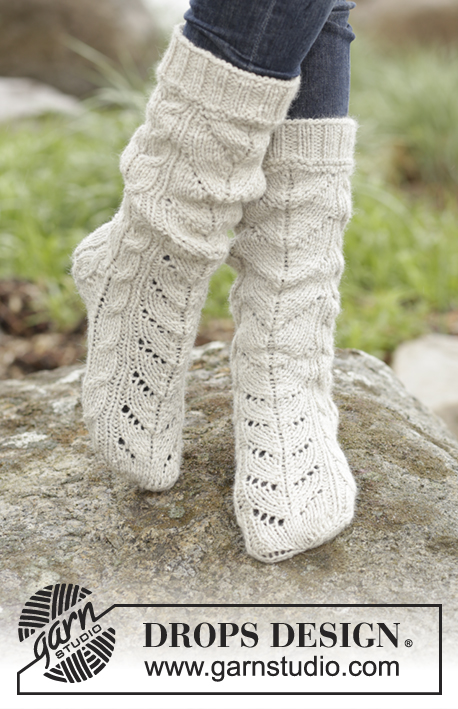
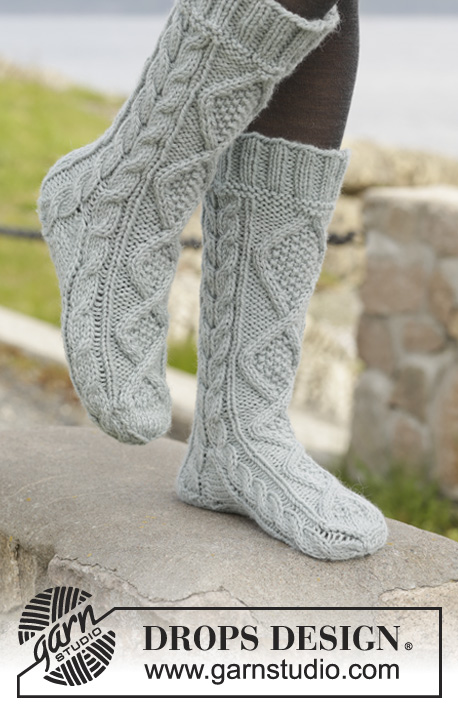
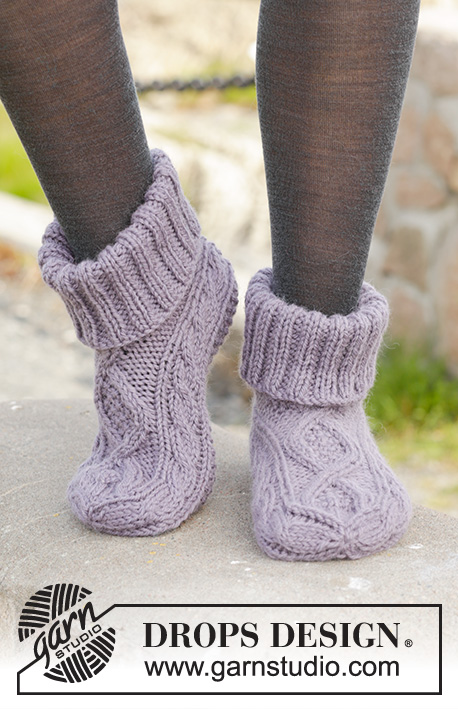
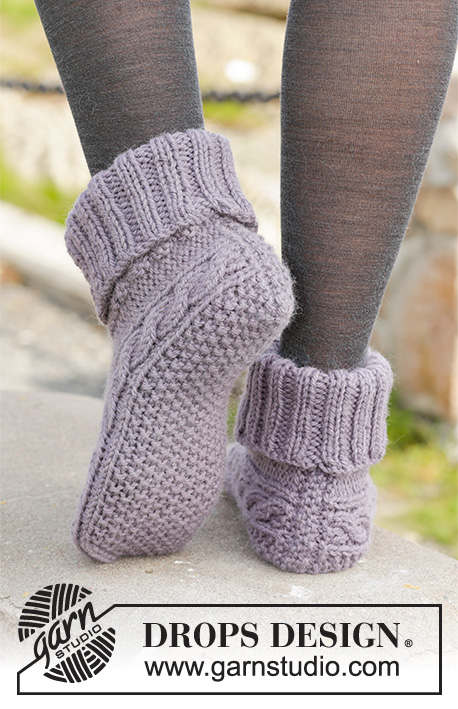
Kapcie DROPS z warkoczami, z włóczki „Nepal”. Rozmiary od 35 do 43.
DROPS 156-55 |
|||||||||||||||||||
|
ŚCIEG FANTAZYJNY: Patrz schematy A.1-A.3. Schematy przedstawiają motyw, widok na prawej stronie robótki. ZAMYKANIE OCZEK: Zamknąć 1 o. przed markerem następująco: 2 o. razem na prawo. Zamknąć 1 o. za markerem następująco: 2 przekręcone i przerobione razem na prawo. ŚCIEG FRANCUSKI (w tę i z powrotem): Przer. we wszystkich rzędach na prawo. 1 ściągacz francuski = 2 rz. na prawo. ŚCIEG RYŻOWY: Rz./okr. 1: * 1 o.p., 1 o.l. *, powt. od *-*. Rz./okr. 2: przer. oczka lewe na prawo, a prawe na lewo. Powt. rz./okr. 2. WSKAZÓWKA DO MIERZENIA: Mierzyć po środku warkocza w A.1/A.3. ---------------------------------------------------------- KAPEĆ: Przerabiany w tę i z powrotem zaczynając od środka tyłu. Na drutach nr 5 nabrać 33-33-35 o. włóczką Nepal (zostawić ok. 20 cm nitki, która będzie wykorzystana na zszycie). Przer. 1 ściągacz ściegiem francuskim - patrz powyżej, W TYM SAMYM CZASIE w ost. rzędzie równomiernie dodać 4 o. = 37-37-39 o. Dalej przer. na prawej stronie robótki następująco: 4 o.l., A.3 (= 8 o.), 13-13-15 o. ŚCIEGIEM RYŻOWYM – patrz powyżej, A.1 (= 8 o.), zakończyć przerabiając 4 o.l. Dalej przer. tak samo, przer. oczka lewe na prawo na lewej stronie robótki. Powt. A.1 i A.3 do końca. ZACHOWAĆ TAKIE SAME NAPRĘŻENIE NICI JAK W PRZYPADKU PRÓBKI! Gdy dł. robótki wynosi 10½-11½-13 cm – patrz WSKAZÓWKA DO MIERZENIA powyżej, przer. na prawej stronie robótki następująco: 4 o.l., A.3, 13-13-15 o. ściegiem ryżowym, A.1, 4 o.l., nabrać 4 o., przer. 4 pierwsze o., okrążenie zaczyna się tutaj = 41-41-43 o. Przer. teraz na okrągło na drutach pończoszniczych. Dalej przer. ściegiem fantazyjnym jak wcześniej, ale przer. teraz A.2 (= 12 o.) ponad 4 o.l. z każdej strony i 4 nowymi o. Gdy schemat A.2 zostanie przerobiony 1 raz na wysokość, przer. A.a aż dł. robótki wynosi 17-19-22 cm. Przer. teraz dżersejem ponad oczkami schematu A.a, lub zacząć dżersejem trochę wcześniej. Dalej przer. A.1 i A.3 do końca. Umieścić teraz 4 markery następująco: przer. A.3, ale włożyć 1-szy marker między 1-sze i 2-gie o., a 2-gi marker między 7-me i 8-me o. w schemacie, przer. ściegiem ryżowym jak wcześniej, przer. A.1, ale włożyć 3-ci marker między 1-sze i 2-gie o., oraz włożyć 4-ty marker między 7-me i 8-me o. w schemacie A.1, przer. pozostałe o. na prawo (= 14 o. na wierzch stopy, 15-15-17 o. na spód stopy i 6 o. z każdej strony). W nast. okrążeniu zacząć zamykanie o. na palce następująco: zamknąć 0-0-1 raz 1 o. za 2-gim markerem i 1 o. przed 3-cim markerem na spodzie stopy – PATRZ ZAMYKANIE OCZEK powyżej, przer. pozostałe o. = 14 o. na wierzch i 15 o. na spod stopy (= w sumie 41 o.). W nast. okrążeniu zamykać o. następująco: zamknąć 1 o. przed 1-szym i 3-cim markerem i 1 o. za 2-gim i 4-tym markerem (= w sumie 4 zamknięte o.). Powt. zamykanie o. w sumie 6 razy w każdym okrążeniu, W TYM SAMYM CZASIE przy ost. zamykaniu o., przer. oczka warkoczy w schematach A.1 i A.3 następująco: 2 przekręcone i przerobione razem na prawo, 2 o. razem na prawo. Po zamknięciu wszystkich o. zostaje 13 o. Dł. robótki wynosi ok. 20-22-25 cm. Odciąć nitkę i przeciągnąć ją przez pozostałe o., zacisnąć i zakończyć. WYKOŃCZENIE: Złożyć pierwszy rząd (nabierania oczek) na pół (= środek tyłu), pozostawioną nitką zszyć starannie na środku tyłu. BRZEG: Przerabiany na okrągło na drutach pończoszniczych wokół otworu kapcia. Na drutach pończoszniczych nr 4 nabrać 50-50-54 o. włóczką Nepal i przer. 1 okr. na lewo, dalej 1 okr. na prawo. W TYM SAMYM CZASIE równomiernie dodać 10 o. = 60-60-64 o. Przer. ściągaczem 2 o.p./2 o.l., aż dł. robótki wynosi ok. 12-13-14 cm. Zamknąć oczka tak jak schodzą z drutu. Zagiąć brzeg na pół. Wykonać drugi kapeć. |
|||||||||||||||||||
Objaśnienia do schematu |
|||||||||||||||||||
|
|||||||||||||||||||
 |
|||||||||||||||||||
Skończyłaś ten wzór?Otaguj swoje zdjęcia #dropspattern #celticdancerslippers lub prześlij je do #dropsfan gallery. Potrzebujesz pomocy w związku z tym wzorem?Zobacz 22 instrukcje video, sekcję Komentarze/Pytania i jeszcze więcej, wchodząc na stronę wzoru na garnstudio.com © 1982-2026 DROPS Design A/S. Wszelkie prawa zastrzeżone. Ten dokument, w całości, jest chroniony prawem. Zobacz co możesz robić z naszymi wzorami na dole każdego wzoru na naszej stronie. |
|||||||||||||||||||


Posiadając 40 lat doświadczenia w projektowaniu wzorów na druty i szydełko, DROPS Design oferuje jedną z największych kolekcji bezpłatnych wzorów w internecie – przetłumaczonych na 17 języków. Obecnie jest dostępnych 324 katalogów i 12290 wzorów w języku polskim.
Dokładamy wszelkich starań, aby oferować Wam druty i szydełka, inspiracje, fachowe porady oraz doskonałej jakości włóczki w najlepszych cenach! Zamierzasz wykorzystać nasze wzory inaczej niż tylko do osobistego użytku? Przeczytaj jakie masz prawa w Copyright, który znajdziesz na końcu każdego wzoru. Miłej pracy!
Dodaj komentarz do modelu DROPS 156-55
Chcielibyśmy się dowiedzieć co masz do powiedzenia o tym wzorze!
Jeśli chcesz zadać pytanie i szybko uzyskać odpowiedź, upewnij się, że została wybrana właściwa kategoria w formularzu poniżej. Pola obowiązkowe są oznaczone *.