
Popular categories
Looking for a yarn?


Comments / Questions (27)
![]() Else wrote:
Else wrote:
Hvordan sættes ærmer ind til bærestykket
17.02.2026 - 09:05DROPS Design answered:
Hei Else I denna video ser du hur du ska göra. Mvh DROPS Design
18.02.2026 - 08:19
![]() Henzi wrote:
Henzi wrote:
Ärmel: Bei einer Länge von 4 cm mit Maschen zunehmen beginnen. Ist dies ab Krausrippen, Anschlag oder ab Streifen? Dasselbe auch: Bei einer Länge von 19.5 cm Maschen abketten. Es stellt sich die gleiche Frage wie oben. Länge ab wann gerechnet? Ihre Anleitungen sind leider sehr unpräzise formuliert und auch für mich als geübte Strickerin nicht immer gut umsetzbar.
09.12.2025 - 20:39DROPS Design answered:
Liebe Frau Henzi, die Zunahmen beginnen wenn der Ärmel 4 cm misst, diese 4 cm messen Sie ab der Anschlagskante; sowie die weitere 19,5 cm. Viel Spaß beim Stricken!
10.12.2025 - 08:02
![]() Barbara wrote:
Barbara wrote:
Ich bin an der linken Blende: wenn ich von jeder Randmasche eine Masche auffasse, komme ich auf 48 Maschen. In der Anleitung steht, es sollen 74 Maschen sein…., wie mache ich das?
06.06.2025 - 22:09DROPS Design answered:
Liebe Barbara, das hängt wahrscheinlich davon ab, wie Sie die Ranchmaschen gestrickt haben, hier muss man 74 Maschen auffassen, damit die Blende die Arbeit nicht zusammenzieht, am besten nehmen Sie dann regelmäßig verteilt zu, damit die Maschenanzahl stimmt, und die Blende nicht zu fest ist. Viel Spaß beim Stricken!
09.06.2025 - 09:38
![]() Claudia wrote:
Claudia wrote:
Hallo Ich bin bei der Passe und stolpere über das fertige Mass. Mir fehlt da die cm Angabe. Die Raglanabnahmen sind alle gestrickt. Ist das dann das fertige Mass ohne cm-Angabe? Ich stricke in Grösse 12//18 Monate. Vielen Dank! Lieber Gruss, Claudia
09.04.2025 - 10:03DROPS Design answered:
Liebe Claudia, die Passe misst ca 10 cm in 12/18 Monate - siehe Maßskizze - dann stricken Sie die Halsblende, und mit den 3 cm Schulter wird die Passe ca (10+3=13 cm) ab Schulter messen. Viel Spaß beim Stricken!
09.04.2025 - 16:06
![]() Eva Kling wrote:
Eva Kling wrote:
Jag har stickat en kofta i stl 12/18 månader. Enligt mönstret ska det gå åt 200 g av bottenfärgen men jag har bara använt 2 nystan (100 g). Min stickfasthet stämmer med mönstret. Garnåtgången borde kanske ändras till 150g i alla fall.
04.11.2024 - 13:55
![]() Rita Andreasen wrote:
Rita Andreasen wrote:
I den mindste størrelse hvor man sætter ærmer til ryg og forstykker skriver i at der bliver 150 m Efter man har lukket af til ærmer er ryg og forstykker 78 m og hvert ærme er 30 m. Det får jeg samlet til 138 m. Hvordan passer resten af opskriften udfra dette ?
04.03.2024 - 11:46DROPS Design answered:
Hej Rita, du skal have 36 masker til ærme i den mindste størrelse :)
07.03.2024 - 15:05
![]() Marie-Luise Brüggen wrote:
Marie-Luise Brüggen wrote:
Hallo liebes Drops-Team, Wie bekomme ich die Ärmelmaschen auf die rumpfteilnadel ohne die strickteile zu überdehnen. Werden die entstehenden Lücken unter den Armen per Hand geschlossen (hierzu erfolgen keine Angaben), habe ich evtl. Beim zusammenführen von Rumpf- und Armteil einen Denkfehler ? Vielen Dank im voraus
22.02.2024 - 13:15DROPS Design answered:
Liebe Frau Brüggen, in disem Video zeigen wir, wie man die Ärmel auf die gleiche Nadeln wie Rumpf strickt, die ersten Reihen sind oft etwas tricky aber nach einigen Reihen geht es besser, eventuell kann man die Magic loop Technik benutzen. Hier zeigen wir, wie man unter die Ärmel zusammennäht. Viel Spaß beim stricken!
22.02.2024 - 15:01
![]() Melanie wrote:
Melanie wrote:
Hallo liebes Drops-Team, mir geht es um die angegebenen cm-Angaben: gelten die für die gesamte Arbeit oder nur für den Abschnitt, den man gestrickt hat? Ich bin z. B. beim Rumpfteil und habe auf die 3er-Nadel gewechselt. Gelten die 10 cm (ich stricke
16.06.2023 - 09:11DROPS Design answered:
Liebe Melanie, die 10 cm (in 1. Grösse) beim Rumpfteil für die Verteilung werden ab der Anschlagskante gemessen - Viel Spaß beim stricken!
16.06.2023 - 11:24
![]() Olivia Mack wrote:
Olivia Mack wrote:
Hallo ich habe die Ärmel beim Rumpfteil dabei. Muss ich zuerst die Streifen Passe stricken und dann erst die Raglanabnahmen machen oder muss ich schon während der Streifen Passe die Abnahmen vornehmen? Vielen Dank
17.04.2023 - 21:54DROPS Design answered:
Liebe Frau Mack, die Raglanabnahmen stricken Sie gleichzeitig, dh während die Streifen. Viel Spaß beim stricken!
18.04.2023 - 10:11
![]() Pamela wrote:
Pamela wrote:
I am unclear on how to pick up the button band edge. It says " inside edge stitch"? What stitch should be picked up? Is it the stocking stitch or the garter stitch? Thank you for any help.
19.07.2022 - 12:01DROPS Design answered:
Dear Pamela, see this video tutorial - hopefully it would be helpful for you. Happy knitting!
22.07.2022 - 19:06
|
|
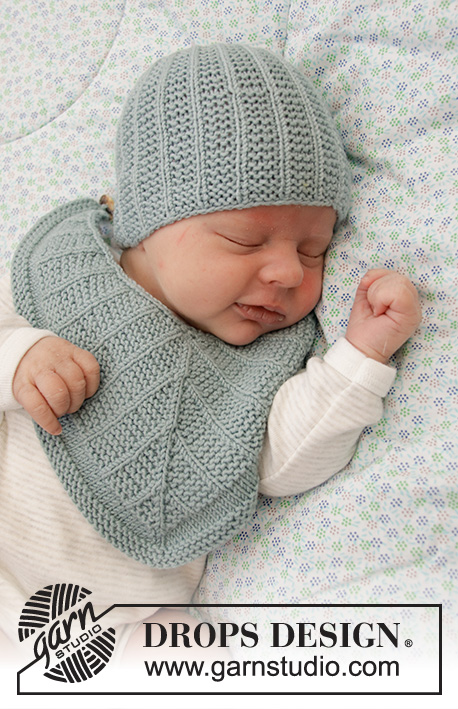
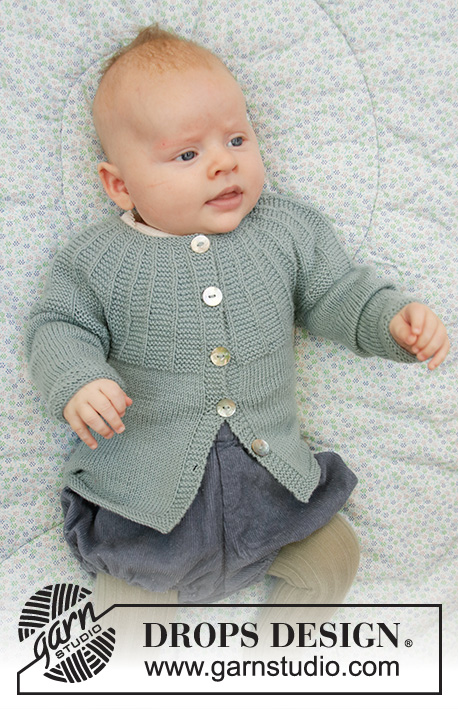
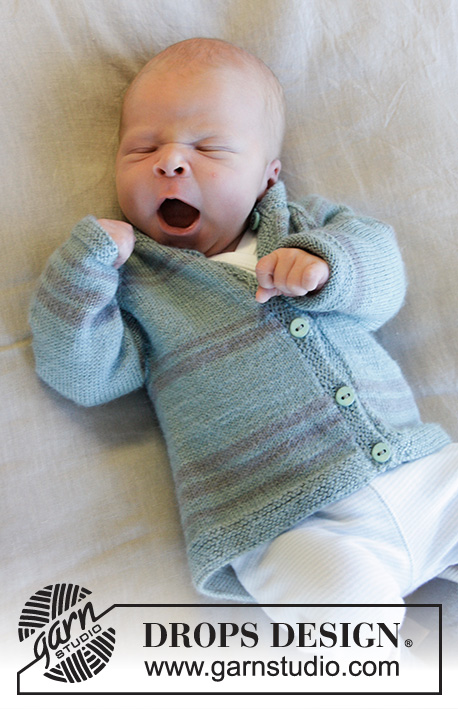
Little Brother Jacket#littlebrotherjacket |
|
 |
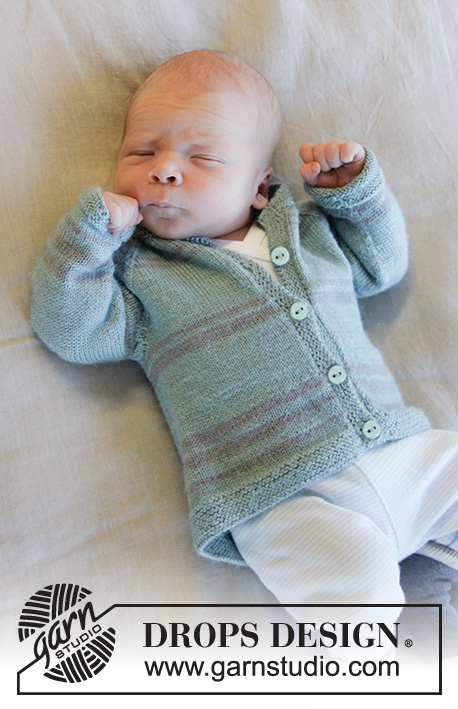 |
Knitted jacket for babies with raglan and stripes in DROPS Baby Merino. Sizes: Premature – 4 years.
DROPS Baby 33-32 |
|
|
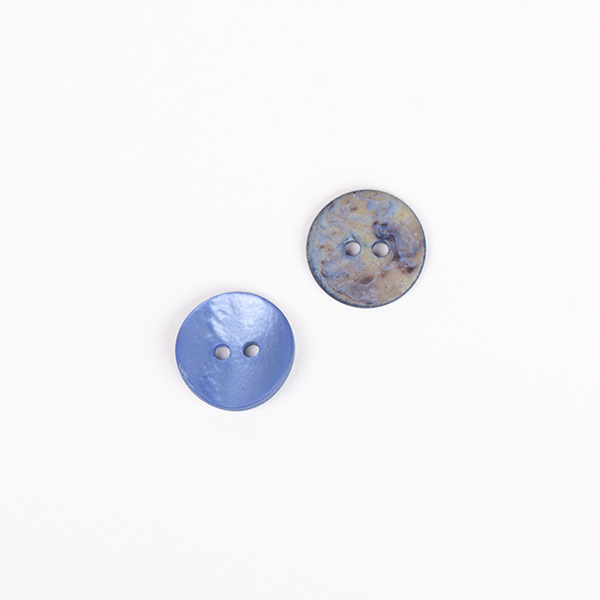
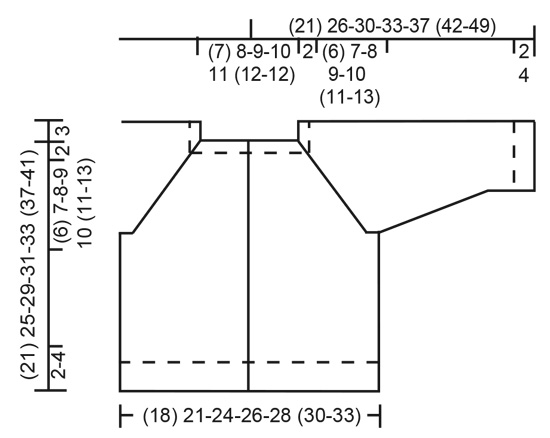
------------------------------------------------------- EXPLANATIONS FOR THE PATTERN: ------------------------------------------------------- RIDGE/GARTER STITCH (worked back and forth): Knit all rows. 1 ridge in height = Knit 2 rows. RIDGE/GARTER STITCH (worked in the round): 1 ridge in height = 2 rounds; Knit 1 round and purl 1 round. INCREASE TIP (for sleeves): Work until there is 1 stitch left before the marker, 1 yarn over, knit 2 (marker sits between these 2 stitches), 1 yarn over (= a total of 2 stitches increased). The yarn overs are knitted twisted on the next round; no holes. RAGLAN DECREASES: All decreases are worked from the right side! Work until there are 2 stitches left before the marker, knit 2 together (= 1 stitch decreased), slip 1 stitch as if to knit, knit 1 and pass the slipped stitch over (= 1 stitch decreased). Decrease like this at each marker (= 2 stitches decreased at each marker and a total of 8 stitches decreased on the row). STRIPES BODY, sizes (<0) 0/1 - 1/3 months: 4 rows light sea green 2 rows light lavender 2 rows light sea green 2 rows light lavender Work with light sea green for 3-6-8 cm 2 rows light lavender 2 rows light sea green 2 rows light lavender STRIPES BODY, sizes 6/9 – 12/18 months (2-3/4) years: 4 rows light sea green 2 rows light lavender 4 rows light sea green 4 rows light lavender 2 rows light sea green 4 rows light lavender Work with light sea green for 5-6 (8-10) cm 4 rows light lavender 2 rows light sea green 2 rows light lavender STRIPES SLEEVES, sizes (<0) 0/1 - 1/3 months: 3 rows light sea green 2 rows light lavender 2 rows light sea green 4 rows light lavender Work with light sea green for 2 ½-6-7½ cm 2 rows light lavender 2 rows light sea green 2 rows light lavender STRIPES SLEEVES, sizes 6/9 - 12/18 months (2 - 3/4) years: 5 rows light sea green 2 rows light lavender 4 rows light sea green 4 rows light lavender 2 rows light sea green 4 rows light lavender Work with light sea green for 6- 8½ (11-15) cm 2 rows light lavender 2 rows light sea green 2 rows light lavender. STRIPES YOKE (all sizes): Work with light sea green for (3) 3-4 4-4 (5-6) cm 2 rows light lavender 2 rows light sea green 2 rows light lavender Work with light sea green to finished length. ------------------------------------------------------- START THE PIECE HERE: ------------------------------------------------------- JACKET – SHORT OVERVIEW OF THE PIECE: The piece is worked bottom up. The body is worked back and forth, then the sleeves are worked in the round with double pointed needles, before the body and sleeves are put together and continued back and forth. The bands and neck are worked to finish. BODY: The piece is worked back and forth. Cast on (90) 102-118-126-138 (146-162) stitches (including 1 edge stitch on each side; the bands will be worked inside these edge stitches later) with circular needle size 2.5 mm and light sea green. Work GARTER STITCH over all stitches – read description above, for (2) 2-3-3-3 (4-4) cm. Change to circular needle size 3 mm, continue with stocking stitch and STRIPES BODY – read description above, with 1 edge stitch in garter stitch on each side. REMEMBER THE KNITTING TENSION! When the piece measures (10) 13-16-17-18 (21-23) cm cast off stitches for the armholes on the next row from the right side as follows: Work 1 edge stitch in garter stitch, (19) 22-25-27-30 (32-36) stitches in stocking stitch (= right front piece), cast off the next (6) 6-8-8-8 (8-8) stitches, work (38) 44-50-54-60 (64-72) stitches in stocking stitch (= back piece), cast off the next (6) 6-8-8-8 (8-8) stitches, work (19) 22-25-27-30 (32-36) stitches in stocking stitch and 1 edge stitch in garter stitch (= left front piece) = (78) 90-102-110-122 (130-146) stitches. Lay the piece to one side and work the sleeves. SLEEVE: The piece is worked in the round. Cast on (36) 36-36-36-40 (40-44) stitches with double pointed needles size 2.5 mm and light sea green. Work GARTER STITCH – read description above for (2) 2-3-3-3 (4-4) cm. Change to double pointed needles size 3 mm and insert 1 marker at the beginning of the round (= mid under sleeve) and continue with stocking stitch and STRIPES SLEEVES – read description above. When the piece measures 4 cm, increase 1 stitch on each side of the marker mid under sleeve – read INCREASE TIP. Increase like this every (2) 1½-1½-1-1 (1½-1½) cm a total of (3) 6-8-11-11 (13-14) times = (42) 48-52-58-62 (66-72) stitches. When the sleeve measures (9½) 13-15½-17-19½ (23-27) cm, cast off the first and last (3) 3-4-4-4 (4-4) stitches (= a total of (6) 6-8-8-8 (8-8) stitches cast off) = (36) 42-44-50-54 (58-64) stitches. Lay the piece to one side and work 1 more sleeve. YOKE: Place the sleeves on the same circular needle as the body, where stitches were cast off for the armholes = (150) 174-190-210-230 (246-274) stitches. The piece is continued with stocking stitch and STRIPES YOKE – read description above, with 1 edge stitch in garter stitch on each side. On the first row insert 4 markers in the piece as follows (row worked from the wrong side): 1 edge stitch in garter stitch, (22) 25-28-31-34 (36-40) stitches in stocking stitch, insert 1 marker, (30) 36-38-42-46 (50-56) stitches in stocking stitch, insert 1 marker, (44) 50-56-62-68 (72-80) stitches in stocking stitch, insert 1 marker, (30) 36-38-42-46 (50-56) stitches in stocking stitch, insert 1 marker and finish with (22) 25-28-31-34 (36-40) stitches in stocking stitch and 1 edge stitch in garter stitch. Work (3) 0-0-0-0 (0-0) rows of stocking stitch with 1 edge stitch in garter stitch on each side. On the next row from the right side decrease to raglan on each side of each marker – read RAGLAN DECREASES! Decrease like this on each row from the right side (= every 2nd row) a total of (8) 11-12-14-16 (18-21) times = (86) 86-94-98-102 (102-106) stitches. On the next row from the right side decrease (10) 10-10-14-14 (14-14) stitches evenly spaced = (76) 76-84-84-88 (88-92) stitches. Leave the stitches on the circular needle; now the bands are worked on each front piece and the neck will be worked over these stitches. LEFT BAND: The piece is worked back and forth. Knit up (42) 58-68-74-78 (88-98) stitches from the right side, inside the 1 edge stitch mid front using circular needle size 2.5 mm and light sea green. Work garter stitch for approx. 2 cm, then cast off; make sure the cast-off edge is not tight (you can use a size larger needle if necessary). RIGHT BAND: Work as for the left band but (4) 4-5-5-6 (6-7) buttonholes are worked evenly spread when the band measures 1 cm (1 more buttonhole will also be worked on the neck, so the first buttonhole on the band is approx. 3-4 cm below the neck. There are approx. 4-6 cm between each buttonhole. You can mark where the buttonholes should be, evenly on the band, before working them). 1 buttonhole = knit 2 together, 1 yarn over. NECK: Knit up 5 stitches over each band, inside the 1 stitch in light sea green and place all the stitches on circular needle size 2.5 mm = (86) 86-94-94-98 (98-102) stitches. Work garter stitch for 1 cm, then work 1 more buttonhole by knitting together the 3rd and 4th stitches from the edge and making 1 yarn over on a row (from the right side). Cast off when the neck measures 2 cm. Make sure the cast-off edge is not tight (you can use a size larger needle if necessary). ASSEMBLY: Sew the openings under each sleeve. Sew the buttons onto the left band. |
|
 |
|
Have you finished this pattern?Tag your pictures with #dropspattern #littlebrotherjacket or submit them to the #dropsfan gallery. Do you need help with this pattern?You'll find 30 tutorial videos, a Comments/Questions area and more by visiting the pattern on garnstudio.com. © 1982-2026 DROPS Design A/S. We reserve all rights. This document, including all its sub-sections, has copyrights. Read more about what you can do with our patterns at the bottom of each pattern on our site. |
|


With over 40 years in knitting and crochet design, DROPS Design offers one of the most extensive collections of free patterns on the internet - translated to 17 languages. As of today we count 324 catalogues and 12290 patterns translated into English (UK/cm). 12290
We work hard to bring you the best knitting and crochet have to offer, inspiration and advice as well as great quality yarns at incredible prices! Would you like to use our patterns for other than personal use? You can read what you are allowed to do in the Copyright text at the bottom of all our patterns. Happy crafting!
Post a comment to pattern DROPS Baby 33-32
We would love to hear what you have to say about this pattern!
If you want to leave a question, please make sure you select the correct category in the form below, to speed up the answering process. Required fields are marked *.