
Popular categories
Looking for a yarn?


Comments / Questions (30)
![]() Marjo Nousiainen wrote:
Marjo Nousiainen wrote:
Hei! Myös L-koossa on virhe heti alkuun, 126 s ei riitä mitenkään 1. kerroksen ohjeeseen.
10.02.2021 - 13:11
![]() Carolyn wrote:
Carolyn wrote:
I am working Climbing Ivy Cardigan, using Nepal yarn. After I cast on of 114 stitches for the second set of size numbers, pattern says purl first row. As I read it, row 2 goes right into set up row. That misses 3/4 inch of rib. What sentence in the pattern am I missing?
03.01.2021 - 19:39DROPS Design answered:
Hi Carolyn, The patterns A.1 and A.2 are ribbed patterns, so they contribute to the rib on the neck. Happy knitting!
04.01.2021 - 06:50
![]() Birgitte Engstrøm wrote:
Birgitte Engstrøm wrote:
Jeg er ved bærestykket, og er i tvivl om der også er mønster bag på trøjen, idet man skal stikke A2 4 gange? Og i forbindelse med udtagning, skal man så lave 2 slå om masker hvis det er på hver side af A2?
26.12.2020 - 09:23DROPS Design answered:
Hej Birgitte, ja du strikker A.1 i alle 4 raglan-overgange. Og du tager ud på hver side af alle 4 raglan-snoninger = ialt 8 udtagninger. Se mere information øverst under RAGLAN. God fornøjelse!
07.01.2021 - 11:26
![]() Ulla Ojala wrote:
Ulla Ojala wrote:
Aloitin S-kokoa tekemään, mutta ohjeessa on virhe. 114 silmukkaa ei riittänyt ohjeen 3. aloituskerrokseen. Olisi pitänyt olla 126.
13.12.2020 - 18:10
![]() Dee Drummond wrote:
Dee Drummond wrote:
For Pattern 215-2 at the yoke, could you please explain the instruction: Work A.2 (=26 stitches) over A1 (= left front piece)? Thanking you in anticipation of your assistance.
16.10.2020 - 16:18DROPS Design answered:
Dear Mrs Drummond, after you have worked the last row in A.1, you have increased 4 sts in each A.1 (see yarn overs on last row) = there are now 26sts in each A.1, work now the 26 sts in A.2 over these 26 sts. You will now work A.2 a total of 4 times in the round = at each raglan line. Happy knitting!
16.10.2020 - 16:28
![]() Sophie wrote:
Sophie wrote:
Merci pour le détail des explications, c’est ok pour moi maintenant ! Bonne journée !
12.10.2020 - 08:57
![]() Sophie Florez wrote:
Sophie Florez wrote:
Bonjour, j'ai commencé ce modele en taille S (monter 114 m) mais dès le premier rang endroit, le nombre de mailles ne correspond pas. N'y aurait-il pas une erreur dans les explications ?
10.10.2020 - 14:28DROPS Design answered:
Bonjour Mme Florez, tricotez le 1er rang ainsi: 5 m de bordure devant, 2 m endroit, A.1 (= 22 mailles), 3 m endroit, A.1 (= 22 m), 2 m endroit, *2 m envers, 2 m endroit*, répéter de *-* au-dessus des 4 m suivantes, A.1 (= 22 m), 3 m endroit, A.1 (= 22 m), 2 m endroit, et terminer par 5 mailles de bordure devant au point mousse (on ne tricote pas les côtes 2 m end/2 m env en taille S car 0 mailles sont concernées ) autrement dit: 5+2+22+3+22+2+4+22+3+22+2+5= 114 m. Bon tricot!
12.10.2020 - 07:33
![]() Beate Hoth wrote:
Beate Hoth wrote:
Tolles Modell, sitzt perfekt. Tipp: Besser erst die Ärmel stricken und dann den Kirpus/Rumpf. Geht leichter😀
16.09.2020 - 16:42
![]() Birte wrote:
Birte wrote:
200g nicht 400g - 4x 50 meinte ich?
23.08.2020 - 21:04DROPS Design answered:
Liebe Birte, jenach dem Garn werden Sie eine andere Menge brauchen, hier brauchen Sie nicht 4 Knäuel sonder 8 Knäuel DROPS Brushed Alpaca Silk je 25 g/140 m. Viel Spaß beim stricken!
24.08.2020 - 09:01
![]() Birte wrote:
Birte wrote:
Hallo! Mit erscheint das so wenig Wolle! Ist das wirklich richtig für XL nur 400g Wolle?
23.08.2020 - 21:01
|
||||||||||||||||||||||||||||
Climbing Ivy Cardigan#climbingivycardigan |
||||||||||||||||||||||||||||
 |
 |
|||||||||||||||||||||||||||
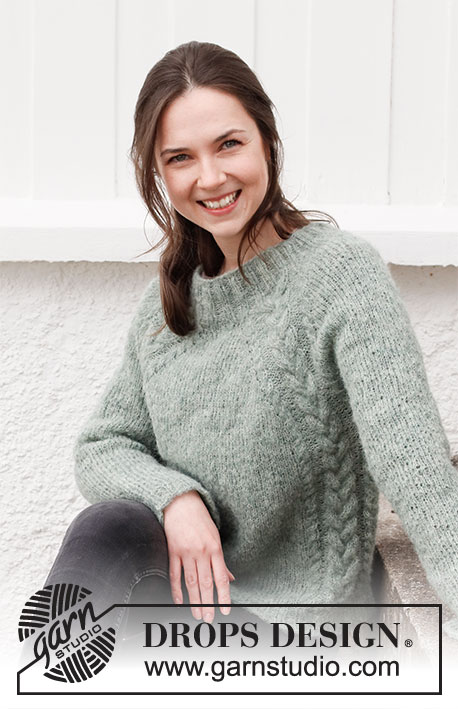
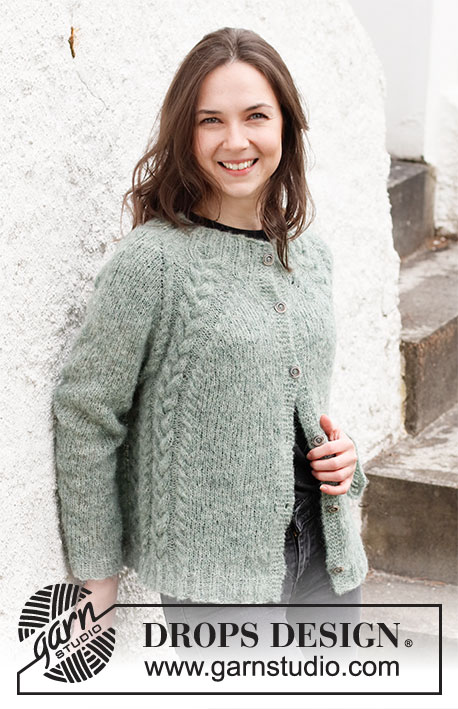
Knitted jacket in DROPS Brushed Alpaca Silk. The piece is worked top down with raglan and cables. Sizes S - XXXL.
DROPS 215-2 |
||||||||||||||||||||||||||||
|
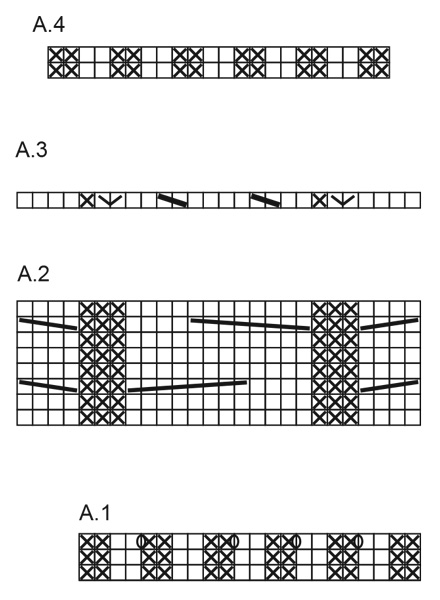
------------------------------------------------------- EXPLANATIONS FOR THE PATTERN: ------------------------------------------------------- RIDGE/GARTER STITCH (worked back and forth): Knit all rows. 1 ridge in height = Knit 2 rows. PATTERN: See diagrams A.1 to A.4. RAGLAN: Increase 1 stitch on each side of every repeat of A.2 (= 8 stitches increased on the row). Increase by making 1 yarn over. On the next row (wrong side) purl the yarn overs twisted so there are NO holes. Then work the new stitches in stocking stitch. DECREASE TIP (for sleeves): Decrease 1 stitch on either side of the marker thread as follows: Work until there are 3 stitches left before the marker thread, knit 2 together, knit 2 (marker thread sits between these 2 stitches), slip 1 stitch as if to knit, knit 1 and pass the slipped stitch over the knitted stitch. INCREASE TIP (evenly spaced): To work out how to increase evenly, count the total number of stitches on the needle (e.g. 19 stitches) and divide by the number of increases to be made (e.g. 6) = 3.1. In this example, increase by making 1 yarn over after approx. each 3rd stitch. On the next round work the yarn overs twisted to avoid holes. BUTTONHOLES: Work buttonholes on the right band (when the garment is worn). Work from the right side when there are 3 stitches left on the row as follows: Make 1 yarn over, knit 2 together and knit 1. On the next row (wrong side), knit the yarn over to leave a hole. The first buttonhole is worked when the rib on the neck measures approx. 2 cm. Then work the other 5-5-5-6-6-6 buttonholes with approx. 8-9 cm between each one. ------------------------------------------------------- START THE PIECE HERE: ------------------------------------------------------- JACKET – SHORT OVERVIEW OF THE PIECE. The piece is worked back and forth with circular needle, from mid front and top down. The sleeves are worked in the round with double pointed needles/short circular needle, top down. NECK: Cast on 114-114-126-126-138-138 stitches with circular needle size 4 mm and Brushed Alpaca Silk. Purl 1 row from the wrong side, then work rib from the right side as follows: 5 band stitches in GARTER STITCH – read description above, knit 2, * purl 2, knit 2 * work from *-* over the next 0-0-4-4-8-8 stitches, work A.1 (= 22 stitches), knit 3, work A.1 (= 22 stitches), knit 2, * purl 2, knit 2 *, repeat from *-* over the next 4-4-8-8-12-12 stitches, A.1 (= 22 stitches), knit 3, A.1 (= 22 stitches), knit 2, * purl 2, knit 2 *, repeat from *-* over the next 0-0-4-4-8-8 stitches and finish with 5 band stitches in garter stitch. Remember to work BUTTONHOLES on the right band – read description above. Repeat the first 2 rows in A.1 and work remaining stitches as before until the piece measures 3 cm, insert 1 marker here (= mid front, now measure from here), continue with the first 2 rows in A.1 and work remaining stitches as before until the piece measures 7 cm; finish after a row from the right side. Then work the last row in A.1 (with increases) from the wrong side. There are 130-130-142-142-154-154 stitches on the needle. YOKE: Change to circular needle size 5 mm. The next row is worked as follows from the right side: 5 band stitches in garter stitch, knit 2-2-6-6-10-10, work A.2 (= 26 stitches) over A.1 (= left front piece), * 1 yarn over, knit 1 *, work from *-* a total of 3 times, 1 yarn over (= 7 sleeve stitches), work A.2 over A.1, knit 6-6-10-10-14-14, work A.2 over A.1 (= back piece), * 1 yarn over, knit 1 *, work from *-* a total of 3 times, 1 yarn over (= 7 sleeve stitches), A.2 over A.1, knit 2-2-6-6-10-10 and finish with 5 band stitches in garter stitch (= right front piece) = 138-138-150-150-162-162 stitches. Work this pattern back for 1 row; the 4 yarn overs in each side over each sleeve are purled twisted to avoid holes. REMEMBER THE KNITTING TENSION! Continue with A.2, 5 band stitches in garter stitch on each side and stocking stitch over the other stitches, AT THE SAME TIME on the first row increase on each side of each A.2 to RAGLAN – read description above. Increase like this every 2nd row a total of 17-21-22-25-27-31 times = 274-306-326-350-378-410 stitches. Then continue to increase on the sleeves 4-2-4-4-2-0 more times (= a total of 21-23-26-29-29-31 stitches increased on each side of the sleeves); the other stitches are worked as before. When all the increases are finished there are 290-314-342-366-386-410 stitches on the needle. Continue working until the piece measures 23-25-28-30-31-32 cm from the marker mid-front. If the piece is shorter than this, continue working without further increases to correct length. The next row is worked as follow: Work the first 50-54-59-62-68-72 stitches (= front piece), place the next 49-53-59-65-65-69 stitches on a thread for the sleeve and cast on 6-6-6-8-10-12 new stitches on the needles (= in side under sleeve), work the next 92-100-106-112-120-128 stitches (= back piece), place the next 49-53-59-65-65-69 stitches on a thread for the sleeve and cast on 6-6-6-8-10-12 new stitches on the needles (= in side under sleeve) and work the remaining 50-54-59-62-68-72 stitches (= front piece). THE PIECE IS NOW MEASURED FROM HERE! BODY: 204-220-236-252-276-296 stitches. Continue back and forth with A.2, 5 band stitches in garter stitch on each side and stocking stitch as before. The new stitches cast on in each side are worked in stocking stitch. Continue working until the piece measures 26-26-25-25-26-27 cm from the division – adjust so the next row in A.2 includes cabling. Change to circular needle size 4 mm and work as follows from the right side: 5 band stitches in garter stitch, * purl 2, knit 2 *, work from *-* over the next 19-23-28-31-37-41 stitches, AT THE SAME TIME as you increase 1-1-0-1-3-3 stitches evenly spaced – read INCREASE TIP (= 20-24-28-32-40-44 stitches in rib), work A.3 over the stitches in A.2, * knit 2, purl 2 *, repeat from *-* over the next 6-6-6-8-10-12 stitches, AT THE SAME TIME as you increase 0-0-0-2-0-2 stitches evenly spaced over these stitches (= 6-6-6-10-10-14 stitches in rib), work A3 over A.2, * knit 2, purl 2 *, repeat from *-* over the next 40-48-54-60-68-76 stitches, AT THE SAME TIME as you increase 2-2-0-2-2-2 stitches evenly spaced (= 42-50-54-62-70-78 stitches in rib), work A.3 over A.2, * knit 2, purl 2 *, repeat from *-* over the next 6-6-6-8-10-12 stitches, AT THE SAME TIME as you increase 0-0-0-2-0-2 stitches evenly spaced over these stitches (= 6-6-6-10-10-14 stitches in rib), work A3 over A.2, * knit 2, purl 2 *, repeat from *-* over the next 19-23-28-31-37-41 stitches, AT THE SAME TIME as you increase 1-1-0-1-3-3 stitches evenly spaced (= 20-24-28-32-40-44 stitches in rib), finish with 5 band stitches in garter stitch. On the next row continue with this rib and A.4 over A.3 = 192-208-220-244-268-292 stitches on the needle. When the rib measures 4 cm, cast off with knit over knit and purl over purl. The jacket measures approx. 56-58-60-62-64-66 cm from the shoulder down. SLEEVE: Place the 49-53-59-65-65-67 stitches from the thread on the one side of the piece on double pointed needles/short circular needle size 5 mm and knit up 1 stitch in each of the 6-6-6-8-10-12 stitches cast on under the sleeve = 55-59-65-73-75-81 stitches. Insert a marker thread in the middle of the 6-6-6-8-10-12 stitches under the sleeve. Work stocking stitch in the round. When the sleeve measures 4 cm from the division, decrease 1 stitch on each side of the marker thread under the sleeve – read DECREASE TIP. Decrease like this every 5-4-2½-2-2-1½ cm a total of 6-7-10-13-13-14 times = 43-45-45-47-49-53 stitches. Continue working until the sleeve measures 35-34-32-30-30-30 cm – NOTE! Shorter measurements in larger sizes due to wider neck and longer yoke). Knit 1 round where you increase 1-3-3-1-3-3 stitches evenly spaced = 44-48-48-48-52-56 stitches. Change to double pointed needles size 4 mm and work rib (knit 2, purl 2) for 4 cm. Cast off with knit over knit and purl over purl. The sleeve measures approx. 39-38-36-34-34-34 cm. Work the other sleeve in the same way. ASSEMBLY: Sew the buttons onto the left band. |
||||||||||||||||||||||||||||
Diagram explanations |
||||||||||||||||||||||||||||
|
||||||||||||||||||||||||||||
 |
||||||||||||||||||||||||||||
 |
||||||||||||||||||||||||||||
Have you finished this pattern?Tag your pictures with #dropspattern #climbingivycardigan or submit them to the #dropsfan gallery. Do you need help with this pattern?You'll find 30 tutorial videos, a Comments/Questions area and more by visiting the pattern on garnstudio.com. © 1982-2026 DROPS Design A/S. We reserve all rights. This document, including all its sub-sections, has copyrights. Read more about what you can do with our patterns at the bottom of each pattern on our site. |
||||||||||||||||||||||||||||


With over 40 years in knitting and crochet design, DROPS Design offers one of the most extensive collections of free patterns on the internet - translated to 17 languages. As of today we count 324 catalogues and 12290 patterns translated into English (UK/cm). 12290
We work hard to bring you the best knitting and crochet have to offer, inspiration and advice as well as great quality yarns at incredible prices! Would you like to use our patterns for other than personal use? You can read what you are allowed to do in the Copyright text at the bottom of all our patterns. Happy crafting!
Post a comment to pattern DROPS 215-2
We would love to hear what you have to say about this pattern!
If you want to leave a question, please make sure you select the correct category in the form below, to speed up the answering process. Required fields are marked *.