
Popular categories
Looking for a yarn?


Comments / Questions (30)
![]() Rebecca Burghardt wrote:
Rebecca Burghardt wrote:
Hi Drops- Team, Habe eine Frage zur ersten Hinreihe der Passe: Man soll sowohl vor und nach A2 per Umschlag zunehmen als auch neben den Ärmelmaschen. Aber dann müsste man an den Grenzen von A2 und den Ärmelmaschen 2 Umschläge nebeneinander machen, was aber technisch nicht möglich ist. Habe ich da was falsch verstanden oder soll man an den Stellen auf andere Art zunehmen? Dank(!) und viele Grüße
05.02.2026 - 19:23DROPS Design answered:
Liebe Rebecca, in der 1. Hin-Reihe der Passe nehmen Sie neben A.2 noch nicht zu, das kommt erst in der nächsten Hin-Reihe. In der ersten Hin-Reihe stricken Sie nur die Zunahmen am Ärmel, diese Zunahmen werden dann aber nicht mehr wiederholt. Ab der 3. Reihe (= Hin-Reihe) arbeiten Sie nur noch die Raglanzunahmen beidseitig jedes A.2. Viel Spaß beim Weiterstricken!
05.02.2026 - 23:28
![]() Karin wrote:
Karin wrote:
Stickas tröjan i enkelt eller dubbelt garn?
31.07.2025 - 19:55DROPS Design answered:
Hei Karin. Climbing Ivy Cardigan er strikket i 1 tråd DROPS Brushed Alpaca. mvh DROPS Design
25.08.2025 - 09:55
![]() Ana Coma wrote:
Ana Coma wrote:
Siento volver a molestar pero no entiendo la explicación que dice: repetir las dos primeras filas en A1 y trabajar los puntos restantes como antes. Qué quiere decir puntos restantes? Muchas gracias
20.03.2025 - 20:06DROPS Design answered:
Hola Ana, en A.1 solo trabajas las primeras 2 filas, ya que la 3ª fila tiene aumentos; esta fila solo se trabaja al final del cuello. El resto de puntos (los que no se trabajan en A.1 en la 1ª fila explicada) se trabajan en punto elástico, de derecho o en punto musgo, tal y como se indicaba en esta fila.
23.03.2025 - 14:06
![]() Ana Coma wrote:
Ana Coma wrote:
Mil gracias por la aclaración. No había entendido bien la explicación entre asterisco.
17.03.2025 - 18:36
![]() Ana Coma wrote:
Ana Coma wrote:
He comenzado a hacer el patrón, pero desgraciadamente creo que está equivocado. En la talla L no se corresponden los 126 puntos que montamos para empezar elcuello con el número de puntos que hay que trabajar luego que son más. Es posible que haya algún error?. Muchas gracias
14.03.2025 - 20:12DROPS Design answered:
Hola Ana, para la talla L trabajas sobre los 126 puntos montados: 5 puntos de la cenefa en PUNTO MUSGO, 2 derechos, * 2 reveses, 2 derechos* sobre 4 puntos (es decir, 1 vez), trabajar A.1 (= 22 puntos), 3 derechos, trabajar A.1 (= 22 puntos), 2 derechos, * 2 reveses, 2 derechos* sobre 8 puntos (es decir, 2 veces), A.1 (= 22 puntos), 3 derechos, A.1 (= 22 puntos), 2 derechos, * 2 reveses, 2 derechos* sobre 4 puntos (es decir, 1 vez) y finalizar con 5 puntos de la cenefa en punto musgo. 5+2+4+22+3+22+2+8+22+3+22+2+4+5 =126 puntos
16.03.2025 - 19:07
![]() Kjersti Arild-Pedersen wrote:
Kjersti Arild-Pedersen wrote:
Hei. Jeg skal strikke M, lagt opp 114 m og strikket første omgang vrang. Så får jeg problemer med andre omgang, følger forklaringen men har da for lite til å avslutte med rillekant. Ser en annen norsk tekst her som også beskriver problem fra 2 pinne. Når jeg legger sammen alle m i første forklaring til halskant får jeg 126 m, så lurer på hva det kan være jeg misforstår? Mvh Kjersti A-P
05.10.2024 - 11:02DROPS Design answered:
Hei Kjersti. Mulig du har regnet med * 2 vrang, 2 rett * , gjenta fra *-* over de neste 0-0-4-4-8-8 maskene. I str. S og M skal ikke disse strikkes (det står over 0 masker). Så da strikkes det slik: 5 stolpemasker + 2 rett + A.1 + 3 rett + A.1 + 2 rett + * 2 vrang, 2 rett *, gjenta fra *-* over de neste 4 maskene + A.1 + 3 rett + A.1 + 2 rett + 5 stolpemasker = 114 masker. mvh DROPS Design
15.10.2024 - 13:58
![]() Françoise Roget wrote:
Françoise Roget wrote:
Avant de commencer je ne comprends pas: Montage du col > répéter de "-" au dessus des 0-0-4-4-8-8 mailles suivantes??? D où sortent ces mailles? Merci beaucoup.
10.08.2024 - 14:57DROPS Design answered:
Bonjour Mme Roget, vous devez tricoter (en taille L à XXXL seulement) les 4 ou 8 mailles suivantes en côtes 2 mailles envers, 2 mailles endroit. Ce sont les mailles du devant, juste avant A.1. Bon tricot!
12.08.2024 - 07:53
![]() Karin Neumann wrote:
Karin Neumann wrote:
Hallo, beim Zunahmetipp ist ein Fehler, gesamte Maschenzahl teilen durch die Zunahmen, Beispiel 19 : 16 = 3,1 Ferner ist in der Anleitung letzte Reihe vom Bündchen nicht angegeben, wieviele Maschen zugenommen werden, ( nicht ganz so schlimm, kann man ausrechnen)
27.07.2024 - 12:29
![]() Geneviève wrote:
Geneviève wrote:
Vielen Dank für Ihre schnelle Antwort. Ich kannte es bisher so, dass die erste Reihe nach dem Anschlag immer eine Hinreihe war. Das bedeutet also, dass es bei dieser Anleitung andersrum ist? Viele Grüße
05.04.2024 - 17:54DROPS Design answered:
Liebe Geneviève, ja genau, bei dieser Anleitung soll die 1. Reihe eine Reihe glatt rechts sein, so wird man alle Maschen zuerst links stricken, damit sie rechts bei der Vorderseite aussehen. Viel Spaß beim Stricken!
08.04.2024 - 07:27
![]() Geneviève wrote:
Geneviève wrote:
Hallo, ganz am Anfang bei der Halsblende steht: "Anschlag: 114-114-126-126-138-138 Maschen auf Rundnadel Nr. 4 mit Brushed Alpaca Silk. 1 Rück-Reihe links stricken, dann wie folgt im Rippenmuster ab der Hin-Reihe stricken". Muss vor der Rück-Reihe links zuerst die erste Hin-Reihe rechts gestrickt werden? Vielen Dank! Viele Grüße Geneviève
04.04.2024 - 21:04DROPS Design answered:
Liebe Geneviève, die ganz erste Reihe nach Anschlag ist eine Rückreihe links, so daß die 1. Reihe sieht Glattrechts vor dem Bündchen. Viel Spaß beim Stricken!
05.04.2024 - 08:06
|
||||||||||||||||||||||||||||
Climbing Ivy Cardigan#climbingivycardigan |
||||||||||||||||||||||||||||
 |
 |
|||||||||||||||||||||||||||
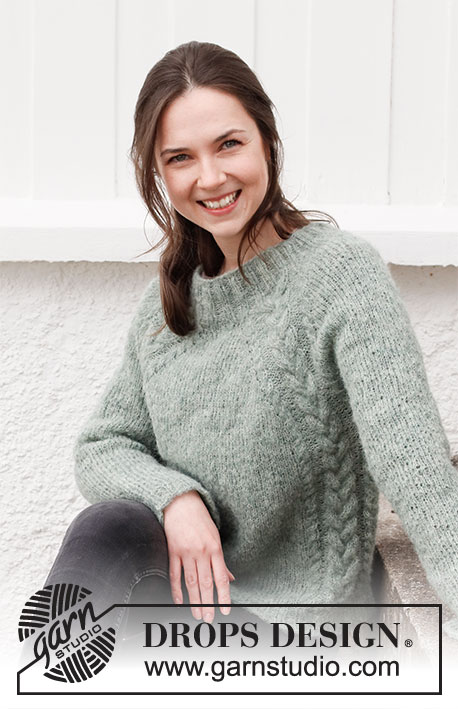
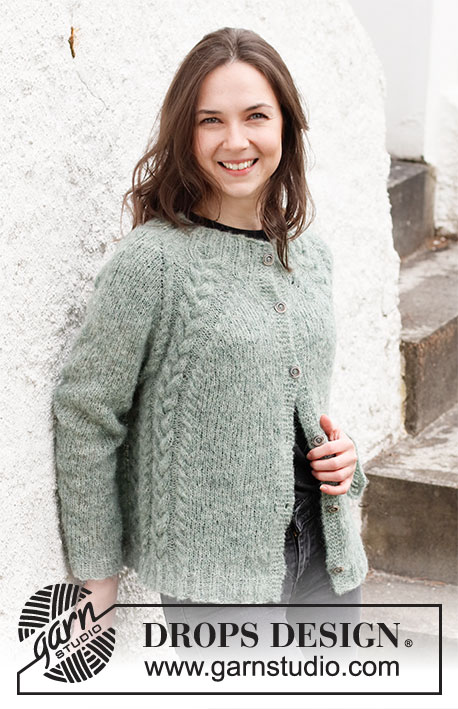
Knitted jacket in DROPS Brushed Alpaca Silk. The piece is worked top down with raglan and cables. Sizes S - XXXL.
DROPS 215-2 |
||||||||||||||||||||||||||||
|
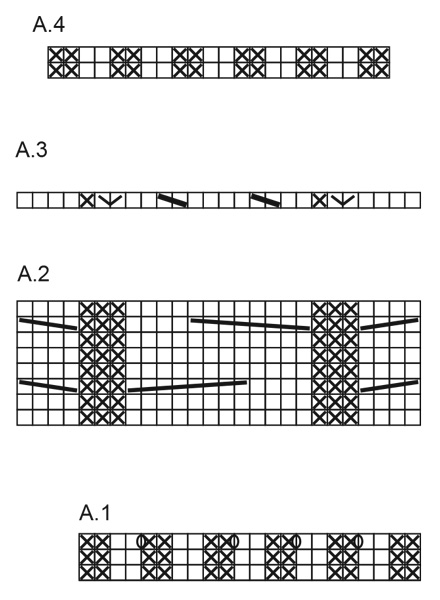
------------------------------------------------------- EXPLANATIONS FOR THE PATTERN: ------------------------------------------------------- RIDGE/GARTER STITCH (worked back and forth): Knit all rows. 1 ridge in height = Knit 2 rows. PATTERN: See diagrams A.1 to A.4. RAGLAN: Increase 1 stitch on each side of every repeat of A.2 (= 8 stitches increased on the row). Increase by making 1 yarn over. On the next row (wrong side) purl the yarn overs twisted so there are NO holes. Then work the new stitches in stocking stitch. DECREASE TIP (for sleeves): Decrease 1 stitch on either side of the marker thread as follows: Work until there are 3 stitches left before the marker thread, knit 2 together, knit 2 (marker thread sits between these 2 stitches), slip 1 stitch as if to knit, knit 1 and pass the slipped stitch over the knitted stitch. INCREASE TIP (evenly spaced): To work out how to increase evenly, count the total number of stitches on the needle (e.g. 19 stitches) and divide by the number of increases to be made (e.g. 6) = 3.1. In this example, increase by making 1 yarn over after approx. each 3rd stitch. On the next round work the yarn overs twisted to avoid holes. BUTTONHOLES: Work buttonholes on the right band (when the garment is worn). Work from the right side when there are 3 stitches left on the row as follows: Make 1 yarn over, knit 2 together and knit 1. On the next row (wrong side), knit the yarn over to leave a hole. The first buttonhole is worked when the rib on the neck measures approx. 2 cm. Then work the other 5-5-5-6-6-6 buttonholes with approx. 8-9 cm between each one. ------------------------------------------------------- START THE PIECE HERE: ------------------------------------------------------- JACKET – SHORT OVERVIEW OF THE PIECE. The piece is worked back and forth with circular needle, from mid front and top down. The sleeves are worked in the round with double pointed needles/short circular needle, top down. NECK: Cast on 114-114-126-126-138-138 stitches with circular needle size 4 mm and Brushed Alpaca Silk. Purl 1 row from the wrong side, then work rib from the right side as follows: 5 band stitches in GARTER STITCH – read description above, knit 2, * purl 2, knit 2 * work from *-* over the next 0-0-4-4-8-8 stitches, work A.1 (= 22 stitches), knit 3, work A.1 (= 22 stitches), knit 2, * purl 2, knit 2 *, repeat from *-* over the next 4-4-8-8-12-12 stitches, A.1 (= 22 stitches), knit 3, A.1 (= 22 stitches), knit 2, * purl 2, knit 2 *, repeat from *-* over the next 0-0-4-4-8-8 stitches and finish with 5 band stitches in garter stitch. Remember to work BUTTONHOLES on the right band – read description above. Repeat the first 2 rows in A.1 and work remaining stitches as before until the piece measures 3 cm, insert 1 marker here (= mid front, now measure from here), continue with the first 2 rows in A.1 and work remaining stitches as before until the piece measures 7 cm; finish after a row from the right side. Then work the last row in A.1 (with increases) from the wrong side. There are 130-130-142-142-154-154 stitches on the needle. YOKE: Change to circular needle size 5 mm. The next row is worked as follows from the right side: 5 band stitches in garter stitch, knit 2-2-6-6-10-10, work A.2 (= 26 stitches) over A.1 (= left front piece), * 1 yarn over, knit 1 *, work from *-* a total of 3 times, 1 yarn over (= 7 sleeve stitches), work A.2 over A.1, knit 6-6-10-10-14-14, work A.2 over A.1 (= back piece), * 1 yarn over, knit 1 *, work from *-* a total of 3 times, 1 yarn over (= 7 sleeve stitches), A.2 over A.1, knit 2-2-6-6-10-10 and finish with 5 band stitches in garter stitch (= right front piece) = 138-138-150-150-162-162 stitches. Work this pattern back for 1 row; the 4 yarn overs in each side over each sleeve are purled twisted to avoid holes. REMEMBER THE KNITTING TENSION! Continue with A.2, 5 band stitches in garter stitch on each side and stocking stitch over the other stitches, AT THE SAME TIME on the first row increase on each side of each A.2 to RAGLAN – read description above. Increase like this every 2nd row a total of 17-21-22-25-27-31 times = 274-306-326-350-378-410 stitches. Then continue to increase on the sleeves 4-2-4-4-2-0 more times (= a total of 21-23-26-29-29-31 stitches increased on each side of the sleeves); the other stitches are worked as before. When all the increases are finished there are 290-314-342-366-386-410 stitches on the needle. Continue working until the piece measures 23-25-28-30-31-32 cm from the marker mid-front. If the piece is shorter than this, continue working without further increases to correct length. The next row is worked as follow: Work the first 50-54-59-62-68-72 stitches (= front piece), place the next 49-53-59-65-65-69 stitches on a thread for the sleeve and cast on 6-6-6-8-10-12 new stitches on the needles (= in side under sleeve), work the next 92-100-106-112-120-128 stitches (= back piece), place the next 49-53-59-65-65-69 stitches on a thread for the sleeve and cast on 6-6-6-8-10-12 new stitches on the needles (= in side under sleeve) and work the remaining 50-54-59-62-68-72 stitches (= front piece). THE PIECE IS NOW MEASURED FROM HERE! BODY: 204-220-236-252-276-296 stitches. Continue back and forth with A.2, 5 band stitches in garter stitch on each side and stocking stitch as before. The new stitches cast on in each side are worked in stocking stitch. Continue working until the piece measures 26-26-25-25-26-27 cm from the division – adjust so the next row in A.2 includes cabling. Change to circular needle size 4 mm and work as follows from the right side: 5 band stitches in garter stitch, * purl 2, knit 2 *, work from *-* over the next 19-23-28-31-37-41 stitches, AT THE SAME TIME as you increase 1-1-0-1-3-3 stitches evenly spaced – read INCREASE TIP (= 20-24-28-32-40-44 stitches in rib), work A.3 over the stitches in A.2, * knit 2, purl 2 *, repeat from *-* over the next 6-6-6-8-10-12 stitches, AT THE SAME TIME as you increase 0-0-0-2-0-2 stitches evenly spaced over these stitches (= 6-6-6-10-10-14 stitches in rib), work A3 over A.2, * knit 2, purl 2 *, repeat from *-* over the next 40-48-54-60-68-76 stitches, AT THE SAME TIME as you increase 2-2-0-2-2-2 stitches evenly spaced (= 42-50-54-62-70-78 stitches in rib), work A.3 over A.2, * knit 2, purl 2 *, repeat from *-* over the next 6-6-6-8-10-12 stitches, AT THE SAME TIME as you increase 0-0-0-2-0-2 stitches evenly spaced over these stitches (= 6-6-6-10-10-14 stitches in rib), work A3 over A.2, * knit 2, purl 2 *, repeat from *-* over the next 19-23-28-31-37-41 stitches, AT THE SAME TIME as you increase 1-1-0-1-3-3 stitches evenly spaced (= 20-24-28-32-40-44 stitches in rib), finish with 5 band stitches in garter stitch. On the next row continue with this rib and A.4 over A.3 = 192-208-220-244-268-292 stitches on the needle. When the rib measures 4 cm, cast off with knit over knit and purl over purl. The jacket measures approx. 56-58-60-62-64-66 cm from the shoulder down. SLEEVE: Place the 49-53-59-65-65-67 stitches from the thread on the one side of the piece on double pointed needles/short circular needle size 5 mm and knit up 1 stitch in each of the 6-6-6-8-10-12 stitches cast on under the sleeve = 55-59-65-73-75-81 stitches. Insert a marker thread in the middle of the 6-6-6-8-10-12 stitches under the sleeve. Work stocking stitch in the round. When the sleeve measures 4 cm from the division, decrease 1 stitch on each side of the marker thread under the sleeve – read DECREASE TIP. Decrease like this every 5-4-2½-2-2-1½ cm a total of 6-7-10-13-13-14 times = 43-45-45-47-49-53 stitches. Continue working until the sleeve measures 35-34-32-30-30-30 cm – NOTE! Shorter measurements in larger sizes due to wider neck and longer yoke). Knit 1 round where you increase 1-3-3-1-3-3 stitches evenly spaced = 44-48-48-48-52-56 stitches. Change to double pointed needles size 4 mm and work rib (knit 2, purl 2) for 4 cm. Cast off with knit over knit and purl over purl. The sleeve measures approx. 39-38-36-34-34-34 cm. Work the other sleeve in the same way. ASSEMBLY: Sew the buttons onto the left band. |
||||||||||||||||||||||||||||
Diagram explanations |
||||||||||||||||||||||||||||
|
||||||||||||||||||||||||||||
 |
||||||||||||||||||||||||||||
 |
||||||||||||||||||||||||||||
Have you finished this pattern?Tag your pictures with #dropspattern #climbingivycardigan or submit them to the #dropsfan gallery. Do you need help with this pattern?You'll find 30 tutorial videos, a Comments/Questions area and more by visiting the pattern on garnstudio.com. © 1982-2026 DROPS Design A/S. We reserve all rights. This document, including all its sub-sections, has copyrights. Read more about what you can do with our patterns at the bottom of each pattern on our site. |
||||||||||||||||||||||||||||


With over 40 years in knitting and crochet design, DROPS Design offers one of the most extensive collections of free patterns on the internet - translated to 17 languages. As of today we count 324 catalogues and 12290 patterns translated into English (UK/cm). 12290
We work hard to bring you the best knitting and crochet have to offer, inspiration and advice as well as great quality yarns at incredible prices! Would you like to use our patterns for other than personal use? You can read what you are allowed to do in the Copyright text at the bottom of all our patterns. Happy crafting!
Post a comment to pattern DROPS 215-2
We would love to hear what you have to say about this pattern!
If you want to leave a question, please make sure you select the correct category in the form below, to speed up the answering process. Required fields are marked *.