
Popular categories
Looking for a yarn?


Comments / Questions (41)
![]() Eva wrote:
Eva wrote:
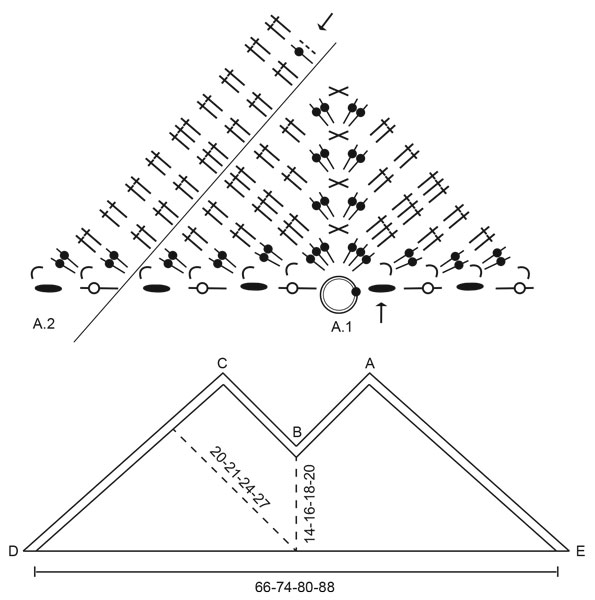
Nun wird hin und zurück über die eine Seite der Arbeit gehäkelt, mit einer Hin-Reihe in dem Luftmaschenbogen in der Mitte der Arbeit beginnen (in der Mitte von Diagramm A.1). Verstehe ich das richtig, dass ich nun in der oberen Ecke mit meiner Wolle neu ansetzen muss?
18.07.2022 - 19:31DROPS Design answered:
Liebe Eva, ja genau, und nun häkeln Sie A.2 auf eine Seite, dann häkeln Sie A.2 auf der anderen Seite. Viel Spaß beim häkeln!
01.08.2022 - 10:42
![]() Inge Madsen wrote:
Inge Madsen wrote:
Jeg har problemer med at komme igang med opskriften, efter de 5 luftmasker og 1 kantmaske hvad så. Vi er 4 mennesker der har kigget på opskriften og har givet op, hvorfor skriver I ikke bare hvor mange stangmasker og luftmasker der skal bruges i række. Vær venlig at hjælpe mig, jeg vil nødig skuffe mit 15 årlige barnebarn. Hilsen Inge Madsen
20.06.2022 - 12:56
![]() Mona Holmgren wrote:
Mona Holmgren wrote:
Svårt att för att tå hur jag börjar
02.06.2022 - 15:36DROPS Design answered:
Hej Mona, du börjar med själva diagrammet, vid ringen =Börja här - virka 5 luftmaskor .... när du har satt ihop till en ring, virkar du från där pilen är, 4+3 luftmaskor, stolpe, stolpe, stolpe, 4 luftmaskor, stolpe, stolpe, stolpe osv :)
03.06.2022 - 12:48
![]() Claudia wrote:
Claudia wrote:
Buongiorno, per cortesia è possibile avere lo stesso modello lavorato ai ferri? Grazie
16.05.2022 - 14:46DROPS Design answered:
Buonasera Claudia, questo modello è stato progettato per essere lavorato all'uncinetto, non può essere trasformato in un modello ai ferri. Provi a navigare tra i modelli del nostro sito per trovarne tanti altri lavorati ai ferri. Buon lavoro!
17.05.2022 - 19:00
![]() Claudia wrote:
Claudia wrote:
Buongiorno, è possibile avere lo stesso modello lavorato ai ferri? Grazie
16.05.2022 - 14:45DROPS Design answered:
Buonasera Claudia, questo modello è stato progettato per essere lavorato all'uncinetto, non può essere trasformato in un modello ai ferri. Provi a navigare tra i modelli del nostro sito per trovarne tanti altri lavorati ai ferri. Buon lavoro!
17.05.2022 - 19:00
![]() Sissel Nesse wrote:
Sissel Nesse wrote:
Hei! Jeg er ferdig med A1 og skal begynne på A2. De tre første maskene skal være tre luftmasker, men hvordan starter jeg med med disse luftmaskene?
06.05.2022 - 12:24DROPS Design answered:
Hej Sissel, du hæfter tråden med en kædemaske hvis du starter midt i arbejdet. God fornøjelse!
06.05.2022 - 14:22
![]() Sara wrote:
Sara wrote:
Dalla figura del modello sembra che la Riga 2 del bordo sia lavorata con il colore denim e non con il grigio chiaro come scritto nelle istruzioni. Potete confermare denim o grigio chiaro? Grazie.
06.05.2022 - 07:41DROPS Design answered:
Buonasera Sara, grazie per la segnalazione, abbiamo corretto il testo. Buon lavoro!
06.05.2022 - 21:26
![]() Maike Klein wrote:
Maike Klein wrote:
Hallo, Ich habe Probleme bei A1 am Anfang und am Ende mit den Luftmaschen. Es wird schon auf englisch erklärt, aber es hilft mir leider nicht. Ich würde mich über eine Erklärung freuen. Dankeschön
09.01.2022 - 17:38DROPS Design answered:
Liebe Frau Klein, haben Sie die deutsche Anleitung gelesen? Oder wie kann ich Ihnen helfen? bei A.1 fangen Sie mit 3. Symbol = 4 Luftmaschen und enden Sie mit 1 Doppelstäbchen um den Luftmaschenring/in den Luftmaschenbogen (abwechslungsweise rechts und links im Diagram, je nach Hin- und Rückreihen). Kann das Ihnen helfen?
10.01.2022 - 09:02
![]() Tiny Moonbeams wrote:
Tiny Moonbeams wrote:
IN A1, when you're are almost finished with a row, you chain 3 (symbol: ( ) and connect with the 4 chains (dark kernel symbol) from the base row. How do you connect the chain 3 with these 4 chains - which stitch do you hook into? Or do you just swing around the chain 4?
13.06.2021 - 22:12DROPS Design answered:
Dear Tiny Moonbeams, what you desribe is at the end of a row. (the row starts with a "kernel (= 4 ch)" - see arrow at the bottom of the diagram! - and ends with a double treble crochet, and then the next row starts with 4 ch st ("kernel) (to make thw row higher), and 3 ch stitches for the first chainstitch loop. Happy Stitching!
14.06.2021 - 02:21
![]() Odile Cazade wrote:
Odile Cazade wrote:
Je ne sais pas commencer le diagramme A1
24.05.2021 - 19:29DROPS Design answered:
Bonjour Mme Cazade, commencez le diagramme A.1 par le rond de mailles en l'air (= 1er symbole de la légende), puis crochetez le premier rang à partir de la flèche: de droite à gauche dans le diagramme et les rangs impairs de gauche à droite. Bon crochet!
25.05.2021 - 09:01
|
||||||||||||||||||||||||||||
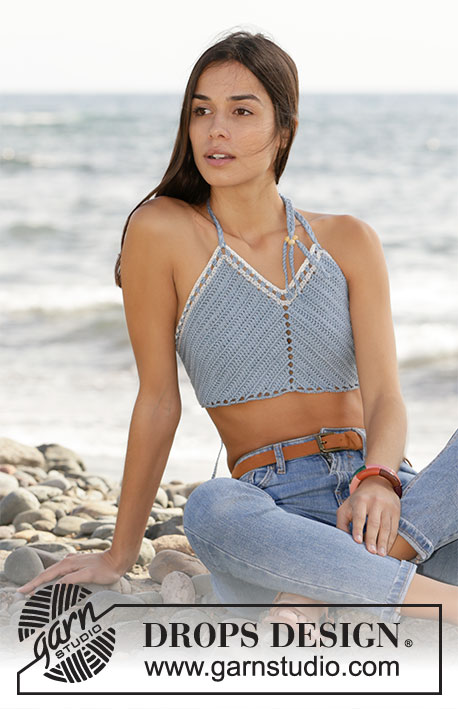
Beach Rite#beachritetop |
||||||||||||||||||||||||||||
 |
 |
|||||||||||||||||||||||||||
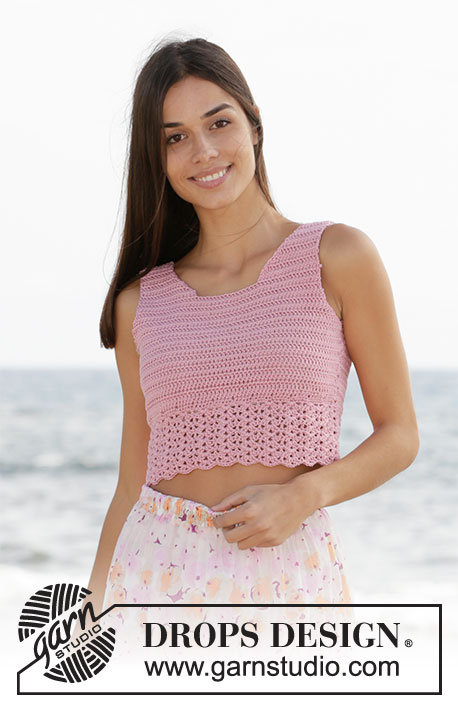
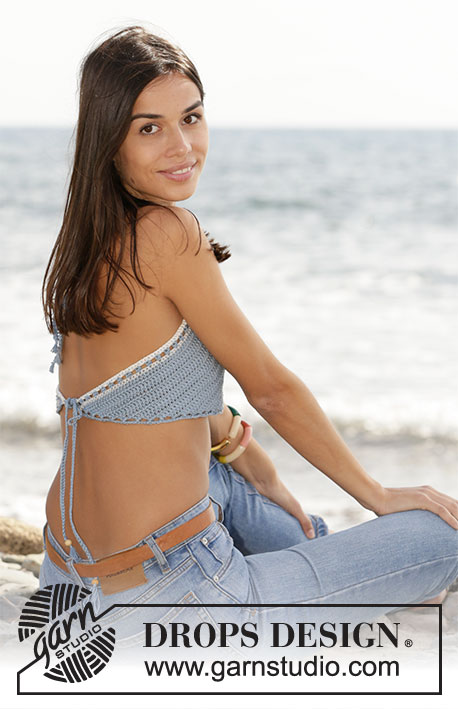
Crocheted top in DROPS Muskat. Size S-XL.
DROPS 211-17 |
||||||||||||||||||||||||||||
|
---------------------------------------------------------- EXPLANATION FOR THE PATTERN: ---------------------------------------------------------- PATTERN: See diagrams A.1 and A.2. INCREASE TIP: Increase stitches along row with treble crochets by working 2 stitches in same stitch. 2 TREBLE CROCHETS TOGETHER: Work 2 treble crochets together in same stitch as follows: Work 1 treble crochet but wait with last yarn over and pull through (= 2 loops on hook). Work 1 treble crochet more in same stitch the same way (= 3 loops on hook). Make a yarn over and pull through all loops on hook. ---------------------------------------------------------- START THE PIECE HERE: ---------------------------------------------------------- TOP - SHORT OVERVIEW OF THE PIECE: Top is worked from the bottom, work upwards and outwards to each side as a triangle. Then divide the piece at the middle, and work up and outwards in each side separately. Work an edge along the top side of piece and work ties at the end. TOP: Use hook size 3 mm and light denim. Work according to diagram A.1. When diagram has been worked, continue and increase the same way until piece measures approx. 14-16-18-20 cm measures from chain stitch ring in the middle of A.1 and upwards. Now work back and forth over one side of piece, begin from right side in chain space in the middle of piece (at the middle of diagram A.1). Work treble crochets and increase in the outer side as shown in diagram A.2. Continue to work and increase like this until piece measures 11-11-12-13 cm measures in crochet direction from where piece was divided, piece measures approx. 20-21-24-27 cm in total in crochet direction from chain stitch ring at the beginning of A.1 and up to last row. Repeat the same way along the other side of A.1 but begin from wrong side. EDGE: Now work an edge along the 4 top sides of piece. On first row worked it is important to adjust number of stitches (adjust up rather than down) so that number of stitches is divisible by 3 stitches on each of the first 3 sides, along the last side number of stitches should be divisible by 3 + 1 stitch to make the pattern the same in both sides - read INCREASE TIP in explanation above. ROW 1: Use light grey, fasten strand with 1 slip stitch at the edge in the side of A.2 (point E on chart). Work double crochets along all the 4 sides and make sure that number of stitches is divisible as explained above along each side. Cut and fasten the yarn. Do not turn piece, work next row from same side. ROW 2: Use light denim, fasten strand with 1 slip stitch in first stitch, work 3 chain stitches and 1 treble crochet in first stitch, * work 2 chain stitches and skip 2 double crochet, in next stitch work 2 TREBLE CROCHETS TOGETHER - read explanation above *, work from *-* over the first 2 sides (last stitch worked along 2nd side is 2 treble crochets worked together). Work 1 chain stitch (point B on chart) and skip 4 double crochets. In next stitch work 2 treble crochets together, work from *-* along the last 2 sides (last stitch worked along the 4th side is 2 treble crochets worked together). Cut and fasten the yarn. Do not turn piece, work next row from same side. ROW 3: Use off white, fasten strand with 1 slip stitch in first stitch, work 1 double crochet in every treble crochet worked together and work 2 double crochets around every chain space until chain space at point A. Work 3 double crochets in this chain space. Work as before until chain stitch at point B. Work 1 double crochet in this chain stitch. Work as before until point C Work 3 double crochets in this chain space. Work as before the rest of row. Cut and fasten the yarn. TIE: Make 4 ties with light denim. The placement of the ties is marked on chart. Tie at point D and E are the ties that are tied at the back. Tie at point A and C are the ties that are tied around the neck. Make ties at point A and C as follows: Cut 9 strands with a length of approx. 140-150-160-170 cm. Pull strands through chain space at point A and place them double = 18 strands. Distribute strands in 3 piles with 6 strands in each. Make a braid but leave approx. 16-18 cm at the end. Tie a string around the strands to keep the braid together. Distribute the strands into 3 equal piles again, thread a bead on each of the piles if desired and make a knot on the under the bead to fasten it. Make 3 braids and tie yarn around each of the braids. Repeat the same way at point C. Make ties at point D and E as follows: Cut 3 strands with a length of approx. 120-130-140-150 cm. Pull strand through piece at point D and place them double = 6 strands. Distribute strands in 3 piles with 2 strands in each. Make a braid but leave approx. 16 cm of strand at the end. Tie a string around the strands to keep the braid together. Thread a bead if desired and make a new knot on the under side of bead so that it is fastened. Repeat the same way at point E. |
||||||||||||||||||||||||||||
Diagram explanations |
||||||||||||||||||||||||||||
|
||||||||||||||||||||||||||||
 |
||||||||||||||||||||||||||||
Have you finished this pattern?Tag your pictures with #dropspattern #beachritetop or submit them to the #dropsfan gallery. Do you need help with this pattern?You'll find 8 tutorial videos, a Comments/Questions area and more by visiting the pattern on garnstudio.com. © 1982-2026 DROPS Design A/S. We reserve all rights. This document, including all its sub-sections, has copyrights. Read more about what you can do with our patterns at the bottom of each pattern on our site. |
||||||||||||||||||||||||||||


With over 40 years in knitting and crochet design, DROPS Design offers one of the most extensive collections of free patterns on the internet - translated to 17 languages. As of today we count 324 catalogues and 12290 patterns translated into English (UK/cm). 12290
We work hard to bring you the best knitting and crochet have to offer, inspiration and advice as well as great quality yarns at incredible prices! Would you like to use our patterns for other than personal use? You can read what you are allowed to do in the Copyright text at the bottom of all our patterns. Happy crafting!
Post a comment to pattern DROPS 211-17
We would love to hear what you have to say about this pattern!
If you want to leave a question, please make sure you select the correct category in the form below, to speed up the answering process. Required fields are marked *.