
Looking for a yarn?


Comments / Questions (40)
![]() Eliana wrote:
Eliana wrote:
Hola no entiendo el patrón es decir hay que hacer un anillo de cadenetas ynluego comenzar por el lado izquierdo y luego que hago porque si continuo con el derecho tengo un circulo y no un triangulo
21.06.2025 - 15:29DROPS Design answered:
Hola Eliana, primero haces el anillo mágico y sigues trabajando en la misma dirección para la primera fila. Después de trabajar los símbolos indicados, giras al final de la fila y comienzas a trabajar en la dirección opuesta. De este modo, poco a poco comenzará a tomar la forma de triángulo (incluso el círculo se aplanará en la base).
22.06.2025 - 18:35
![]() Christina wrote:
Christina wrote:
I've finished making the top in size L for my daughter's birthday on Tuesday. I bought 150g of muskat in the main colour as the pattern says. I've hardly any yarn left. Not even enough of that colour to make one tie of 9 strands of 160cm let alone 4 ties. I've enough for 6 strands of 160cm! I'll have to use the grey. I dont understand why there isn't enough. My measurements are pretty much in line with the pattern. Good job I didn't tty to make the XL!
01.06.2025 - 17:42
![]() Christina wrote:
Christina wrote:
I've finished making the top in size L for my daughter's birthday on Tuesday. I bought 150g of muskat in the main colour as the pattern says. I've hardly any yarn left. Not even enough of that colour to make one tie of 9 strands of 160cm let alone 4 ties. I've enough for 6 strands of 160cm! I'll have to use the grey. I dont understand why there isn't enough. My measurements are pretty much in line with the pattern. Good job I didn't tty to make the XL!
01.06.2025 - 17:40
![]() Christina wrote:
Christina wrote:
Thanks for your reply. You say I can adjust the pattern to my gauge using the rule of 3 and can check how to do this in this lesson (you provide a link). However when I click on the lesson it doesn't mention anything about rule of three and how to recalculate a pattern. It's all about measuring tension swatches.
15.05.2025 - 22:13DROPS Design answered:
Dear Christina, the lesson explains how important the gauge/tension is and why/how to adjust crochet hook size to get the correct tension and then the required finished measurements. If you can't get the tension because you are working with a complete different yarn then you will have to recalculate your own number of stitches depending on your own tension. We are unfortunately not able to adjust every pattern to every request/tension, hope you understand, but your Yarn store should be able to assist you that way. Happy crocheting_
16.05.2025 - 08:24
![]() Christina wrote:
Christina wrote:
Hello, I asked about tension a few days ago now. Just waiting for a response from anyone. Thanks
14.05.2025 - 13:17DROPS Design answered:
Dear Christina, you have received an answer - if you can't see it, try to refresh the page. Happy crocheting!
14.05.2025 - 16:36
![]() Christina wrote:
Christina wrote:
Hi, I've got as far as my tension swatch. I'm using musket cotton and 3mm hook and over 22 trebles and 11 rows my square was too wide and high. I counted I had 19 trebles to 10cm, so I tried a 2.5 hook. I kept my tension tight, which made it difficult as this wool feels too thick for the hook and the swatch comes out dense. It's still measuring 11cm and that's over 21 trebles (I miscounted!) Am I being thick and have changed down a hook size instead of up? Suggestions please.
09.05.2025 - 21:06DROPS Design answered:
Dear Christina, you need a 22 stitches x 11 rows swatch = 10 x 10cm. If you had too few stitches in 10 cm (that is, if you needed more cm to get to 22 stitches) then you needed a smaller hook. If the smaller hook get the same gauge as the previous one, then the swatch is not being effective in your case; you can try working the pattern for a bit and check if the gauge is more fitting as you work. You can also adjust the pattern to your gauge, by recalculating the pattern and using rule-of-three; check how to do this in this lesson . Happy crochetting!
11.05.2025 - 00:28
![]() Maria Jose Rocha wrote:
Maria Jose Rocha wrote:
è possivel explicar melhor como fazer este top tao giro
23.04.2025 - 20:31
![]() MARTIN wrote:
MARTIN wrote:
Comment rallonger ce top Beach Rite. Il semble un peu court, j'aimerais le rallonger de 10 cm/ Merci pour votre réponse
06.04.2025 - 09:01DROPS Design answered:
Bonjour Mme Martin, nous ne sommes malheureusement pas en mesure d'adapter chacun de nos modèles à chaque demande; pour toute assistance individuelle, vous pouvez contacter votre magasin et/ou un forum spécialisé. Merci pour votre compréhension. Bon crochet!
07.04.2025 - 08:31
![]() Raquel wrote:
Raquel wrote:
Ya he acabado el diagrama A.1 y ahora he empezado con el 2 pero tengo dudas. Empieza con - - - que entiendo que son tres cadenas y después un punto alto dentro de la cadena. Una vez he hecho el derecho y el revés, tengo que volver a empezar por - - - no? Después de las tres cadenas no entiendo donde tengo que hacer el siguiente punto alto porque es dentro del arco de cadena pero de esas tres cadenetas que acabo de hacer o de la vuelta anterior?
21.05.2024 - 12:12DROPS Design answered:
Hola Raquel, A.2 se trabaja sobre A.1, a cada lado de A.1. Es decir, trabajarías en el otro lado el inverso del diagrama mostrado. Comienzas con 3 p.de cad y 1 p.a en el arco central de 4 p.de cad, después sigues con 1 p.a en cada punto y terminas con el arco de 3 p.de cad y el p.a. Ahora trabajas los 4 p.de cad para subir y sigues trabajando de vuelta. Al trabajar la tercera fila, trabajas los p.de cad y el p.a sobre los 2 p.a del final de la fila anterior.
27.05.2024 - 01:27
![]() Maria Jose Rocha wrote:
Maria Jose Rocha wrote:
Bom dia Muito agradecia que me enviasse uma explicação mais simples de como fazer este top. É muito bonito . Parabens pelas vossa peças que são especiais. obrigada
17.05.2024 - 12:30DROPS Design answered:
Bom dia, Aconselhamos a que veja os vídeos na página do modelo pois podem ajudá-la a fazer este top! Bons crochés!
22.05.2024 - 11:45
|
||||||||||||||||||||||||||||
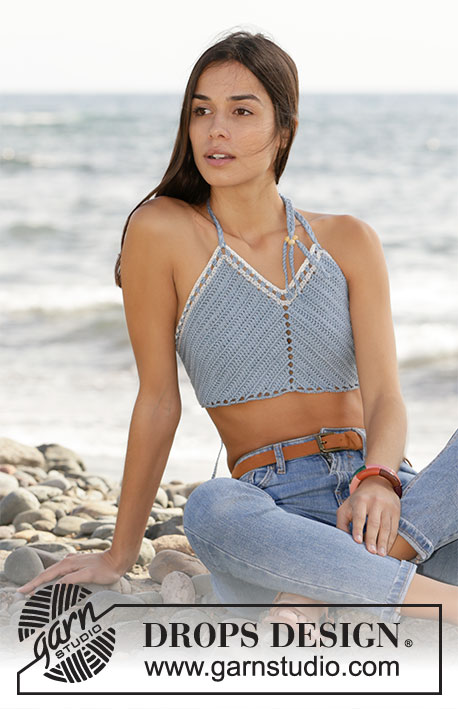
Beach Rite#beachritetop |
||||||||||||||||||||||||||||
 |
 |
|||||||||||||||||||||||||||
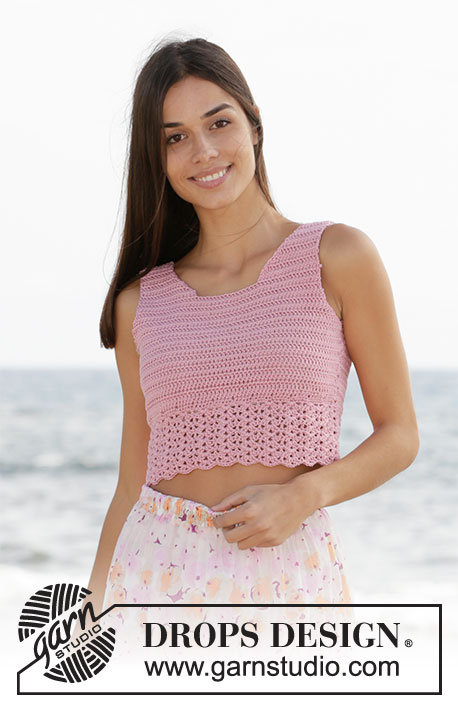
Crocheted top in DROPS Muskat. Size S-XL.
DROPS 211-17 |
||||||||||||||||||||||||||||
|
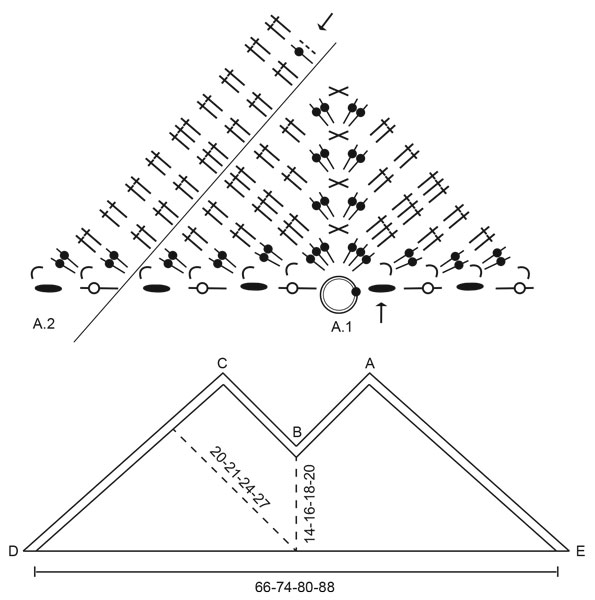
---------------------------------------------------------- EXPLANATION FOR THE PATTERN: ---------------------------------------------------------- PATTERN: See diagrams A.1 and A.2. INCREASE TIP: Increase stitches along row with double crochets by working 2 stitches in same stitch. 2 DOUBLE CROCHETS TOGETHER: Work 2 double crochets together in same stitch as follows: Work 1 double crochet but wait with last yarn over and pull through (= 2 loops on hook). Work 1 double crochet more in same stitch the same way (= 3 loops on hook). Make a yarn over and pull through all loops on hook. ---------------------------------------------------------- START THE PIECE HERE: ---------------------------------------------------------- TOP - SHORT OVERVIEW OF THE PIECE: Top is worked from the bottom, work upwards and outwards to each side as a triangle. Then divide the piece at the middle, and work up and outwards in each side separately. Work an edge along the top side of piece and work ties at the end. TOP: Use hook size 3 mm = US C and light denim. Work according to diagram A.1. When diagram has been worked, continue and increase the same way until piece measures approx. 14-16-18-20 cm = 5½"-6¼"-7"-8" measures from chain stitch ring in the middle of A.1 and upwards. Now work back and forth over one side of piece, begin from right side in chain space in the middle of piece (at the middle of diagram A.1). Work double crochets and increase in the outer side as shown in diagram A.2. Continue to work and increase like this until piece measures 11-11-12-13 cm = 4⅜"-4⅜"-4¾"-5⅛" measures in crochet direction from where piece was divided, piece measures approx. 20-21-24-27 cm = 8"-8¼"-9½"-10⅝" in total in crochet direction from chain stitch ring at the beginning of A.1 and up to last row. Repeat the same way along the other side of A.1 but begin from wrong side. EDGE: Now work an edge along the 4 top sides of piece. On first row worked it is important to adjust number of stitches (adjust up rather than down) so that number of stitches is divisible by 3 stitches on each of the first 3 sides, along the last side number of stitches should be divisible by 3 + 1 stitch to make the pattern the same in both sides - read INCREASE TIP in explanation above. ROW 1: Use light grey, fasten strand with 1 slip stitch at the edge in the side of A.2 (point E on chart). Work single crochets along all the 4 sides and make sure that number of stitches is divisible as explained above along each side. Cut and fasten the yarn. Do not turn piece, work next row from same side. ROW 2: Use light denim, fasten strand with 1 slip stitch in first stitch, work 3 chain stitches and 1 double crochet in first stitch, * work 2 chain stitches and skip 2 single crochet, in next stitch work 2 DOUBLE CROCHETS TOGETHER - read explanation above *, work from *-* over the first 2 sides (last stitch worked along 2nd side is 2 double crochets worked together). Work 1 chain stitch (point B on chart) and skip 4 single crochets. In next stitch work 2 double crochets together, work from *-* along the last 2 sides (last stitch worked along the 4th side is 2 double crochets worked together). Cut and fasten the yarn. Do not turn piece, work next row from same side. ROW 3: Use off white, fasten strand with 1 slip stitch in first stitch, work 1 single crochet in every double crochet worked together and work 2 single crochets around every chain space until chain space at point A. Work 3 single crochets in this chain space. Work as before until chain stitch at point B. Work 1 single crochet in this chain stitch. Work as before until point C Work 3 single crochets in this chain space. Work as before the rest of row. Cut and fasten the yarn. TIE: Make 4 ties with light denim. The placement of the ties is marked on chart. Tie at point D and E are the ties that are tied at the back. Tie at point A and C are the ties that are tied around the neck. Make ties at point A and C as follows: Cut 9 strands with a length of approx. 140-150-160-170 cm = 55"-59"-63"-67". Pull strands through chain space at point A and place them single = 18 strands. Distribute strands in 3 piles with 6 strands in each. Make a braid but leave approx. 16-18 cm = 6¼"-7" at the end. Tie a string around the strands to keep the braid together. Distribute the strands into 3 equal piles again, thread a bead on each of the piles if desired and make a knot on the under the bead to fasten it. Make 3 braids and tie yarn around each of the braids. Repeat the same way at point C. Make ties at point D and E as follows: Cut 3 strands with a length of approx. 120-130-140-150 cm = 48"-51¼"-55"-59". Pull strand through piece at point D and place them single = 6 strands. Distribute strands in 3 piles with 2 strands in each. Make a braid but leave approx. 16 cm = 6¼" of strand at the end. Tie a string around the strands to keep the braid together. Thread a bead if desired and make a new knot on the under side of bead so that it is fastened. Repeat the same way at point E. |
||||||||||||||||||||||||||||
Diagram explanations |
||||||||||||||||||||||||||||
|
||||||||||||||||||||||||||||
|
||||||||||||||||||||||||||||
Have you finished this pattern?Tag your pictures with #dropspattern #beachritetop or submit them to the #dropsfan gallery. Do you need help with this pattern?You'll find 8 tutorial videos, a Comments/Questions area and more by visiting the pattern on garnstudio.com. © 1982-2025 DROPS Design A/S. We reserve all rights. This document, including all its sub-sections, has copyrights. Read more about what you can do with our patterns at the bottom of each pattern on our site. |
||||||||||||||||||||||||||||


With over 40 years in knitting and crochet design, DROPS Design offers one of the most extensive collections of free patterns on the internet - translated to 17 languages. As of today we count 314 catalogs and 11822 patterns - 11812 of which are translated into English (US/in).
We work hard to bring you the best knitting and crochet have to offer, inspiration and advice as well as great quality yarns at incredible prices! Would you like to use our patterns for other than personal use? You can read what you are allowed to do in the Copyright text at the bottom of all our patterns. Happy crafting!
Post a comment to pattern DROPS 211-17
We would love to hear what you have to say about this pattern!
If you want to leave a question, please make sure you select the correct category in the form below, to speed up the answering process. Required fields are marked *.