
Popular categories
Looking for a yarn?


Comments / Questions (26)
![]() Annamaria wrote:
Annamaria wrote:
Salve vorrei creare questo modello, consigliate di usare i ferri circolari ma io preferisco i ferri diritti, ma seguendo i diagrammi non capisco come lavorare i ferri a rovescio? Grazie per la vostra risposta
07.01.2022 - 03:23DROPS Design answered:
Buonasera Annamaria, questo modello è lavorato in piano con i ferri circolari, quindi può seguire le stesse spiegazioni anche utilizzando i ferri dritti. Buon lavoro!
07.01.2022 - 16:47
![]() Daniela wrote:
Daniela wrote:
Buongiorno per lavorare questo modello in circolare e non avanti e indietro. cosa bisogna fare per adattare lo schema? Grazie
19.09.2021 - 16:12DROPS Design answered:
Buongiorno Daniela, questo modello è stato progettato per la lavorazione in piano anche per dare una struttura maggiore al capo: se volesse lavorarlo in tondo, deve togliere le maglie di vivagno e riadattare la lavorazione dei motivi alla lavorazione in tondo. Buon lavoro!
20.09.2021 - 09:26
![]() MARTIN Véronique wrote:
MARTIN Véronique wrote:
Bonjour, La stature de mon cousin est de 157 cm. Pensez-vous que la taille S correspondrait pour lui ? D'avance merci.
23.03.2021 - 07:48DROPS Design answered:
Bonjour Mme Martin, l'idéal est de mesurer un pull qu'il a et dont il aime la forme et de comparer ces mesures avec celles du schéma; vous trouverez ainsi plus facilement la bonne taille. Retrouvez plus d'infos sur les tailles et les schémas ici. Bon tricot!
23.03.2021 - 08:26
![]() Wilmo wrote:
Wilmo wrote:
There is a missing word in the neck explanations - certainly you have to increase TO 92-94 etc stitches (not increase 90-92 etc stitches) same mistake in french pattern
21.02.2021 - 10:30DROPS Design answered:
Dear Mrs Wilmo, thanks for your feedback, correction will be made asap. Happy knitting!
22.02.2021 - 08:39
![]() Wilmo wrote:
Wilmo wrote:
Bonjour, je crois qu'il y a un problème avec l'explication du col "Relever sur l'endroit (avec la petite aiguille circulaire 3,5) environ 80 à 94 mailles autour de l'encolure – y compris les mailles du devant en attente. Tricoter 1 tour envers, puis 1 tour endroit en augmentant 90-92-94-96-100-102 mailles à intervalles réguliers. " Est-ce qu'il ne fait pas plutôt augmenter JUSQU'A OBTENIR 90-92-94-96-100-102 mailles EN TOUT ? merci de votre réponse
21.02.2021 - 09:26DROPS Design answered:
Bonjour Mme Wilmo, tout à fait et merci de l'avoir relevé, la correction a été faite. Bon tricot!
22.02.2021 - 08:34
![]() Monika wrote:
Monika wrote:
Ich hab Schwierigkeiten mit dem Aufnehmen der Maschen für die Ärmel - ich habe Vorder- und Rückenteil an den Schultern zusammengenäht und habe am Ärmelausschnitt vorne und hinten zusammen insgesamt ca. 70 Randmaschen, aus denen ich nun aber 90 Maschen für den Ärmel aufnehmen soll. Wie kann das gehen? In der Videoanleitung wird maximal eine neue Masche pro Randmasche aufgenommen.
18.02.2021 - 15:14DROPS Design answered:
Liebe Monika, die Maschenanzahl für die Ärmel sollte der Maschenprobe stimmen, aber wenn Sie die genaue Maschenanzahl nicht auffassen können, können Sie regelmäßig verteilt zunehmen (z.B. 1 Masche in die Randmasche, 1 Masche vor der nächsten Masche (= zwischen 2 Maschen), 1 Masche in die nächste Randmasche), damit Sie die genaue Maschenanzahl haben (aber von 90 M ist doch nicht die Rede, welche Größe stricken Sie? ). Viel Spaß beim stricken!
18.02.2021 - 16:06
![]() Annie Saltton wrote:
Annie Saltton wrote:
Me-195 Diagrammerne ses fra retsiden. Hvordan skal vrangsiden strikkes? 😳 Annie
14.02.2021 - 11:38
![]() Solène wrote:
Solène wrote:
Bonjour, J’ai fini de tricoter le dos et le devant mais j’avoue ne pas bien comprendre comment tricoter les manches à partir des épaules. pourriez-vous me venir en aide ? Mille mercis !
29.01.2021 - 10:00DROPS Design answered:
Bonjour Solène, les manches se tricotent de haut en bas, à partir des emmanchures. Commencez par coudre le dos et le devant aux épaules, puis, relevez les mailles sur l'endroit le long des emmanchures (= entre les mailles rabattues pour les emmanchures pour le dos/le devant (manche gauche) et le devant/le dos (manche droite) et tricotez d'abord en rangs puis continuez en rond. La partie tricotée en rangs sera assemblée aux mailles rabattues pour les emmanchures (dos/devant). Bon tricot!
29.01.2021 - 15:08
![]() Evelien Challis Kinsbergen wrote:
Evelien Challis Kinsbergen wrote:
Bij het achterpand staat dat: als het werk 64 cm meet , minder dan 10 steken verdeeld over de middelste 44 steken van de naald. Maar hoe doe ik dat met het patroon?
11.01.2021 - 23:12DROPS Design answered:
Dag Evelien,
Deze minderingen kun je het beste over de kabels maken die in de naalden erna worden afgekant. Dus over de kabels in A.3 en voor de rest verdeeld over de andere steken, maar niet over de kabels die nog doorgebreid worden.
17.01.2021 - 12:55
![]() Lucia wrote:
Lucia wrote:
Se volessi realizzare questo modello ma con il collo alto come dovrei modificare le diminuzioni per il davanti e il dietro? Grazie
10.12.2020 - 23:58DROPS Design answered:
Buongiorno Lucia, purtroppo in questa sede non possiamo fornirle un aiuto così personalizzato, ma può rivolgersi al suo rivenditore DROPS di fiducia. Buon lavoro!
11.12.2020 - 08:35
|
|||||||||||||||||||||||||
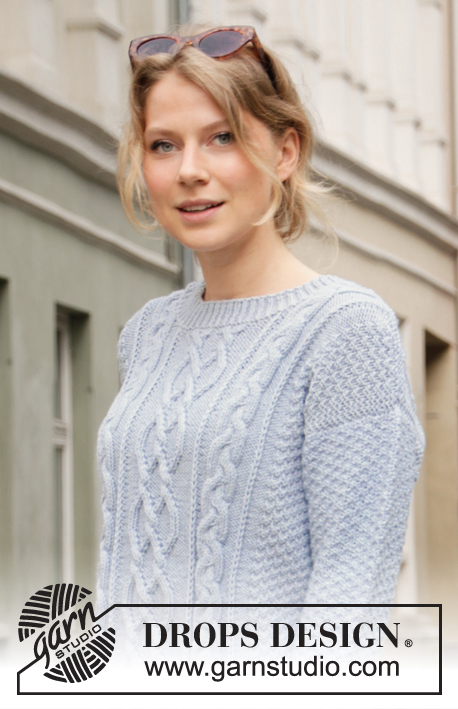
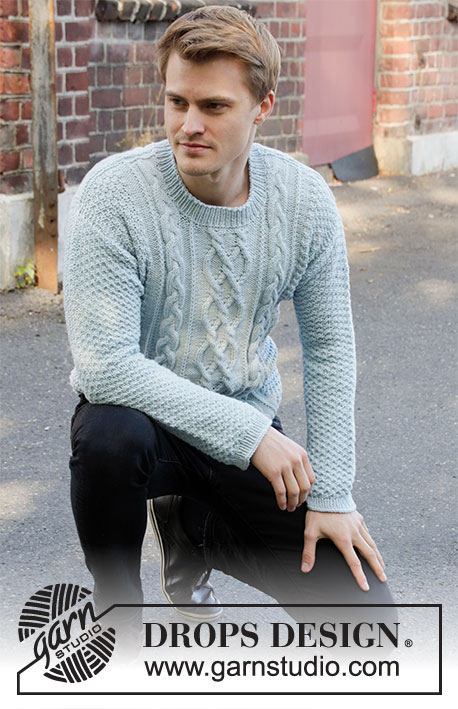
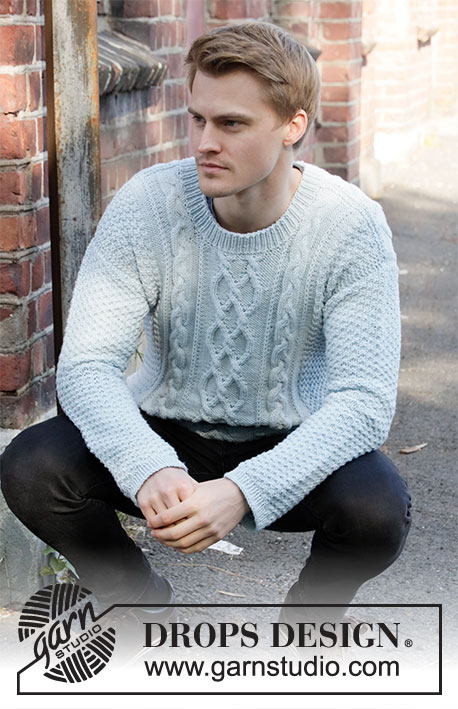
Winter Delight#winterdelightsweater |
|||||||||||||||||||||||||
 |
 |
||||||||||||||||||||||||
Knitted jumper for men in DROPS Merino Extra Fine or DROPS Soft Tweed. The piece is worked with cables and double moss stitch. Sizes S – XXXL.
DROPS 208-8 |
|||||||||||||||||||||||||
|
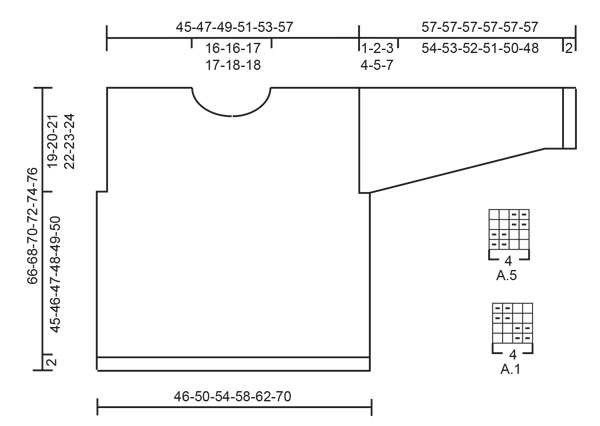
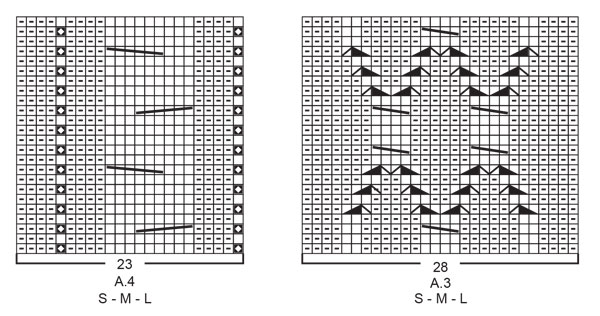
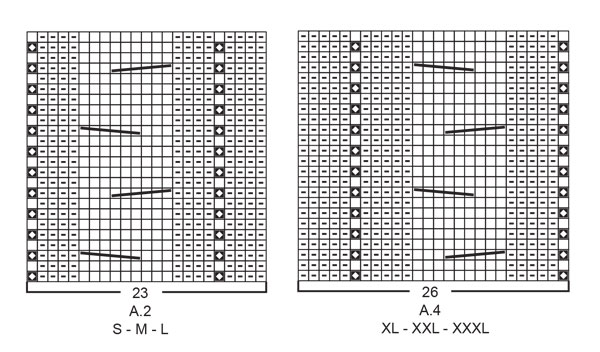
------------------------------------------------------- EXPLANATIONS FOR THE PATTERN: ------------------------------------------------------- RIDGE/GARTER STITCH (worked back and forth): Knit all rows. 1 ridge in height = Knit 2 rows. PATTERN: See diagrams A.1 to A.5. Choose diagram for your size (applies to A.2, A.3 and A.4). The diagrams show all rows in the pattern from the right side. KNITTING TIP: In this pattern stitches are knitted up along the armholes and the sleeves are worked top down. This is done to have better control over the length of the sleeves. If you wish, the sleeves can be worked separately and then sewn in; by casting on the same number of stitches as suggested are knitted up in the text and then following the instructions for the sleeves in the same way. Sew in the sleeves (the sleeve is placed under the garter stitch edge around the armhole leaving this edge visible – sew in the outermost stitch of the garter stitch edge). DECREASE TIP-1 (evenly spaced): To work out how to decrease evenly, count the total number of stitches on needle (e.g. 44 stitches) and divide by number of decreases to be made (e.g. 10) = 4.4. The decreases are worked from the right side! In this example decrease by knitting together alternately each 3rd and 4th stitch and each 4th and 5th stitch. DECREASE TIP-2 (for mid under sleeves): Decrease 1 stitch before the marker thread as follows: Work until there are 2 stitches left before the marker thread, knit 2 together if this stitch should be knitted or purl 2 together if this stitch should be purled. Decrease 1 stitch after the marker thread as follows: Knit 2 twisted together if this stitch should be knitted or purl 2 twisted together if this stitch should be purled. ------------------------------------------------------- START THE PIECE HERE: ------------------------------------------------------- JUMPER – SHORT OVERVIEW OF THE PIECE: Front and back pieces are worked back and forth with circular needle, bottom up. The shoulder seams are sewn together. Then stitches are knitted up around the armholes for the sleeves – read KNITTING TIP! The sleeves are worked back and forth until the sleeve cap is finished, then in the round with double pointed needles, top down. The bottom of the armhole is sewn together and the neck is worked to finish. BACK PIECE: Cast on 108-116-124-132-140-156 stitches with circular needle 3.5 mm and Merino Extra Fine. Purl 1 row (= wrong side). The next row is worked as follows from the right side: 1 edge stitch in GARTER STITCH – read description above, * knit 1, purl 1 *, work from *-* until there is 1 stitch left on the row, finish with 1 edge stitch in garter stitch. Continue this rib for approx. 2 cm but adjust so the last row is worked from the right side. Purl 1 row from the wrong side with 1 edge stitch in garter stitch on each side. Change to circular needle size 4.5 mm. Now begin the pattern as follows from the right side: 1 edge stitch in garter stitch, work A.1 over the next 16-20-24-24-28-36 stitches (= 4-5-6-6-7-9 repeats of 4 stitches), A.2 (= 23-23-23-26-26-26 stitches), A.3 (= 28-28-28-30-30-30 stitches), A.4 (= 23-23-23-26-26-26 stitches), A.5 over the next 16-20-24-24-28-36 stitches (= 4-5-6-6-7-9 repeats of 4 stitches) and finish with 1 edge stitch in garter stitch. Continue this pattern. REMEMBER THE KNITTING TENSION! When the piece measures 47-48-49-50-51-52 cm, cast off 1-3-5-7-9-13 stitches at the beginning of the next 2 rows for the armholes = 106-110-114-118-122-130 stitches. Continue the pattern as before but now with 4 edge stitches in garter stitch on each side towards the armholes. When the piece measures 64-66-68-70-72-74 cm, decrease 10 stitches evenly over the middle 44-44-44-48-48-48 stitches on the row – read DECREASE TIP-1 = 96-100-104-108-112-120 stitches left. On the next row (wrong side) cast off the middle 36-36-38-38-40-40 stitches for the neck and each shoulder is finished separately. Continue the pattern and cast off 1 stitch on the next row from the neck = 29-31-32-34-35-39 stitches left on the shoulder. Continue working until the piece measures 65-67-69-71-73-75 cm. Knit 1 row from the right side and knit 1 row from the wrong side. Loosely cast off with knit from the right side. Work the other shoulder in the same way. The back piece measures approx. 66-68-70-72-74-76 cm from the shoulder down. FRONT PIECE: Cast on 108-116-124-132-140-156 stitches with circular needle size 3.5 mm and Merino Extra Fine. Purl 1 row (= wrong side). The next row is worked from the right side as follows: 1 edge stitch in GARTER STITCH – read description above, * knit 1, purl 1 *, work from *-* until there is 1 stitch left on the row, finish with 1 edge stitch in garter stitch. Continue this rib for 2 cm but adjust so the last row is worked from the right side. Purl 1 row from the wrong side with 1 edge stitch in garter stitch on each side. Change to circular needle size 4.5 mm. Now begin the pattern as follows from the right side: 1 edge stitch in garter stitch, work A.1 over the next 16-20-24-24-28-36 stitches (= 4-5-6-6-7-9 repeats of 4 stitches), A.2 (= 23-23-23-26-26-26 stitches), A.3 (= 28-28-28-30-30-30 stitches), A.4 (= 23-23-23-26-26-26 stitches), A.5 over the next 16-20-24-24-28-36 stitches (= 4-5-6-6-7-9 repeats of 4 stitches) and finish with 1 edge stitch in garter stitch. Continue this pattern. When the piece measures 47-48-49-50-51-52 cm, cast off 1-3-5-7-9-13 stitches at the beginning of the next 2 rows for the armholes = 106-110-114-118-122-130 stitches. Continue the pattern as before but now with 4 edge stitches in garter stitch on each side towards the armholes. When the piece measures 57-59-61-62-64-66 cm, decrease 10 stitches evenly over the middle 44-44-44-48-48-48 stitches on the row = 96-100-104-108-112-120 stitches left. On the next row (wrong side) place the middle 20-20-22-22-22-22 stitches on 1 thread for the neck and each shoulder is finished separately. Continue the pattern and cast off stitches at the beginning of each row from the neck as follows: Cast off 2 stitches 3 times and then 1 stitch 3-3-3-3-4-4 times = 29-31-32-34-35-39 stitches left on the shoulder. Continue working until the piece measures 65-67-69-71-73-75 cm. Knit 1 row from the right side and knit 1 row from the wrong side. Loosely cast off with knit from the right side. Work the other shoulder in the same way. ASSEMBLY: Sew the shoulder seams inside the cast-off edge. SLEEVE: Knit up stitches along the armhole on the front and back piece; start in the corner of the armhole on the one side of the piece where stitches were cast off; knit up from the right side 76-80-84-88-92-96 stitches inside the 1 edge stitch in garter stitch with circular needle size 4.5 mm and Merino Extra Fine (do not knit up stitches along the bottom of the armhole) – read KNITTING TIP! Work A.1 back and forth with 1 edge stitch in garter stitch on each side. When the sleeve measures 1-2-3-4-5-7 cm from where you knitted up stitches, insert 1 marker on the row; it marks where the sleeve will be sewn to the bottom of the armhole and the sleeve is measured from this marker! Continue working the sleeve in the round; change to double pointed needles or short circular needle size 4.5 mm. Insert 1 marker thread at the beginning of the round and allow it to follow your work onwards; it will be used when decreasing mid under the sleeve. Continue A.1 in the round over all stitches (= 19-20-21-22-23-24 repeats of 4 stitches). When the sleeve measures 3-2-3-2-3-2 cm from the marker decrease 2 stitches mid under the sleeve - read DECREASE TIP-2. Decrease like this every 3-3-2½-2-2-1½ cm a total of 15-16-17-18-19-20 times = 46-48-50-52-54-56 stitches. Continue working until the sleeve measures 54-53-52-51-50-48 cm from the marker (there is approx. 2 cm left to finished length; you can try the jumper on and work to desired length). Change to double pointed needles size 3.5 mm and work rib (= knit 1 / purl 1) for 2 cm. Loosely cast off with knit. The sleeve measures approx. 57-57-57-57-57-57 cm from where the stitches were knitted up. Work the other sleeve in the same way. ASSEMBLY: Sew the side seams – sew in the outermost loop of the outermost stitch so the seam is flat. Sew the sleeves to the bottom of the armholes, from the marker and in to the corner. NECK: Knit up from the right side (using short circular needle size 3.5 mm) approx. 80 to 94 stitches around the neck – including the stitches on the thread in front. Purl 1 round. Knit 1 round where you increase evenly to adjust to 90-92-94-96-100-102 stitches evenly spaced. Then work rib in the round (= knit 1 / purl 1) for 3 cm. Cast off with knit over knit and purl over purl. |
|||||||||||||||||||||||||
Diagram explanations |
|||||||||||||||||||||||||
|
|||||||||||||||||||||||||
 |
|||||||||||||||||||||||||
 |
|||||||||||||||||||||||||
 |
|||||||||||||||||||||||||
 |
|||||||||||||||||||||||||
Have you finished this pattern?Tag your pictures with #dropspattern #winterdelightsweater or submit them to the #dropsfan gallery. Do you need help with this pattern?You'll find 28 tutorial videos, a Comments/Questions area and more by visiting the pattern on garnstudio.com. © 1982-2026 DROPS Design A/S. We reserve all rights. This document, including all its sub-sections, has copyrights. Read more about what you can do with our patterns at the bottom of each pattern on our site. |
|||||||||||||||||||||||||


With over 40 years in knitting and crochet design, DROPS Design offers one of the most extensive collections of free patterns on the internet - translated to 17 languages. As of today we count 324 catalogues and 12290 patterns translated into English (UK/cm). 12290
We work hard to bring you the best knitting and crochet have to offer, inspiration and advice as well as great quality yarns at incredible prices! Would you like to use our patterns for other than personal use? You can read what you are allowed to do in the Copyright text at the bottom of all our patterns. Happy crafting!
Post a comment to pattern DROPS 208-8
We would love to hear what you have to say about this pattern!
If you want to leave a question, please make sure you select the correct category in the form below, to speed up the answering process. Required fields are marked *.