
Popular categories
Looking for a yarn?


Comments / Questions (55)
![]() Victoria wrote:
Victoria wrote:
Is it possible for me to shorten the length of the cardigan to the waist by not doing so many rows? like making it more cropped?
06.05.2022 - 09:24DROPS Design answered:
Dear Victoria, sure, you can, one advantage of the top down technique is that you can adjust to the desired length. Just try the jacket on to check the total length (remember that you should finish with 4 cm ribbing edge) and adjust to the desired length. Happy knitting!
06.05.2022 - 16:04
![]() Kathi wrote:
Kathi wrote:
Hallihallo! Kurze Frage zum Rumpfteil: **Bei einer Länge von 24-26-26-26-26-25 cm ab der Teilung 19-19-20-23-25-26 Maschen gleichmäßig verteilt zunehmen = 151-155-163-177-191-203 Maschen** Sprich es werden in der letzten Reihe vor dem Bündchen noch Maschen zugenommen. Aber was hat das für einen Sinn? Würde sonst das Bündchen durch das 1R1L Muster zu weit zusammenspringen? Oder warum macht man das?
01.02.2022 - 13:50DROPS Design answered:
Liebe Kathi, man braucht mehr Maschen im Rippenmuster/Bündchen mit den kleineren Nadeln als glatt rechts mit den grösseren Nadeln, deshalb wird man kurz vor dem Bündchen zugenommen; so wird die Jacke unten nicht enger werden. Viel Spaß beim stricken!
01.02.2022 - 16:22
![]() Iris Haeussler wrote:
Iris Haeussler wrote:
Hallo Liebes Strick Team Ich möchte die Jacke stricken mein Problem ist Ich habe die Wolle Lana Grossa Bingo . Ich möchte die Jacke in der Größe XXL Stricken meine Maschenprobe ist aber 23 Maschen wie Rechne ich das jetzt aus .Da ich ja mehr Maschen aufnehmen muss, muss ich dann auch beim Verteilen am Vorerteil und an dem Ärmel mehr Maschen verteilen, wenn ich die Markierungsfäden setze? Da komme ich nicht mit. Vielen Dank für Eure Hilfe
01.01.2022 - 19:51DROPS Design answered:
Liebe Frau Haeussler, diese Jacke wird für eine Maschenprobe von 12 Maschen x 14 Reihen geschrieben, leider können wir nicht jede Anleitung nach jeder Anfrage anpassen, Hier finden Sie unsere Jacken & Cardigans mit V-Halsausschnitt für Damen. Hoffentlich kann es Ihnen helfen. Viel Spaß beim stricken!
03.01.2022 - 11:57
![]() Claudia Layne wrote:
Claudia Layne wrote:
Kann es sein, dass im Abschnitt "Passe" ein Fehler ist? Ich habe alles nach Anleitung durchgeführt, aber der V-Ausschnitt sieht nicht so langgezogen aus wie auf dem Bild. Meines Erachtens ist die Zunahme in jeder 2. Reihe 9x bei XL und nur 1x in jeder 6. Reihe zuviel. Wäre der Ausschnitt nicht langgezogener, wenn die Zunahmen von Anfang an nur in jeder 6. Reihe erfolgen würden? So sieht es eher aus wie auf dem Diagramm, aber nicht wie auf dem Foto. Für mich ist es jetzt leider zu spät.
01.01.2022 - 14:20DROPS Design answered:
Liebe Frau Layne, danke für den Hinweis, Anleitung wurde korrigiert. Viel Spaß beim stricken!
10.03.2022 - 11:57
![]() DOMINIQUE AMBROSET wrote:
DOMINIQUE AMBROSET wrote:
Bonjour je suis en train de diviser mon tricot pour le dos et le devant mais je ne comprends pas votre explication concernant "monter 10 mailles côté sous la manche", faut il les tricoter ces mailles en même temps que les 39 mailles merci pour votre réponse
26.12.2021 - 17:28DROPS Design answered:
Bonjour Dominique, regarde la lecon DROPS ICI. Bon tricot!
28.12.2021 - 12:35
![]() Mariejeannegeerolf wrote:
Mariejeannegeerolf wrote:
Inorde
01.12.2021 - 19:56
![]() Cor Weber wrote:
Cor Weber wrote:
Guten Tag, bezieht sich die Maschenprobe auf Nadelstärke 6 oder 8? Die Arbeit beginnt mit Nadel 6, da stimmt meine Maschenprobe, der Hauptteil wird mit 8 gestrickt. Wechsel ich zu Nadel 8 ? Oder bleibe ich bei 6, wo die Maschenprobe stimmt? Danke für eine Antwort!
21.10.2021 - 09:45DROPS Design answered:
Liebe Frau Weber, die Maschenprobe wird mit Nadeln Nr 8 gestrickt (= 12 M x 14 Reihen glatt rechts mit Nadel Nr 8 = 10 x 10 cm) - wechseln Sie zu Nadel Nr 8 bevor Sie die Passe beginnen. Viel Spaß beim stricken!
21.10.2021 - 11:19
![]() Demarchi wrote:
Demarchi wrote:
Bonjour, j’ai acheté la laine pour faire le modele213-27 en ligne. Je ne comprends rien aux explications très compliquées données. J’ai besoin d’aide svp. J’en suis au raglan et encolure. Merci de me donner un numéro où appeler et des vidéos à suivre comme pour le col. Car sans la vidéo, je n’aurais rien compris. Merci d’avance Anne
30.08.2021 - 15:09DROPS Design answered:
Bonjour Mme Demarchi, vous devez augmenter 8 mailles pour le raglan (cf RAGLAN) soit 1 m pour chaque devant, 2 m pour chaque manche et pour le dos tous les 2 rangs (= tous les rangs sur l'endroit) et, en même temps, vous allez augmenter pour l'encolure V tous les 2 rangs (6 à 9 fois selon la taille) + 1 fois tous les 6 rangs = vous allez donc augmenter 1 m par devant. Pour toute assistance individuelle, n'hésitez pas à contacter votre magasin DROPS, même par mail ou téléphone, on saura vous aider. Bon tricot!
30.08.2021 - 16:05
![]() Kasia wrote:
Kasia wrote:
Bardzo proszę o wyjaśnienie, jak przesunąć przejścia między tyłem/przodem i rękawami aby jedno oczko rękawa były na przodach i tyle.
31.03.2021 - 18:41DROPS Design answered:
Witaj Kasiu, musisz przesunąć markery o 1 oczko w stronę środka rękawa (rękaw będzie miał w ten sposób o 2 o. mniej, tył o 2 o. więcej, a każdy przód o 1 o. więcej). Pozdrawiamy!
31.03.2021 - 22:48
![]() Suztakowski wrote:
Suztakowski wrote:
Bjr, je n'arrive pas à faire les cols. Avec votre aide je suis arrivé à faire les 14 premiers centimètres mais après je ne comprends pas . Rang 1 monter les mailles après le col gauche.........
15.03.2021 - 11:46DROPS Design answered:
Bonjour Mme Suztakowski, cette vidéo montre comment faire les deux cols et les "assembler" avec les mailles de l'encolure dos au milieu, cela devrait pouvoir vous aider. Bon tricot!
15.03.2021 - 13:15
|
|||||||
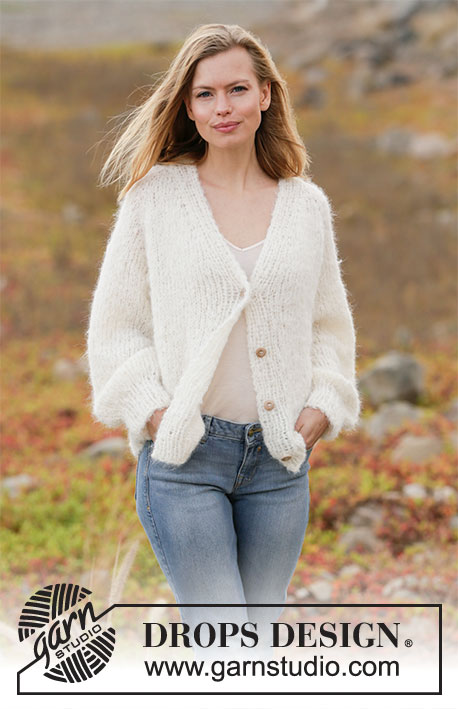
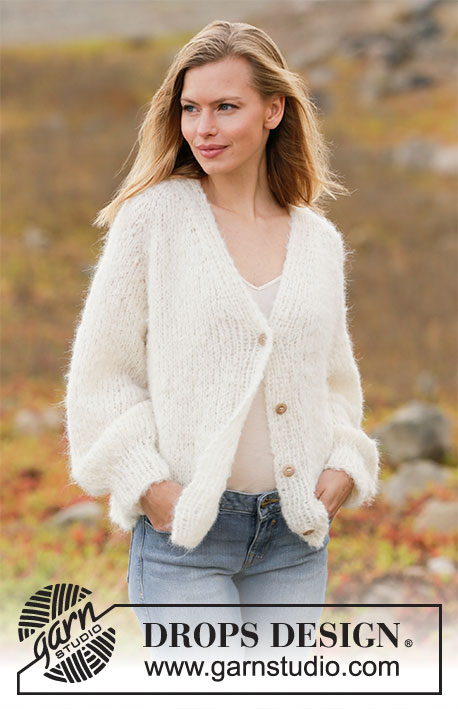
Spring Fuzz Jacket#springfuzzjacket |
|||||||
 |
 |
||||||
Knitted jacket with raglan in DROPS Melody. The piece is worked top down with v-neck. Sizes XS - XXL.
DROPS 213-27 |
|||||||
|
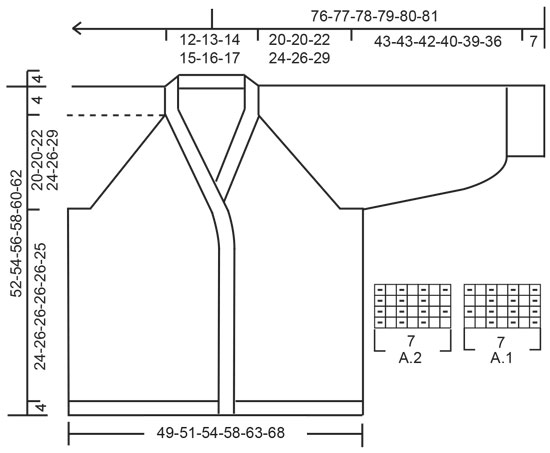
------------------------------------------------------- EXPLANATIONS FOR THE PATTERN: ------------------------------------------------------- PATTERN: See diagrams A.1 and A.2. The diagrams show all rows in the pattern seen from the right side. SHORT ROWS-1 (for the first neck-piece worked, i.e. right neck): Start from the right side and work as follows: * Work back and forth as before over the first 5 stitches, then work as before, back and forth over all 7 stitches *, work from *-* a total of 2 times. SHORT ROWS-2 (for the second neck-piece worked, i.e. left neck): Start from the wrong side and work as follows: * Work back and forth as before over the first 5 stitches, then work as before back and forth over all 7 stitches *, work from *-* a total of 2 times, then work 1 row back from the wrong side over all 7 stitches. INCREASE/DECREASE TIP (evenly spaced): To work out how to increase/decrease evenly, count the total number of stitches on needle (e.g. 54 stitches), minus band stitches (e.g. 14 stitches) and divide the remaining stitches with number of increases/decreases to be made (e.g. 4) = 10. In this example, increase by making 1 yarn over after each 10th stitch. On the next row work the yarn overs twisted to avoid holes. When decreasing, knit together each 9th and 10th stitch. KNITTING TIP: To keep the bands even and neat it is important to tighten the strand slightly when working the outermost 7 stitches on each side. V-NECK: All increases are worked from the right side! Increase 1 stitch on the inside of 7 band stitches + 1 knit stitch (= 8 stitches). Increase by making 1 yarn over after the 8 stitches on the beginning of the row and before the 8 stitches at the end of the row. On the next row (wrong side) purl the yarn overs twisted to avoid holes. Then work the new stitches in stocking stitch. RAGLAN: All increases are worked from the right side! Increase 1 stitch on each side of the 4 markers in each transition between body and sleeves as follows: Work until there is 1 stitch left before marker thread, 1 yarn over, knit 2 (marker sits between these 2 stitches), 1 yarn over (= 2 stitches increased). Repeat at all the markers On the next row (wrong side) purl the yarn overs twisted to avoid holes. Then work the new stitches in stocking stitch. DECREASE TIP (for sleeves): Decrease 1 stitch on each side of the marker thread as follows: Work until there are 3 stitches left before the marker thread, knit 2 together, knit 2 (marker thread sits between these 2 stitches), slip 1 stitch as if to knit, knit 1 and pass the slipped stitch over the knitted stitch. BUTTONHOLE: Work buttonholes on the right band (when the garment is worn). Work from the right side when there are 5 stitches left on the row as follows: Make 1 yarn over, knit 2 together and knit the last stitches. On the next row (wrong side), knit the yarn over to leave a hole. The first buttonhole is worked on the first row on the body. Then work the other 3 buttonholes with approx. 8-8½-8½-8½-8½-8½cm between each one. CASTING-OFF TIP: To avoid the cast-off edge being tight you can cast off with a larger size needle. ------------------------------------------------------- START THE PIECE HERE: ------------------------------------------------------- JACKET – SHORT OVERVIEW OF THE PIECE: First work 2 loose neck-pieces. These are placed on the circular needle when casting on stitches for the neck as described in the text (the neck-edges are sewn together mid back to finish and then sewn to the neck-line at the back). Then the whole piece is continued top down. The yoke is worked back and forth with circular needle from mid front, while increasing for the v-neck and raglan. The yoke is divided for body and sleeves. The body is continued back and forth from mid front. The sleeves are worked in the round with double pointed needles/short circular needle. NECK: Right neck: Cast on 7 stitches with needle size 6 mm and Melody and work A.1 (= 7 stitches) back and forth (row 1 = right side). When the neck-piece measures 4-4-5-5-6-6 cm, work SHORT ROWS-1 – read description above. When the short rows are finished continue with A.1 over all stitches until the piece measures approx. 12-12-13-13-14-14 cm outermost on the neck (i.e. on the long-side) – adjust so you finish after a row from the wrong side. Cut the strand and lay the piece to one side. Left neck: Cast on 7 stitches with needle size 6 mm and Melody and work A.2 (= 7 stitches) back and forth. When the neck-piece measures 4-4-5-5-6-6 cm, work SHORT ROWS-2 – read description above. When the short rows are finished continue with A.2 over all stitches until the piece measures approx 12-12-13-13-14-14 cm outermost on the neck (i.e. on the long-side) – adjust so you finish after a row from the wrong side. Now continue as follows: ROW 1 (right side): Do not cut the strand but work the left neck-piece (from the right side), cast on 40-42-43-44-45-46 stitches with the same circular needle, straight after the neck-piece, and then work as before over the 7 stitches on the right neck-piece = 54-56-57-58-59-60 stitches on the needle. ROW 2: Purl 1 row from the wrong side (band stitches worked as before). ROW 3: Knit 1 row from the right side (band stitches worked as before) where you increase 4-8-10-10-11-13 stitches evenly spaced – read INCREASE/DECREASE TIP = 58-64-67-68-70-73 stitches. ROW 4: Purl 1 row from the wrong side (band stitches worked as before). Insert a marker inside the 7 stitches on the edge of A.1. The piece will be measured from this marker. Change to circular needle size 8 mm and work the yoke as described below. YOKE: Insert 4 marker threads in the piece as follows (without working the stitches): Insert a marker thread 10 stitches in from each side (= in the transition between sleeves and front pieces), place the next 2 marker threads 10 stitches further in from both the first marker threads (= in transitions between sleeves and back piece). There are now 18-24-27-28-30-33 stitches on the back piece between the last 2 marker threads. Work stocking stitch and band stitches as before – read KNITTING TIP. AT THE SAME TIME on the first row from the right side increase for V-NECK and RAGLAN – read description above. REMEMBER THE KNITTING TENSION! Increase to raglan every 2nd row a total of 14-14-15-16-18-20 times and increase for the v-neck every 2nd row 1-3-2-3-3-1 times in total, then on every 4th row 5-4-5-5-6-8 times then on every 6th row 1 time in all sizes. When all the increases to raglan and v-neck are finished there are 184-192-203-214-234-253 stitches on the row. Continue with stocking stitch and work the 7 band stitches on each side as before until the piece measures 20-20-22-24-26-29 cm from the marker. Now divide the piece for body and sleeves. The transitions between body and sleeves are displaced so the 2-1-1-1-1-1 stitches on each side of both sleeves are now worked on the front and back pieces. The next row from the wrong side is worked as follows: Work the first 33-33-34-36-39-41 stitches as before, place the next 34-36-38-40-44-48 stitches on a thread for sleeve, cast on 8-8-8-10-10-10 new stitches on the needle (= in side under sleeve), work the next 50-54-59-62-68-75 stitches (= back piece), place the next 34-36-38-40-44-48 stitches on a thread for sleeve, cast on 8-8-8-10-10-10 new stitches on the needle (= in side under sleeve), work the remaining 33-33-34-36-39-41 stitches as before. Body and sleeves are finished separately. THE PIECE IS NOW MEASURED FROM HERE. BODY: = 132-136-143-154-166-177 stitches. Continue with stocking stitch and A.1/A.2 over the 7 band stitches on each side as before – remember BUTTONHOLES – read description above. When the piece measures 24-26-26-26-26-25 cm from the division increase 19-19-20-23-25-26 stitches evenly spaced = 151-155-163-177-191-203 stitches. Change to circular needle size 6 mm and work rib as follows: A.2 as before over the first 7 stitches, work rib (= knit 1 / purl 1) until there are 8 stitches left on the row, knit 1, and work A.1 over the last 7 stitches. When the rib measures 4 cm, cast off with knit over knit and purl over purl – read CASTING-OFF TIP. The jacket measures approx. 52-54-56-58-60-62 cm from the shoulder down. SLEEVES: Place the 34-36-38-40-44-48 stitches from the thread on the one side of the piece on short circular needle/double pointed needles size 8 mm and knit up 1 stitch in each of the 8-8-8-10-10-10 stitches cast on under the sleeve = 42-44-46-50-54-58 stitches. Work the different sizes as follows: Sizes XS, S and M: Work stocking stitch in the round until the piece measures 43-43-42 cm. Continue as described below. Sizes L, XL and XXL: Insert a marker thread in the middle of the 10-10-10 stitches under the sleeve. Allow the thread to follow your work onwards. When the sleeve measures 5 cm, decrease 1 stitch on each side of the marker thread – read DECREASE TIP. Repeat the decrease when the sleeve measures 12 cm = 46-50-54 stitches. Continue working stocking stitch until the sleeve measures 40-39-36 cm. Continue as described below. All sizes: Knit 1 round where you decrease 14-14-14-14-14-16 stitches evenly spaced = 28-30-32-32-36-38 stitches. Change to double pointed needles size 6 mm and work rib (= knit 1 / purl 1) in the round for 7 cm. Cast off with knit over knit and purl over purl – remember CASTING-OFF TIP. The sleeve measures approx 50-50-49-47-46-43 cm. Work the other sleeve in the same way. ASSEMBLY: Sew the neck-pieces together mid-back with the seam turning inwards. Stretch the neck slightly and sew it to the neck-line at the back. Sew the buttons onto the left band. |
|||||||
Diagram explanations |
|||||||
|
|||||||
 |
|||||||
Have you finished this pattern?Tag your pictures with #dropspattern #springfuzzjacket or submit them to the #dropsfan gallery. Do you need help with this pattern?You'll find 26 tutorial videos, a Comments/Questions area and more by visiting the pattern on garnstudio.com. © 1982-2026 DROPS Design A/S. We reserve all rights. This document, including all its sub-sections, has copyrights. Read more about what you can do with our patterns at the bottom of each pattern on our site. |
|||||||


With over 40 years in knitting and crochet design, DROPS Design offers one of the most extensive collections of free patterns on the internet - translated to 17 languages. As of today we count 324 catalogues and 12290 patterns translated into English (UK/cm). 12290
We work hard to bring you the best knitting and crochet have to offer, inspiration and advice as well as great quality yarns at incredible prices! Would you like to use our patterns for other than personal use? You can read what you are allowed to do in the Copyright text at the bottom of all our patterns. Happy crafting!
Post a comment to pattern DROPS 213-27
We would love to hear what you have to say about this pattern!
If you want to leave a question, please make sure you select the correct category in the form below, to speed up the answering process. Required fields are marked *.