
Popular categories
Looking for a yarn?


Comments / Questions (52)
![]() Esther Haller wrote:
Esther Haller wrote:
Raglan Aufnehmen Anleitung: In jeder zweiten Reihe 14x arbeiten Heisst das: In jeder Hinreihe, oder in jeder zweiten Hinreihe? Also in jeder 4. Reihe oder in jeder 2. Reihe? Vielen Dank für eine Erklärung.
15.06.2025 - 12:00DROPS Design answered:
Liebe Frau Haller, in jeder 2. Reihe bedeutet in jeder Hinreihe, dh 1 Hinreihe mit Zunahmen, 1 Rückreihe ohne. Viel Spaß beim Stricken!
16.06.2025 - 08:13
![]() Kristin Vågene wrote:
Kristin Vågene wrote:
Det er feil i oppskriftene til Spring Fuzz Jacket. Har dere en revidert utgave?
22.05.2025 - 16:43DROPS Design answered:
Hej Kristin, ja bærestykket blev opdateret online den 7/3-2022 :)
23.05.2025 - 07:20
![]() Molly Dalessandro wrote:
Molly Dalessandro wrote:
I have done the v-neck and raglan increases and am now at the step where I continue in stockinette stitch until piece measures 20 cm from the marker. My question is this: I used stitch markers instead of marker threads. Should I measure 20 cm from where I began increases or 20 cm from end of raglan/v-neck increases (when 184 stitches on row)?
18.05.2025 - 13:40DROPS Design answered:
Dear Molly, you need to measure the piece from the marker inserted before starting the raglan increases (in the instructions, the marker inserted right before the YOKE section. Happy knitting!
18.05.2025 - 16:45
![]() Karin Kossen wrote:
Karin Kossen wrote:
Hai, ik kom na t meerderen van de pas een tekort aan steken. Hoe ik t ook doe ik blijf tekort komen. Of lees ik t verkeerd? 14x raglan, 3, 4 ,1 vhals
29.04.2025 - 23:57DROPS Design answered:
Dag Karin,
Voor de hals meerder je iedere 2e naald 3 keer, dan iedere 4e naald 4 keer en dan iedere 6e naald 1 keer in alle maten. Voor de raglan inderdaad 14 keer. Heb je na het meerderen minder steken op de naald dan aangegeven in het patroon?
04.05.2025 - 10:08
![]() Beth Toomey wrote:
Beth Toomey wrote:
I’m currently knitting the yoke. I’m slightly confused how the first parts of A1 and A2 connect to the overall shape of the piece since they jutt out from the main yoke and seemingly the neckline
07.04.2025 - 15:37DROPS Design answered:
Dear Mrs Toomey, in this video we show how to work these both diagrams A.1 andA.2 and then how to work the short rows and finally how to cast on the new stitches for neck in between, this might help you. Happy knitting!
08.04.2025 - 08:52
![]() Christiane Zeidler wrote:
Christiane Zeidler wrote:
Das mit der Halsblende peil ich nicht. Wird die nur bis zur Schulter angenäht? Auf dem Diagramm schaut es so aus als ob sie kpl. über den gesamten Nacken läuft. Aber dafür reichen die angegebenen 12cm nicht
25.03.2025 - 14:46DROPS Design answered:
Liebe Frau Zeidler, könnte Ihnen vielleicht dieses Video helfen? Wir zeigen, wir man die Diagramme für die Halsblende strickt, und wie die Maschen dazwischen angeschlagen werden. Viel Spaß beim Stricken!
25.03.2025 - 15:50
![]() Anna Langkilde wrote:
Anna Langkilde wrote:
Der mangler en forklaring på:Overgangen mellem ryg & forstykke og ærmer bliver forskudt så 2-1-1-1-1-1 masker i hver side af ærmerne kommer på forstykket og bagstykket. Næste pind fra vrangen strikkes således: Jeg er i tvivl - skal man først strikke en gang ret og så lave den nævnte udtagning når man strikker retur med vrang? Og så kan jeg ikke gennemskue hvordan det med 1 forskudt skal forståes. Jeg kan ikke finde nogen forklaringer
10.11.2024 - 22:11DROPS Design answered:
Hej Anna, nej det er bare en forklaring. Du skal bare følge opskriften og strikke næste pind fra vrangen som beskrevet :)
19.11.2024 - 10:16
![]() Jorunn wrote:
Jorunn wrote:
V-hals: jeg forstår ikke "øk 1 maske på innsiden av 7 stolpemasker", hvor skal jeg plassere/øke den ene masken? Vil det ikke bare bli flere og flere stolpemasker? Min første strikkejakke:)
28.09.2024 - 21:02DROPS Design answered:
Hei Jorunn, De økte maskene er etter den første stolpen og før den siste stolpen. Disse nye maskene er strikket inn i mønsteret fortløpende, slik at stolpene er alltid 7 masker i bredden. God fornøyelse!
30.09.2024 - 06:48
![]() Torhill wrote:
Torhill wrote:
Halskanten som skal sys sammen i nakken og festes til halskanten er altfor kort dersom den skal festes rundt hele kanten. Hvordan løses dette? Ser den skal strekkes men ikke mulig å strekke den så mye.
30.08.2024 - 22:52DROPS Design answered:
Hei Torhild. Man skal greie å strekke den slik at den passer, om man ikke har strikket for stramt. Men du kan da evnt. strikke halskanten lengre om du ønsker det (plukk opp masker ved oppleggskanten på halskanten og strikk til ønsket lengde). Bare husk at den skal stramme litt, slik at man får en "bueform" mot halsen / legger seg penere mot halsen. mvh DROPS Design
02.09.2024 - 11:35
![]() DANGUY DES DESERTS wrote:
DANGUY DES DESERTS wrote:
Bonjour tout le monde! S\'il vous plaît, aidez-moi\r\nje désire faire le modèle \"Spring Fuzz jacket\", taille XL. Mais ma laine est différente de celle du modèle. La mienne est la drops air, et celle du modèle est la drops Mélody, et je ne comprends rien à la conversion des mailles...la Drops Air se tricote en 5\r\nMerci metci merci à la personne qui me répondra!!!\r\nFrançoise D
05.12.2023 - 12:43DROPS Design answered:
Bonjour Françoise D, en fait, Air appartient au groupe de fils C alors que Melody appartient au groupe de fils D, votre échantillon sera alors complètement différent, il vaudrait mieux choisir un modèle similaire du groupe de fils C pour vous éviter d'avoir à tout recalculer. Retrouvez ici tous nos gilets et vestes que vous pouvez tricoter en Air, et là, le convertisseur fonctionnera. Bon tricot!
05.12.2023 - 16:06
|
|||||||
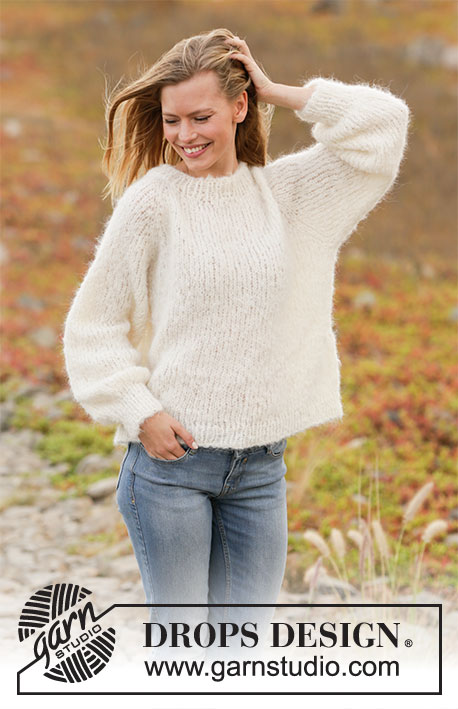
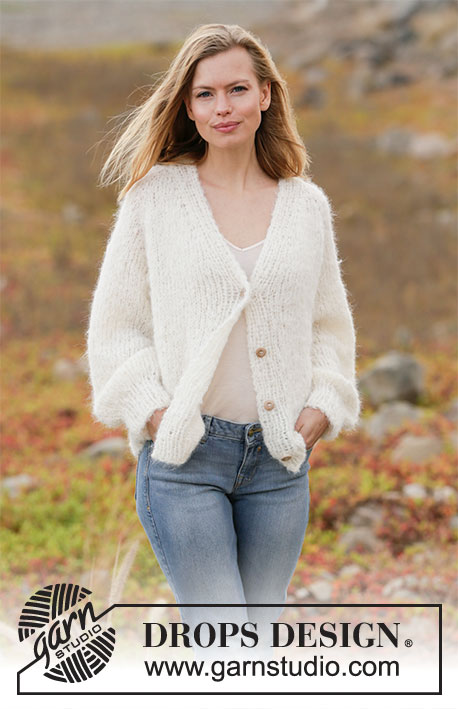
Spring Fuzz Jacket#springfuzzjacket |
|||||||
 |
 |
||||||
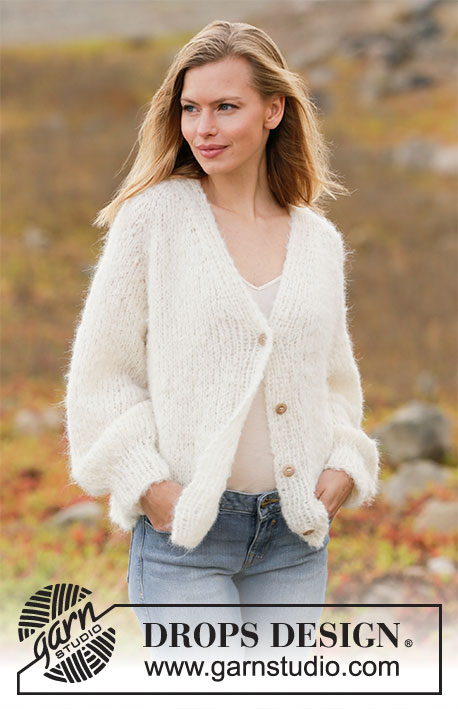
Knitted jacket with raglan in DROPS Melody. The piece is worked top down with v-neck. Sizes XS - XXL.
DROPS 213-27 |
|||||||
|
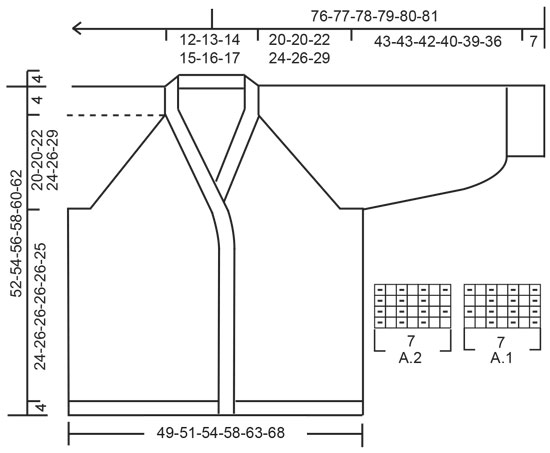
------------------------------------------------------- EXPLANATIONS FOR THE PATTERN: ------------------------------------------------------- PATTERN: See diagrams A.1 and A.2. The diagrams show all rows in the pattern seen from the right side. SHORT ROWS-1 (for the first neck-piece worked, i.e. right neck): Start from the right side and work as follows: * Work back and forth as before over the first 5 stitches, then work as before, back and forth over all 7 stitches *, work from *-* a total of 2 times. SHORT ROWS-2 (for the second neck-piece worked, i.e. left neck): Start from the wrong side and work as follows: * Work back and forth as before over the first 5 stitches, then work as before back and forth over all 7 stitches *, work from *-* a total of 2 times, then work 1 row back from the wrong side over all 7 stitches. INCREASE/DECREASE TIP (evenly spaced): To work out how to increase/decrease evenly, count the total number of stitches on needle (e.g. 54 stitches), minus band stitches (e.g. 14 stitches) and divide the remaining stitches with number of increases/decreases to be made (e.g. 4) = 10. In this example, increase by making 1 yarn over after each 10th stitch. On the next row work the yarn overs twisted to avoid holes. When decreasing, knit together each 9th and 10th stitch. KNITTING TIP: To keep the bands even and neat it is important to tighten the strand slightly when working the outermost 7 stitches on each side. V-NECK: All increases are worked from the right side! Increase 1 stitch on the inside of 7 band stitches + 1 knit stitch (= 8 stitches). Increase by making 1 yarn over after the 8 stitches on the beginning of the row and before the 8 stitches at the end of the row. On the next row (wrong side) purl the yarn overs twisted to avoid holes. Then work the new stitches in stocking stitch. RAGLAN: All increases are worked from the right side! Increase 1 stitch on each side of the 4 markers in each transition between body and sleeves as follows: Work until there is 1 stitch left before marker thread, 1 yarn over, knit 2 (marker sits between these 2 stitches), 1 yarn over (= 2 stitches increased). Repeat at all the markers On the next row (wrong side) purl the yarn overs twisted to avoid holes. Then work the new stitches in stocking stitch. DECREASE TIP (for sleeves): Decrease 1 stitch on each side of the marker thread as follows: Work until there are 3 stitches left before the marker thread, knit 2 together, knit 2 (marker thread sits between these 2 stitches), slip 1 stitch as if to knit, knit 1 and pass the slipped stitch over the knitted stitch. BUTTONHOLE: Work buttonholes on the right band (when the garment is worn). Work from the right side when there are 5 stitches left on the row as follows: Make 1 yarn over, knit 2 together and knit the last stitches. On the next row (wrong side), knit the yarn over to leave a hole. The first buttonhole is worked on the first row on the body. Then work the other 3 buttonholes with approx. 8-8½-8½-8½-8½-8½cm between each one. CASTING-OFF TIP: To avoid the cast-off edge being tight you can cast off with a larger size needle. ------------------------------------------------------- START THE PIECE HERE: ------------------------------------------------------- JACKET – SHORT OVERVIEW OF THE PIECE: First work 2 loose neck-pieces. These are placed on the circular needle when casting on stitches for the neck as described in the text (the neck-edges are sewn together mid back to finish and then sewn to the neck-line at the back). Then the whole piece is continued top down. The yoke is worked back and forth with circular needle from mid front, while increasing for the v-neck and raglan. The yoke is divided for body and sleeves. The body is continued back and forth from mid front. The sleeves are worked in the round with double pointed needles/short circular needle. NECK: Right neck: Cast on 7 stitches with needle size 6 mm and Melody and work A.1 (= 7 stitches) back and forth (row 1 = right side). When the neck-piece measures 4-4-5-5-6-6 cm, work SHORT ROWS-1 – read description above. When the short rows are finished continue with A.1 over all stitches until the piece measures approx. 12-12-13-13-14-14 cm outermost on the neck (i.e. on the long-side) – adjust so you finish after a row from the wrong side. Cut the strand and lay the piece to one side. Left neck: Cast on 7 stitches with needle size 6 mm and Melody and work A.2 (= 7 stitches) back and forth. When the neck-piece measures 4-4-5-5-6-6 cm, work SHORT ROWS-2 – read description above. When the short rows are finished continue with A.2 over all stitches until the piece measures approx 12-12-13-13-14-14 cm outermost on the neck (i.e. on the long-side) – adjust so you finish after a row from the wrong side. Now continue as follows: ROW 1 (right side): Do not cut the strand but work the left neck-piece (from the right side), cast on 40-42-43-44-45-46 stitches with the same circular needle, straight after the neck-piece, and then work as before over the 7 stitches on the right neck-piece = 54-56-57-58-59-60 stitches on the needle. ROW 2: Purl 1 row from the wrong side (band stitches worked as before). ROW 3: Knit 1 row from the right side (band stitches worked as before) where you increase 4-8-10-10-11-13 stitches evenly spaced – read INCREASE/DECREASE TIP = 58-64-67-68-70-73 stitches. ROW 4: Purl 1 row from the wrong side (band stitches worked as before). Insert a marker inside the 7 stitches on the edge of A.1. The piece will be measured from this marker. Change to circular needle size 8 mm and work the yoke as described below. YOKE: Insert 4 marker threads in the piece as follows (without working the stitches): Insert a marker thread 10 stitches in from each side (= in the transition between sleeves and front pieces), place the next 2 marker threads 10 stitches further in from both the first marker threads (= in transitions between sleeves and back piece). There are now 18-24-27-28-30-33 stitches on the back piece between the last 2 marker threads. Work stocking stitch and band stitches as before – read KNITTING TIP. AT THE SAME TIME on the first row from the right side increase for V-NECK and RAGLAN – read description above. REMEMBER THE KNITTING TENSION! Increase to raglan every 2nd row a total of 14-14-15-16-18-20 times and increase for the v-neck every 2nd row 1-3-2-3-3-1 times in total, then on every 4th row 5-4-5-5-6-8 times then on every 6th row 1 time in all sizes. When all the increases to raglan and v-neck are finished there are 184-192-203-214-234-253 stitches on the row. Continue with stocking stitch and work the 7 band stitches on each side as before until the piece measures 20-20-22-24-26-29 cm from the marker. Now divide the piece for body and sleeves. The transitions between body and sleeves are displaced so the 2-1-1-1-1-1 stitches on each side of both sleeves are now worked on the front and back pieces. The next row from the wrong side is worked as follows: Work the first 33-33-34-36-39-41 stitches as before, place the next 34-36-38-40-44-48 stitches on a thread for sleeve, cast on 8-8-8-10-10-10 new stitches on the needle (= in side under sleeve), work the next 50-54-59-62-68-75 stitches (= back piece), place the next 34-36-38-40-44-48 stitches on a thread for sleeve, cast on 8-8-8-10-10-10 new stitches on the needle (= in side under sleeve), work the remaining 33-33-34-36-39-41 stitches as before. Body and sleeves are finished separately. THE PIECE IS NOW MEASURED FROM HERE. BODY: = 132-136-143-154-166-177 stitches. Continue with stocking stitch and A.1/A.2 over the 7 band stitches on each side as before – remember BUTTONHOLES – read description above. When the piece measures 24-26-26-26-26-25 cm from the division increase 19-19-20-23-25-26 stitches evenly spaced = 151-155-163-177-191-203 stitches. Change to circular needle size 6 mm and work rib as follows: A.2 as before over the first 7 stitches, work rib (= knit 1 / purl 1) until there are 8 stitches left on the row, knit 1, and work A.1 over the last 7 stitches. When the rib measures 4 cm, cast off with knit over knit and purl over purl – read CASTING-OFF TIP. The jacket measures approx. 52-54-56-58-60-62 cm from the shoulder down. SLEEVES: Place the 34-36-38-40-44-48 stitches from the thread on the one side of the piece on short circular needle/double pointed needles size 8 mm and knit up 1 stitch in each of the 8-8-8-10-10-10 stitches cast on under the sleeve = 42-44-46-50-54-58 stitches. Work the different sizes as follows: Sizes XS, S and M: Work stocking stitch in the round until the piece measures 43-43-42 cm. Continue as described below. Sizes L, XL and XXL: Insert a marker thread in the middle of the 10-10-10 stitches under the sleeve. Allow the thread to follow your work onwards. When the sleeve measures 5 cm, decrease 1 stitch on each side of the marker thread – read DECREASE TIP. Repeat the decrease when the sleeve measures 12 cm = 46-50-54 stitches. Continue working stocking stitch until the sleeve measures 40-39-36 cm. Continue as described below. All sizes: Knit 1 round where you decrease 14-14-14-14-14-16 stitches evenly spaced = 28-30-32-32-36-38 stitches. Change to double pointed needles size 6 mm and work rib (= knit 1 / purl 1) in the round for 7 cm. Cast off with knit over knit and purl over purl – remember CASTING-OFF TIP. The sleeve measures approx 50-50-49-47-46-43 cm. Work the other sleeve in the same way. ASSEMBLY: Sew the neck-pieces together mid-back with the seam turning inwards. Stretch the neck slightly and sew it to the neck-line at the back. Sew the buttons onto the left band. |
|||||||
Diagram explanations |
|||||||
|
|||||||
|
|||||||
Have you finished this pattern?Tag your pictures with #dropspattern #springfuzzjacket or submit them to the #dropsfan gallery. Do you need help with this pattern?You'll find 25 tutorial videos, a Comments/Questions area and more by visiting the pattern on garnstudio.com. © 1982-2025 DROPS Design A/S. We reserve all rights. This document, including all its sub-sections, has copyrights. Read more about what you can do with our patterns at the bottom of each pattern on our site. |
|||||||


With over 40 years in knitting and crochet design, DROPS Design offers one of the most extensive collections of free patterns on the internet - translated to 17 languages. As of today we count 314 catalogues and 11822 patterns translated into English (UK/cm).
We work hard to bring you the best knitting and crochet have to offer, inspiration and advice as well as great quality yarns at incredible prices! Would you like to use our patterns for other than personal use? You can read what you are allowed to do in the Copyright text at the bottom of all our patterns. Happy crafting!
Post a comment to pattern DROPS 213-27
We would love to hear what you have to say about this pattern!
If you want to leave a question, please make sure you select the correct category in the form below, to speed up the answering process. Required fields are marked *.