
Popular categories
Looking for a yarn?


Comments / Questions (34)
![]() Marta wrote:
Marta wrote:
Prima di iniziare il lavoro volevo una precisazione sul diagramma A1: i giri di ritorno ( sul rovescio del lavoro) non sono calcolati nel diagramma ? Grazie per la pazienza
01.03.2026 - 22:43DROPS Design answered:
Buonasera Marta il diagramma mostra tutti i ferri del lavoro. Buon lavoro!
03.03.2026 - 22:49
![]() Marta wrote:
Marta wrote:
Nella mia domanda precedente c'è un errore di trascrizione. Intendevo scrivere lavorare con 2 fili invece ho scritto "lavare" 🫣
01.03.2026 - 22:25
![]() Marta wrote:
Marta wrote:
Il golfino modello 207-23 è eseguito con lana a 2 filati di tipo A. Io voglio realizzarlo in cotone. Ho scelto il Drops Bumull-Line che è di tipo A. Devo lavarlo con due gomitoli assieme ?
01.03.2026 - 21:53DROPS Design answered:
Buonasera Marta, si è preferibile usare 2 gomitoli separati. Buon lavoro!
03.03.2026 - 22:50
![]() Marta wrote:
Marta wrote:
Voglio realizzare il modello 207-23 usando il filato di cotone Bumull-Line. Nel vostro modello è indicato il filato A+A, quindi se uso il filato C dovrebbe essere compatibile, giusto?
01.03.2026 - 09:49DROPS Design answered:
Buonasera Marta, prima di iniziare a lavorare provi a realizzare un campione, per controllare che corrisponda a quello indicato. Buon lavoro!
01.03.2026 - 20:53
![]() Sylvie wrote:
Sylvie wrote:
Bonjour. Pour la taille M quand il est noté pour le dos et les devants : "quand l'ouvrage mesure 20 cm depuis la séparation". Cela veut dire quand on commence le point jersey ou depuis que les manches sont mises en attente ? Merci pour votre aide
11.11.2024 - 14:24DROPS Design answered:
Bonjour Sylvie, ces 20 cm sont mesurés depuis la division de l'empiècement, autrement dit depuis que vous tricotez les 178 mailles après avoir mis les mailles des manches en attente. Bon tricot!
11.11.2024 - 16:15
![]() Sylvie wrote:
Sylvie wrote:
Bonjour. Pour la taille M il est écrit qu'après la séparation des mailles on a 178 m. Ensuite il est écrit ajuster a 171 m au dernier rang de A2. Doit on faire des diminutions pour passer de 178 a 171 m ? Merci pour votre aide
07.11.2024 - 10:20DROPS Design answered:
Bonjour Sylvie, tout à fait, au dernier rang de A.2, diminuez 7 mailles à intervalles réguliers (cf cette leçon), vous avez 171 mailles pour tricoter A.3 au rang suivant. Bon tricot!
07.11.2024 - 12:55
![]() Sylvie wrote:
Sylvie wrote:
Bonjour. Je suis entrain de faire la taille M. Pour le diagramme A2 le 8e rang se trouve t'il sur l'envers et dois je faire 2 m ensemble endroit, 1 jeté ou se trouve t'il sur l'endroit ? Merci pour votre reponse
03.11.2024 - 06:23DROPS Design answered:
Bonjour Sylvie, le 1er rang de A.2 se tricote sur l'endroit, ainsi, tous les rangs pairs se tricotent sur l'envers, y compris le rang ajouré de A.2. Bon tricot!
04.11.2024 - 09:02
![]() Catherine Debons wrote:
Catherine Debons wrote:
Bonjour, Je réalise le modèle 207-23 et c'est la 1ere fois que je tricote en aller et retour avec aiguille circulaire. Je suis à cet endroit : 5m.endroit, 35m.envers, glisser 46m.sur un arrêt: mes questions : les 6m. à monter se font après les 46m.sur arrêt ? Est-ce que pour tricoter les 70m. suivantes, je garde le même fil ou je dois prendre une nouvelle pelote? Merci pour votre réponse Belle soirée Catherine
04.03.2024 - 20:33DROPS Design answered:
Bonjour Mme Debons, ce rang va effectivement se tricoter sans couper le fil, les mailles montées sous la manche vont la remplacer. Dans cette leçon, nous montrons, à partir de la photo 9 comment on va diviser les mailles à la fin de l'empiècement en mettant les mailles des manches en attente, et en montant les mailles sous la manche. Pour une veste, la technique est la même, à la fin de ce rang, vous tricotez simplement sur l'envers au lieu de continuer en rond comme pour le pull dans la leçon. Bon tricot!
05.03.2024 - 09:08
![]() Trine wrote:
Trine wrote:
Hei! A2 omgang 8: blir det to vrange sammen?
10.08.2023 - 09:24DROPS Design answered:
Hei Trine, Nei, Skråstrek opp til høyre er 2 rett sammen, med en 1 kast i mellom hver gang du strikke 2 rett sammen. God fornøyelse!
11.08.2023 - 06:51
![]() Céline wrote:
Céline wrote:
Bonjour, J'ai tricoté ce beau gilet. Mais je trouve que l'encolure est trop large et j'aimerais remonter le col pour le rendre plus étroit. Je peux relever les mailles du col mais avez vous un modèle de point pour le rapetisser et que ce soit joli ? Merci.
26.09.2022 - 16:44DROPS Design answered:
Bonjour Céline, vous pouvez tricoter au point mousse et diminuer le nombre de mailles nécessaire pour avoir la longueur souhaitée, ou bien tricoter en côtes en terminant par un bord picot (ex 1 ou bien ex. 2 ou bien autre chose en fonction de ce que vous souhaitez. Bon tricot!
26.09.2022 - 17:14
|
||||||||||||||||||||||
Story of Snow Jacket#storyofsnowjacket |
||||||||||||||||||||||
 |
 |
|||||||||||||||||||||
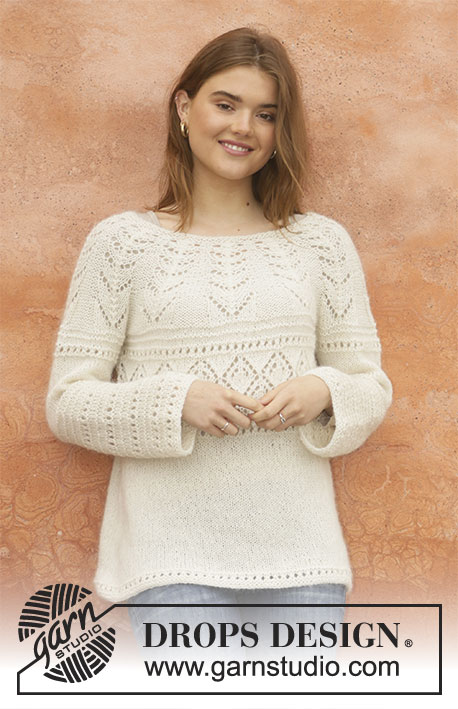
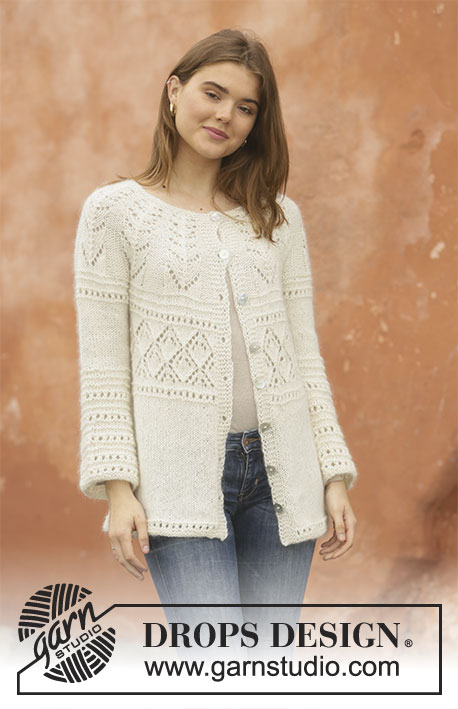
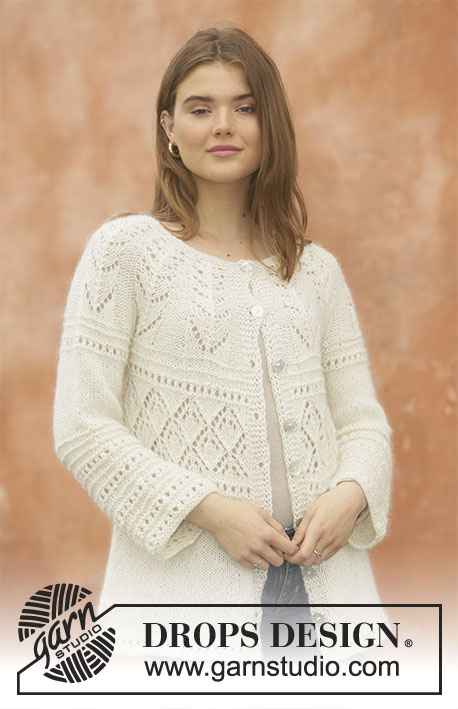
Knitted jacket with round yoke in 1 strand DROPS Alpaca and 1 strand DROPS Kid-Silk. Piece is knitted top down with lace pattern. Size S-XXXL.
DROPS 207-23 |
||||||||||||||||||||||
|
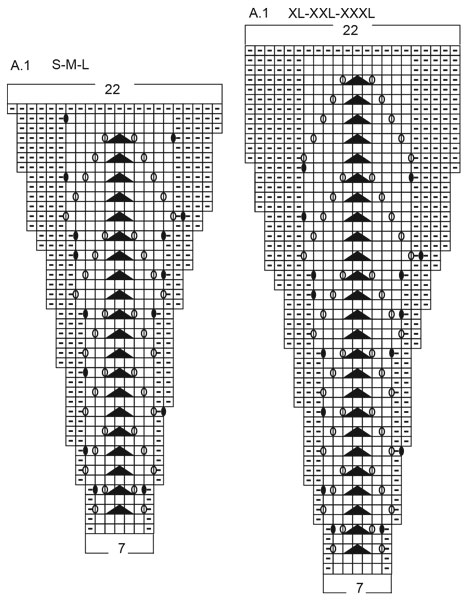
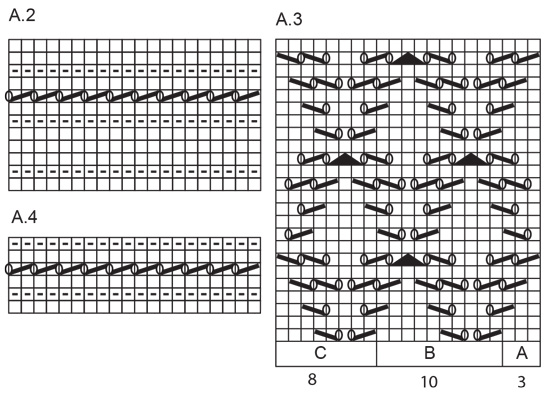
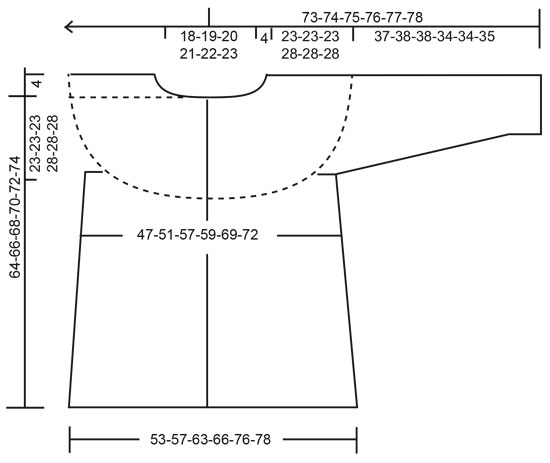
---------------------------------------------------------- EXPLANATION FOR THE PATTERN: ---------------------------------------------------------- GARTER STITCH (back and forth): Knit all rows. 1 ridge vertically = knit 2 rows. PATTERN: See diagrams A.1 to A.4. Choose diagram for your size in A.1. Diagrams show all rows seen from right side. INCREASE/DECREASE TIP (evenly): To calculate how to increase/decrease evenly, use the total number of stitches on row (e.g. 252 stitches) minus bands (e.g. 10 stitches) and divide the remaining 242 stitches by number of increases/decreases to be done (e.g. 10) = 24.2. In this example increase by making 1 yarn over after approx. every 24th stitch. Do not increase over bands. On next row work yarn overs twisted to avoid holes. If decreasing knit approx. every 23rd and 24th stitch together. INCREASE TIP (applies to sides of body): Work until 1 stitch remain before marker thread, make 1 yarn over, knit 2 (marker thread is in the middle of these 2 stitches), make 1 yarn over (= 2 stitches increased at the marker thread and 4 stitches increased in total on round.) On next row purl yarn overs twisted to avoid holes. Then work the new stitches in stocking stitch. DECREASE TIP-2 (applies to sleeves): Decrease 1 stitch on each side of marker thread as follows: Work until 3 stitches remain before marker thread and knit 2 together, knit 2 (marker thread is between these stitches), slip 1 stitch knitwise, knit 1, pass slipped stitch over stitch worked. BUTTONHOLES: Decrease for buttonholes on right band (when garment is worn). Decrease from right side when 3 stitches remain on row as follows: Make 1 yarn over, knit the next 2 stitches together, knit last stitch. On next row knit yarn over to make holes. Decrease first buttonhole when piece measures approx. 1½-2 cm. Then decrease the next 7-7-7-7-7-7, approx. 7-7-7-8-8-8 cm between each. ---------------------------------------------------------- START THE PIECE HERE: ---------------------------------------------------------- JACKET - SHORT OVERVIEW OF THE PIECE: Work yoke back and forth on circular needle from mid front, work top down. Now divide yoke for body and sleeves. Work body back and forth on circular needle from mid front, work top down. Work sleeves in the round on double pointed needles/short circular needle, top down. YOKE: Cast on 87-94-101-108-115-122 stitches on circular needle size 5.5 mm. Work 2 ridges in GARTER STITCH - see explanation above. Then work as follows from the right side: 5 band stitches in garter stitch, work A.1 (= 11-12-13-14-15-16 repetitions of 7 stitches) and finish with 5 band stitches in garter stitch. When A.1 has been worked vertically, there are 252-274-296-318-340-362 stitches on needle. Knit next row from right side, AT THE SAME TIME decrease 10-4-2-0-6-4 stitches evenly = 242-270-294-318-334-358 stitches – READ DECREASE TIP. Work next row as follows - from wrong side: Knit 5 stitches, purl 35-39-42-46-50-54 stitches (= front piece), slip the next 46-52-58-62-62-66 stitches on 1 stitch holder for sleeve, cast on 6-6-6-6-8-8 new stitches on row (= in the side under sleeve), purl 70-78-84-92-100-108 stitches (= back piece), slip the next 46-52-58-62-62-66 stitches on 1 stitch holder for sleeve, cast on 6-6-6-6-8-8 new stitches on row (= in the side under sleeve and purl the next 35-39-42-46-50-54 stitches, knit the last 5 stitches (= front piece). Now finish body and sleeves separately. NOW MEASURE THE PIECE FROM HERE! BODY: = 162-178-190-206-226-242 stitches. Work as follows - from right side: 5 stitches in garter stitch, A.2 until 5 stitches remain, work 5 stitches in garter stitch. On last row in A.2 adjust number of stitches to 161-171-191-201-231-241. Work next row as follows from right side: Work 5 stitches in garter stitch as before, A.3A (= 3 stitches), work A.3B over the next 140-150-170-180-210-220 stitches (= 14-15-17-18-21-22 repetitions), A.3C (= 8 stitches), finish with 5 stitches in garter stitch as before. When A.3 has been worked 1 time vertically, work as follows from right side: 5 stitches in garter stitch, A.4 over all stitches, 5 stitches in garter stitch. Insert 1 marker thread in each side, 43-45-50-53-60-63 stitches in from each side, back piece = 75-81-91-95-111-115 stitches. Then work in stocking stitch with 5 stitches in garter stitch in each side. When piece measures 20 cm from division, increase 1 stitch on each side of every marker thread (= 4 stitches increased) – READ INCREASE TIP! Increase every 3 cm 5 times in total = 181-191-211-221-251-261 stitches. Continue until piece measures 39-41-43-40-42-44 cm. Work as follows - from right side: 5 stitches in garter stitch, A.4 until 6 stitches remain, knit 1 and 5 stitches in garter stitch. Work A.4 1 time vertically, work 1 ridge back and forth over all stitches. Cast off. Piece measures approx. 64-66-68-70-72-74 cm from shoulder. SLEEVE: Slip the 46-52-58-62-62-66 stitches from stitch holder in one side of piece on a short circular needle or double pointed needles size 5.5 mm and pick in addition up 1 stitch in each of the 6-6-6-6-8-8 stitches cast on under sleeve = 52-58-64-68-70-74 stitches. Insert 1 marker thread in the middle of the 6-6-6-6-8-8 stitches. Marker thread marks mid under sleeve and round begins at the marker thread. Work A.2. When A.2 has been worked 1 time vertically, continue in stocking stitch. AT THE SAME TIME when piece measures 3 cm, begin decreasing stitches mid under sleeve - READ DECREASE TIP-2. Decrease every 4 cm 4 times in total in all sizes = 44-50-56-60-62-66 stitches. Continue in stocking stitch until piece measures 16 cm from division. Purl 1 round and knit 2 rounds, purl 1 round and knit 2 rounds. Then work A.2 over all stitches. Continue with A.2 until sleeve measures 37-38-38-34-34-35 cm from division (shorter sleeves in the larger sizes because of longer yoke), work 1 ridge, then cast off. Work the other sleeve the same way. ASSEMBLY: Sew the buttons on to the left band. |
||||||||||||||||||||||
Diagram explanations |
||||||||||||||||||||||
|
||||||||||||||||||||||
 |
||||||||||||||||||||||
 |
||||||||||||||||||||||
 |
||||||||||||||||||||||
Have you finished this pattern?Tag your pictures with #dropspattern #storyofsnowjacket or submit them to the #dropsfan gallery. Do you need help with this pattern?You'll find 27 tutorial videos, a Comments/Questions area and more by visiting the pattern on garnstudio.com. © 1982-2026 DROPS Design A/S. We reserve all rights. This document, including all its sub-sections, has copyrights. Read more about what you can do with our patterns at the bottom of each pattern on our site. |
||||||||||||||||||||||


With over 40 years in knitting and crochet design, DROPS Design offers one of the most extensive collections of free patterns on the internet - translated to 17 languages. As of today we count 324 catalogues and 12290 patterns translated into English (UK/cm). 12290
We work hard to bring you the best knitting and crochet have to offer, inspiration and advice as well as great quality yarns at incredible prices! Would you like to use our patterns for other than personal use? You can read what you are allowed to do in the Copyright text at the bottom of all our patterns. Happy crafting!
Post a comment to pattern DROPS 207-23
We would love to hear what you have to say about this pattern!
If you want to leave a question, please make sure you select the correct category in the form below, to speed up the answering process. Required fields are marked *.