
Popular categories
Looking for a yarn?


Comments / Questions (19)
![]() Rosa MANTIONE wrote:
Rosa MANTIONE wrote:
Re-bonjour, Je vous avoue que je n'ai pas réalisé d'échantillon, mais que j'ai respecté les instructions à la lettre : aiguilles 6 et 8, 3 fils... Je l'ai réalisé en taille M. Merci pour le suivi.
29.11.2019 - 11:35DROPS Design answered:
Bonjour Mme Mantione, si vous n'avez pas la bonne tension (en largeur ou même en hauteur), cela peut influencer la quantité de laine requise - plus d'infos ici. Bon tricot!
29.11.2019 - 13:01
![]() Rosa MANTIONE wrote:
Rosa MANTIONE wrote:
Bonjour, j'ai suivi exactement les instructions, tant pour la commande des fournitures que pour la réalisation de ce pull, mais j'aimerais signaler que j'ai juste assez de laine gris clair (mais vraiment pile) et, par contre, deux pelotes de vert forêt de trop et deux pelotes de gris de trop ! Il y a sûrement une erreur dans les quantités ?! J'ai eu peur, mais le pull est beau !
29.11.2019 - 11:10DROPS Design answered:
Bonjour Mme Mantione, et merci pour votre retour. Votre échantillon et votre tension lors de la réalisation du pull étaient-ils justes? Autrement dit, avez-vous bien 10,5 m x 14 rangs = 10 x 10 cm? Si c'est le cas, pouvez-vous nous indiquer la taille que vous avez réalisé? L'information sera transmise à nos stylistes, merci d'avance. Bon tricot!
29.11.2019 - 11:12
![]() Ana wrote:
Ana wrote:
Bonjour, moi j’ai déjà du mal avec l’échantillon - avec 10 mailles, je n’ai même pas 8 cm, alors que je ne tricote pas vraiment serré ... en hauteur aussi, il me manque un bon centimètre avec 14 rangs. J’ai commencé le pull, j’ai dû défaire le travail car ma tête ne passait pas... je suis un peu découragée :(
13.11.2019 - 21:10DROPS Design answered:
Bonjour Anna, vous tricotez bien avec 2 fils Brushed Alpaca Silk en même temps? N'hésitez pas à utiliser des aiguilles plus grosses pour obtenir le bon échantillon, car si vous n'avez pas le bon nombre de mailles pour 10 cm, votre ouvrage sera automatiquement trop petit/court - plus d'infos sur l'échantillon ici. Bon tricot!
14.11.2019 - 10:15
![]() Valérie wrote:
Valérie wrote:
Merci pour votre réponse. J'ai réalisé ce pull il rend très bien !
27.10.2019 - 08:13
![]() Valérie wrote:
Valérie wrote:
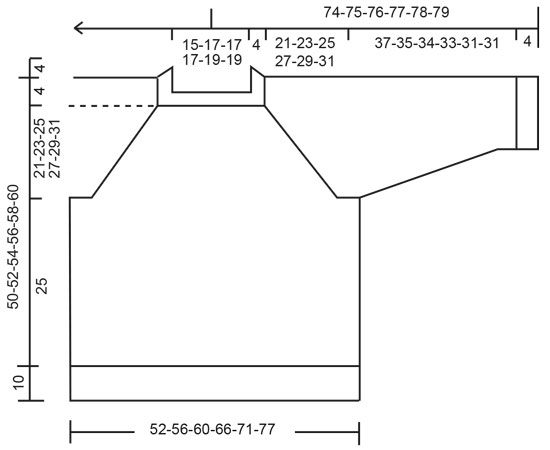
Bonjour, je suis surprise des dimensions notées sur le diagramme : elles ne correspondent pas à la longueur totale. Quelles sont les réelles dimensions pour une taille M ? Par ailleurs est ce normal pour une taille M que la dernière rayure soit plus large que les autres? Merci de votre réponse.
24.10.2019 - 08:49DROPS Design answered:
Bonjour Valérie, les mesures du schéma sont correctes: vous avez 4 cm pour l'épaule + 21 cm d'empiècement + 25 cm après les emmanchures jusqu'en bas pour le devant = 50 cm au total pour le devant + 10 cm supplémentaires pour le dos = 60 cm au total pour le dos. La dernière rayure sera plus large dans toutes les tailles car le dos est plus long. Bon tricot!
24.10.2019 - 10:50
![]() Désirée Delsing wrote:
Désirée Delsing wrote:
Hej! Kan man sticka denna i Andes?
03.09.2019 - 21:18DROPS Design answered:
Hej Desiree, jo du kan strikke den i DROPS Andes, sørg for at overholde strikkefastheden som der står i opskriften. God fornøjelse!
06.09.2019 - 08:44
![]() Rut Baltzer wrote:
Rut Baltzer wrote:
Hvor meget garn skal jeg bruge ialt til Forest Shadows Sweater i M, hvis jeg ønsker at strikke den i to farver med 2/3 den ene og 1/3 den anden farve? Tak på forhånd. Vh. Rut
29.08.2019 - 14:50DROPS Design answered:
Hej Rut, du skal bruge ialt ca 325 g til størrelse M, det har vi ikke regnet på i 2 farver... men hvis du vil strikke den fordelt som du skriver, så skal du bruge 125 g i den ene og 200 g i den anden farve. God fornøjelse!
02.09.2019 - 15:41
![]() Annika wrote:
Annika wrote:
Hej! Kan man sticka den här tröjan i Kid-Silk?
20.08.2019 - 06:34DROPS Design answered:
Hej. Om du ska sticka den i Kid-Silk får du använda 6 trådar (2 trådar Kid-silk motsvarar 1 tråd Brushed Alpaca Silk). Tänk bara som vanligt på att få riktig stickfasthet och att beräkna rätt garnåtgång om du byter till ett annat garn. Lycka till!
20.08.2019 - 08:51
![]() Annika wrote:
Annika wrote:
Hej! Kan man sticka den här tröjan i Kid-Silk?
20.08.2019 - 06:32
|
|
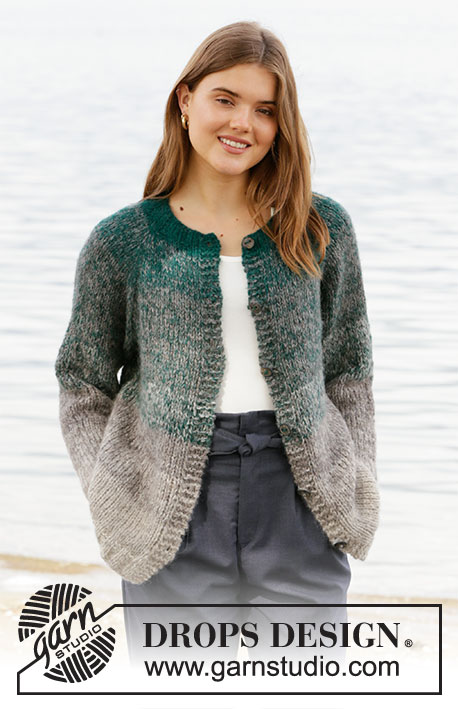
Forest Shadows Sweater#forestshadowssweater |
|
 |
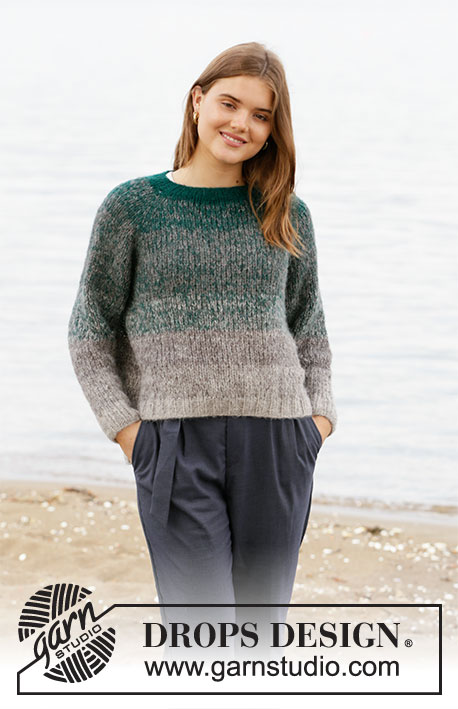 |
Knitted jumper with raglan in 3 strands DROPS Brushed Alpaca Silk. The piece is worked top down with stripes. Sizes S - XXXL.
DROPS 207-15 |
|
|
------------------------------------------------------- EXPLANATIONS FOR THE PATTERN: ------------------------------------------------------- RIDGE/GARTER STITCH (worked back and forth): Knit all rows. 1 ridge in height = Knit 2 rows. INCREASE TIP (evenly spaced): To work out how to increase evenly, count the total number of stitches on the needle (e.g. 48 stitches) and divide by the number of increases to be made (e.g. 10) = 4.8. In this example, increase by making 1 yarn over after approx. each 5th stitch. On the next round/row work the yarn overs twisted to avoid holes. STRIPES-1: All stripes are worked with 3 strands. STRIPE 1: 7-7-8-8-8-9 cm with 2 strands forest green + 1 strand grey. STRIPE 2: 14-14-16-16-16-18 cm with 2 strands grey + 1 strand forest green. STRIPE 3: 7-7-8-8-8-9 cm with 1 strand forest green + 1 strand grey + 1 strand light grey. STRIPE 4: 7-7-8-8-8-9 cm with 2 strands grey + 1 strand light grey. STRIPE 5: 7-7-8-8-8-9 cm with 1 strand grey + 2 strands light grey. STRIPE 6: Work with 3 strands light grey to finished length. STRIPES-2 (for sleeves): All stripes are worked with 3 strands. Continue with STRIPES-1 – read description above, until stripe 3 is finished. The sleeve measures approx. 8-6-8-6-4-6 cm from the division. Continue the stripes as follows: STRIPE 4: 13-13-12-12-12-11 cm with 2 strands grey + 1 strand light grey. STRIPE 5: 13-13-12-12-12-11 cm with 1 strand grey + 2 strands light grey. STRIPE 6: Work with 3 strands light grey to finished length. RAGLAN: Increase 1 stitch on each side of the marker thread in each transition between body and sleeves (= 8 stitches increased on the round) as follows: Work until there is 1 stitch left before marker thread, 1 yarn over, knit 2 (marker thread sits between these 2 stitches), 1 yarn over (= 2 stitches increased). Repeat at all marker threads. On the next round knit the yarn overs twisted to avoid holes. Then work the new stitches in stocking stitch. DECREASE TIP (for sleeves): Decrease 1 stitch on each side of the marker thread as follows: Work until there are 3 stitches left before the marker thread, knit 2 together, knit 2 (marker thread sits between these 2 stitches), slip 1 stitch as if to knit, knit 1 and pass the slipped stitch over the knitted stitch. ------------------------------------------------------- START THE PIECE HERE: ------------------------------------------------------- JUMPER – SHORT OVERVIEW OF THE PIECE: The piece is worked in the round with circular needle, top down. The sleeves are worked in the round with short circular needle/double pointed needles. NECK: Cast on 48-52-52-52-56-56 stitches with short circular needle size 6 mm and 3 strands forest green. Knit 1 round then work rib (= knit 2 / purl 2) for 4 cm. Insert 1 marker on the last round. THE PIECE IS NOW MEASURED FROM HERE! YOKE: Knit 1 round where you increase 10-10-10-14-18-22 stitches evenly spaced – read INCREASE TIP = 58-62-62-66-74-78 stitches. Change to circular needle size 8 mm. Now insert 4 marker threads in the piece as follows: Insert the first marker thread after the first 10-11-11-12-14-15 stitches (= half back piece), skip the next 8 stitches (= sleeve), insert the next thread here, skip the next 21-23-23-25-29-31 stitches (= front piece), insert the next thread here, skip the next 8 stitches (= sleeve), insert the last thread here; there are 11-12-12-13-15-16 stitches between the last marker thread and beginning of round (= half back piece). Change to circular needle size 8 mm. Continue with stocking stitch and work STRIPES-1 – read description above. At the same time on the first round begin to increase to RAGLAN – read description above. Increase like this every 2nd round a total of 12-13-15-16-16-17 times = 154-166-182-194-202-214 stitches. Then continue to increase every 2nd round on the front and back pieces (do not increase further on the sleeves = 4 stitches increased on round) 2-2-2-2-3-4 more times = 162-174-190-202-214-230 stitches. Continue working without increasing until the piece measures 21-23-25-27-29-31 cm from the marker. The next round is worked as follows: Work the first 24-26-28-30-33-36 stitches (= half back piece), place the next 32-34-38-40-40-42 stitches on 1 thread for sleeve and cast on 6-6-6-8-8-8 new stitches on the needle (= in side under sleeve), work the next 49-53-57-61-67-73 stitches (= front piece), place the next 32-34-38-40-40-42 stitches on 1 thread for sleeve and cast on 6-6-6-8-8-8 new stitches on the needle (= in side under sleeve) and work the remaining 25-27-29-31-34-37 stitches (= half back piece). THE PIECE IS NOW MEASURED FROM HERE. BODY: = 110-118-126-138-150-162 stitches. Continue in the round with stocking stitch and STRIPES-1. When the piece measures 20 cm, place half the stitches; i.e. the stitches for the front piece, on a thread = 55-59-63-69-75-81 stitches. Continue back and forth over the remaining 55-59-63-69-75-81 stitches (back piece). On the next 2 rows cast on 1 stitch at the end of the row for edge stitches = 57-61-65-71-77-83 stitches. The edge stitches are worked in GARTER STITCH – read description above. When the piece measures 31 cm increase 7-7-11-13-15-17 stitches evenly spaced – remember INCREASE TIP = 64-68-76-84-92-100 stitches. Change to circular needle size 6 mm and work rib as follows: 1 edge stitch in garter stitch, (knit 2 / purl 2) until there are 3 stitches left, knit 2 and finish with 1 edge stitch in garter stitch. When the rib measures 4 cm cast off with knit over knit and purl over purl. Cut and fasten the strand. The back piece measures approx. 60-62-64-66-68-70 cm from the shoulder down. Place the 55-59-63-69-75-81 stitches from the thread back on circular needle size 8 mm and continue with 3 strands light grey to finished length. Work 2 rows stocking stitch where you increase 7-7-11-13-15-17 stitches evenly spaced at the same time as you cast on 1 stitch at the end of these 2 rows for edge stitches = 64-68-76-84-92-100 stitches. Change to circular needle size 6 mm and work rib as follows: 1 edge stitch in garter stitch, (knit 2 / purl 2) until there are 3 stitches left, knit 2 and finish with 1 edge stitch in garter stitch. When the rib measures 4 cm cast off with knit over knit and purl over purl. You can sew the split together in each side if you wish. The front piece is approx. 10 cm shorter than the back piece and measures approx. 50-52-54-56-58-60 cm from the shoulder down. SLEEVE: Place the 32-34-38-40-40-42 stitches from the thread on the one side of the piece on short circular needle/double pointed needles size 8 mm and knit up 1 stitch in each of the 6-6-6-8-8-8 stitches cast on under the sleeve = 38-40-44-48-48-50 stitches. Insert a marker thread in the middle of the new stitches (= 3-3-3-4-4-4 new stitches on each side of the thread). Work stocking stitch and STRIPES-2; at the same time when the sleeve measures 4 cm decrease 2 stitches under the sleeve - read DECREASE TIP. Decrease like this every 4½-3½-3-2-2-2 cm a total of 7-8-9-11-10-11 times = 24-24-26-26-28-28 stitches. When the piece measures 37-35-34-33-31-31 cm (shorter measurements in larger sizes due to longer yoke) increase 4-4-6-6-8-8 stitches evenly spaced = 28-28-32-32-36-36 stitches. Change to double pointed needles size 6 mm and work rib (= knit 2 / purl 2) for 4 cm. Cast off with knit over knit and purl over purl. Cut and fasten the strands. The sleeve measures approx. 41-39-38-37-35-35 cm from the division. Work the other sleeve in the same way. |
|
 |
|
Have you finished this pattern?Tag your pictures with #dropspattern #forestshadowssweater or submit them to the #dropsfan gallery. Do you need help with this pattern?You'll find 28 tutorial videos, a Comments/Questions area and more by visiting the pattern on garnstudio.com. © 1982-2026 DROPS Design A/S. We reserve all rights. This document, including all its sub-sections, has copyrights. Read more about what you can do with our patterns at the bottom of each pattern on our site. |
|


With over 40 years in knitting and crochet design, DROPS Design offers one of the most extensive collections of free patterns on the internet - translated to 17 languages. As of today we count 324 catalogues and 12290 patterns translated into English (UK/cm). 12290
We work hard to bring you the best knitting and crochet have to offer, inspiration and advice as well as great quality yarns at incredible prices! Would you like to use our patterns for other than personal use? You can read what you are allowed to do in the Copyright text at the bottom of all our patterns. Happy crafting!
Post a comment to pattern DROPS 207-15
We would love to hear what you have to say about this pattern!
If you want to leave a question, please make sure you select the correct category in the form below, to speed up the answering process. Required fields are marked *.