
Popular categories
Looking for a yarn?


Comments / Questions (21)
![]() Afifah Stevenson wrote:
Afifah Stevenson wrote:
Hi,I just start do the (PM)15,6,23,6,15. and continue to the pattern A.1A it's say 11sts still have 4sts left before increased raglan,and the sleeve and inc and work A.1B 11sts, and A.1A 11sts,inc, work sleeve, inc and work A.1A 11sts. My question front side 15sts, the diagram is 11sts, what should I do with the rest of 4sts? Thank you so much
13.01.2026 - 19:17DROPS Design answered:
Dear Mrs Stevenson, note that the markers should be inserted in each 1 stitch (and not between stitches), so that you should have: 15,1,6,1,23,1,6,1,15 (= 69 sts). Happy knitting!
27.02.2026 - 14:06
![]() Afifah wrote:
Afifah wrote:
Hi l need help, the first increased Tip. So 49÷12=4, mean increased every stitches? But total will be (61),but at the yoke space required (15,6,23,6,15=65) I only have 61 stitches by increased 12, how I solving this?it will work if I increased 16 instead of 12. But I would like get help from the person who created this patterns. Thank you
13.01.2026 - 05:16DROPS Design answered:
Hi Afifah, You make 1 yarn over after every 4th stitch but only across the stitches between the bands. So you work the band without increasing, then increase after every 4th stitch across the next 49 stitches and finally work the second band without increasing. Your 49 stitches increase to 61 + 8 (the bands) = 69 stitches in total. Hope this helps. Regards, Drops Team.
13.01.2026 - 06:42
![]() Elisabeth wrote:
Elisabeth wrote:
Bonjour. Je recherche le même modèle mais en version pull. Merci d'avance. Bonne journée
04.01.2026 - 09:40DROPS Design answered:
Bonjour Elisabeth, il y en a un, mais plus fin, a voir ICI. Bon tricot!
04.01.2026 - 09:54
![]() Nicole wrote:
Nicole wrote:
Hallo Ihr Lieben! Ich stricke die Größe XL und tue mich gerade schwer mit der Einarbeitung der Diagramme A4 und A5 - wenn ich das richtig verstanden habe, stricke ich die nur einmal in Reihe 25, oder? Weil ich bis dahin ja Ragelan-Zunahmen habe. \\r\\n\\r\\nUnd wie geht es dann am Übergang von Passe auf Rumpfteil mit diesen Mustern weiter? Fallen sie weg? Denn wenn ich nach den 12 zugenommenen Ärmelmaschen mit A2B starte, müsste ich ja rechts starten - mein Muster ist da aber links.
07.11.2025 - 09:55DROPS Design answered:
Liebe Nicole, wenn mann die 185 Maschen hat, sind die Raglan-Zunahmen fertig, aber die Länge/Höhe hat man noch nicht erreicht, so wird man das Muster weiterstricken aber bei den Markierungen A.4 und A.5 stricken damit die Löcher forsetzen ohne die Maschenanzahl zu ändern; die mittlere Masche A.4/A.5 muss die Masche mit der Markierung sein. So beginnen Sie A.4/A.5 wenn 2 Maschen übrig vor dieser Maschen sind. Viel Spaß beim Stricken!
18.11.2025 - 11:23
![]() Brenda wrote:
Brenda wrote:
Is this pattern available for knitting in the round, and steeking the front?
27.09.2025 - 13:07DROPS Design answered:
Hi Brenda, it is not. If you are experimented enough to do so, you can give it a try :) Happy knitting!
28.09.2025 - 09:46
![]() Nathalie wrote:
Nathalie wrote:
Bonsoir, Je fais le modèle en XXL mais dans la légende il manque une explication concernant le triangle rectangle avec la pente noire descendante vers la droite. Je suppose donc que c'est un surjet. Ai-je raison ? Merci d'avance. Cordialement PS : J'en profite pour vous remercier pour tous ces modèles .
12.12.2022 - 22:08DROPS Design answered:
Bonjour Nathalie, le surjet étant le 6ème symbole, je pencherai plutôt pour 2 mailles ensemble à l'envers - ce qui colle avec le nombre de mailles envers au rang suivant, nos stylistes vont vérifier et faire une correction, merci pour votre retour. Bon tricot!
13.12.2022 - 08:13
![]() Marina Druzhkova wrote:
Marina Druzhkova wrote:
Hello! Are there any knit stitches at the sides of the body? I see ones by the photo, where the marker thread sits.
29.07.2021 - 20:46DROPS Design answered:
Dear Mrs Druzhkova, the stitches cast on mid under each sleeve are worked in reversed stocking stitch (purl from right side and knit from wrong side), the knit stitch you can see on the photo is the first stitch in A.2B (at the beg of pattern on back piece, size S/M/L/XL - Happy knitting!
30.07.2021 - 08:14
![]() Kathi wrote:
Kathi wrote:
Auf den Fotos sind die Ärmel glatt rechts gestrickt. In der Anleitung schreiben Sie glatt links. Lese ich das nicht richtig? Wie sieht denn der Rücken aus?
12.10.2020 - 05:54DROPS Design answered:
Liebe Kathi, die Ärmel werden glatt rechts gestrickt (Anleitung wird angepasst,danke fûr den Hinweis) - Rückenteil wird mt A.1B, 1 M glatt links und A.1A gestrickt. Viel Spaß beim stricken!
12.10.2020 - 08:55
![]() Marina wrote:
Marina wrote:
Hello! I don't understand, neck is finished: "purl 1 row from the right side where you increase stitches ...." And Yoke starts from the right side, after we insert all markers. Where is the row from the wrong side between them?
16.04.2020 - 02:40DROPS Design answered:
Hi Marina, The instructions should be 'purl 1 row from the wrong side....'. Apologies and happy knitting!
16.04.2020 - 07:16
![]() Anne wrote:
Anne wrote:
Bonjour, Je fais le gilet en taille XL. Après les augmentations du dernier rang d'encolure , il y a 69 mailles. Problème : la mise en place des marqueurs (15 +6+23+6+15) donne un total de 65 mailles. Il faut répartir différemment ... mais comment ?
31.10.2019 - 19:36DROPS Design answered:
Bonjour Anne, les marqueurs doivent chacun être placés dans une maille, vous aurez ainsi: 15 + 1 + 6+ 1 + 23 +1 + +6 + 1 +15 = 69 mailles. Bon tricot!
04.11.2019 - 14:20
|
||||||||||||||||||||||||||||
Wistful#wistfuljacket |
||||||||||||||||||||||||||||
 |
 |
|||||||||||||||||||||||||||
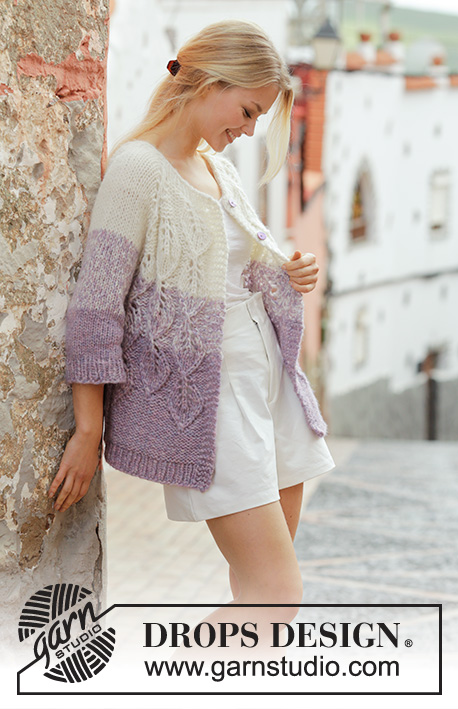
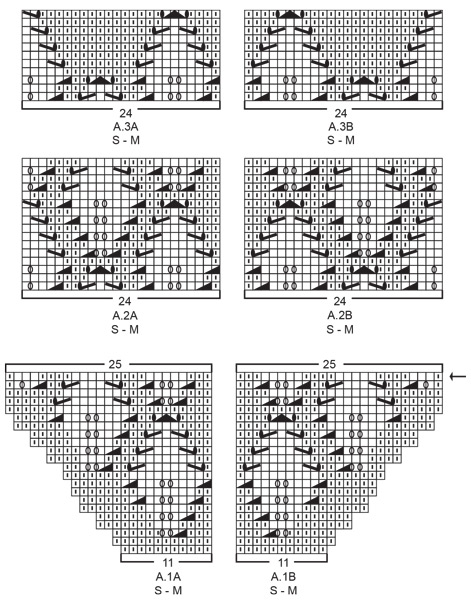
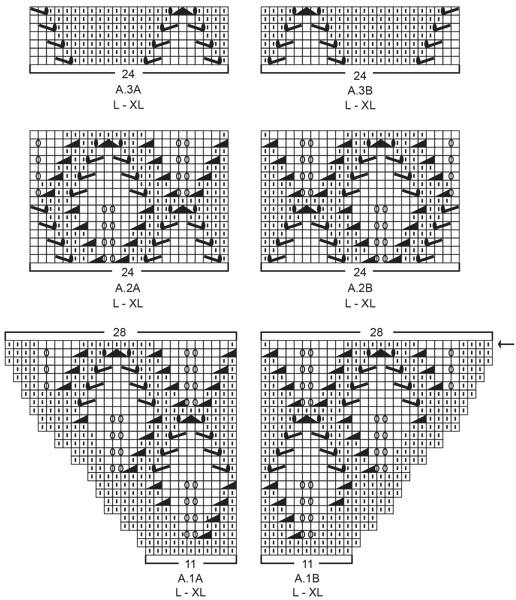
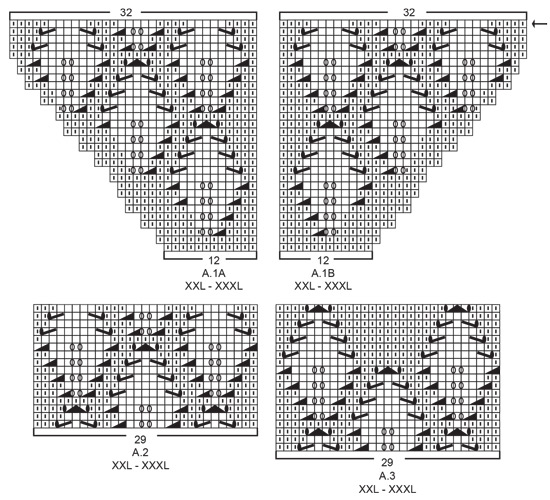
Jacket with leaf pattern and stripes, worked in 2 strands DROPS Air or 2 strands DROPS Brushed Alpaca Silk. The piece is worked top down with ¾-length sleeves. Sizes S - XXXL.
DROPS 201-9 |
||||||||||||||||||||||||||||
|
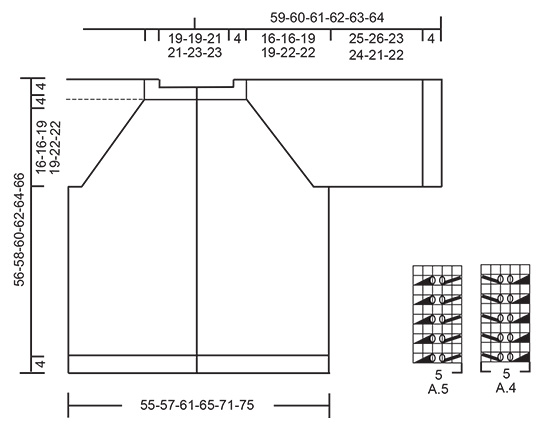
------------------------------------------------------- EXPLANATIONS FOR THE PATTERN: ------------------------------------------------------- RIDGE/GARTER STITCH (worked back and forth): Knit all rows. 1 ridge in height = Knit 2 rows INCREASE TIP (evenly spaced): To work out how to increase evenly, count the total number of stitches on needle (e.g. 57 stitches), minus the bands (e.g. 8 stitches) and divide the remaining 49 stitches with number of increases to be made (e.g. 12) = 4.1. In this example, increase by making 1 yarn over after approx. each 4th stitch - do not increase on bands. On the next row work yarn overs twisted to avoid holes. PATTERN: See diagrams A.1 to A.5. Choose diagram for your size (applies to A.1 to A.3). Diagrams show all the rows in the pattern seen from the right side. STRIPES: The whole garment is worked in 2 strands Air or 2 strands Brushed Alpaca Silk. On the yoke you use 2 strands off-white until the piece measures approx. 23-23-23-23-28-28 cm from the cast-on edge – finish after a whole/half leaf in height. Then on the body you use 1 strand off-white + 1 strand purple haze/light lavender until the piece measures approx. 34-34-34-34-39-39 cm from the cast-on edge – finish after a whole/half leaf in height. Then work with 2 strands purple haze/light lavender to finished length. The sleeves are worked with 1 strand off-white + 1 strand purple haze/light lavender until this stripe measures approx. 15-14-14-14-12-12 cm. Then work with 2 strands purple haze/light lavender to finished length. RAGLAN: All increases are worked from the right side! Increase to raglan in each transition between body and sleeves as follows: Start just before the stitch with marker, make 1 yarn over, knit stitch with marker from right side and purl it from wrong side (= raglan-stitch), 1 yarn over (= 2 stitches increased at marker and a total of 8 stitches increased on row). On next row knit the yarn overs towards the front/back pieces from the wrong side and purl the yarn overs towards the sleeves from the wrong side (there will be holes). BUTTONHOLES: Work buttonholes on right band (when garment is worn). Work from the right side when there are 3 stitches left on row as follows: 1 yarn over, knit 2 together and knit 1. On the next row (wrong side) knit the yarn over to leave a hole. The first buttonhole is worked when the neck measures approx. 1½-2 cm. Then the next 4-4-5-5-5-5 buttonholes are worked with approx. 9-9-8-8-9-9 cm between each one. ------------------------------------------------------ START THE PIECE HERE: ------------------------------------------------------- JACKET - SHORT OVERVIEW OF THE PIECE: Neck and yoke are worked back and forth with circular needle from mid front, top down. The yoke is divided for body and sleeves. The body is continued back and forth with circular needle from mid front, top down. Sleeves are worked in the round with double pointed needles, top down. NECK: Cast on 57-57-61-61-65-65 stitches (including 4 band stitches on each side towards mid front) with circular needle size 8 mm and 2 strands off-white Air or 2 strands off-white Brushed Alpaca Silk. Purl 1 row from the wrong side. The next row is worked as follows from the right side: 4 band stitches in GARTER STITCH – read description above, * knit 1, purl 1 *, work from *-* until there are 5 stitches left on row, knit 1 and finish with 4 band stitches in garter stitch. Continue this rib for 4 cm – remember BUTTONHOLES on right band – read description above. Purl 1 row from the right side where you increase 12-12-8-8-8-8 stitches evenly spaced – read INCREASE TIP = 69-69-69-69-73-73 stitches. Then work yoke as described below. YOKE: Change to circular needle size 9 mm. Insert 4 markers in the piece as described below (without working the stitches). The markers will be used when increasing to raglan. Count 15-15-15-15-16-16 stitches (= front piece), insert first marker in the next stitch, count 6 stitches (= sleeve), insert 2nd marker in next stitch, count 23-23-23-23-25-25 stitches (= back piece), insert 3rd marker in next stitch, count 6 stitches (= sleeve) and insert 4th marker in next stitch. There are 15-15-15-15-16-16 stitches left after last marker (front piece). The next row is worked as follows from the right side: 4 band stitches in garter stitch, work A.1A (= 11-11-11-11-12-12 stitches), increase to RAGLAN on each side of stitch with marker (raglan-stitch) – read description above, work stocking stitch with right side out over the stitches on sleeve and as far as the next raglan-stitch, increase to raglan on each side of raglan-stitch, work A.1B (= 11-11-11-11-12-12 stitches), work 1 stitch stocking stitch with wrong side out, A.1A (= 11-11-11-11-12-12 stitches), increase on each side of raglan-stitch, work stocking stitch with right side out over the sleeve as far as the next raglan-stitch, increase on each side of the raglan-stitch, work A.1B (= 11-11-11-11-12-12 stitches) and finish with 4 band stitches in garter stitch towards mid front. Continue this pattern and increase to raglan every 2nd row (i.e. each row from right side) a total of 9-9-12-12-13-13 times (including the first increase described in text) – the increased stitches on front and back pieces are worked into the pattern as you go as shown in A.1. On the sleeves the increased stitches are worked in stocking stitch with right side out. REMEMBER THE KNITTING TENSION and read STRIPES! When the increases to raglan are finished there are 161-161-185-185-205-205 stitches on the needle. Continue with pattern as shown in diagram, but to avoid the lace pattern on each side of the raglan-line being broken when the increases are finished, work A.4 at markers 1 and 3 and A.5 at markers 2 and 4 (stitch with markers should match mid-stitches in A.4/A.5). Work until the last row in A.1 remains. Now divide the yoke for body and sleeves as follows: Work 29-29-32-32-36-36 stitches as before (= front piece), place the next 26-26-32-32-34-34 stitches on 1 thread for sleeve, cast on 4-6-4-8-6-10 new stitches on the needle (= in side under sleeve), work 51-51-57-57-65-65 stitches as before (= back piece), place the next 26-26-32-32-34-34 stitches on 1 thread for sleeve, cast on 4-6-4-8-6-10 new stitches on the needle (= in side under sleeve) and work the remaining 29-29-32-32-36-36 stitches as before (= front piece). The yoke measures approx. 20-20-23-23-26-26 cm from the cast-on edge mid front. Body and sleeves are finished separately. THE PIECE IS NOW MEASURED FROM HERE! BODY: = 117-121-129-137-149-157 stitches. Insert 1 marker thread 31-32-34-36-39-41 stitches in from each side (= 55-57-61-65-71-75 stitches between marker threads on back piece). The marker threads mark the sides of the body. First row worked as follows from the right side (with 1 strand off-white + 1 strand purple haze/light lavender): SIZES S, M, L and XL: Work 4 band stitches in garter stitch, A.2A (= 24 stitches), 6-8-12-16 stitches in stocking stitch with wrong side out (marker thread sits in middle of these stitches), work A.2B (= 24 stitches), 1 stitch in stocking stitch with wrong side out, work A.2A (= 24 stitches), 6-8-12-16 stitches stocking stitch with wrong side out (marker thread sits in middle of these stitches) work A.2B (= 24 stitches) and finish with 4 band stitches in garter stitch towards mid front. Continue this pattern – remember STRIPES. When A.2 has been worked a total of 2 times in height, work A.3A over A.2A and A.3B over A.2B (the other stitches are continued as before). When A.3 has been worked 1 time in height, work stocking stitch with wrong side out and 4 band stitches in garter stitch on each side until the piece measures 28-30-29-31 cm from the division (or to desired length; there is 4cm left to finished length). Then work rib-body as described below. SIZES XXL and XXXL: Work 4 band stitches in garter stitch, 1-1 stitch in stocking stitch with wrong side out, work A.2 (= 29 stitches), 11-15 stitches in stocking stitch with wrong side out (marker thread sits in middle of these stitches with 6-8 purled stitches towards back piece and 5-7 purled stitches towards front piece), work A.2 (= 29 stitches), 1 stitch in stocking stitch with wrong side out, A.2 (= 29 stitches), 11-15 stitches in stocking stitch with wrong side out (marker thread sits in middle of these stitches), work A.2 (= 29 stitches), 1-1 stitch in stocking stitch with wrong side out and finish with 4 band stitches in garter stitch towards mid front. Continue this pattern – remember STRIPES. When A.2 has been worked 1 time in height, work A.3 over A.2 (the other stitches are continued as before). When A.3 has been worked 1 time in height work stocking stitch with wrong side out and 4 band stitches in garter stitch on each side until the piece measures 30-32 cm from the division (or to desired length; there is 4cm left to finished length). Then work rib-body as described below. RIB-BODY: = 117-121-129-137-149-157 stitches. Knit 1 row from the right side over all stitches. Change to circular needle size 8 mm. The next row is worked as follows from the wrong side: 4 band stitches in garter stitch, * purl 1, knit 1 *, work from *-* until there are 5 stitches left on row, purl 1 and finish with 4 band stitches in garter stitch. Continue this rib for 4 cm. Loosely cast off with garter stitch over garter stitch, knit over knit and purl over purl. The jacket measures approx. 56-58-60-62-64-66 cm from the shoulder down. SLEEVE: Place the 26-26-32-32-34-34 stitches from the thread on the one side of the piece on double pointed needles size 9 mm and knit up 1 stitch in each of the 4-6-4-8-6-10 stitches cast on under the sleeve, with 1 strand off-white and 1 strand purple haze/light lavender (= 2 strands) = 30-32-36-40-40-44 stitches. Work stocking stitch in the round with right side out. When the stripe with off white + purple haze/light lavender measures 15-14-14-14-12-12 cm, change to 2 strands purple haze/light lavender, Continue with stocking stitch in the round until the piece measures 25-26-23-24-21-22 cm from the division (or to desired length; there is 4 cm left to finished length. NOTE: Shorter measurements in larger sizes due to wider neck and longer yoke). Knit 1 round. Change to double pointed needles size 8 mm and work rib in the round (= knit 1 / purl 1) for 4 cm. Loosely cast off with knit over knit and purl over purl. The sleeve measures approx. 29-30-27-28-25-26 cm from the division. Work the other sleeve in the same way. ASSEMBLY: Sew buttons onto left band. |
||||||||||||||||||||||||||||
Diagram explanations |
||||||||||||||||||||||||||||
|
||||||||||||||||||||||||||||
 |
||||||||||||||||||||||||||||
 |
||||||||||||||||||||||||||||
 |
||||||||||||||||||||||||||||
 |
||||||||||||||||||||||||||||
Have you finished this pattern?Tag your pictures with #dropspattern #wistfuljacket or submit them to the #dropsfan gallery. Do you need help with this pattern?You'll find 33 tutorial videos, a Comments/Questions area and more by visiting the pattern on garnstudio.com. © 1982-2026 DROPS Design A/S. We reserve all rights. This document, including all its sub-sections, has copyrights. Read more about what you can do with our patterns at the bottom of each pattern on our site. |
||||||||||||||||||||||||||||


With over 40 years in knitting and crochet design, DROPS Design offers one of the most extensive collections of free patterns on the internet - translated to 17 languages. As of today we count 324 catalogues and 12290 patterns translated into English (UK/cm). 12290
We work hard to bring you the best knitting and crochet have to offer, inspiration and advice as well as great quality yarns at incredible prices! Would you like to use our patterns for other than personal use? You can read what you are allowed to do in the Copyright text at the bottom of all our patterns. Happy crafting!
Post a comment to pattern DROPS 201-9
We would love to hear what you have to say about this pattern!
If you want to leave a question, please make sure you select the correct category in the form below, to speed up the answering process. Required fields are marked *.