
Popular categories
Looking for a yarn?


Comments / Questions (196)
![]() Monique BOGEN wrote:
Monique BOGEN wrote:
Bonjour, J'ai tricoté les 7 motifs A4 et je suis bloquée au (marqueur au milieu dos) est-ce en bas? ou les 94 mailles en attente, ou celles laissées dans les rangs raccourcis. Je ne m'y retrouve pas. Merci de me guider Bien cordialement
08.03.2019 - 19:13
![]() Pacaïto wrote:
Pacaïto wrote:
Bonjour, Superbe ce modèle et Je souhaiterai réaliser ce modèle mais plus court... A quel niveau dois je enlever des rangs ? Merci de vos réponses et bravo pour ce modèle. Bien cordialement
06.03.2019 - 16:54DROPS Design answered:
Bonjour Mme Pacïto, nous ne sommes malheureusement pas en mesure de pouvoir adapter chacun de nos modèles à chaque demande. Pour toute assistance personnelle, merci de bien vouloir contacter votre magasin DROPS, même par mail ou téléphone. Bon tricot!
07.03.2019 - 08:38
![]() Willekens wrote:
Willekens wrote:
Bonjour à toute l'équipe et aux dames qui ont eu un gros coup de coeur pour ce modèle. J'ai commencé mon pull le 4-févr car n'y tenant plus (j'avais les doigts qui me démangeait ;-) ) et je l'ai terminé le 18-févr. J'ai adoré le faire tant la laine est douce et agréable et les explications super bien faites. Merci, merci, merci... Aux créateurs des modles. A très bientôt, Vinciane
06.03.2019 - 09:37
![]() Claudine QUERE wrote:
Claudine QUERE wrote:
Bonjour...Je souhaite tricoter ce modèle 194-17 magnifique mais pas facile (!)... Avant de commander la laine une question, j'aimerais savoir si, en cours de tricot, il est toujours possible, pour ce modèle de vous poser des questions.....Merci....
05.03.2019 - 11:31DROPS Design answered:
Bonjour Mme Quere, tout à fait, vous pouvez poser votre question à tout moment lors de la réalisation de votre veste. Pour toute assistance individuelle, vous pouvez également contacter votre magasin - même par mail ou téléphone. Bon tricot!
05.03.2019 - 11:51
![]() Monique BOGEN wrote:
Monique BOGEN wrote:
Bonjour Je suis arrivée aux rangs raccourcis de la veste et la je bloque littéralement. est ce que ces rangs forment l arrondi de la veste? j'ai visualisé plusieurs tutos mais certains different et je suis un peu perdu. (Est ce que je dois jamais tricoter les dernieres mailles? un rang sur deux comme dans une brassiere par exemple)? Je vous remercie de bien vouloir m'éclairer. Bien cordialement, Monique Bogen
04.03.2019 - 09:57DROPS Design answered:
Bonjour Mme Bogen, quand on tricote les rangs raccourcis du bas de la veste, on n'arrête de tricoter les mailles indiquées (3 m à la fin du rang 1), on tourne et on tricote le rang suivant jusqu'à ce qu'il reste 3 m avant le fil marqueur, on tourne et on continue ainsi en tricotant toujours 3 m en moins à la fin de chaque rang (n'oubliez pas d'augmenter). Toutes les mailles tricotées vont former l'arrondi du bas de la veste (puis des devants), et les mailles non tricotées seront ensuite reprises pour tricoter la bordure finale. Bon tricot!
04.03.2019 - 11:42
![]() Roberta Courtney wrote:
Roberta Courtney wrote:
Thanks for this - will this eventually take into account the stitcehs on the thread at the neck or what happens to them?
26.02.2019 - 14:30DROPS Design answered:
Dear Mrs Courtney, the sts already on thread from first short rows will remain on the same thread, there will just be more sts on thread, but then at the very end, you will work an edge over all sts from circle/short rows and work 2 ridges all around the jacket. Happy knitting!
26.02.2019 - 15:47
![]() Roberta Courtney wrote:
Roberta Courtney wrote:
I am really confused. I am working over the bottom left front piece. Where exactly am i meant to stat this and where am i meant too go to. Where do the stitches on the thread come into play because as it stands at the minute there is no way they ar going to make the collar that is shown in the picture so are they added to in this back and forth rounds.
26.02.2019 - 12:41DROPS Design answered:
Dear Mrs Courtney, you start left front piece from RS as before (after last row from WS, turn and start left front piece here) towards the marker mid on bottom of the jacket until 4 sts remain before the cable/A.4. Turn and work next row from WS until 3 sts more remain on needle (as before), turn and continue working back and forth leaving 4 more sts at the end of row from RS and 3 sts more at the end of row from WS (remember to increase from WS as stated). Happy knitting!
26.02.2019 - 14:24
![]() Nadine Leycuras wrote:
Nadine Leycuras wrote:
Bonjour, je ne comprends pas devant et bas de la veste, les 42 rangs faits, rang1 : tricoter jusqu'à ce qu'il reste 4m avant la torsade...autre côté en sens inverse, ça va faire la torsade non tricoter donc toute une bande non tricoter ?
22.02.2019 - 11:23DROPS Design answered:
Bonjour Mme Leycuras, après le cercle, on tricote maintenant les bordures devants et dos (l'arrondi que l'on voit dans le schéma), et pour ce faire, on tricote des rangs raccourcis (pour former le col), quand vous tricotez jusqu'à ce qu'il reste 4 m avant la torsades, vous tournez à cet endroit, cette torsade ne sera effectivement plus tricotée. Bon tricot!
22.02.2019 - 14:51
![]() Nadine Leycuras wrote:
Nadine Leycuras wrote:
Bonjour. A1fini. Quand on commence A3, au début il n'y a pas assez de rangs au dessus des 22m emmanchures pour tricoter en piquant l'aiguille dans la maille 4 rang plus bas. Aurais je mon nombre de maille final : 352. Merci
12.02.2019 - 16:05DROPS Design answered:
Bonjour Mme Leycuras, quand A.1 est terminé, on tricote A.2 et on rabat les mailles des emmanchures au dernier rang de A.2, on tricote ensuite A.3 au tour suivant. Au 3ème tour de A.3, tricotez le motif central en piquant l'aiguille dans la maille montée au 1er rang de A.3 au-dessus des emmanchures (n'oubliez pas les jetés) et continuez comme avant. Bon tricot!
13.02.2019 - 08:47
![]() Nadine Leycuras wrote:
Nadine Leycuras wrote:
Merci beaucoup. C'est 8 fois en largeur et non en hauteur (comme je pensais)
11.02.2019 - 11:05
|
|||||||||||||||||||||||||||||||
Empress#empressjacket |
|||||||||||||||||||||||||||||||
 |
 |
||||||||||||||||||||||||||||||
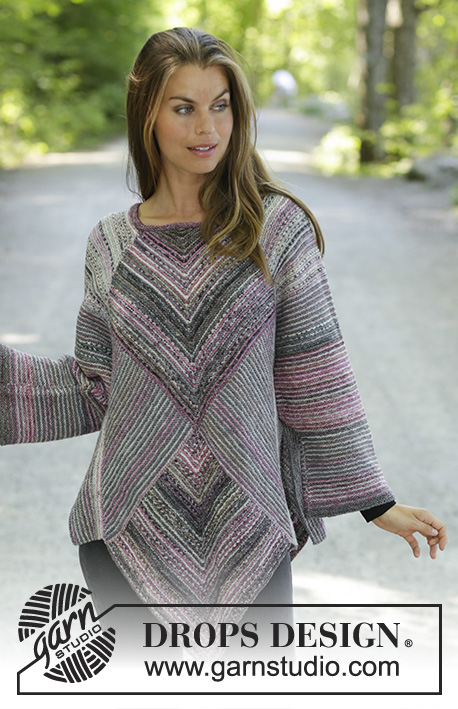
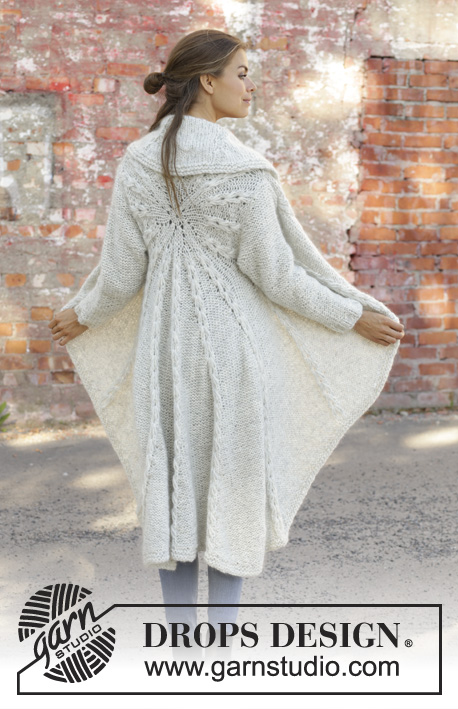
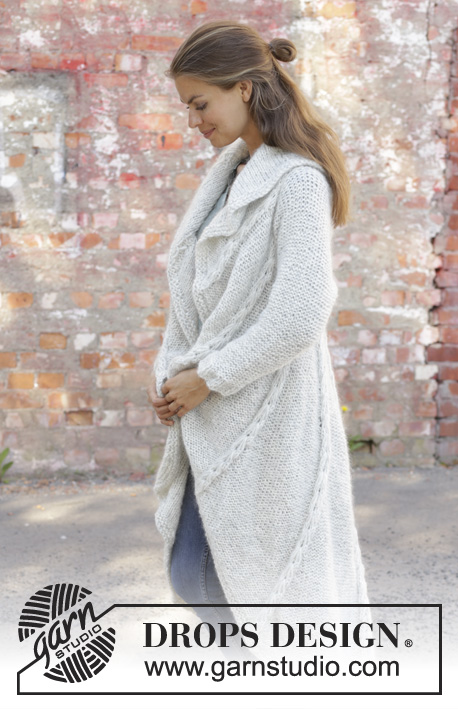
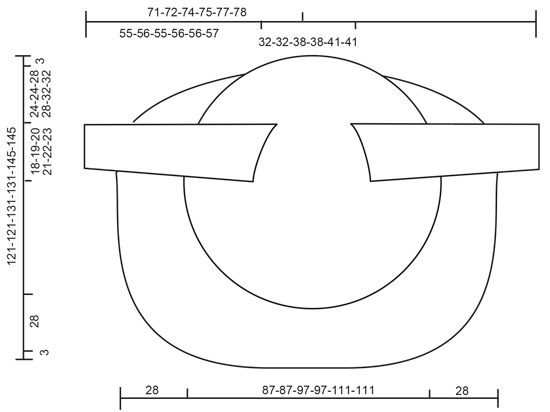
Knitted long circle jacket in 1 strand DROPS Air and 1 strand DROPS Brushed Alpaca Silk. The piece is worked in the round in a circle with texture. Sizes S - XXXL.
DROPS 194-17 |
|||||||||||||||||||||||||||||||
|
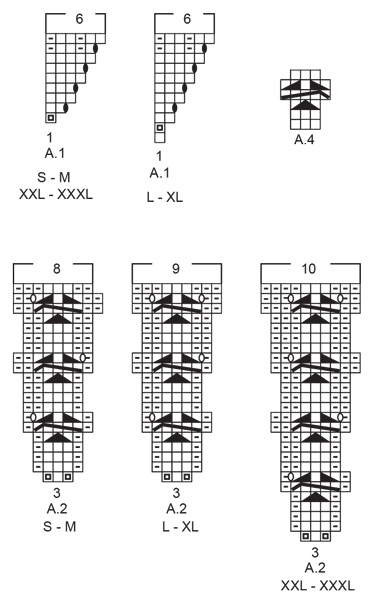
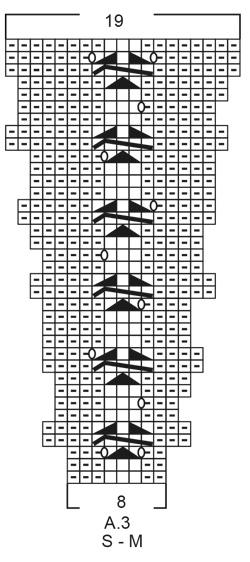
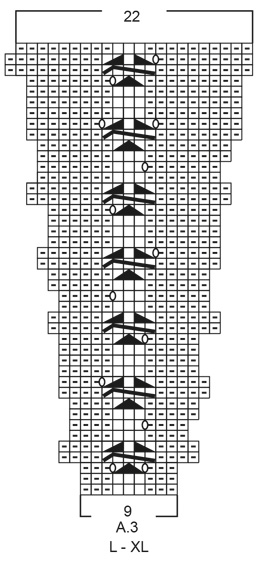
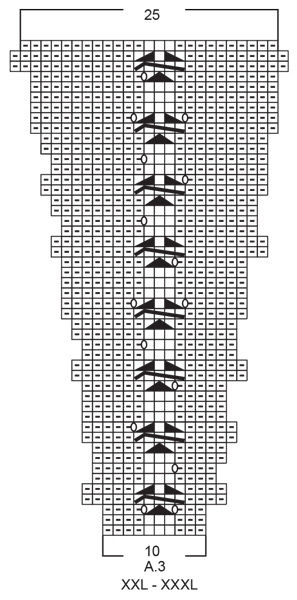
------------------------------------------------------- EXPLANATIONS FOR THE PATTERN: ------------------------------------------------------- RIDGE/GARTER STITCH (worked in the round): 1 ridge = 2 rounds. Knit 1 round and purl 1 round. RIDGE/GARTER STITCH (worked back and forth): 1 ridge = knit 2 rows. PATTERN: See diagrams A.1 to A.4. Choose diagram for your size. The diagrams show all the rows in the pattern seen from the right side! DECREASE TIP (for sleeves): All decreases are made from the side in purl! Decrease 1 stitch by purling 2 stitches together ------------------------------------------------------- START THE PIECE HERE: ------------------------------------------------------- CIRCLE JACKET - SHORT OVERVIEW OF THE PIECE: The piece is worked in the round in a circle from the middle of the back outwards. Change to circular needle(s) when necessary. Then work back and forth with short rows for the front pieces and down the back. The sleeves are worked top down in stocking stitch with the wrong side out. Because of the weight of the yarn, the garment will stretch somewhat after use. CIRCLE JACKET: CIRCLE: Cast on 8 stitches with double pointed needles size 8 mm and 1 strand Air and 1 strand Brushed Alpaca Silk (= 2 strands). Divide the stitches between 4 needles so that there are 2 stitches on each. Insert a marker thread at the beginning of the round. Allow the marker thread to follow your work onwards. Work pattern in the round according to A.1 – choose diagram for your size, a total of 8 times on the round. REMEMBER THE KNITTING TENSION! When A.1 is finished, there are 48 stitches on the round. Now work pattern as follows: Work A.2 – choose diagram for your size, a total of 16 times on the round. After the next-to-last round in A.2 there are 128-128-144-144-160-160 stitches on the round. The last round in A.2 is worked as follows: Work the first 39-39-45-45-49-49 stitches (there is now 1-1-0-0-1-1 stitch left in the last repeat of A.2 worked), insert a new marker thread here (follows your work onwards and is later used when you work short rows from the front pieces and down the body on the back piece), cast off the next 20-21-22-23-24-25 stitches (= armhole), work the next 49-47-55-53-63-61 stitches, cast off the last 20-21-22-23-24-25 stitches (= armhole). The piece measures approx. 39-39-41-41-47-47 cm in diameter. The next round is worked as follows: Work A.3 – choose diagram for your size (= 8-8-9-9-10-10 stitches on the first round in the diagram) a total of 16 times on the round and at the same time cast on 20-21-22-23-24-25 new stitches on the needle where the stitches were cast off for the armholes = 128-128-144-144-160-160 stitches. Continue in the round with A.3 until the whole diagram has been completed in height. There are now 304-304-352-352-400-400 stitches on the round. The piece measures approx. 87-87-97-97-111-111 cm in diameter. Cut the strand. Place the first 94-94-110-110-124-124 stitches on the round (= stitches between the 2 marker threads) on a thread. FRONT PIECES AND DOWN THE BODY: There are now 210-210-242-242-276-276 stitches for the front pieces and down the body on the back piece. Start from the right side after the second marker thread and work short rows back and forth for the front pieces and down the body on the back piece as follows: ROW 1 (right side): Purl over purl and work A.4 (= 3 stitches) over each cable until there are 3 stitches left before the next marker thread (i.e. start of round), turn. ROW 2 (wrong side): Work back until there are 3 stitches left before the marker thread, turn. ROW 3: Purl over purl and work A.4 over each of the cables until there are 6 stitches left before the marker thread, AT THE SAME TIME increase 1 purled stitch after each cable/A.4, turn. ROW 4: Work back until there are 6 stitches left before the marker thread, turn. Continue back and forth like this by working 3 fewer stitches than the previous row and increase 1 stitch after each cable/A.4 every 4th row until you have worked 7 repeats of A.4 in height (= 42 rows). The piece measures approx. 72-72-77-77-84-84 cm from the middle of the circle and down mid back. The last row is worked from the wrong side. Do not cut the strand. Insert a marker thread in the middle cable/A.4 mid back of jacket. Continue back and forth with pattern as before over the bottom of the left front piece as follows: ROW 1 (right side): Work until there are 4 stitches left before the cable/A.4 with the marker thread mid back, turn. ROW 2 (wrong side): Work until there are 3 more stitches left before the marker thread than the previous row (start of round), AT THE SAME TIME increase 1 purled stitch after each cable/A.4, turn. ROW 3 (right side): Work until there are 4 more stitches than last time left before the cable/A.4 with the marker thread mid back, turn. ROW 4 (wrong side): Work until there are 3 more stitches before the marker thread than the previous row, turn. Continue back and forth with pattern and increase after each cable/A.4 every 4th row until you have worked 3 repeats of A.4 in height (= 18 rows). Cut the strand. Start from the right side and after A.4/mid back and work short rows back and forth over the bottom of the right front piece in the same way, but reversed, i.e. each row from the wrong side is turned when there are 4 more stitches before the cable/A.4 with the marker thread mid back than the previous time and on each row from the right side is turned when there are 3 more stitches left than the previous time. EDGE: Place all stitches on the circle back on circular needle and work 2 RIDGES – read description above, around the whole circle. Cast off, but to avoid the cast-off edge being tight you can make 1 yarn over after approx. each 5th stitch - the yarn overs are cast off as normal stitches. SLEEVE: The sleeve is worked in stocking stitch with the wrong side out (reversed stocking stitch). Cast on 11-11-12-12-14-14 stitches with circular needle size 8 mm and 1 strand Air and 1 strand Brushed Alpaca Silk (= 2 strands). Work stocking stitch back and forth, AT THE SAME TIME cast on new stitches at the end of each row in each side as follows: Cast on 2 stitches 2 times, 1 stitch 3-4-5-6-6-7 times, 2 stitches 1 time and 4 stitches 1 time = 37-39-42-44-46-48 stitches. THE PIECE IS NOW MEASURED FROM HERE. Continue back and forth with stocking stitch and 1 edge stitch in GARTER STITCH – read description above, in each side. When the piece measures 4 cm decrease 1 stitch inside the 1 edge stitch in garter stitch in each side – read DECREASE TIP. Decrease like this every 7-6-6-5-5-4 cm a total of 6-7-7-8-8-9 times = 25-25-28-28-30-30 stitches. When the piece measures 42-42-40-40-39-39 cm increase 7-7-4-9-7-7 stitches evenly on row = 32-32-32-37-37-37 stitches. Change to circular needle size 7 mm. Work rib, starting from the side with purl (reversed stocking stitch/the wrong side out) as follows: 1 edge stitch in garter stitch (knit 2, purl 3) until there is 1 stitch left, 1 edge stitch in garter stitch. When the rib measures 5 cm cast off with knit over knit and purl over purl. The sleeve measures approx. 55-56-55-56-56-57 cm from the sleeve cap down. Work the other sleeve in the same way. ASSEMBLY: Sew sleeves to body inside the cast-off/cast-on edge. Sew sleeve seams. Make sure that the seam is not tight. |
|||||||||||||||||||||||||||||||
Diagram explanations |
|||||||||||||||||||||||||||||||
|
|||||||||||||||||||||||||||||||
 |
|||||||||||||||||||||||||||||||
 |
|||||||||||||||||||||||||||||||
 |
|||||||||||||||||||||||||||||||
 |
|||||||||||||||||||||||||||||||
 |
|||||||||||||||||||||||||||||||
Have you finished this pattern?Tag your pictures with #dropspattern #empressjacket or submit them to the #dropsfan gallery. Do you need help with this pattern?You'll find 31 tutorial videos, a Comments/Questions area and more by visiting the pattern on garnstudio.com. © 1982-2026 DROPS Design A/S. We reserve all rights. This document, including all its sub-sections, has copyrights. Read more about what you can do with our patterns at the bottom of each pattern on our site. |
|||||||||||||||||||||||||||||||


With over 40 years in knitting and crochet design, DROPS Design offers one of the most extensive collections of free patterns on the internet - translated to 17 languages. As of today we count 324 catalogues and 12245 patterns translated into English (UK/cm). 12245
We work hard to bring you the best knitting and crochet have to offer, inspiration and advice as well as great quality yarns at incredible prices! Would you like to use our patterns for other than personal use? You can read what you are allowed to do in the Copyright text at the bottom of all our patterns. Happy crafting!
Post a comment to pattern DROPS 194-17
We would love to hear what you have to say about this pattern!
If you want to leave a question, please make sure you select the correct category in the form below, to speed up the answering process. Required fields are marked *.