
Popular categories
Looking for a yarn?


Comments / Questions (27)
![]() Ria wrote:
Ria wrote:
Bij het breien van het patroon moet ik als ik de averechtse naald brei toch de steken breien zoals ze zich voordoen?
05.01.2026 - 19:03DROPS Design answered:
Hi Ria, on the body, from the wrong side you purl stitches, excluding front bands which are knitted from the right and wrong side. Happy knitting!
05.01.2026 - 19:09
![]() Giuseppina Luongo wrote:
Giuseppina Luongo wrote:
Buongiorno,vorrei sapere come vedere le correzioni di questo modello! Grazie
27.12.2025 - 07:45DROPS Design answered:
Buonasera Giuseppina, le correzioni sono incorporate nel modello. Le istruzioni online sono già aggiornate. Buon lavoro!
27.12.2025 - 13:38
![]() Åsa wrote:
Åsa wrote:
”Sticka 1 varv rätt från rätsidan där det minskas 18-21-21-21-21-21 maskor jämnt fördelat. Sticka 1 varv rätt från rätsidan där det ökas 21-23-33-36-39-42 maskor jämnt fördelat”. Jag ser att det är fler än jag som undrar över halskanten, förstår ändå inte. Jag minskar med räta maskor från rätsidan, sedan ökar med räta maskor från rätsidan. Ska det vara ett avigt varv däremellan? Eller står det fel och ökningen ska göras med aviga maskor från avigsidan?
30.11.2025 - 09:30DROPS Design answered:
Hei Åsa. Oppskriften er oversendt til Design avd. for en dobbeltsjekk / rettelse, men er nok tenkt at det skal økes 20-22-32-36-39-42 masker jevnt fordelt fra vrangen (når det felles og økes slik, vil ikke plagget sige / man får en bedre passform). Når det er økt, byttes det til større pinne nr og man starter på en forhøyning (om man ønsker). mvh DROPS Design
08.12.2025 - 10:20
![]() Kristín wrote:
Kristín wrote:
Góðan dag , er rétt skilið hjá mér að munstur umferðir séu prjónaðar á réttunni ? kveðja Kristín
22.10.2025 - 12:10DROPS Design answered:
Blessuð Kristín. Mynstrið er prjónað í hverri umferð. Bæði frá réttu og frá röngu. Mynsturteikning er lesin frá hægri til vinstri þegar prjónað er frá réttu og frá vinstri til hægri þegar prjónað er frá röngu. Það er dálkur efst á síðunni með mynstrinu sem stendur Myndbönd og þar má sjá góða útskýringu hvernig á að prjóna með 2 litum. Gangi þér vel.
23.10.2025 - 14:00
![]() Inga Johansson wrote:
Inga Johansson wrote:
Går det att få mönster på papper. Dropps 196-22 o 196-23. Jag har ingen skrivare. Inga Johansson Källebergsgatan 12 46462 Brålanda.Det vore bra. Tack
07.09.2025 - 13:33DROPS Design answered:
Hej Inga. Vi har dessvärre inte möjlighet att skicka mönster på papper, men vissa av våra återförsäljare kan hjälpa till med detta. Eller eventuellt om du kan skriva ut på ditt närmaste bibliotek. Mvh DROPS Design
09.09.2025 - 08:44
![]() Eleonor wrote:
Eleonor wrote:
Hej. Jag har ökat och börjat sticka mönster A1 i st M. I slutet på första mönstervarvet får jag kvar 6 maskor (och 5 framkantsmaskor) Ska det inte vara 3 maskor kvar +framkantsmaskorna? Jag har 203 maskor efter ökningarna. Jag hade 144 maskor från början och ökat enligt mönster. Vad blir fel? Tack på förhand!
25.08.2025 - 19:58DROPS Design answered:
Hej Eleonor. Om du stickar storlek M och är vid oket så ska du ha 130 maskor. Sedan stickar du 5 framkantsmaskor, 17 rapporter av A.1, A.2 och till sist 5 framkantsmaskor. 5+(17x7)+1+5= 130 maskor. Mvh DROPS Design
26.08.2025 - 11:17
![]() Guðný wrote:
Guðný wrote:
Ætla að panta í þessa peysu garn og uppskrift
05.08.2025 - 16:01DROPS Design answered:
Garnið kaupir þú hjá DROPS söluaðilum sem þú getur fundið á síðunni okkar og uppskriftin er frí. Gangi þér vel.
05.08.2025 - 17:18
![]() Vivi Møller Larsen wrote:
Vivi Møller Larsen wrote:
Er det muligt at strikke cardigan mønstret uden at skulle strikkevrangpinde. Kan dette mønster bruges til at strikke opklipningsmasker og derefter strikke knap stolper til og har Drops en beskrivelse af det. Jeg magter ikke strikke fair ile vrang.. Venlig hilsen Vivi
01.02.2025 - 21:51DROPS Design answered:
Hei Vivi. Du kan strikke jakken rundt og så klippe opp (ved å legge til oppklippningsmasker), men vi har ingen skriftlig beskrivelse på hvordan det gjøres på denne modellen. mvh DROPS Design
10.02.2025 - 09:20
![]() Lisbeth Gjertsen wrote:
Lisbeth Gjertsen wrote:
Hei. Når man skal ta ut på mønsteret. Hvordan i all verden vil det passe inn så mønsteret passer inn
09.08.2024 - 12:41DROPS Design answered:
Hei Lisbeth. Beklager, men her skjønner jeg ikke spørsmålet. Ta ut mønstret / og hvordan det vil passe inn så det vil passe inn? mvh DROPS Design
12.08.2024 - 14:25
![]() Marie Claude PIERARD wrote:
Marie Claude PIERARD wrote:
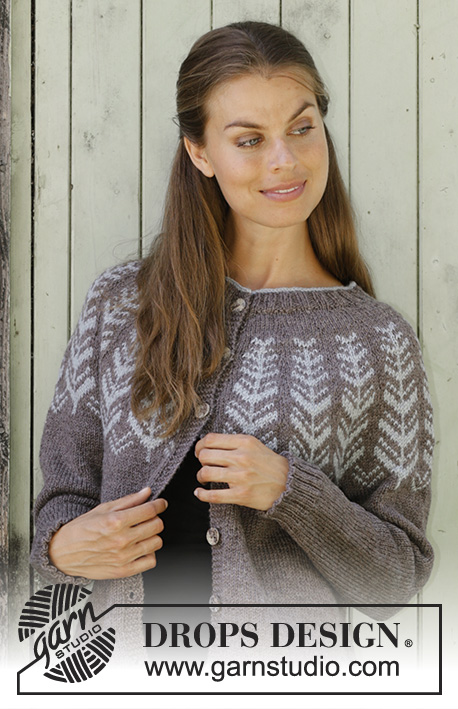
Concernant le modèle inner circle jacket est-ce bien 24 cm après la séparation pour commencer les cotes ? Ça me paraît très peu pour une veste qui alors serait très courte. Le modèle paraît beaucoup plus long sur la photo. Merci
03.04.2023 - 11:35DROPS Design answered:
Bonjour Marie Claude, si le jacket est trop court pour vous, vous pouvez l'allonger a ce moment, a votre gout. Bon tricot!
04.04.2023 - 07:49
|
|||||||||||||
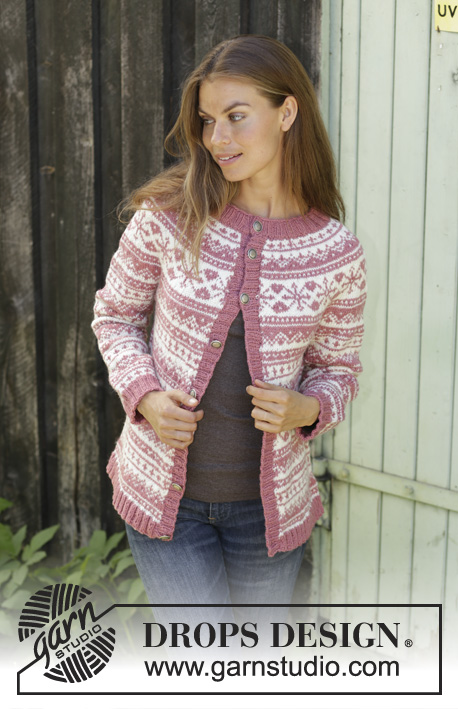
Inner Circle Jacket#innercirclejacket |
|||||||||||||
 |
 |
||||||||||||
Knitted jacket with round yoke in DROPS Merino Extra Fine or DROPS Karisma. The piece is worked top down with Nordic pattern. Sizes S - XXXL.
DROPS 196-22 |
|||||||||||||
|
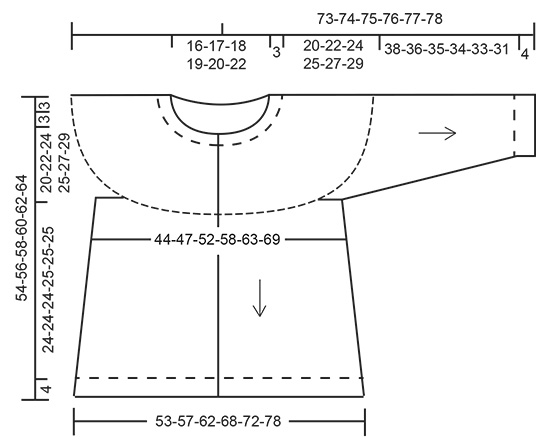
EXPLANATIONS FOR THE PATTERN: ------------------------------------------------------- RIDGE/GARTER STITCH (worked back and forth): 1 ridge = Knit 2 rows. PATTERN: See diagrams A.1 and A.2. All stitches worked in stocking stitch. The diagram shows all the rows in the pattern seen from the right side. KNITTING TIP (for multi-coloured pattern): To avoid the knitting tension becoming tighter when working pattern, it is important that the strands at the back are not tight. Use a size larger needle when working pattern if this is a problem. ELEVATION: Insert a marker thread in the middle of the work (=mid back) like this: S: in the 62nd stitch, M: after 65 stitches, L: after 72 stitches, XL: in the 76th stitch, XXL: after 79 stitches, XXXL: after 83 stitches. Start from the wrong side and knit until you have knitted 12-12-13-14-14-15 stitches past the marker thread, turn, tighten the strand and knit24-24-26-28-28-30 stitches. Turn, tighten the strand and purl 36-36-39-42-42-45 stitches, turn, tighten the strand and knit 48-48-52-56-56-60 stitches. Turn, tighten the strand and purl 60-60-65-70-70-75 stitches, turn, tighten the strand and knit 72-72-78-84-84-90 stitches.Turn, tighten strand and purl to end of row (the band is knitted). DECREASE/INCREASE TIP (evenly spaced): To work out how to decrease/increase evenly, count the total number of stitches on the row (e.g. 124 stitches), minus the bands (e.g. 10 stitches) and divide the remaining stitches by the number of decreases/increases to be made (e.g. 18) = 6.3.In this example, knit each 5th and 6th stitch together (approx.) and do not decrease over the bands. When increasing make 1 yarn over after approx. each 6th stitch and do not increase over the bands. On the next row work the yarn overs twisted to avoid holes. INCREASE TIP (for sides of body): All increases are made from the right side! Work until there are 2 stitches left before the marker thread, make 1 yarn over, knit 4 stitches (the marker thread sits in the middle of these 4 stitches), make 1 yarn over (= 2 stitches increased). On the next row purl the yarn overs twisted to avoid holes. DECREASE TIP (for sleeves): Decrease 1 stitch on each side of the marker thread as follows: Work until there are 3 stitches left before the marker thread, knit 2 together, knit 2 (the marker thread sits in the middle of these 2 stitches), slip 1 stitch as if to knit, knit 1, pass the slipped stitch over the knitted stitch (= 2 stitches decreased). BUTTONHOLES: Work the buttonholes on the right band (when the garment is worn). 1 buttonhole = Knit from the right side until there are 3 stitches left on the row, make 1 yarn over, knit 2 together and knit the last stitch. On the next row (wrong side) knit the yarn over to leave a hole. The first buttonhole is worked when the neck measures 1½-2 cm. Then work the next 6 buttonholes with approx. 7½ -8-8-8-8½-9 cm between each. ------------------------------------------------------- START THE PIECE HERE: ------------------------------------------------------- JACKET - SHORT OVERVIEW OF THE PIECE: The piece is worked back and forth with circular needle, from mid front and top down. The sleeves are worked in the round with short circular needle/double pointed needles. NECK: Cast on 120-128-132-136-140-144 stitches (including 5 band stitches in each side towards mid front) with circular needle size 3 mm and light greyish green. Purl 1 row from the wrong side. Change to light brown. Now work rib as follows: 5 band stitches in GARTER STITCH – read description above, (knit 2, purl 2) until there are 7 stitches left on the row, knit 2, work 5 band stitches in garter stitch. Continue this rib until the piece measures 3 cm – adjust so that the next row is worked from the right side. Work BUTTONHOLE on right band – read description above! Knit 1 row from the right side where you decrease 18-21-21-21-21-21 stitches evenly on row – read DECREASE/INCREASE TIP = 102-107-111-115-119-123 stitches. Purl 1 row. Knit 1 row from the right side where you increase 21-23-33-36-39-42 stitches evenly on row = 123-130-144-151-158-165 stitches. Change to circular needle size 4 mm. For a better fit you can now work an elevation in the back of the neck so that the yoke is slightly higher at the back. This elevation can be left out; the neck will then be the same front and back – read ELEVATION. YOKE: Now work pattern as follows: 5 band stitches in garter stitch, work A.1 until there are 6 stitches left on the row (= 16-17-19-20-21-22 repeats of 7 stitches), A.2 (= 1 stitch), finish with 5 band stitches in garter stitch - read KNITTING TIP and REMEMBER THE KNITTING TENSION! Continue this pattern. When A.1 and A.2 have been completed in height there are 299-317-353-371-389-407 stitches on the needle. The piece should now measure 23-24-24-24-24-24 cm from the cast on edge. Size S is now finished – Continue with ALL SIZES. In sizes M, L, XL, XXL and XXXL continue working as follows: Sizes M, L and XL: Continue working stocking stitch and 5 band stitches in garter stitch in each side towards mid front and with light brown until the piece measures 25-27-28 cm from the cast-on edge, AT THE SAME TIME when the piece measures 24-24-24 cm, increase 13-5-19 stitches evenly on row = 330-358-390 stitches. Continue with ALLSIZES. Sizes XXL and XXXL: Continue working stocking stitch and with 5 band stitches in garter stitch in each side towards mid front and with light brown until the piece measures 30-32 cm from the cast-on edge, AT THE SAME TIME when the piece measures 24-24 cm increase 11-14 stitches evenly on row and when the piece measures 27-29 cm increase 10-13 stitches evenly on row = 410-434 stitches. Continue with ALL SIZES. ALL SIZES: The next row is worked from the wrong side as follows: Work 47-51-55-61-65-70 stitches as before (= right front piece), place the next 60-68-74-78-80-82 stitches on a thread for sleeve, cast on 8-8-10-10-12-14 new stitches on the needle (= in side under sleeve), work 85-92-100-112-120-130 stitches (= back piece), place the next 60-68-74-78-80-82 stitches on a thread for sleeve, cast on 8-8-10-10-12-14 new stitches on needle (= in side under sleeve) and work the remaining 47-51-55-61-65-70 stitches as before (= left front piece). Body and sleeves are finished separately. THE PIECE IS NOW MEASURED FROM HERE! BODY: = 195-210-230-254-274-298 stitches. Insert 1 marker thread 51-55-60-66-71-77 stitches in from each side = 93-100-110-122-132-144 stitches between marker threads on the back piece. Continue with stocking stitch and light brown and 5 band stitches in garter stitch in each side towards mid front. When the piece measures 2 cm from the division, increase 1 stitch on each side of both marker threads – read INCREASE TIP (= 4 stitches increased). Increase like this every 6th row (approx. every 2 cm) a total of 10 times in each side = 235-250-270-294-314-338 stitches on the needle. When the piece measures 24-24-24-25-25-25 cm from the division, purl 1 row from the wrong side where you increase 57-62-66-74-78-82 stitches on row = 292-312-336-368-392-420 stitches. Change to circular needle size 3 mm and work rib from the wrong side as follows: 5 band stitches in garter stitch, work rib (knit 2, purl 2) until there are 7 stitches left, knit 2, work 5 band stitches in garter stitch. When the rib measures 4 cm cast off with garter stitch over garter stitch, knit over knit and purl over purl, but to avoid the cast-off edge being tight you can make 1 yarn over after each 4th stitch (the yarn overs are cast off as normal stitches). The jacket measures approx. 54-56-58-60-62-64 cm from the shoulder down. SLEEVE: Place the 60-68-74-78-80-82 stitches from the thread on the one side of the piece on short circular needle/double pointed needles size 4 mm and knit up 1 stitch in each of the 8-8-10-10-12-14 stitches cast on under the sleeve = 68-76-84-88-92-96 stitches on the needle. Insert 1 marker thread in the middle of the 8-8-10-10-12-14 stitches (= mid under sleeve). Work stocking stitch in the round with light brown. When the piece measures 2 cm from the division, decrease 2 stitches mid under sleeve – read DECREASE TIP. Decrease like this every 8th-6th-5th-4th-4th-4th round a total of 12-15-18-19-20-21 times = 44-46-48-50-52-54 stitches. When the sleeve measures 38-36-35-34-33-31 cm from the division (shorter measurements in larger sizes due to longer yoke), knit 1 round where you increase 12-14-16-18-20-22 stitches evenly on round = 54-60-64-68-72-76 stitches. Change to double pointed needles size 3 mm. Work rib in the round (= knit 2 / purl 2) for 4 cm. Cast off with knit over knit and purl over purl, but to avoid the cast-off edge being tight you can make 1 yarn over after each 4th stitch (the yarn overs are cast off as normal stitches). The sleeve measures approx. 42-40-39-38-37-35 cm from the division and down Work the other sleeve in the same way. ASSEMBLY: Sew buttons onto the left band. |
|||||||||||||
Diagram explanations |
|||||||||||||
|
|||||||||||||
 |
|||||||||||||
 |
|||||||||||||
Have you finished this pattern?Tag your pictures with #dropspattern #innercirclejacket or submit them to the #dropsfan gallery. Do you need help with this pattern?You'll find 32 tutorial videos, a Comments/Questions area and more by visiting the pattern on garnstudio.com. © 1982-2026 DROPS Design A/S. We reserve all rights. This document, including all its sub-sections, has copyrights. Read more about what you can do with our patterns at the bottom of each pattern on our site. |
|||||||||||||


With over 40 years in knitting and crochet design, DROPS Design offers one of the most extensive collections of free patterns on the internet - translated to 17 languages. As of today we count 324 catalogues and 12290 patterns translated into English (UK/cm). 12290
We work hard to bring you the best knitting and crochet have to offer, inspiration and advice as well as great quality yarns at incredible prices! Would you like to use our patterns for other than personal use? You can read what you are allowed to do in the Copyright text at the bottom of all our patterns. Happy crafting!
Post a comment to pattern DROPS 196-22
We would love to hear what you have to say about this pattern!
If you want to leave a question, please make sure you select the correct category in the form below, to speed up the answering process. Required fields are marked *.