
Popular categories
Looking for a yarn?


Comments / Questions (45)
![]() Maringa Sauter wrote:
Maringa Sauter wrote:
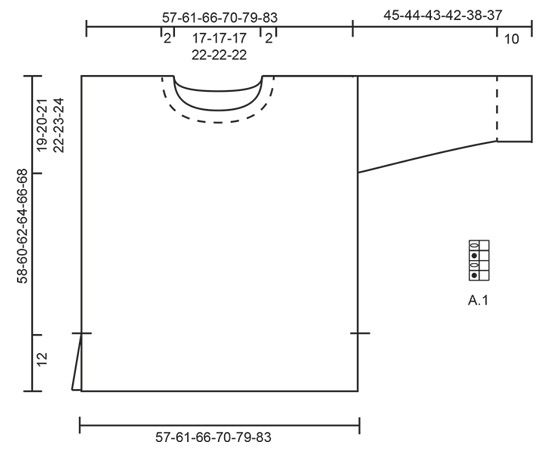
Sehr geehrte Damen und Herren, ich finde leider kein Diagramm A1.Vielen Dank. M. Sauter
24.09.2018 - 14:39DROPS Design answered:
Liebe Frau Sauter, Diagram A.1 finden Sie neben der Maßskizze (unter die Ärmel), es handelt sich um ein kleines Diagram, die über 2 Maschen und 4 Reihen gestrickt wird. Viel Spaß beim stricken!
25.09.2018 - 10:36
![]() Marja wrote:
Marja wrote:
En ik ben linkshandig daar kan het misschien ook door komen dat het niet lukt
22.09.2018 - 21:04
![]() Marja wrote:
Marja wrote:
Na de 3 toeren van het patroon krijg je de meerdering en minderen en daar kan ik niet uitkomen Het is denk ik heel makkelijk maar kan er echt niet uitkomen
21.09.2018 - 20:38
![]() Marja wrote:
Marja wrote:
Ik kan er maar niet uit komen hoe dit moet: = haal de rechte steek en de omslag recht af. Brei 1 averecht, maak 1 omslag en 1 recht (= 3 steken, inclusief de omslag) brei ze dan recht samen, haal de omslag en de rechte steek over de samengebreide steken (= 2 steken geminderd)
20.09.2018 - 11:37Alexandra wrote:
The pattern is supposed to have two diagrams, but one is missing. Where/when will the other diagram be available?
20.09.2018 - 01:16DROPS Design answered:
Dear Alexandra, diagram A.1 is a small diagram you will find on the left side of measurement chart under the sleeve. A.1 is worked over 2 sts and 4 rows. Happy knitting!
20.09.2018 - 09:26
![]() Marja wrote:
Marja wrote:
Ik heb al heel veel patronen gebreid en gehaakt maar deze telpatroon kan ik echt niet uitkomen en in YouTube is het ook niet echt duidelijk ,maar ik wil deze wel heel graag maken. Kunt u mij helpen om het duidelijker uit te leggen
19.09.2018 - 18:33DROPS Design answered:
Dag Marja, Zou je aan kunnen geven waar je precies tegen aan loopt? Ik neem aan dat je al steken op hebt gezet voor het voorpand en de instructie aan het volgen bent (* 1 recht, 2 averecht samen *, brei van *-*.... etc) Waar kom je precies niet uit; wat is niet duidelijk? Dan kunnen we je beter helpen :)
21.09.2018 - 08:42Зинаида wrote:
Can I put a photo and a link to your website in my microblog?
13.09.2018 - 09:07DROPS Design answered:
Dear Зинаида , you will find all informations about the copyright at the bottom of each pattern page, ie what you are allowed to share and link. Happy knitting!
13.09.2018 - 09:18
![]() Kathy wrote:
Kathy wrote:
Thank you. I'll keep looking out for it.
10.09.2018 - 13:20
![]() Kathy wrote:
Kathy wrote:
Where is the diagram please? There is no link.
10.09.2018 - 12:44DROPS Design answered:
Dear Kathy, the site is experiencing a temporary problem with pictures, like the diagrams. We are working hard to solve the solution, we ask you for yor patiente. Everything will be back to normal shortly.
10.09.2018 - 12:54Stella wrote:
Is there a video to help with the instructions for the diagram (A2). I am getting rather confused and getting myself in quite a knot! I dearly would love to be able to knit this pattern.
10.09.2018 - 11:28DROPS Design answered:
Dear Stella, this video shows how to increase 4 sts in English rib - make sure to repeat from *-* only 1 time to increase only 2 sts and not 4 as in the video. And this video shows how to decrease (time code 2:45 for 5th symbol and time code 3:42 for 6th symbol). Your number of sts will be the same since you increase 2 sts and decrease 2 sts on the same row, this will just displace the English Rib. Happy knitting!
11.09.2018 - 08:54
|
|||||||||||||||||||
Autumn Blush#autumnblushsweater |
|||||||||||||||||||
|
|
|||||||||||||||||||
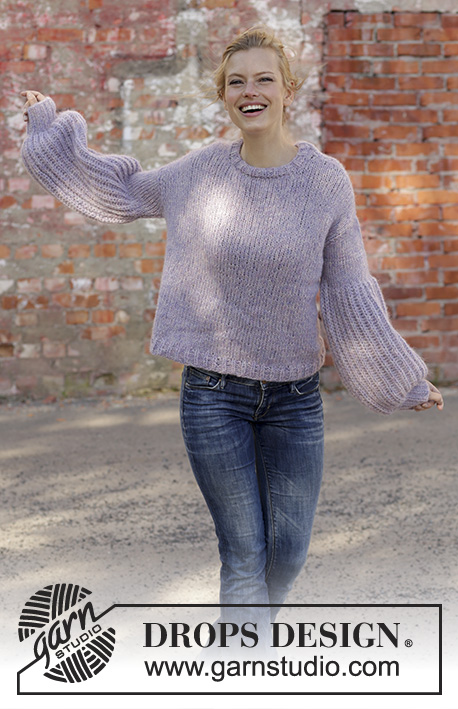
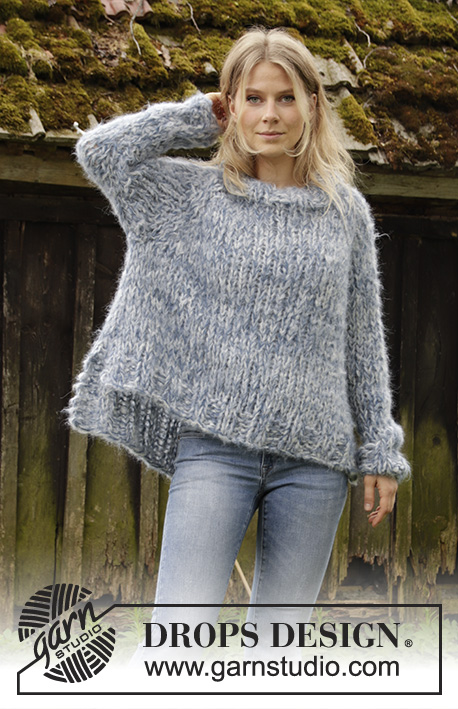
Knitted jumper with false English rib and displacements in DROPS Snow. Size: S - XXXL
DROPS 194-22 |
|||||||||||||||||||
|
EXPLANATION FOR THE PATTERN: ---------------------------------------------------------- GARTER STITCH (back and forth): 1 ridge = knit 2 rows. PATTERN: See diagrams A.1 and A.2. Diagrams show all rows in pattern seen from the right side. INCREASE TIP: All increases are done from the right side. Work 1 edge stitch in garter stitch, knit 1, 1 yarn over (= 1 stitch increased), knit until 2 stitches remain, 1 yarn over (= 1 stitch increased), knit 1 and finish with 1 edge stitch in garter stitch (= 2 stitches increased in total). Knit yarn overs twisted on next row to avoid holes. ---------------------------------------------------------- START THE PIECE HERE: ---------------------------------------------------------- JUMPER - SHORT OVERVIEW OF THE PIECE: Worked back and forth. Finish front and back piece separately. Work sleeves back and forth on needle. FRONT PIECE: Cast on 78-84-90-96-108-114 stitches (including 1 edge stitch in each side) on circular needle size 9 mm with Snow. Work first row as follows from right side: Work 1 edge stitch in GARTER STITCH – read explanation above, * knit 1, purl 2 together *, work from *-* until 2 stitches remain, finish with knit 1 and 1 edge stitch in garter stitch = 53-57-61-65-73-77 stitches. Then work as follows from wrong side (read diagrams from left towards right): Work 1 edge stitch in garter stitch, A.1 (= 2 stitches) over the next 12-14-16-18-22-24 stitches, A.2 (= 26 stitches), A.1 over the next 13-15-17-19-23-25 stitches and finish with 1 edge stitch in garter stitch. I.e. pattern begins and ends with 1 knit stitch in false English rib inside 1 edge stitch in garter stitch in each side of piece, seen from right side. Continue pattern like this. REMEMBER THE KNITTING TENSION! When piece measures 48-50-50-52-52-54 cm (approx. 10-10-12-12-14-14 cm remain), work A.1 over all stitches (i.e. pattern continues straight up without displacements). On next row from right side cast off the middle 11-11-11-15-15-15 stitches for neck with knit over knit and purl over purl (1 yarn over and 1 knit stitch = 1 stitch) = 21-23-25-25-29-31 stitches on each shoulder. Stitch closest to the neck on each shoulder should now be a purl stitch from right side. Now finish each shoulder separately. RIGHT SHOULDER: On next row from the neck (= right side) work as follows: Work 1 stitch in garter stitch, slip yarn over and 1 stitch off the needle as if to knit together, purl 1, pass yarn over and stitch over stitch worked (= 1 stitch decreased), work the rest of row as before. Decrease like this on every row from right side 4 times in total = 17-19-21-21-25-27 stitches. Work until piece measures 58-60-62-64-66-68 cm in total. On next row from right side cast off. Knit together yarn overs and knit stitches while casting off and purl the purl stitches while casting off. LEFT SHOULDER: Work as right shoulder by decrease for neck at the end of every row from right side as follows: Work as before until 3 stitches remain (yarn over is not counted as stitch), knit purl stitch, yarn over and knit stitch together (= 1 stitch decreased) and finish with 1 stitch in garter stitch. BACK PIECE: Cast on 78-84-90-96-108-114 stitches (including 1 edge stitch in each side) on circular needle size 9 mm with Snow. Work first row as follows from right side: Work 1 edge stitch in garter stitch, * knit 1, purl 2 together *, work from *-* until 2 stitches remain, finish with knit 1 and 1 edge stitch in garter stitch = 53-57-61-65-73-77 stitches. Then work as follows from wrong side (read diagram from left towards right): Work 1 edge stitch in garter stitch, A.1 until 1 stitch remains and finish with 1 edge stitch in garter stitch. I.e. pattern begins and ends with 1 knit stitch in false English rib inside 1 edge stitch in garter stitch in each side of piece, seen from right side. Continue pattern like this. When piece measures 54-56-58-60-62-64 cm (approx. 4 cm remain), cast off the middle 19-19-19-23-23-23 stitches for neck with knit over knit and purl over purl (1 yarn over and 1 knit stitch = 1 stitch) = 17-19-21-21-25-27 stitches on each shoulder. Stitch closest to the neck on each shoulder should now be a purl stitch from right side. Now finish each shoulder separately. RIGHT SHOULDER: Work pattern as before 1 stitch in garter stitch closest to the neck until piece measures 58-60-62-64-66-68 cm in total. Cast off on next row from right side. Knit together yarn overs and knit stitches while casting off and purl the purl stitches while casting off. LEFT SHOULDER: Work as right shoulder. SLEEVE: Cast on 35-35-38-38-41-41 stitches on circular needle size 9 mm with Snow. Work first row as follows from right side: Work 1 edge stitch in garter stitch, * knit 1, purl 2 together *, work from *-* until 1 stitch remains, finish 1 edge stitch in garter stitch = 24-24-26-26-28-28 stitches. Then work as follows from wrong side (read diagram from left towards right): Work 1 edge stitch in garter stitch, A.1 until 1 stitch remains and finish with 1 edge stitch in garter stitch. Continue like this until piece measures 10 cm, adjust to finish with last row from right side. Now work piece in stocking stitch with 1 edge stitch in garter stitch in each side of piece. When piece measures 12 cm, increase 1 stitch inside 1 edge stitch and 1 stitch in each side of piece - read INCREASE TIP! Increase like this every 4-3½-3½-3-2½-2 cm 8-9-9-10-10-11 times in total = 40-42-44-46-48-50 stitches. Cast off when piece measures 45-44-43-42-38-37 cm. Knit another sleeve the same way. ASSEMBLY: Sew the shoulder seams. Sew in sleeves (= approx. 19-20-21-22-23-24 cm down from shoulder seams) and sew sleeve seams and side seams inside 1 edge stitch until approx. 12 cm remain (= vent). NECK EDGE: Pick up approx. 44 to 56 stitches along neck edge (make sure to avoid a tight edge, pick up more stitches if needed), adjust so that number of stitches is divisible by 2. Work rib (= knit 1/purl 1). Work 2 rounds in total, then cast off with knit over knit and purl over purl. |
|||||||||||||||||||
Diagram explanations |
|||||||||||||||||||
|
|||||||||||||||||||
 |
|||||||||||||||||||
 |
|||||||||||||||||||
Have you finished this pattern?Tag your pictures with #dropspattern #autumnblushsweater or submit them to the #dropsfan gallery. Do you need help with this pattern?You'll find 25 tutorial videos, a Comments/Questions area and more by visiting the pattern on garnstudio.com. © 1982-2026 DROPS Design A/S. We reserve all rights. This document, including all its sub-sections, has copyrights. Read more about what you can do with our patterns at the bottom of each pattern on our site. |
|||||||||||||||||||


With over 40 years in knitting and crochet design, DROPS Design offers one of the most extensive collections of free patterns on the internet - translated to 17 languages. As of today we count 324 catalogues and 12290 patterns translated into English (UK/cm). 12290
We work hard to bring you the best knitting and crochet have to offer, inspiration and advice as well as great quality yarns at incredible prices! Would you like to use our patterns for other than personal use? You can read what you are allowed to do in the Copyright text at the bottom of all our patterns. Happy crafting!
Post a comment to pattern DROPS 194-22
We would love to hear what you have to say about this pattern!
If you want to leave a question, please make sure you select the correct category in the form below, to speed up the answering process. Required fields are marked *.