
Popular categories
Looking for a yarn?


Comments / Questions (27)
![]() Pilar wrote:
Pilar wrote:
Si se hace este modelo solo con una hebra , ¿como se calculan los puntos que hay que tejer? O sería con los mismo que indica el patrón?
14.10.2018 - 16:50DROPS Design answered:
Hola Pilar. Con sólo un hilo vas a tener que trabajar con aguja de 4 mm y la tensión va a ser diferente, no como en el patrón. Por eso no se pueden usar los cálculos del patrón. Para hacer los nuevos cálculos tienes que primero hacer una muestra para calcular cuántos puntos/filas tienes en un cuadrado de 10x 10 cm y después aplicarlo a las medidas del jersey.
14.10.2018 - 17:31
![]() Katarina wrote:
Katarina wrote:
Hei, kan det være feil i oppskriften her: " Fell slik på ca hver 6.-4.-4.-3.-3.-3.cm totalt 8-10-11-12-13-14 ganger "? Skal man kanskje felle hver 6. rad, ikke cm? Hvis ikke, så skal man felle over 48 cm i størrelsen S og det blir for langt, ikke sant?
27.09.2018 - 11:20DROPS Design answered:
Hei Katarina. Ja det stemmer, her hadde det skjedd en feil. Du skal felle på ca hver 6-4-4-3-3-3 omgang (Ikke cm). Det er nå rettet i oppskriften, takk for beskjed og god fornøyelse.
02.10.2018 - 07:53
![]() Sivet wrote:
Sivet wrote:
Bonjour, effectivement le convertisseur en 1 fil fonctionne mais la quantité indiqué est donc fausse vu qu'il faut que je le tricote en 2 fils ? combien de gramme dois-je prendre pour tricoté en puna ? en 1 fil dans le convertisseur sa me met le double du fil sky d'origine ... donc si je doit prendre encore le double c'est énormément de laine !
07.09.2018 - 09:32DROPS Design answered:
Bonjour Mme Sivet, la quantité indiquée est juste, il vous faudra le même métrage en SKy que dans une autre qualité, par ex. 350 g Sky = 7 pelotes de 50 g x 190 m= 1330 m / 110 m la pelote de Puna = 13 pelotes (en arrondissant) soit 650 g. Retrouvez la méthode de calcul ici - vous tricotez Sky en double, vous tricoterez ainsi Puna en double également, pensez juste à bien vérifier ce que votre échantillon est juste. Bon tricot!
07.09.2018 - 13:46
![]() Sivet wrote:
Sivet wrote:
Bonjour, votre convertisseur ne fonctionne pas sur se modèle. J'aimerais savoir si je peut le tricoté en puna ? et cb de pelote il me faudrait ?
01.09.2018 - 11:38DROPS Design answered:
Bonjour Mme Sivet, le convertisseur fonctionne, mais sélectionnez bien "1 fil" car vous allez remplacer Sky par une autre qualité du groupe B et non par 2 fils d'une autre qualité (correspondance effectivement impossible). Il vous faudra alors toujours tricoter avec 2 fils Puna par exemple. Bon tricot!
04.09.2018 - 11:25Maritza wrote:
Hola podrias traducir este patrón al español. Muchas gracias
30.07.2018 - 01:55DROPS Design answered:
Hola Maritza. Durante el agosto todos los patrones publicados de la nueva colección estarán traducidos al español.
31.07.2018 - 12:03
![]() Irena wrote:
Irena wrote:
Mam nadzieję że opis ukaże się również w języku polskim. Przepiękny sweterek!
20.06.2018 - 18:56
![]() Carmen wrote:
Carmen wrote:
Muy bonito y muy bonita la lana
06.06.2018 - 23:08
|
||||||||||
Forward#forwardsweater |
||||||||||
 |
 |
|||||||||
Knitted jumper with raglan in 2 strands DROPS Sky. The piece is worked top down with texture. Size S – XXXL.
DROPS 195-28 |
||||||||||
|
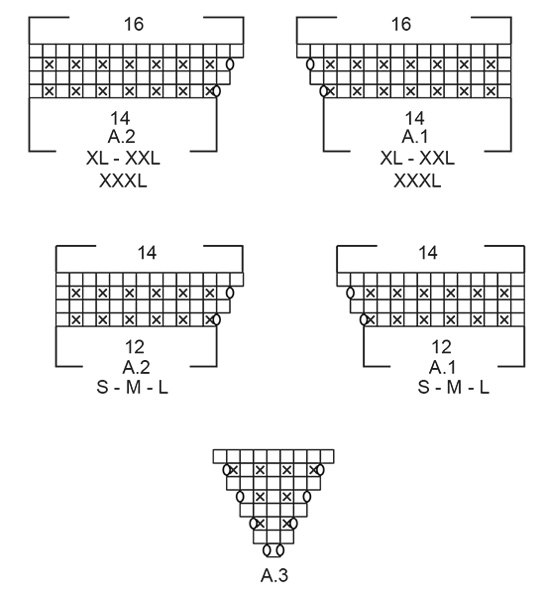
EXPLANATIONS FOR THE PATTERN: ------------------------------------------------------- PATTERN: See diagrams A.1 to A.3. Choose diagram for your size (applies to diagrams A.1 and A.2). RAGLAN (on sleeves): Increase 1 stitch before/after the marker thread on the sleeves as follows: Work as far as the first marker thread on the sleeve, knit 1, make 1 yarn over, work as far as 1 stitch before the next marker thread, make 1 yarn over, knit 1. Repeat on the other sleeve (= 4 stitches increased on the round. On the next round knit the yarn overs to make holes. Then work the new stitches in stocking stitch. DECREASE TIP (for sleeves): Decrease 1 stitch on each side of the marker thread as follows: Work until there are 3 stitches left before the marker thread, knit 2 together, knit 2 (the marker thread sits in the middle of these 2 stitches), slip 1 stitch as if to knit, knit 1, pass the slipped stitch over the knitted stitch. ------------------------------------------------------- START THE PIECE HERE: ------------------------------------------------------- JUMPER - SHORT OVERVIEW OF THE PIECE: The piece is worked in the round with circular needle, top down. The sleeves are worked in the round with short circular needle/double pointed needles. NECK: Cast on 60-60-64-68-72-72 stitches with short circular needle size 6 mm and 2 strands Sky. Knit 1 round. Insert a marker thread at the beginning of the round (marks the transition between left sleeve and back piece). The marker thread follows your work onwards. Now work rib (knit 1 / purl 1) in the round for 4 cm. The next round is worked as follows: Knit over knit and purl over purl over the first 25-25-25-29-29-29 stitches, insert a marker thread here (marks the transition between back piece and right sleeve), knit the next 5-5-7-5-7-7 stitches and at the same time increase 1-2-2-2-1-2 stitches over these stitches, insert a marker thread here (marks the transition between right sleeve and front piece), knit over knit and purl over purl over the next 25-25-25-29-29-29 stitches, insert a marker thread here (marks the transition between front piece and left sleeve), knit the next 5-5-7-5-7-7 stitches and at the same time increase 1-2-2-2-1-2 stitches evenly over these stitches = 62-64-68-72-74-76 stitches. YOKE: Change to circular needle size 7 mm. Now work pattern as follows: * Work A.1 (choose diagram for your size) over the first 12-12-12-14-14-14 stitches, knit 1 (= mid-stitch on back/front piece), work A.2 (choose diagram for your size) over the next 12-12-12-14-14-14 stitches, (the marker thread sits here), knit 1, make 1 yarn over (= increase to raglan), knit the next 4-5-7-5-6-7 stitches, make 1 yarn over (= increase to raglan), knit 1 (marker thread sits here) *, work from *-* 1 more time on the round. Continue in the round with pattern like this and increase to RAGLAN (on the sleeves) – read description above, every 2nd round until A.1 and A.2 have been completed in height. You have now increased 2 stitches in each A.1 and 2 stiches in each A.2 (= 8 stitches increased) and increased 2 stitches to raglan in each side of the sleeves (= 8 stitches increased) = 78-80-84-88-90-92 stitches. Now work pattern as follows: * Work texture as before over the 14-14-14-16-16-16 stitches in A.1, work A.3 (= 1 stitch) over mid-stitch on back/front piece, work texture as before over the 14-14-14-16-16-16 stitches in A.2, (marker thread sits here), knit 1, make 1 yarn over (= increase to raglan), knit until there is 1 knitted stitch left before the next marker thread, make 1 yarn over (= increase to raglan), knit 1, (marker thread sits here) *, work from *-* 1 more time on the round. You have now increased 2 stitches in A.3 on front/back piece (= 4 stitches increased) and increased 1 stitch to raglan on each side of each sleeve (= 4 stitches increased) = 86-88-92-96-98-100 stitches. Continue with pattern in the round like this and increase to raglan (on sleeves) every 2nd round 12-14-15-18-19-20 more times (= a total of 15-17-18-21-22-23 stitches increased on each side of each sleeve from the start of the yoke) and continue A.3 and increase on each side of A.3 every 2nd round until you have increased 13-13-15-17-21-25 more times (= a total of 14-14-16-18-22-26 times from the first round in A.3). NOTE: Each time you increase in the side of A.3 you work 2 more stitches in texture between the yarn overs. When all the increases are finished there are 186-196-212-236-258-280 stitches on the round. Continue with texture on the front and back pieces and knit on sleeves until the piece measures 25-27-29-31-33-35 cm. The next round is worked as follows: Work as before over the first 57-57-61-69-77-85 stitches (= back piece), place the next 36-41-45-49-52-55 stitches on a thread (= sleeve), cast on 9 stitches on needle (= in side under sleeve), work the next 57-57-61-69-77-85 stitches as before (= front piece), place the next 36-41-45-49-52-55 stitches on a thread (= sleeve), cast on 9 new stitches on the needle (= in side under sleeve). THE PIECE IS NOW MEASURED FROM HERE! BODY: = 132-132-140-156-172-188 stitches. Continue in the round with texture. Work structure over the new stitches cast on in each side under the sleeves so that the textured pattern fits all the way around the body. When the piece measures 30 cm from the division in all sizes cast off with knit. To avoid the cast-off edge being tight, you can make a yarn over after each 6th stitch; the yarn overs are cast off as normal stitches. The jumper measures a total of 58-60-62-64-66-68 cm from the shoulder down. SLEEVE: Place the 36-41-45-49-52-55 stitches from the thread on the one side of the piece on short circular needle/double pointed needles size 7 mm and, in addition, knit up 1 stitch in each of the 9 stitches cast on under the sleeve = 45-50-54-58-61-64 stitches. Insert 1 marker thread in the middle stitch of the 9 stitches under the sleeve. Continue with knit in the round. When the piece measures 4-4-4-4-3-2 cm from the division, decrease 2 stitches mid under sleeve – read DECREASE TIP. Decrease like this every 6-4-4-3-3-3 round a total of 8-10-11-12-13-14 times = 29-30-32-34-35-36 stitches. Continue working until the piece measures 36-35-34-32-30-29 cm from the division (shorter measurements in larger sizes due to wider neck and longer yoke). Knit 1 round where you increase 3-4-4-6-7-8 stitches evenly on round = 32-34-36-40-42-44 stitches. Change to double pointed needles size 6 mm and work rib in the round (= knit 1 / purl 1) for 4 cm. Cast off with knit over knit and purl over purl, but to avoid the cast-off edge being tight, you can make a yarn over after each 6th stitch; the yarn overs are cast off as normal stitches. The sleeve measures approx. 40-39-38-36-34-33 cm from the division. Work the other sleeve in the same way. |
||||||||||
Diagram explanations |
||||||||||
|
||||||||||
 |
||||||||||
 |
||||||||||
Have you finished this pattern?Tag your pictures with #dropspattern #forwardsweater or submit them to the #dropsfan gallery. Do you need help with this pattern?You'll find 28 tutorial videos, a Comments/Questions area and more by visiting the pattern on garnstudio.com. © 1982-2026 DROPS Design A/S. We reserve all rights. This document, including all its sub-sections, has copyrights. Read more about what you can do with our patterns at the bottom of each pattern on our site. |
||||||||||


With over 40 years in knitting and crochet design, DROPS Design offers one of the most extensive collections of free patterns on the internet - translated to 17 languages. As of today we count 324 catalogues and 12290 patterns translated into English (UK/cm). 12290
We work hard to bring you the best knitting and crochet have to offer, inspiration and advice as well as great quality yarns at incredible prices! Would you like to use our patterns for other than personal use? You can read what you are allowed to do in the Copyright text at the bottom of all our patterns. Happy crafting!
Post a comment to pattern DROPS 195-28
We would love to hear what you have to say about this pattern!
If you want to leave a question, please make sure you select the correct category in the form below, to speed up the answering process. Required fields are marked *.