
Popular categories
Looking for a yarn?


Comments / Questions (10)
![]() Heike wrote:
Heike wrote:
Sorry für die dumme Frage... Hab den Fehler gefunden
03.06.2024 - 23:09
![]() Heike wrote:
Heike wrote:
Ich stricke die Jacke in xl und habe eine frage zum Rumpfteil. Bei 250 Maschen nehme ich unter den Ärmeln je 12 Maschen zu und habe dann 274 Maschen auf der Nadel. Dann werden noch gesamt 24 Maschen zugenommen, also sind es 298 Maschen und nicht wie in der Anleitung 274 Maschen. Habe ich einen Rechenfehler?
03.06.2024 - 21:21DROPS Design answered:
Liebe Heike, die 12 Maschen unter jeder Ärmel gehörten zu den 250 Maschen, dh bei der Verteilung haben Sie: 59 M (linkes Vorderteil), 12 M (unter 1. Ärmel), 108 M (Rückenteil), 12 M (unter 2. Ärmel), 59 M (rechtes Vordreteil) = 59+12+108+12+59=250. Viel Spaß beim Stricken!
04.06.2024 - 08:08
![]() Maritta Jattu wrote:
Maritta Jattu wrote:
Miksi helman aina oikein osa kääntyy ylöspäin?
09.05.2022 - 13:00DROPS Design answered:
Hei, kostuta tai höyrytä neule kevyesti, niin reuna ei käänny ylöspäin.
19.05.2022 - 17:19
![]() Gabriela Barca wrote:
Gabriela Barca wrote:
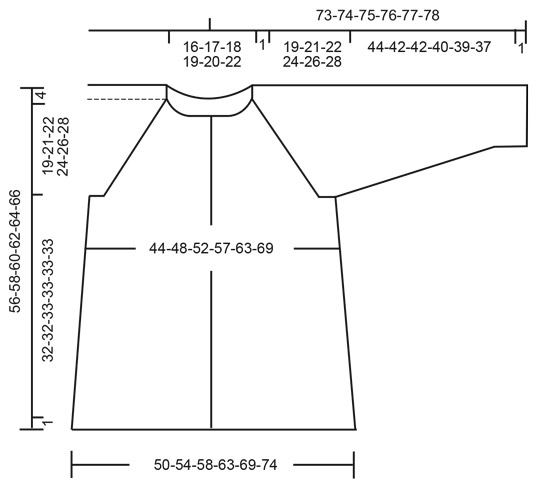
Hello, could you please tell in centimeters the length of the raglan , I mean measured from the neck to underarm, for size XL.Thank you!
19.05.2021 - 19:40DROPS Design answered:
Dear Gabriela, all the relevant measurements, that we have on this pattern, can be found in the schematic drawing at the bottom of the pattern. Just below the diagrams. Happy Knitting!
20.05.2021 - 00:22
![]() Sandra Huckaby wrote:
Sandra Huckaby wrote:
Thank you for the prompt answer regarding the chart. I am still confused about how to work increases into the pattern.
12.12.2019 - 14:21DROPS Design answered:
Dear Mrs Huckaby, the increases for the raglan are simply worked in stocking stitch; the yarn overs in diagrams are worked as shown in diagram (= purl from WS), but these are not increased, these are for the lace patterns. Happy knitting!
12.12.2019 - 14:24
![]() Sandra Huckaby wrote:
Sandra Huckaby wrote:
191-19 after completing 1st inc row for raglan under yoke, how are extra sts worked when continuing in pattern Charts: are the even # rows worked on the wrong side behind odd # rows
12.12.2019 - 13:05DROPS Design answered:
Dear Mrs Huckaby, first row in diagrams (and every odd numbered row) is worked from RS and every even numbered rows are worked from WS. Increases for raglan are worked in stocking stitch. Happy knitting!
12.12.2019 - 14:14Sujata wrote:
How can I knit this pattern in down to up pattern, please guide, with regards.
14.11.2018 - 06:39DROPS Design answered:
Dear Sujata, you would have to completely readjust the pattern, it would be much easier to work top down as explained in the pattern, or then look for another pattern worked bottom up if you rather. Happy knitting!
14.11.2018 - 09:00Rosie wrote:
The neckline an tension look different in the two pictures, is the first one knitted on larger needles?
28.06.2018 - 07:42DROPS Design answered:
Dear Rosie, both ladies in the pictures are wearing the same jacket, so tension is the same on both. Happy knitting!
28.06.2018 - 08:58
![]() Inez Lutjeboer wrote:
Inez Lutjeboer wrote:
Voor oudere dames is de hals erg laag. Ze hebben het wat gauwer koud... Hoe is de hals hoger te maken?
08.05.2018 - 10:10DROPS Design answered:
Dag Inez, Dit ontwerp is inderdaad met een lage hals. Het is voor ons helaas niet mogelijk om de patronen naar persoonlijke wensen aan te passen. Eventueel kun je ook hulp vragen bij de winkel waar je het garen hebt gekocht.
10.05.2018 - 10:35
![]() Doris wrote:
Doris wrote:
Sehr schön auch mit dem Pullover als Twinset.
25.12.2017 - 09:41
|
|||||||||||||
Peonia Cardigan#peoniacardigan |
|||||||||||||
 |
 |
||||||||||||
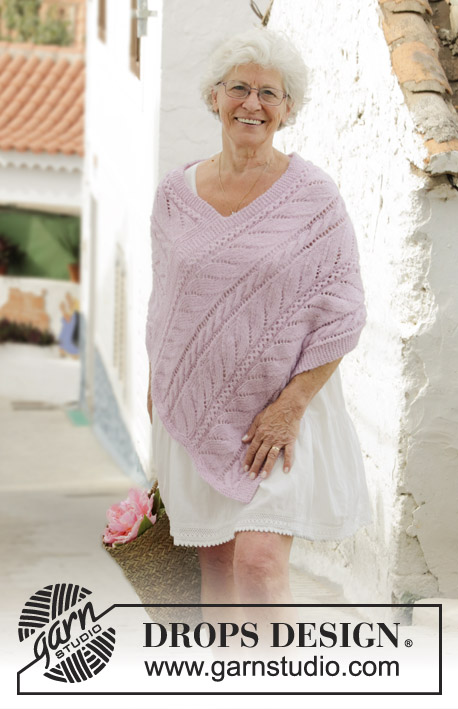
Jacket with lace pattern, raglan and A-shape, knitted back and forth top down. Size: S - XXXL Piece is knitted in DROPS Muskat.
DROPS 191-19 |
|||||||||||||
|
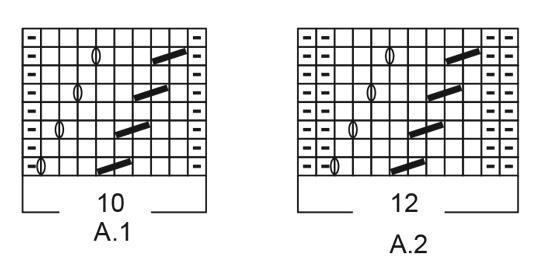
INFORMATION FOR PATTERN: GARTER STITCH (back and forth): 1 ridge = knit 2 rows. GARTER STITCH (worked in the round): 1 ridge = 2 rounds. Knit 1 round and purl 1 round. PATTERN: See diagrams A.1 and A.2. Diagrams show all rows in pattern seen from the right side. INCREASE/DECREASE TIP (evenly): To calculate how to increase/decrease evenly, use the total number of stitches on row (e.g. 100 stitches), minus bands (e.g. 10 stitches) and divide the remaining stitches by number of increases/decreases to be done (e.g. 32) = 2.8. In this example increase 1 stitch by making a yarn over after approx. every 3rd stitch. On next round knit yarn over twisted to avoid holes. If decreasing evenly knit approx. every other and 3rd. stitch together. RAGLAN: All increases are done from right side. Increase on each side of every repetition of A.2 (= 8 increases on row) Increase 1 stitch by making a yarn over. On next row purl yarn overs to make holes. INCREASE TIP (applies to sides of body): All increases are done from right side. Work until 2 stitches remain before marker, make 1 yarn over, knit 4 (marker thread is in the middle of these 4 stitches), make 1 yarn over (= 2 stitches increased). On next row purl yarn overs twisted to avoid holes. DECREASE TIP (applies to mid under sleeve): Begin 3 stitches before marker and knit 2 together, knit 2 (marker is between these two stitches), slip 1 stitch knitwise, knit 1, pass slipped stitch over stitch worked (= 2 stitches decreased). BUTTONHOLES: Decrease for buttonholes on right band (when garment is worn). Decrease from right side when 3 stitches remain on row as follows: Make 1 yarn over, knit the next 2 stitches together, knit last stitch. On next row knit yarn over to make holes. Decrease first buttonhole when piece measures approx. 1½-2 cm from cast-on edge. Then decrease the next 5-5-6-6-7-7 buttonholes, approx. 8 cm between each. ---------------------------------------------------------- JACKET: Worked back and forth on circular needle, top down. Sleeves are worked in the round on double pointed needles. YOKE: Cast on 111-115-119-123-128-136 stitches on circular needle size 3.5 mm with Muskat. Work 3 ridges in GARTER STITCH back and forth - see explanation above! Switch to circular needle size 4 mm. Knit 1 row from right side while increasing 21-21-25-29-32-32 stitches evenly – read INCREASE/DECREASE TIP, (but not over the 5 outermost stitches in each side) = 132-136-144-152-160-168 stitches – remember BUTTONHOLES on right band – see explanation above. Purl 1 row from wrong side inside 5 band stitches in garter stitch in each side. On next row work pattern as follows: 5 band stitches in garter stitch, A.1 (= 10 stitches), 3-4-6-8-10-12 stitches in stocking stitch , (= left front piece), make 1 yarn over, A.2 (= 12 stitches), make 1 yarn over, 11 stitches in stocking stitch (= sleeve), make 1 yarn over, A.2, make 1 yarn over, 26-28-32-36-40-44 stitches in stocking stitch (= back piece), make 1 yarn over, A.2, make 1 yarn over, 11 stitches in stocking stitch (= sleeve), make 1 yarn over, A.2, make 1 yarn over, 3-4-6-8-10-12 stitches in stocking stitch (= right front piece), A.1, 5 band stitches in garter stitch. First increase for raglan is now done (= 8 stitches increased on round). REMEMBER THE KNITTING TENSION! Continue pattern like this and increase for RAGLAN – see explanation above, every other row 22-25-27-30-33-36 times in total (including first increase) = 308-336-360-392-424-456 stitches. Continue with stocking stitch, A.2 in every transition between body and sleeves and A.1 + 5 band stitches in garter stitch in each side towards mid front until piece measures 20-22-23-25-27-29 cm from cast-on edge and down along band mid front. Continue the pattern as before and work next row from right side as follows: Work first 46-50-54-59-64-69 stitches (= left front piece), slip the next 67-73-77-83-89-95 stitches on a stitch holder (= sleeve), cast on 10-10-12-12-14-16 new stitches under sleeve, work the next 82-90-98-108-118-128 stitches (= back piece), slip the next 67-73-77-83-89-95 stitches on a stitch holder (= sleeve), cast on 10-10-12-12-14-16 new stitches under sleeve, work the remaining 46-50-54-59-64-69 stitches (= right front piece). Finish body and sleeves separately. Insert a marker thread here. NOW MEASURE THE PIECE FROM HERE! BODY: = 194-210-230-250-274-298 stitches. Insert 1 marker thread in each side (i.e. in the middle of the 10-10-12-12-14-16 new stitches that were cast on under sleeve in each side). Continue back and forth in stocking stitch with A.1 + 5 band stitches in garter stitch towards mid front as before. When piece measures 4 cm from division, increase 2 stitches in each side - READ INCREASE TIP (= 4 stitches increased). Increase like this every 12th-12th-14th-14th-14th-14th row 7-7-6-6-6-6 times in total = 222-238-254-274-298-322 stitches. When piece measures 31-31-32-32-32-32 cm from division, switch to circular needle size 3.5 mm. Work 3 ridges. Cast off by knitting. To avoid a tight cast-off edge cast off with a needle in a larger size. Jacket measures approx. 56-58-60-62-64-66 cm from shoulder and down. SLEEVE: Slip the 67-73-77-83-89-95 stitches from stitch holder in one side of piece on double pointed needles size 4 mm and pick in addition up 1 stitch in each of the 10-10-12-12-14-16 new stitches cast on under sleeve = 77-83-89-95-103-111 stitches. Insert 1 marker thread in the middle of the 10-10-12-12-14-16 new stitches picked up in each side (= mid under sleeve/side on of jacket). Work in stocking stitch in the round. When piece measures 4 cm from division, decrease 2 stitches mid under sleeve - read DECREASE TIP. Decrease like this every 6th-5th-4th-4th-3rd-3rd round 15-18-20-22-26-29 times in total = 47-47-49-51-51-53 stitches. Work until sleeve measures 44-42-42-40-39-37 cm from division. Switch to double pointed needles size 3.5 mm. Work 3 ridges. Cast off by knitting. To avoid a tight cast-off edge cast off with a needle in a larger size. Work the other sleeve the same way. ASSEMBLY: Sew the buttons on to left band. |
|||||||||||||
Diagram explanations |
|||||||||||||
|
|||||||||||||
 |
|||||||||||||
 |
|||||||||||||
Have you finished this pattern?Tag your pictures with #dropspattern #peoniacardigan or submit them to the #dropsfan gallery. Do you need help with this pattern?You'll find 27 tutorial videos, a Comments/Questions area and more by visiting the pattern on garnstudio.com. © 1982-2026 DROPS Design A/S. We reserve all rights. This document, including all its sub-sections, has copyrights. Read more about what you can do with our patterns at the bottom of each pattern on our site. |
|||||||||||||


With over 40 years in knitting and crochet design, DROPS Design offers one of the most extensive collections of free patterns on the internet - translated to 17 languages. As of today we count 324 catalogues and 12290 patterns translated into English (UK/cm). 12290
We work hard to bring you the best knitting and crochet have to offer, inspiration and advice as well as great quality yarns at incredible prices! Would you like to use our patterns for other than personal use? You can read what you are allowed to do in the Copyright text at the bottom of all our patterns. Happy crafting!
Post a comment to pattern DROPS 191-19
We would love to hear what you have to say about this pattern!
If you want to leave a question, please make sure you select the correct category in the form below, to speed up the answering process. Required fields are marked *.