
Popular categories
Looking for a yarn?


Comments / Questions (64)
![]() Agnieszka wrote:
Agnieszka wrote:
Czy na skosy ramion na plecach nie powinniśmy zamykać oczek na początku rzędów od strony ramienia? Teraz w instrukcj jest zamykanie od strony dekoldu.
19.12.2021 - 13:24DROPS Design answered:
Witaj Agnieszko, oczywiście masz rację, już to poprawiłam we wzorze. Dziękujemy i pozdrawiamy!
20.12.2021 - 08:40
![]() Nicole Peters wrote:
Nicole Peters wrote:
Na 14 cm beginnen met een kantsteek voor xe rugpand. Na 15 cm minderen. Is dit de totale lengte dan of meet je 15 cm na het beginnen van de kantsteek?
09.12.2021 - 21:37DROPS Design answered:
Dag Nicole,
Bij 14 cm zet je 1 kantsteek op en dit wordt gemeten vanaf de opzetrand, dus vanaf het begin. Op 15 cm begin je met minderen en dit is ook de totale lengte, dus 1 cm nadat je de kantsteken hebt opgezet.
11.12.2021 - 15:52
![]() Frieda wrote:
Frieda wrote:
Ich habe eine Frage zum Rückenteil: "6 Maschen 3 x, dann die restlichen 6-6-7-8-9-10 Maschen abketten" - heißt das 18 Maschen stricken und dann abketten? Wo wird abgekettet, an Halsausschnitt oder auf der Ärmelseite. Danke, Frieda
13.10.2021 - 19:08DROPS Design answered:
Liebe Frieda, so stricken Sie am Anfang jeder Hin-Reihe an der rechten Schulter (beim Tragen des Kleidungsstücks) und am Anfang jeder Rück-Reihe an der linken Schulter (beim Tragen des Kleidungsstücks): *die 6 ersten Maschen stricken und abketten, bis Ende der Reihe stricken, wenden und die nächste Reihe (Rückreihe beim rechten Schulter, Hinreihe beim linken Schulter) stricken*, diese 2 Reihe noch 2 Mal stricken (= 3 Mal insgesamt), es sind noch 6-6-7-8-9-10 Maschen auf der Nadel übrig, diese Maschen bei der nächsten Reihe abketten. Viel Spaß beim stricken!
14.10.2021 - 09:22
![]() Agnieszka wrote:
Agnieszka wrote:
Czy po 14 cm na początku dalej trzeba zrobić jeszcze 1 cm z 4 o. ściegu francuskiego czy już przerabiać dżersejem z oczkami brzegowymi?
02.10.2021 - 06:11DROPS Design answered:
Witaj Agnieszko, musisz teraz przerabiać dżersejem z 1 oczkiem brzegowym ściegiem francuskim z każdej strony. Pozdrawiamy!
03.10.2021 - 21:43
![]() Anett wrote:
Anett wrote:
Har tittat på videon hur man monterar fickor men eftetso. Fickan är stickad i helpatent får jag inte det och stämma. Finns någon annan video som visar just patent ficka. Jag blir galen och är på väg att ge upp. Många provlappar och inget blir bra. Har ni något tips tack
06.09.2021 - 22:43DROPS Design answered:
Hei Anett. Vi har ingen video på akkurat dette, men vi skal prøve å få lage en. Men det skal bli OK med bare noen små sting som sys i rillene i siden og i oppleggskanten. mvh DROPS design
15.09.2021 - 13:34
![]() Loretta wrote:
Loretta wrote:
Nelle tasche cosa significa lavorare due coste a legaccio?
17.06.2021 - 15:47DROPS Design answered:
Buonasera Loretta, la costa a legaccio è formata da 2 ferri lavorati a diritto. Buon lavoro!
17.06.2021 - 22:28
![]() Loretta wrote:
Loretta wrote:
Nel dietro del lavoro dove devo calare le due maglie nelle maglie a maglia rasata o nelle maglie a legaccio ai lati? Le maglie a legaccio devono rimanere sempre? Grazie
30.04.2021 - 16:33DROPS Design answered:
Buonasera Loretta, se fa riferimento a quanto spiegato nel SUGGERIMENTO PER LE DIMINUZIONI, deve diminuire prima/dopo le 2 maglie laterali. Buon lavoro!
30.04.2021 - 19:31
![]() Maja Stenholm wrote:
Maja Stenholm wrote:
Hvordan skal den vaskes?
23.04.2021 - 22:30DROPS Design answered:
Hei Maja. Du finner vaskeanvisningen på etiketten til DROPS Air eller du kan lese mer om vaskeanbefalingene til garnet under fargekartet til DROPS Air. mvh DROP design
26.04.2021 - 15:31
![]() Loretta wrote:
Loretta wrote:
Cosa significa nel dietro aggiustare il numero di maglie?poi successivamente cosa significa avviare una maglia di vivagno ai lati.Io lo maglie di vivagno le avevo aggiunte quando ho iniziato il lavoro.
23.04.2021 - 19:09DROPS Design answered:
Buonasera Loretta, in quel punto deve aumentare/diminuire le maglie fino a raggiungere il n° di maglie indicato. Le maglie di vivagno devono essere avviate quando lo indicano le spiegazioni, non prima. Buon lavoro!
24.04.2021 - 22:12
![]() Line Larose wrote:
Line Larose wrote:
Je viens de rabattre les mailles pour l'encolure, pour tricoter les épaules, est-ce que je dois mettre les mailles d'une des épaules sur une aiguille en attente ?
18.04.2021 - 16:35DROPS Design answered:
Bonjour Mme Larose, vous pouvez effectivement si vous vous sentez plus à l'aise ainsi, vous les reprendrez alors lorsque la première épaule sera terminée. Bonne continuation!
19.04.2021 - 08:32
|
|
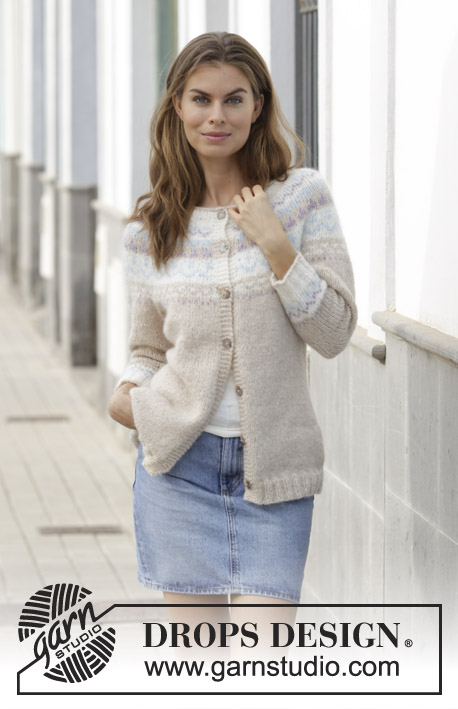
Wayfarer#wayfarerjacket |
|
 |
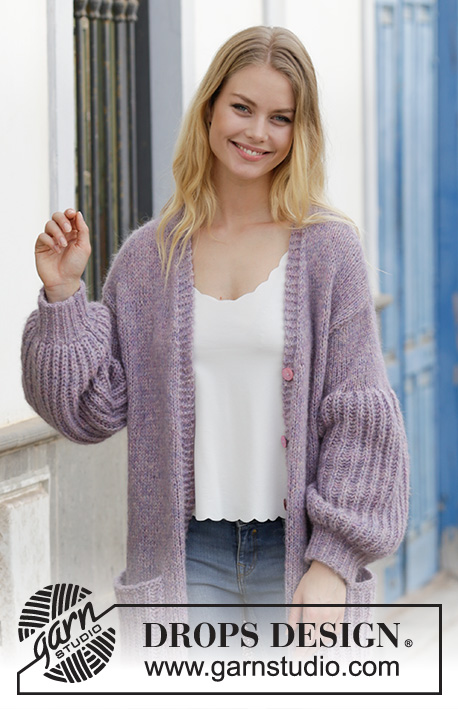 |
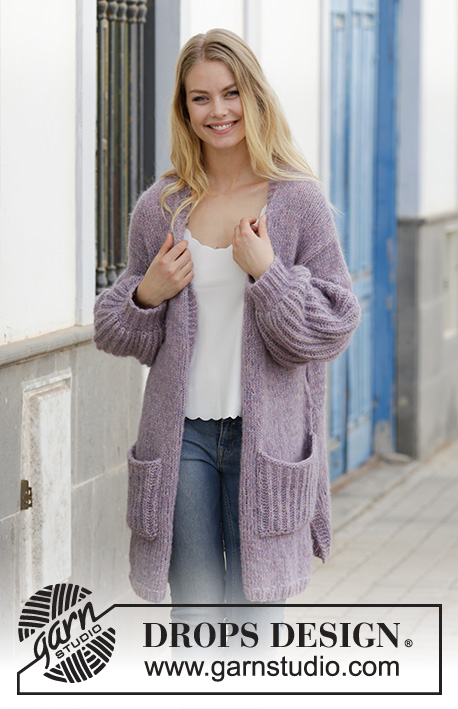
Knitted jacket with English rib, stocking stitch and pockets. Sizes S - XXXL. The piece is worked in DROPS Air.
DROPS 191-18 |
|
|
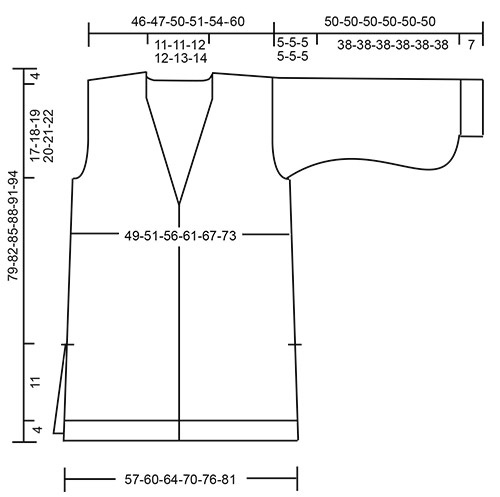
INFORMATION FOR THE PATTERN: RIDGE/GARTER STITCH (worked back and forth): 1 ridge = Knit 2 rows. ENGLISH RIB (back and forth on needle, including 1 edge stitch in each side): ROW 1: 1 stitch garter stitch, * knit 1, 1 yarn over, slip 1 stitch as if to purl *, work from *-* until there are 2 stitches left, finish with knit 1, 1 stitch garter stitch. ROW 2: 1 stitch garter stitch, * 1 yarn over, slip 1 stitch as if to purl, knit the yarn over and the slipped stitch together *, work from *-* until there are 2 stitches left, finish with 1 yarn over, slip 1 stitch as if to purl, 1 stitch garter stitch. ROW 3: 1 stitch garter stitch, * knit the yarn over and the slipped stitch together, 1 yarn over, slip 1 stitch as if to purl *, work from *-* until there are 3 stitches left, knit the yarn over and slipped stitch together, 1 stitch garter stitch. Repeat rows 2 and 3 upwards. DECREASE TIP -1 (= for the sides): All decreases are made from the right side! At the beginning of the row: Decrease 1 stitch after 2 stitches as follows: Slip 1 stitch as if to knit, knit 1, pass the slipped stitch over (= 1 stitch decreased). At the end of the row: Decrease 1 stitch before 2 stitches as follows: Knit 2 together (= 1 stitch decreased). DECREASE TIP -2 (for neck): All decreases are made from the right side! Decrease 1 stitch after the 5 band stitches as follows (applies to right front piece): Work 5 band stitches in garter stitch, slip 1 stitch as if to knit, knit 1, pass the slipped stitch over (= 1 stitch decreased). Decrease 1 stitch before the 5 band stitches as follows (applies to left front piece): Work until there are 7 stitches left, knit 2 together (= 1 stitch decreased), work 5 band stitches in garter stitch. BUTTONHOLES: Work buttonholes on the right band. 1 BUTTONHOLE = knit together the 3rd and 4th stitch from the edge and make 1 yarn over. On the next row knit the yarn over = hole. Work buttonholes when the piece measures: S: 14, 22, 31, 40, 49 and 58 cm M: 14, 23, 32, 41, 50 and 60 cm L: 14, 23, 32, 42, 52 and 62 cm XL: 14, 24, 34, 44, 54 and 64 cm XXL: 14, 24, 34, 44, 54 and 65 cm XXXL: 14, 24, 34, 45, 56 and 67 cm INCREASE TIP: (for sleeves) Increase by making 1 yarn over between 2 stitches; on the next row from the wrong side purl the yarn over twisted to avoid a hole. ---------------------------------------------------------- JACKET: The jacket is worked back and forth with circular needle, bottom up. The back piece and front pieces are worked separately and sewn together to finish. Then the sleeves are worked and sewn to the body. BACK PIECE: The piece is worked back and forth with circular needle. Cast on 81-84-90-99-105-114 stitches with circular needle size 7 mm and Air. Work 4 stitches garter stitch, * knit 1, purl 2 *, work from *-* until there are 5 stitches left, finish with knit 1 and 4 stitches garter stitch. Work 6 rows like this. Then continue in stocking stitch with 4 stitches garter stitch in each side, AT THE SAME TIME on the first row of stocking stitch adjust the number of stitches to 80-84-90-98-106-114 stitches. REMEMBER THE KNITTING TENSION! When the piece measures 14 cm cast on 1 edge stitch at the end of the next 2 rows (= 1 new stitch in each side of the piece) = 82-86-92-100-108-116 stitches. Then continue working stocking stitch with 1 edge stitch in garter stitch in each side of the piece. When the piece measures 15 cm decrease 1 stitch inside the 2 stitches in each side of the piece – read DECREASE TIP-1 = 2 stitches decreased. Decrease like this every 8-8-8½-9-9½-10 cm a total of 6 times = 70-74-80-88-96-104 stitches. When the piece measures 58-60-62-64-66-68 cm cast off 3-4-4-5-5-6 stitches for the armholes at the start of the next 2 rows = 64-66-72-78-86-92 stitches. Then cast off 1 stitch in each side every 2nd row a total of 0-0-1-3-5-7 times = 64-66-70-72-76-78 stitches. When the piece measures 75-78-81-84-87-90 cm cast off the middle 16-18-20-20-22-22 stitches for neck = 24-24-25-26-27-28 stitches left on each shoulder. Then cast off stitches for diagonal shoulders at the beginning of each row towards the neck - i.e. at the beginning of each row from the right side on the right shoulder (when the garment is worn) and the beginning of each row from the wrong side on the left shoulder (when the garment is worn). Cast off for diagonal shoulders as follows: 6 stitches 3 times, then cast off the remaining 6-6-7-8-9-10 stitches. Repeat on the other side. The piece measures a total of 79-82-85-88-91-94 cm. RIGHT FRONT PIECE: Cast on 46-49-49-55-58-61 stitches (including 5 band stitches) with circular needle size 7 mm and Air. Work as follows from the right side: 5 band stitches in garter stitch, * knit 1, purl 2 *, work from *-* until there are 5 stitches left, finish with knit 1 and 4 stitches in garter stitch. Work 6 rows like this. Then continue working from the right side as follows: 5 band stitches in garter stitch, work stocking stitch until there are 4 stitches left, finish with 4 stitches in garter stitch, AT THE SAME TIME on the first row of stocking stitch adjust the number of stitches to 45-47-50-54-58-62 stitches. When the piece measures 14 cm, adjust to match the back piece, cast on 1 edge stitch at the end of the next row from the right side = 46-48-51-55-59-63 stitches. Then continue with stocking stitch and 5 band stitches in garter stitch towards mid front as before and 1 edge stitch in garter stitch towards the side. Work BUTTONHOLES on the band – see description above. When the piece measures 15 cm, decrease 1 stitch inside the 2 stitches in the side at the end of the next row from the right side. Decrease like this every 8-8-8½-9-9½-10 cm a total of 6 times = 40-42-45-49-53-57 stitches. When the piece measures 58-60-62-64-66-68 cm cast off for the armhole in the side as for the back piece = 37-38-40-41-43-44 stitches. AT THE SAME TIME when the piece measures 59-61-63-65-66-68 cm decrease for the neck inside the 5 band stitches – read DECREASE TIP-2. Decrease like this every 4th row a total of 8-9-10-10-11-11 times = 29-29-30-31-32-33 stitches left when the neck decreases are finished. When the piece measures 75-78-81-84-87-90 cm cast off for diagonal shoulder at the beginning of each row from the wrong side as follows: 6 stitches 3 times, 6-6-7-8-9-10 stitches 1 time = 5 band stitches left on the needle. Work garter stitch over the band stitches until the band measures approx. 10-11-11-12-13-13 cm from the last cast off stitch on the shoulder (this will be sewn to the neck on the back piece). LEFT FRONT PIECE: Work as for the right front piece but reversed. Do not work buttonholes. SLEEVES: The sleeves are worked back and forth with circular needle. Cast on 44-47-47-50-50-53 stitches (including 1 edge stitch in each side of the piece) with circular needle size 4 mm and Air. Work rib (= knit 1, purl 2) with 1 edge stitch in garter stitch in each side of the piece. When the rib measures 7-7-7-7-7-7 cm, adjust so that the next row is worked from the right side, work 1 row of rib as before AT THE SAME TIME as you increase 11-12-12-13-13-14 stitches evenly on row – read INCREASE TIP! = 55-59-59-63-63-67 stitches. Purl 1 row. Change to circular needle size 7 mm and work ENGLISH RIB – see description above. Continue until the piece measures 37-37-37-37-37-37 cm and then continue with stocking stitch with 1 edge stitch in garter stitch in each side of the piece AT THE SAME TIME as you decrease 8-9-6-7-4-6 stitches evenly on the first row = 47-50-53-56-59-61 stitches. Continue with stocking stitch until the piece measures 45-45-45-45-45-45 cm. Now cast off 4 stitches in each side every 2nd row a total of 4 times = 15-18-21-24-27-29 stitches. Cast off the remaining stitches, the sleeve measures 50-50-50-50-50-50 cm. Work the other sleeve in the same way. POCKETS: Cast on 25 stitches with circular needle size 7 mm and Air. Work 2 ridges then work ENGLISH RIB with 1 stitch in garter stitch in each side. When the piece measures 16 cm work 1 ridge, then cast off. Work one more pocket in the same way. ASSEMBLY: Sew the side seams inside the 1 edge stitch in garter stitch, sew down to the split (= 14 cm split). Sew shoulder seams and sew the neck from the front pieces together and sew it to the neck on the back piece. Sew the sleeve seams inside the 1 edge stitch in each side, then sew the sleeves to the body. Sew buttons onto the left band. Sew a pocket onto each front piece – approx. 14 cm from the bottom edge and 8 cm from mid front – see photo. |
|
 |
|
Have you finished this pattern?Tag your pictures with #dropspattern #wayfarerjacket or submit them to the #dropsfan gallery. Do you need help with this pattern?You'll find 29 tutorial videos, a Comments/Questions area and more by visiting the pattern on garnstudio.com. © 1982-2026 DROPS Design A/S. We reserve all rights. This document, including all its sub-sections, has copyrights. Read more about what you can do with our patterns at the bottom of each pattern on our site. |
|


With over 40 years in knitting and crochet design, DROPS Design offers one of the most extensive collections of free patterns on the internet - translated to 17 languages. As of today we count 324 catalogues and 12290 patterns translated into English (UK/cm). 12290
We work hard to bring you the best knitting and crochet have to offer, inspiration and advice as well as great quality yarns at incredible prices! Would you like to use our patterns for other than personal use? You can read what you are allowed to do in the Copyright text at the bottom of all our patterns. Happy crafting!
Post a comment to pattern DROPS 191-18
We would love to hear what you have to say about this pattern!
If you want to leave a question, please make sure you select the correct category in the form below, to speed up the answering process. Required fields are marked *.