
Popular categories
Looking for a yarn?


Comments / Questions (64)
![]() Lea wrote:
Lea wrote:
Kuvan mukaan kyseessä on ns. laskettu hartia, jolloin muotoilua ei tarvita, jotta se istuisi hyvin hartiaan. Kuinka monta silmukkaa on valmiin hihan yläosassa ja miten pitäisi käsittää nuo neljän silmukan kavennukset?
21.02.2026 - 15:55DROPS Design answered:
Hei, hihan kummastakin reunasta päätetään 4 silmukkaa 4 kertaa, eli kummastakin reunasta päätetään yhteensä 16 silmukkaa ja jäljelle jää 15-18-21-24-27-29 silmukkaa.
03.03.2026 - 19:15
![]() FERRARI wrote:
FERRARI wrote:
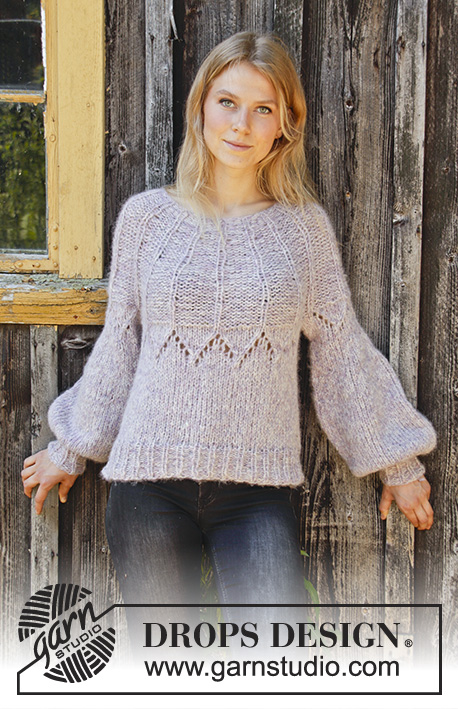
Se tricote en allers et retours sur aiguille circulaire. Monter 81-84-90-99-105-114 mailles avec l'aiguille circulaire 7 en Air. Tricoter 4 mailles point mousse, *1 maille endroit, 2 mailles envers*, répéter de *-* jusqu'à ce qu'il reste 5 mailles, terminer par 1 maille endroit et 4 mailles point mousse. Tricoter 6 rangs. Cela donne quoi ? C'est quoi ce point svp ? Merci
16.11.2025 - 22:11DROPS Design answered:
Bonjour Mme Ferrari, ce sont des côtes 1 m end/2 m env (vu sur l'endroit), qui commencent et se terminent par 1 m end et on a en plus 4 m point mousse de chaque côté pour les bordures des fentes. Bon tricot!
17.11.2025 - 08:32
![]() Ferrari wrote:
Ferrari wrote:
Quel est le point réalisé pour le dos et le devant : 1 maille endroit 2 mailles envers ? cela doit donner quoi à l'issue ? Cela n'est pas de la côte anglaise à priori. Merci Beaucoup
15.11.2025 - 23:01DROPS Design answered:
Bonjour Mme Ferrari, le dos et les devants se tricotent en jersey, en commençant par des côtes 1 m endroit, 2 m envers en bas. Bon tricot!
17.11.2025 - 08:02
![]() ROSA wrote:
ROSA wrote:
è possibile lavorarlo con ferri lineari? Se si puo' come vanno distribuite le maglie? grazie
09.09.2025 - 11:29DROPS Design answered:
Buomgiorno Rosa, questo modello è un cardigan, per cui può lavorarlo con i ferri normali. Buon lavoro!
10.09.2025 - 16:30
![]() Roberta wrote:
Roberta wrote:
Queste istruzioni sono veramente scritte male, incomprensibili a tratti e con dei refusi ( ad esempio nelle diminuzioni per il collo quelle per il lato sinistro hanno la dicitura la to destro) . Anche la parte relativa alla confezione finale è lacunosa e superficiale…va bene che sono gratuite queste istruzioni, ma credo sia veramente poco serio da parte vostra.
14.03.2025 - 09:30DROPS Design answered:
Buonasera Roberta, grazie per la segnalazione, abbiamo corretto il testo. Buon lavoro!
14.03.2025 - 22:48
![]() Lone Jensen wrote:
Lone Jensen wrote:
Hvorfor kan jeg ikke udskrive opskriften? Der kommer bare blanke sider.. der er ingen fejl på min printer..
09.01.2025 - 19:38DROPS Design answered:
Hei Lone. Klikk på Skriv ut ikonet (ikke ctrl+P) eller sjekk skriver innstillingene dine. Vi har testet og her har vi ingen problemer. mvh DROPS Design
13.01.2025 - 13:45
![]() Gerry Stewart wrote:
Gerry Stewart wrote:
This is the most poorly written, confusing pattern I have ever used - and I have been knitting and crocheting for 60+ years. It’s like reading a novel, where you have to keep going back to the previous chapter to see what you missed. The whole process would have been so simple if the pattern was written step by step. It’s frustrating, disappointing and unnecessarily time-consuming.
22.11.2024 - 08:06
![]() Sandra wrote:
Sandra wrote:
Witam, mam wątpliwość jak wszyć rękawy do reszty swetra gdzy mam na końcu tylko 24 oczka (rozmiar L) podszycie rękawa jest znacznie większe. Poproszę o szczegółowe wyjaśnienie tego momentu
13.11.2024 - 11:58DROPS Design answered:
Witaj Sandro, do podkroju rękawa przyszywasz nie tylko te ostatnie 24 oczka, ale całą główkę rękawa, czyli linię skośną, która zaczyna się gdy rękaw ma wys. 45 cm (tam gdzie zaczęło się zamykanie oczek z każdej strony rękawa). Pozdrawiamy!
14.11.2024 - 15:41
![]() Riska wrote:
Riska wrote:
RIGHT FRONT PIECE: Cast on 46-49-49-55-58-61 stitches (including 5 band stitches), but then "on the first row of stockinette stitch adjust the number of stitches to 45-47-50-54-58-62 stitches.". Did I miss some lines or something? I'm a bit confuse. I have read repeatedlybut still can't find any other explanation. help!
25.09.2024 - 05:08DROPS Design answered:
Dear Riska, you first work rib with 5 sts in garter stitch for the front band for 6 rows, then continue in stocking stitch with the front band sts as before and on the first row stocking stitch, decrease or increase (see your size) evenly to get the correct number of stitches at the end of this row. Happy knitting!
25.09.2024 - 08:33
![]() Elisabeth Turesson wrote:
Elisabeth Turesson wrote:
Jag stickar nu ärmen stl m 59masker. Sedan helpantent med omslag då blir det över 80 m hur avmaskar jag dessa vid 37 cm då det igen ska vara 59m sedan av maska 9 fördelat =50m Tacksam för hjälp
09.07.2024 - 19:20DROPS Design answered:
Hei Elisabeth. Kastene ved patentstrikk er ingen egen maske, men tilhører rett/vrangmasken, så du har alltid 59 masker. Når arbeidet måler 37 cm strikkes det nå glattstrikk og felles 9 masker jevnt fordelt (2 masker rett sammen, sammen med et kast. mvh DROPS Design
10.07.2024 - 11:54
|
|
Wayfarer#wayfarerjacket |
|
 |
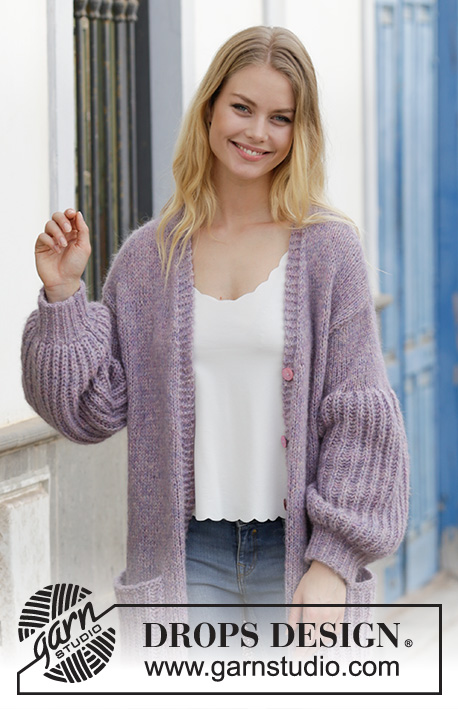 |
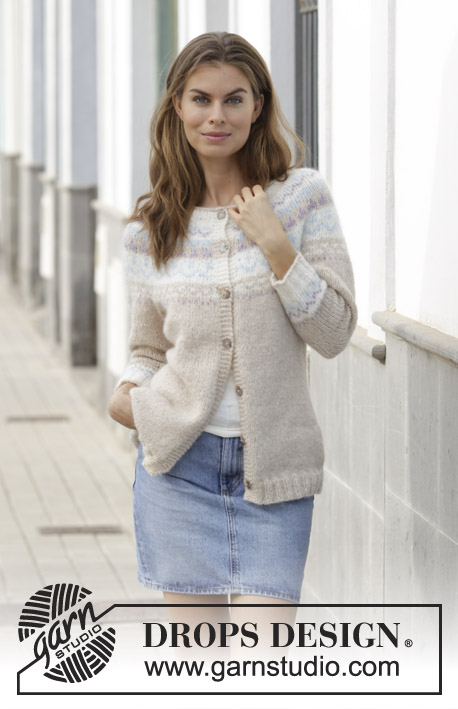
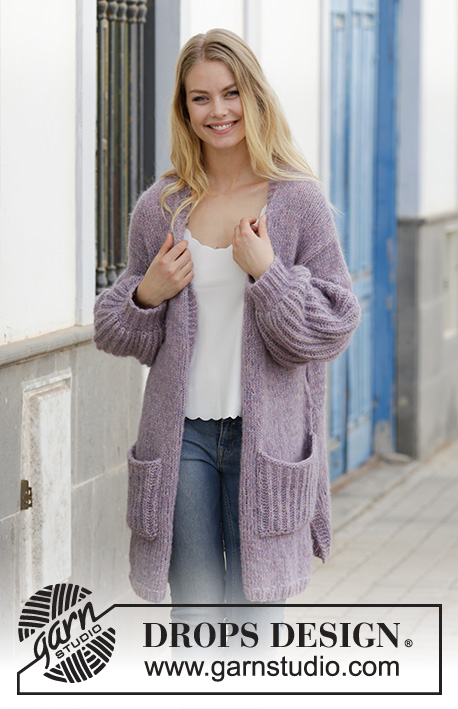
Knitted jacket with English rib, stocking stitch and pockets. Sizes S - XXXL. The piece is worked in DROPS Air.
DROPS 191-18 |
|
|
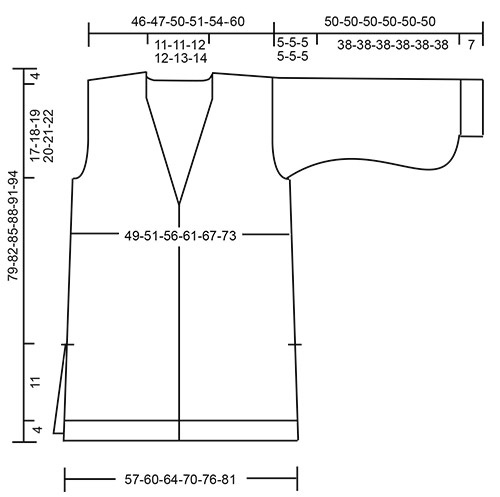
INFORMATION FOR THE PATTERN: RIDGE/GARTER STITCH (worked back and forth): 1 ridge = Knit 2 rows. ENGLISH RIB (back and forth on needle, including 1 edge stitch in each side): ROW 1: 1 stitch garter stitch, * knit 1, 1 yarn over, slip 1 stitch as if to purl *, work from *-* until there are 2 stitches left, finish with knit 1, 1 stitch garter stitch. ROW 2: 1 stitch garter stitch, * 1 yarn over, slip 1 stitch as if to purl, knit the yarn over and the slipped stitch together *, work from *-* until there are 2 stitches left, finish with 1 yarn over, slip 1 stitch as if to purl, 1 stitch garter stitch. ROW 3: 1 stitch garter stitch, * knit the yarn over and the slipped stitch together, 1 yarn over, slip 1 stitch as if to purl *, work from *-* until there are 3 stitches left, knit the yarn over and slipped stitch together, 1 stitch garter stitch. Repeat rows 2 and 3 upwards. DECREASE TIP -1 (= for the sides): All decreases are made from the right side! At the beginning of the row: Decrease 1 stitch after 2 stitches as follows: Slip 1 stitch as if to knit, knit 1, pass the slipped stitch over (= 1 stitch decreased). At the end of the row: Decrease 1 stitch before 2 stitches as follows: Knit 2 together (= 1 stitch decreased). DECREASE TIP -2 (for neck): All decreases are made from the right side! Decrease 1 stitch after the 5 band stitches as follows (applies to right front piece): Work 5 band stitches in garter stitch, slip 1 stitch as if to knit, knit 1, pass the slipped stitch over (= 1 stitch decreased). Decrease 1 stitch before the 5 band stitches as follows (applies to left front piece): Work until there are 7 stitches left, knit 2 together (= 1 stitch decreased), work 5 band stitches in garter stitch. BUTTONHOLES: Work buttonholes on the right band. 1 BUTTONHOLE = knit together the 3rd and 4th stitch from the edge and make 1 yarn over. On the next row knit the yarn over = hole. Work buttonholes when the piece measures: S: 14, 22, 31, 40, 49 and 58 cm M: 14, 23, 32, 41, 50 and 60 cm L: 14, 23, 32, 42, 52 and 62 cm XL: 14, 24, 34, 44, 54 and 64 cm XXL: 14, 24, 34, 44, 54 and 65 cm XXXL: 14, 24, 34, 45, 56 and 67 cm INCREASE TIP: (for sleeves) Increase by making 1 yarn over between 2 stitches; on the next row from the wrong side purl the yarn over twisted to avoid a hole. ---------------------------------------------------------- JACKET: The jacket is worked back and forth with circular needle, bottom up. The back piece and front pieces are worked separately and sewn together to finish. Then the sleeves are worked and sewn to the body. BACK PIECE: The piece is worked back and forth with circular needle. Cast on 81-84-90-99-105-114 stitches with circular needle size 7 mm and Air. Work 4 stitches garter stitch, * knit 1, purl 2 *, work from *-* until there are 5 stitches left, finish with knit 1 and 4 stitches garter stitch. Work 6 rows like this. Then continue in stocking stitch with 4 stitches garter stitch in each side, AT THE SAME TIME on the first row of stocking stitch adjust the number of stitches to 80-84-90-98-106-114 stitches. REMEMBER THE KNITTING TENSION! When the piece measures 14 cm cast on 1 edge stitch at the end of the next 2 rows (= 1 new stitch in each side of the piece) = 82-86-92-100-108-116 stitches. Then continue working stocking stitch with 1 edge stitch in garter stitch in each side of the piece. When the piece measures 15 cm decrease 1 stitch inside the 2 stitches in each side of the piece – read DECREASE TIP-1 = 2 stitches decreased. Decrease like this every 8-8-8½-9-9½-10 cm a total of 6 times = 70-74-80-88-96-104 stitches. When the piece measures 58-60-62-64-66-68 cm cast off 3-4-4-5-5-6 stitches for the armholes at the start of the next 2 rows = 64-66-72-78-86-92 stitches. Then cast off 1 stitch in each side every 2nd row a total of 0-0-1-3-5-7 times = 64-66-70-72-76-78 stitches. When the piece measures 75-78-81-84-87-90 cm cast off the middle 16-18-20-20-22-22 stitches for neck = 24-24-25-26-27-28 stitches left on each shoulder. Then cast off stitches for diagonal shoulders at the beginning of each row towards the neck - i.e. at the beginning of each row from the right side on the right shoulder (when the garment is worn) and the beginning of each row from the wrong side on the left shoulder (when the garment is worn). Cast off for diagonal shoulders as follows: 6 stitches 3 times, then cast off the remaining 6-6-7-8-9-10 stitches. Repeat on the other side. The piece measures a total of 79-82-85-88-91-94 cm. RIGHT FRONT PIECE: Cast on 46-49-49-55-58-61 stitches (including 5 band stitches) with circular needle size 7 mm and Air. Work as follows from the right side: 5 band stitches in garter stitch, * knit 1, purl 2 *, work from *-* until there are 5 stitches left, finish with knit 1 and 4 stitches in garter stitch. Work 6 rows like this. Then continue working from the right side as follows: 5 band stitches in garter stitch, work stocking stitch until there are 4 stitches left, finish with 4 stitches in garter stitch, AT THE SAME TIME on the first row of stocking stitch adjust the number of stitches to 45-47-50-54-58-62 stitches. When the piece measures 14 cm, adjust to match the back piece, cast on 1 edge stitch at the end of the next row from the right side = 46-48-51-55-59-63 stitches. Then continue with stocking stitch and 5 band stitches in garter stitch towards mid front as before and 1 edge stitch in garter stitch towards the side. Work BUTTONHOLES on the band – see description above. When the piece measures 15 cm, decrease 1 stitch inside the 2 stitches in the side at the end of the next row from the right side. Decrease like this every 8-8-8½-9-9½-10 cm a total of 6 times = 40-42-45-49-53-57 stitches. When the piece measures 58-60-62-64-66-68 cm cast off for the armhole in the side as for the back piece = 37-38-40-41-43-44 stitches. AT THE SAME TIME when the piece measures 59-61-63-65-66-68 cm decrease for the neck inside the 5 band stitches – read DECREASE TIP-2. Decrease like this every 4th row a total of 8-9-10-10-11-11 times = 29-29-30-31-32-33 stitches left when the neck decreases are finished. When the piece measures 75-78-81-84-87-90 cm cast off for diagonal shoulder at the beginning of each row from the wrong side as follows: 6 stitches 3 times, 6-6-7-8-9-10 stitches 1 time = 5 band stitches left on the needle. Work garter stitch over the band stitches until the band measures approx. 10-11-11-12-13-13 cm from the last cast off stitch on the shoulder (this will be sewn to the neck on the back piece). LEFT FRONT PIECE: Work as for the right front piece but reversed. Do not work buttonholes. SLEEVES: The sleeves are worked back and forth with circular needle. Cast on 44-47-47-50-50-53 stitches (including 1 edge stitch in each side of the piece) with circular needle size 4 mm and Air. Work rib (= knit 1, purl 2) with 1 edge stitch in garter stitch in each side of the piece. When the rib measures 7-7-7-7-7-7 cm, adjust so that the next row is worked from the right side, work 1 row of rib as before AT THE SAME TIME as you increase 11-12-12-13-13-14 stitches evenly on row – read INCREASE TIP! = 55-59-59-63-63-67 stitches. Purl 1 row. Change to circular needle size 7 mm and work ENGLISH RIB – see description above. Continue until the piece measures 37-37-37-37-37-37 cm and then continue with stocking stitch with 1 edge stitch in garter stitch in each side of the piece AT THE SAME TIME as you decrease 8-9-6-7-4-6 stitches evenly on the first row = 47-50-53-56-59-61 stitches. Continue with stocking stitch until the piece measures 45-45-45-45-45-45 cm. Now cast off 4 stitches in each side every 2nd row a total of 4 times = 15-18-21-24-27-29 stitches. Cast off the remaining stitches, the sleeve measures 50-50-50-50-50-50 cm. Work the other sleeve in the same way. POCKETS: Cast on 25 stitches with circular needle size 7 mm and Air. Work 2 ridges then work ENGLISH RIB with 1 stitch in garter stitch in each side. When the piece measures 16 cm work 1 ridge, then cast off. Work one more pocket in the same way. ASSEMBLY: Sew the side seams inside the 1 edge stitch in garter stitch, sew down to the split (= 14 cm split). Sew shoulder seams and sew the neck from the front pieces together and sew it to the neck on the back piece. Sew the sleeve seams inside the 1 edge stitch in each side, then sew the sleeves to the body. Sew buttons onto the left band. Sew a pocket onto each front piece – approx. 14 cm from the bottom edge and 8 cm from mid front – see photo. |
|
 |
|
Have you finished this pattern?Tag your pictures with #dropspattern #wayfarerjacket or submit them to the #dropsfan gallery. Do you need help with this pattern?You'll find 30 tutorial videos, a Comments/Questions area and more by visiting the pattern on garnstudio.com. © 1982-2026 DROPS Design A/S. We reserve all rights. This document, including all its sub-sections, has copyrights. Read more about what you can do with our patterns at the bottom of each pattern on our site. |
|


With over 40 years in knitting and crochet design, DROPS Design offers one of the most extensive collections of free patterns on the internet - translated to 17 languages. As of today we count 325 catalogues and 12298 patterns translated into English (UK/cm). 12298
We work hard to bring you the best knitting and crochet have to offer, inspiration and advice as well as great quality yarns at incredible prices! Would you like to use our patterns for other than personal use? You can read what you are allowed to do in the Copyright text at the bottom of all our patterns. Happy crafting!
Post a comment to pattern DROPS 191-18
We would love to hear what you have to say about this pattern!
If you want to leave a question, please make sure you select the correct category in the form below, to speed up the answering process. Required fields are marked *.