
Popular categories
Looking for a yarn?


Comments / Questions (58)
![]() Heike wrote:
Heike wrote:
Hallo, mir ist beim Model folgendes aufgefallen: die Schlitzlänge ist in der Anleitung und der Skizze unterschiedlich. Das Symbol für 2 Maschen hinter die Arbeit legen fehlt. Es gibt keinen Hinweis darauf, dass beim Ärmel ebenfalls Maschen stillgelegt werden müssen. Bei der Passe Größe M werden keine 3 Maschen verteilt abgenommen, sondern wie bei Größe S Null. Viele Grüße.
19.08.2019 - 00:36DROPS Design answered:
Liebe Heike, danke für Ihren Kommentar, den haben wir unser Design Team weitergeleitet. Viel Spaß beim stricken!
19.08.2019 - 11:16
![]() Tonje wrote:
Tonje wrote:
Hei 😊 Holder på å strikke genseren nå, og forstår ikke helt hva jeg skal gjøre videre. Jeg er ferdig med fremstykket og bakstykket, så skal nå i gang med bolen. I oppskriften står det «fortsett med møster som før...» men hvilket mønster skal jeg forsette med? Skal jeg starte fra toppen igjen på bakstykket? Eller skal jeg forsette med den nederste delen av bakstykket? Har prøvd flere forskjellige måter, men finner ikke ut av dette!
16.07.2019 - 21:33DROPS Design answered:
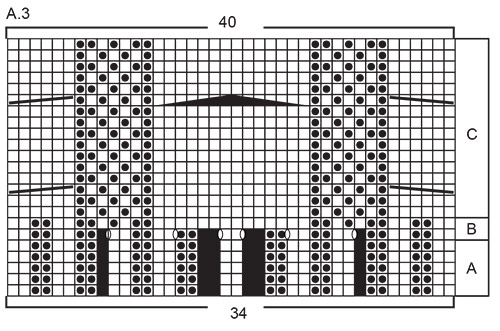
Hei Tonje. Du fortsetter der du sluttet med diagrammene fra frem -og bakstykket. Sluttet du f.eks med 8. pinne i diagram A.3 på frem -og bakstykke, begynner du på 9. pinne av diagram A.3 når du starter bolen. God Fornøyelse!
26.08.2019 - 14:53
![]() La Tricoteuse24 wrote:
La Tricoteuse24 wrote:
Bonjour, Je ne comprends pas ce qu’il faut faire après avoir fait les 8 cm de côte, je tricote la taille S et je ne comprends pas comment faire le motif. Pourriez-vous m’expliquer ?
29.05.2019 - 20:23DROPS Design answered:
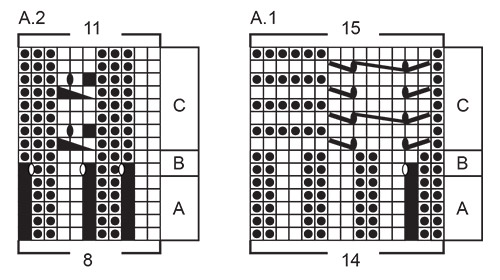
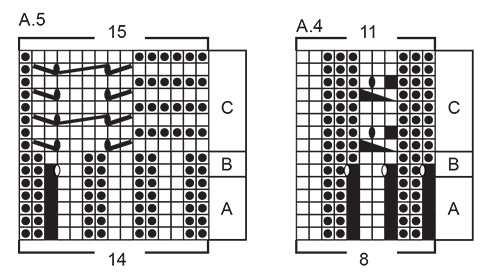
Bonjour! La taille S: changer pour l'aiguille circulaire 5 et tricoter le rang suivant ainsi – sur l'endroit: 3 mailles au point mousse, 2 mailles jersey, tricoter maintenant la partie B des diagrammes au-dessus de la partie A (vous faites A.1B-A.5B au lieu de A.1A-A.5A), 2-0-0-0-0-2 mailles jersey, 3 mailles au point mousse. Bon tricot!
30.05.2019 - 18:34
![]() Astrid wrote:
Astrid wrote:
Tusen takk for hjelpen. Er visst to rett og to vrang før og etter diagrammene jeg har hoppet over😊👍🏻.
20.05.2019 - 13:38
![]() Astrid wrote:
Astrid wrote:
Jeg strikker str m. Når jeg har begynt på den første linjen A1b-a5b, den med økning, så har jeg 8 masker rvrangbord + 3 masker rille igjen på pinnen når jeg er ferdig med diagrammene. Med økningen har jeg 106 masker på pinnen. Er det feil i oppskriften? Står ikke at str M skal strikke en av diagrammene flere ganger. Hva er feil her?
18.05.2019 - 12:30DROPS Design answered:
Hei Astrid. Diagrammene fortsetter på akkurat samme sted som A.1A-A.5A, men det økes masker i hvert diagram - det økes totalt 14 masker på omgangen = 106 masker på pinnen. Du strikker altså slik: 3 masker rille, 2 vrang, 2 rett, A.1, A.2, A.3, A.4, A.5, 2 vrang, 2 rett, 3 masker rille = 106 masker strikket og ingen masker igjen på pinnen. Husket du å strikke de 2 vrang, 2 rett før du begynte på diagrammene? god fornøyelse
20.05.2019 - 09:14
![]() Elena wrote:
Elena wrote:
Do you ship to USA?
09.04.2019 - 19:12DROPS Design answered:
Dear Elena, sure we do, please find list of DROPS stores shipping to USA here. Happy knitting!
10.04.2019 - 10:03
![]() Ruth Andrick wrote:
Ruth Andrick wrote:
Hallo, ich habe Probleme zu verstehen wie der Schulterabschluss gearbeitet wird. Kette ich die verbleibenden 34 Maschen ab ? Und was heißt Schulternähte innerhalb der Abkettkanten schließen? Ansonsten tolle Anleitung! LG Ruth
24.02.2019 - 21:08DROPS Design answered:
Liebe Frau Andrick, in diesem Modell werden Rumpfteil und Ärmel in Runden separat gestrickt und dann wird die Passe bis zur Halsausschnitt in Runden gestrickt - ich finde keine verbleibenden 34 M in diese Anleitung. Wenn der Pullover fertig ist, schliessen Sie die Öffnungen unter den Ärmeln mit einer Naht (siehe Video). Viel Spaß beim stricken!
25.02.2019 - 11:15
![]() Anne wrote:
Anne wrote:
Tak for svaret, men så er det nok mig som stadig ikke forstår. I diagram A.2C och A.4C står der bl.a. "tag 1 maske løs af pinden som om den skulle strikkes ret, strik 2 ret, løft den løse maske over maskerne som blev strikket". Det giver da 1 maske mindre - eller?
13.02.2019 - 15:13
![]() Anne wrote:
Anne wrote:
Jeg forstår ikke helt opskriften. Når man er færdig med A.1B-A.5B er der 114 m på pinden i str. L. Men efter at have strikket A.1C- A.5C er der kun 112. Man “mister” 1 maske i A.2C og A.4C, eller er det mig som tager fejl?
12.02.2019 - 22:53DROPS Design answered:
Hej Anne, Næste pind strikkes således - fra retsiden: Strik 3 masker RETSTRIK - se forklaring over, 8 masker glatstrik – tag 0 maske ind over disse, A.1C (= 15 masker), A.2C (= 11 masker), A.3C (= 40 masker), A.4C (= 11 masker), A.5C (= 15 masker), 8 masker glatstrik – tag 0 masker ind over disse, 3 masker retstrik = 114 masker. God fornøjelse!
13.02.2019 - 11:49
![]() Birbaum Claude-Eveline wrote:
Birbaum Claude-Eveline wrote:
Bonjour, Je suis une bonne tricoteuse,mais là, j\'avoue ne rien comprendre aux explications de ce modèle ! J\'ai compris comment faire les différents points mais la marche à suivre n\'a pas de sens et je suis bien ennuyée pour avancer ce tricot. Merci de vérifier la traduction française et le bon sens de ces explications et de m\'en informer par e-mail.
12.02.2019 - 15:41DROPS Design answered:
Bonjour Mme Birbaum, ce pull se tricote de bas en haut, on tricote d'abord séparément la partie du bas du dos et du devant, puis on tricote les 2 ensemble (= dos et devant, en rond) jusqu'aux emmanchures, et on met en attente. On tricote ensuite les manches puis on termine par l'empiècement en plaçant les manches sur la même aiguille que le dos et le devant, et on termine en rond jusqu'au col. Si vous avez des questions sur un point particulier, n'hésitez pas à utiliser cet espace ou bien contacter votre magasin DROPS, même par mail ou téléphone, on saura vous conseiller. Bon tricot!
12.02.2019 - 15:55
|
||||||||||||||||||||||||||||||||||||||||
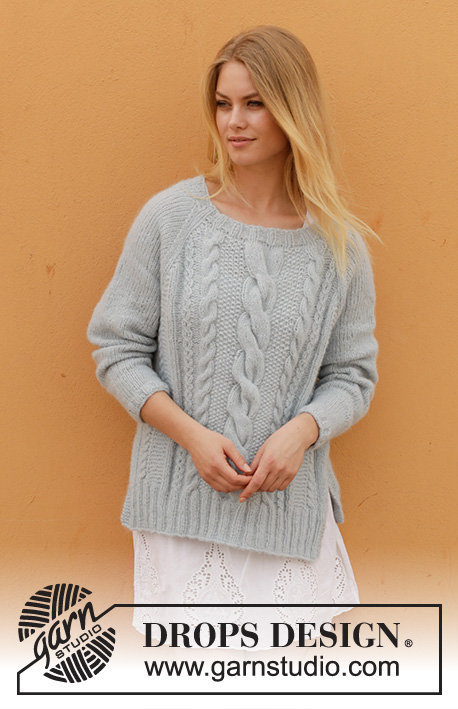
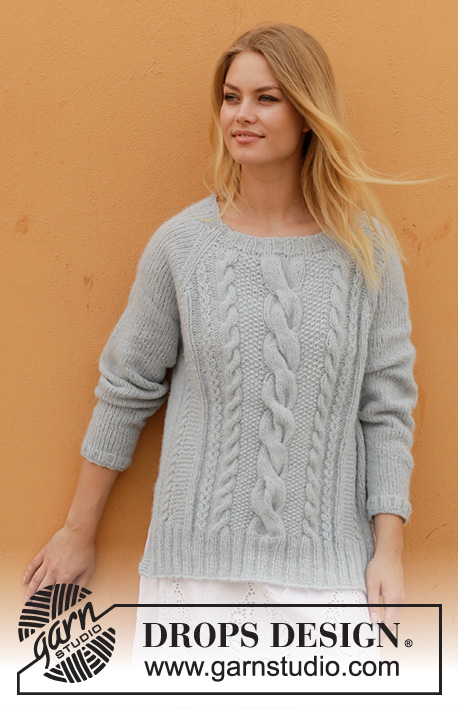
Skye#skyesweater |
||||||||||||||||||||||||||||||||||||||||
 |
 |
|||||||||||||||||||||||||||||||||||||||
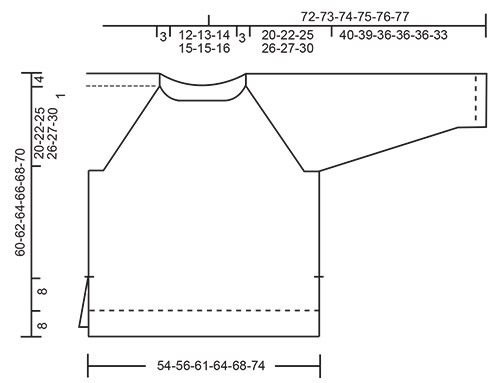
Knitted jumper with cables, lace pattern, split and raglan. Sizes S - XXXL. The piece is worked in DROPS Air.
DROPS 188-36 |
||||||||||||||||||||||||||||||||||||||||
|
INFORMATION FOR THE PATTERN: RIDGE/GARTER STITCH (worked back and forth): 1 ridge = Knit 2 rows. PATTERN: See diagrams A.1 to A.5. The diagrams show all the rows in the pattern seen from the right side. DECREASE TIP (evenly spaced): To work out how to decrease evenly, count the total number of stitches on the needle (e.g. 40 stitches), and divide by the number of decreases to be made (e.g. 4) = 10. In this example, knit every 9th and 10th stitch together. INCREASE TIP (for sleeve): Increase as follows mid under sleeve – start 1 stitch before the marker thread: Make 1 yarn over, knit 2 stitches (the marker thread sits in the middle of these 2 stitches), 1 yarn over. On the next round knit the yarn overs twisted to avoid holes. RAGLAN: * Work over the back/front piece until there are 3 stitches left before the marker thread. Purl 2 stitches together, knit 2 stitches (the marker thread sits in the middle of these 2 stitches), slip 1 stitch as if to knit, knit 1, pass the slipped stitch over the knitted stitch, work sleeve stitches until there are 3 stitches left before the marker thread, knit 2 together, knit 2 (the marker thread sits in the middle of these 2 stitches), purl 2 stitches together *, work from *-* a total of 2 times. ---------------------------------------------------------- JUMPER: The piece is worked bottom up. The front and back pieces are worked separately back and forth with circular needle as far as the split. Then they are worked together in the round. The sleeves are worked in the round with double pointed needles/short circular needle. BACK PIECE: Cast on 88-92-100-108-108-120 stitches with circular needle size 4 mm and Air. Purl 1 row from the wrong side. The next row is worked as follows - from the right side: Work 3 stitches GARTER STITCH - see description above, knit 2-0-0-0-0-2, * purl 2, knit 2 *, work from *-* a total of 0-1-2-3-1-2 times, A.4A (= 8 stitches) 0-0-0-0-1-1 time, A.1A (= 14 stitches), A.2A (= 8 stitches), A.3A (= 34 stitches), A.4A (= 8 stitches), A.5A (= 14 stitches), A.2A (= 8 stitches) 0-0-0-0-1-1 time, * knit 2, purl 2 *, work from *-* a total of 0-1-2-3-1-2 times, knit 2-0-0-0-0-2, 3 stitches in garter stitch. Continue the rib like this until the piece measures 8 cm. REMEMBER THE KNITTING TENSION! Change to circular needle size 5 mm. The next row is worked as follows – from the right side: Work 3 stitches in garter stitch, 2-0-0-0-0-2 stitches in stocking stitch, * purl 2, knit 2 *, work from *-* a total of 0-1-2-3-1-2 times, work diagrams as before but work B above A, * knit 2, purl 2 *, work from *-* a total of 0-1-2-3-1-2 times, 2-0-0-0-0-2 stitches in stocking stitch, 3 stitches in garter stitch. When A.1B to A.5B are finished there are 102-106-114-122-128-140 stitches on the needle. The next row is worked as follows - from the right side: Work 3 stitches in garter stitch, 2-4-8-12-4-10 stitches in stocking stitch – decrease 0-0-0-1-0-1 stitch over these stitches, A.4C (= 11 stitches) 0-0-0-0-1-1 time, A.1C (= 15 stitches), A.2C (= 11 stitches), A.3C (= 40 stitches), A.4C (= 11 stitches), A.5C (= 15 stitches), A.2C (= 11 stitches) 0-0-0-0-1-1 time, 2-4-8-12-4-10 stitches in stocking stitch – decrease 0-0-0-1-0-1 stitch over these stitches, 3 stitches in garter stitch = 102-106-114-120-128-138 stitches. Continue this pattern until the piece measures 18 cm in all sizes. FRONT PIECE: Work as for back piece. BODY: Place the back piece on the same circular needle as the front piece = 204-212-228-240-256-276 stitches. Insert 1 marker thread in each side and allow the marker threads to follow your work onwards. Continue with pattern as before, but the stitches in garter stitch in each side are replaced with stocking stitch from now onwards. When the piece measures 37-37-36-36-37-36 cm cast off 6-6-8-8-10-10 stitches in each side (= 3-3-4-4-5-5 stitches on each side of the marker threads). There are now 96-100-106-112-118-128 stitches on the back and front pieces. Lay the piece to one side and work the sleeves. SLEEVE: The piece is worked in the round with double pointed needle; change to short circular needle when you have enough stitches. Cast on 40-40-44-44-48-48 stitches with double pointed needles size 4 mm and Air. Knit 1 round, then work rib (= knit 2 / purl 2). When the piece measures 2 cm change to double pointed needles size 5 mm. Knit 1 round where you decrease 4-2-4-4-6-4 stitches evenly on round – read DECREASE TIP = 36-38-40-40-42-44 stitches. Insert 1 marker at the beginning of the round (= mid under sleeve). Continue with stocking stitch. When the piece measures 8-6-9-6-5-9 cm increase 2 stitches mid under the sleeve – read INCREASE TIP. Increase like this every 2½-2½-1½-1½-1½.-1cm a total of 12-13-16-19-20-20 times = 60-64-72-78-82-84 stitches. When the piece measures 40-39-36-36-36-33 cm (shorter measurements in larger sizes due to longer yoke) cast off the middle 6-6-8-8-10-10 stitches under the sleeve (= 3-3-4-4-5-5 stitches on each side of the marker thread) = 54-58-64-70-72-74 stitches. Lay the piece to one side and work the other sleeve. YOKE: Place the sleeves on the same circular needle as the body, where the stitches were cast off for the armholes = 300-316-340-364-380-404 stitches. Insert a marker thread in each transition between body and sleeves (= 4 marker threads). Continue the pattern as before and decrease to RAGLAN – see description above. Decrease like this every 2nd round a total of 22-24-27-28-30-33 times – the stitches which do not fit into the diagrams are knitted over knitted stitches and purled over purled stitches AT THE SAME TIME when there is 1 round left before A.1/A.5 meets the raglan decrease, decrease in addition 4 stitches evenly over the cable in A.1/A.5 (applies only to the diagrams towards the raglan). After all the decreases there are 108-108-108-124-124-124 stitches on the round. The yoke measures approx. 20-22-25-26-27-30 cm. Knit 1 round and decrease 3 stitches over each cable with 6 stitches and decrease 7 stitches over the cable with14 stitches = 82-82-82-98-98-98 stitches. NECK: Change to short circular needle size 4 mm and knit 1 round where you increase 10-10-14-6-10-14 stitches evenly on round = 92-92-96-104-108-112 stitches. Work rib (= knit 2 / purl 2) for 3 cm, cast off with knit over knit and purl over purl. ASSEMBLY: Sew the openings under the sleeves. |
||||||||||||||||||||||||||||||||||||||||
Diagram explanations |
||||||||||||||||||||||||||||||||||||||||
|
||||||||||||||||||||||||||||||||||||||||
 |
||||||||||||||||||||||||||||||||||||||||
 |
||||||||||||||||||||||||||||||||||||||||
 |
||||||||||||||||||||||||||||||||||||||||
 |
||||||||||||||||||||||||||||||||||||||||
Have you finished this pattern?Tag your pictures with #dropspattern #skyesweater or submit them to the #dropsfan gallery. Do you need help with this pattern?You'll find 31 tutorial videos, a Comments/Questions area and more by visiting the pattern on garnstudio.com. © 1982-2026 DROPS Design A/S. We reserve all rights. This document, including all its sub-sections, has copyrights. Read more about what you can do with our patterns at the bottom of each pattern on our site. |
||||||||||||||||||||||||||||||||||||||||


With over 40 years in knitting and crochet design, DROPS Design offers one of the most extensive collections of free patterns on the internet - translated to 17 languages. As of today we count 324 catalogues and 12290 patterns translated into English (UK/cm). 12290
We work hard to bring you the best knitting and crochet have to offer, inspiration and advice as well as great quality yarns at incredible prices! Would you like to use our patterns for other than personal use? You can read what you are allowed to do in the Copyright text at the bottom of all our patterns. Happy crafting!
Post a comment to pattern DROPS 188-36
We would love to hear what you have to say about this pattern!
If you want to leave a question, please make sure you select the correct category in the form below, to speed up the answering process. Required fields are marked *.