
Popular categories
Looking for a yarn?


Comments / Questions (20)
![]() HELENA MATŁOSZ wrote:
HELENA MATŁOSZ wrote:
Chcę wykonać ten top w rozmiarze XL. W schemacie robótki z zaznaczonymi miarami jest pokazane obniżenie dekoltu z przodu o 3 cm, a w opisie wykonania karczku, tyłu/przodu nie znalazłam informacji jak to zrobić. Podane jest łączenie oczek tyłu i przodu (po oddzieleniu oczek na rękawy) po wykonaniu takiej samej ilości rzędów z tyłu i z przodu robótki. Lubię mieć większy dekolt z przodu, a ten top jest piękny. Będę wdzięczna za poradę, pozdrawiam
14.02.2022 - 22:16DROPS Design answered:
Witaj Heleno, aby dekolt tyłu był wyżej, a przodu niżej, musiałabyś wykonać rzędy skrócone ponad oczkami tyłu, stopniowo wydłużając je i kończąc prawie na końcu rękawów. To nie byłoby trudne, gdyby ażur był tylko z przodu. Tutaj ażur mamy na przodzie i na na tyle sweterka, i rzędy skrócone zaburzą wzór. Ja zrobiłabym tył dżersejem i z rzędami skróconymi. Pozdrawiam!
15.02.2022 - 09:34
![]() ESCANDE HELENE wrote:
ESCANDE HELENE wrote:
Merci de votre réponse. Vous me donnez un lien qui ne répond pas !!! S'agit il du lien classique de votre site et des articles vendus avec vos laines?. Mes aiguilles circulaires viennent de chez Kalidou Boutique et sont les Drops Basic Aluminium. Ce problème me gâche un peu le plaisir que j'ai à redécouvrir de tricot !!! Merci - cordialement Hélène
12.06.2020 - 11:56DROPS Design answered:
Bonjour Mme Escande, oops petite faute de frappe dans le code du lien, tout est en ordre maintenant - si vous avez ce souci avec l'une de nos aiguilles, merci de bien vouloir contacter directement la boutique Kalidou pour lui expliquer le problème (avec photos si possible, c'est toujours plus parlant). Merci d'avance! Bon tricot!
12.06.2020 - 12:26
![]() ESCANDE HELENE wrote:
ESCANDE HELENE wrote:
Merci de me communiquer comment faut il faire pour que les mailles (surtout les jetés), sur les aiguilles circulaires, arrivent régulièrement sans qu'elles se coincent dans la jonction "cable-aiguille". Y a t'il une marque d'aiguilles circulaires qui ont moins ce problème ? merci pour votre aide Hélène
11.06.2020 - 19:08DROPS Design answered:
Bonjour Mme Escande, effectivement, la transition entre le câble et l'aiguille doit être toute douce pour bien faciliter le passage des mailles, découvrez nos aiguilles circulaires ici, vous ne rencontrerez ainsi plus ce genre de désagrément. Bon tricot!
12.06.2020 - 07:32
![]() Karla wrote:
Karla wrote:
Se teje todo en circular....?
11.07.2019 - 03:12DROPS Design answered:
Hola Karla! Se teje todo en circular. Buen trabajo!
11.07.2019 - 08:16
![]() Norma wrote:
Norma wrote:
Lovely pattern, and it's great to see stylish patterns for older people. I love Drops patterns, but sometimes a pattern I like looks great on a young slim model, but I'm not sure how it will look on an older figure.
08.06.2019 - 12:28
![]() Helle Christensen wrote:
Helle Christensen wrote:
Hej Drops Dejligt i er begyndt at bruger modeller som er ældre end 25 og som vejer mere end 50 kg. Jeg glæder mig til at hoppe i denne model😀. Rigtig dejlig dag til jer
27.07.2018 - 08:10
![]() Katharina wrote:
Katharina wrote:
Vielen Dank für die schöne Anleitung! Ich habe diesen Pullover nach gestrickt, er ist wunderschön geworden!
04.05.2018 - 17:41
![]() Heike Rohn wrote:
Heike Rohn wrote:
Guten Tag, ist dieses hier das gleiche Modell wie 187-30, nur andersherum angezogen?
23.02.2018 - 15:05DROPS Design answered:
Liebe Frau Rohn, das Lochmuster am Vorderteil im 187-30 ist verschieden, sonnst sind beide Modellen gleich. Viel Spaß beim stricken!
23.02.2018 - 16:42
![]() Gonet Yvette wrote:
Gonet Yvette wrote:
Bonjour merci pour ces magnifiques modéles. Savez-vous si le modèle e-274 va bientôt arriver ? j'ai hâte de le tricoter. Merci
13.02.2018 - 08:30DROPS Design answered:
Bonjour Mme Gonet, ça ne devrait plus tarder... bon tricot!
13.02.2018 - 09:49
![]() Cathy wrote:
Cathy wrote:
Wish it was summer... so I can wear this one.
13.12.2017 - 22:18
|
||||||||||||||||
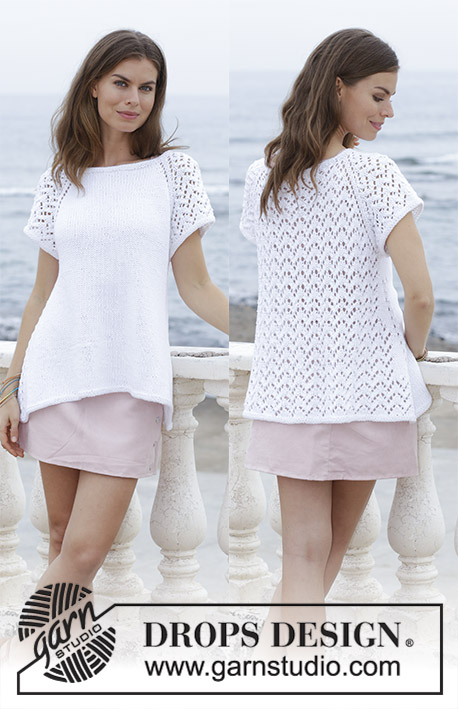
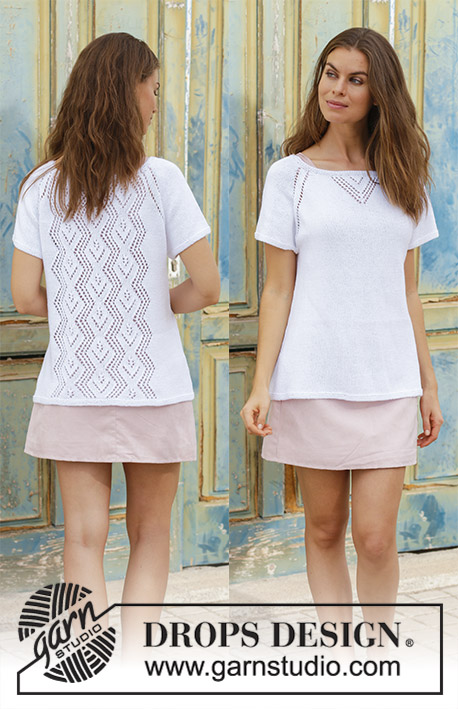
Diamonds in Lace Top#diamondsinlacetop |
||||||||||||||||
 |
 |
|||||||||||||||
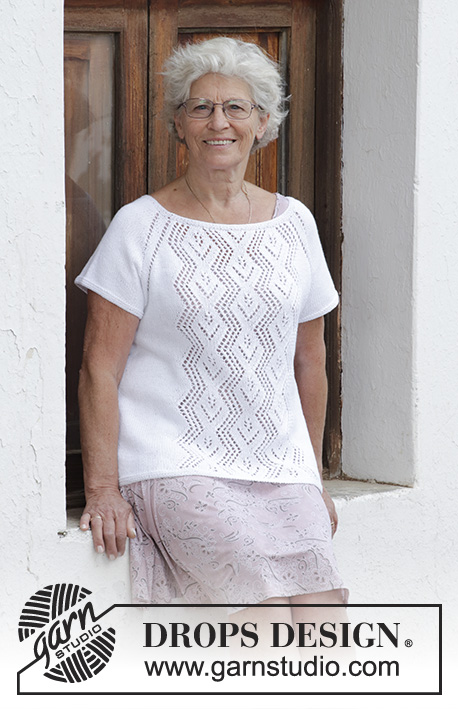
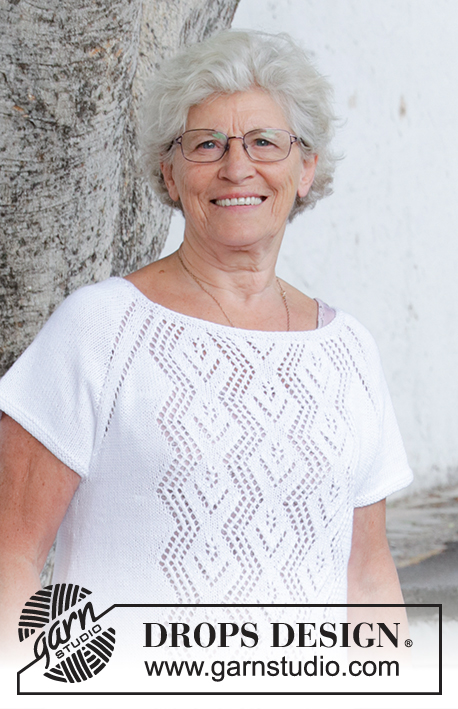
Top with lace pattern, raglan and A-shape, knitted top down. Size: S - XXXL Piece is knitted in DROPS Safran.
DROPS 188-16 |
||||||||||||||||
|
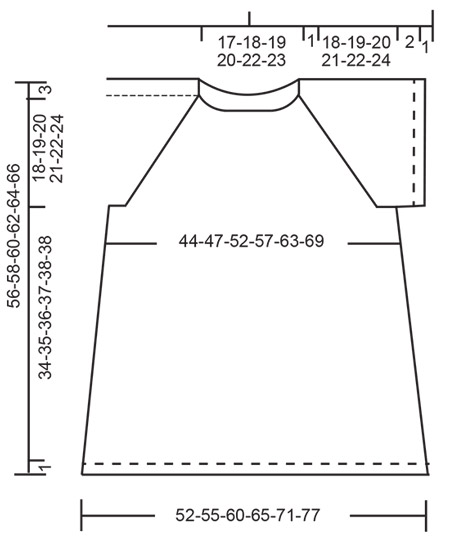
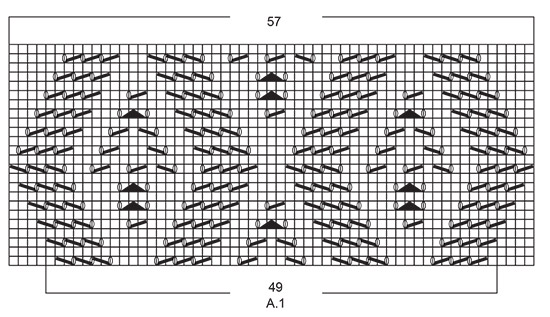
INFORMATION FOR PATTERN: GARTER STITCH (worked in the round): 1 ridge = 2 rounds. Knit 1 round and purl 1 round. INCREASE TIP (evenly): To calculate how to increase evenly, use number of stitches on row (e.g. 110 stitches) and divide number of stitches by number of increases to be done (e.g. 44) = 2.5. In this example increase by making a yarn over after alternately approx. every 2nd and 3rd stitch. On next round work yarn overs twisted to avoid holes. PATTERN: See diagram A.1. Diagrams show all rows in pattern seen from the right side. RAGLAN: Increase in every transition between body and sleeves (= 8 stitches increased on round). Work until 2 stitches remain before marker thread, make 1 yarn over, knit 4 (marker thread is in the middle of these 4 stitches), make 1 yarn over (= 2 stitches increased). On next round knit the yarn overs to make holes. Then knit the new stitches. INCREASE TIP (applies to sides of body): Work until 2 stitches remain before marker thread, make 1 yarn over, knit 4 (marker thread is in the middle of these 4 stitches), make 1 yarn over. Repeat in the other side (= 4 stitches increased on round). On next round knit yarns over twisted to avoid holes. ---------------------------------------------------------- TOP: Worked in the round on circular needle, top down. Sleeves are worked in the round on double pointed needles. YOKE: Cast on 110-115-120-125-130-137 stitches on circular needle size 3 mm with Safran. Work 3 ridges in GARTER STITCH - see explanation above. Knit 1 round while increasing 44-39-38-41-56-65 stitches evenly - read INCREASE TIP (evenly spaced) = 154-154-158-166-186-202 stitches. Switch to circular needle size 3.5 mm. Insert 4 marker threads in piece without working as follows: Insert a marker thread at beginning of round (= in transition between sleeve and back piece), insert next marker thread after 53-53-55-59-69-77 stitches, (= back piece), insert next marker thread after another 24 stitches (= sleeve), insert next marker thread after another 53-53-55-59-69-77 stitches (= front piece), 24 stitches (= sleeve) now remain after last marker thread. Round begins in transition between sleeve and back piece. Now work pattern as follows: * Knit 2, make 1 yarn over, knit 0-0-1-3-8-12, work the middle 49 stitches in A.1 (i.e. skip the outermost 4 stitches in each side of diagram), knit 0-0-1-3-8-12 (= back piece/front piece), make 1 yarn over, knit 4 (marker thread is in the middle of these 4 stitches), make 1 yarn over, knit 20 (= sleeve), make 1 yarn over, knit 2 (marker thread is here) *, work from *-* 1 more time. REMEMBER THE KNITTING TENSION. First increase for RAGLAN - explanation above, is now done (= 8 stitches increased on round). Continue pattern like this and increase every other round 20-24-28-31-33-36 times in total (including first increase explained above) = 314-346-382-414-450-490 stitches. NOTE! For every increase for raglan there is room for one more stitch of pattern A.1 towards raglan lines on back piece and front piece. When enough stitches have been increased to work all stitches in diagrams, 16-20-24-27-29-32 increases remain for raglan – knit these stitches. Repeat diagram A.1 vertically until finished measurements. When all increases are done, the piece should measure 15-17-20-22-23-25 cm from cast-on edge mid front. Continue without increase for raglan until piece measures 19-20-21-22-23-25 cm from cast-on edge mid front (if the knitting tension is correct vertically this measurement is already achieved in size XL, XXL, and XXXL). Work next row as follows: Work first 93-101-111-121-135-149 stitches (= back piece), slip the next 64-72-80-86-90-96 stitches on a stitch holder (= sleeve), cast on 8-8-8-10-10-10 new stitches in the side under sleeve, work the next 93-101-111-121-135-149 stitches (= front piece), slip the next 64-72-80-86-90-96 stitches on a stitch holder (= sleeve), cast on 8-8-8-10-10-10 new stitches in the side under sleeve. NOW MEASURE PIECE FROM HERE! BODY: = 202-218-238-262-290-318 stitches. Insert a marker thread in each side, i.e. in the middle of the 8-8-8-10-10-10 new stitches cast on in each side under sleeves (= 101-109-119-131-145-159 stitches on both back and front piece). Continue in the round with pattern A.1 as before and work in stocking stitch over the remaining stitches on round. When piece measures 4 cm, increase 2 stitches in each side - read INCREASE TIP. Increase like this approx. every 3-3-3-4-4-4 cm 9 times in total = 238-254-274-298-326-354 stitches. When piece measures approx. 34-35-36-37-38-38 cm from division, switch to circular needle size 3 mm. Work 3 ridges. Cast off. To avoid at tight cast-off edge cast off with a larger sized needle. Top measures approx. 56-58-60-62-64-66 cm from shoulder and down. SLEEVE: Slip the 64-72-80-86-90-96 stitches from stitch holder in one side of piece on double pointed needles size 3.5 mm and pick in addition up 1 stitch in each of the 8-8-8-10-10-10 new stitches cast on under sleeve = 72-80-88-96-100-106 stitches. Insert 1 marker thread in the middle of the 8-8-8-10-10-10 new stitches under sleeve. Begin round here and work in stocking stitch in the round. When sleeve measures 2 cm from division, switch to double pointed needles size 3 mm. Work 3 ridges. Cast off. To avoid at tight cast-off edge cast off with a larger sized needle. Work the other sleeve the same way. |
||||||||||||||||
Diagram explanations |
||||||||||||||||
|
||||||||||||||||
 |
||||||||||||||||
 |
||||||||||||||||
Have you finished this pattern?Tag your pictures with #dropspattern #diamondsinlacetop or submit them to the #dropsfan gallery. Do you need help with this pattern?You'll find 27 tutorial videos, a Comments/Questions area and more by visiting the pattern on garnstudio.com. © 1982-2026 DROPS Design A/S. We reserve all rights. This document, including all its sub-sections, has copyrights. Read more about what you can do with our patterns at the bottom of each pattern on our site. |
||||||||||||||||


With over 40 years in knitting and crochet design, DROPS Design offers one of the most extensive collections of free patterns on the internet - translated to 17 languages. As of today we count 324 catalogues and 12290 patterns translated into English (UK/cm). 12290
We work hard to bring you the best knitting and crochet have to offer, inspiration and advice as well as great quality yarns at incredible prices! Would you like to use our patterns for other than personal use? You can read what you are allowed to do in the Copyright text at the bottom of all our patterns. Happy crafting!
Post a comment to pattern DROPS 188-16
We would love to hear what you have to say about this pattern!
If you want to leave a question, please make sure you select the correct category in the form below, to speed up the answering process. Required fields are marked *.