
Popular categories
Looking for a yarn?


Comments / Questions (15)
![]() Katerina Andritsopoulou wrote:
Katerina Andritsopoulou wrote:
Good afternoon! How do I follow pattern A.3 (9th row extended to the right) if I am using straight needles and not circular ones. I have added a stich on each side to join together. Thank you.
18.11.2019 - 18:24DROPS Design answered:
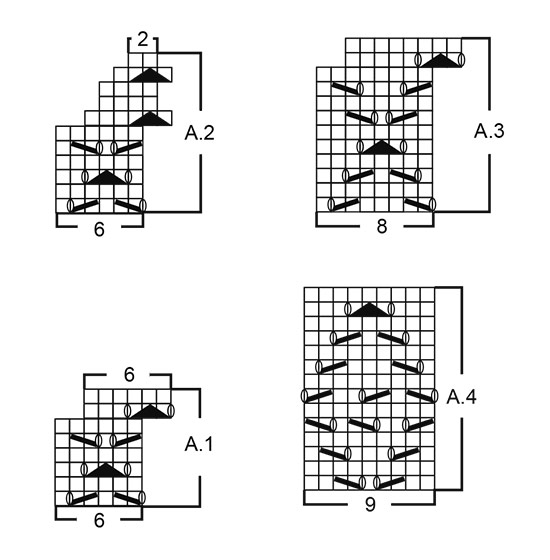
Dear Mrs Andritsopoulou, since this pattern is worked in the round, you have to start the 11th round when 2 sts from 10th round remain on left needle, then work the last 2 sts on round 10 together with the first stricht in first repeat, then work the last 2 sts together with first st next repeat, and so on. Happy knitting!
19.11.2019 - 08:47
![]() Karen A Hartvig Nielsen wrote:
Karen A Hartvig Nielsen wrote:
Regarding charts like A!...I\\\\\\\'m still having problems with the \\\"how\\\" factor of how to read uneven (sticking out to left and right) charts. I was unable to find any information, especially as I don\\\'t even know what these types of charts are called. Would you consider a \\\"uneven charts for dummies\\\" addition to your tutorials? Tak
01.07.2018 - 07:38DROPS Design answered:
Dear Mrs Hartvig Nielsen, in diagrams such as A.1, A.2 (= 7th row for ex.) and A.3 (= row 9) start the 7th/9th row 2 sts before beg of row, ie work the last 2 sts on previous row together with the first st in first repeat, then work the last 2 sts in each repeat tog with the first st next repeat. In next to last row in A.2 work the last st from previous row/repeat tog with the first 2 sts first/next repeat. Happy knitting!
02.07.2018 - 10:19
![]() Guinet Janine wrote:
Guinet Janine wrote:
Même question que Kelsey, mais je n'ai pas compris la réponse en anglais. Je ne vois pas comment commencer le Rang 6 dans le diagramme A1 Merci pour votre réponse
30.03.2018 - 10:30DROPS Design answered:
Bonjour Mme Guidet, au 7ème tour de A.1, tricotez les 2 dernières mailles du tour avec la 1ère m du 1er A.1 du tour, puis 3 m end, tricotez ensuite les 2 m suivantes avec le A.1 suivant et ainsi de suite. Vous décalez ainsi le début du tour de 2 m à droite. Bon tricot!
30.03.2018 - 12:28
![]() Ros-Marie Westerberg wrote:
Ros-Marie Westerberg wrote:
Ska det verkligen vara 2 ST omslag mellan 2 maskor i A4, rad 7
05.03.2018 - 21:52DROPS Design answered:
A.4 stickas endast en gång per varv, så det blir bara 1 omslag mellan maskorna.
06.03.2018 - 14:37
![]() Kelsey K wrote:
Kelsey K wrote:
How did you achieve the last 2 rows in A.1? I'm not sure how you go back 2 stitches after completing the previous row.
29.12.2017 - 09:24DROPS Design answered:
Dear Kelsey, you do not have to go back, but since there is a decrease there without accompaniying yarnovers, you will have two stitches less there. I hope this haelps. Happy Knitting!
29.12.2017 - 09:45
|
||||||||||||||||
Delicia#deliciaset |
||||||||||||||||
 |
 |
|||||||||||||||
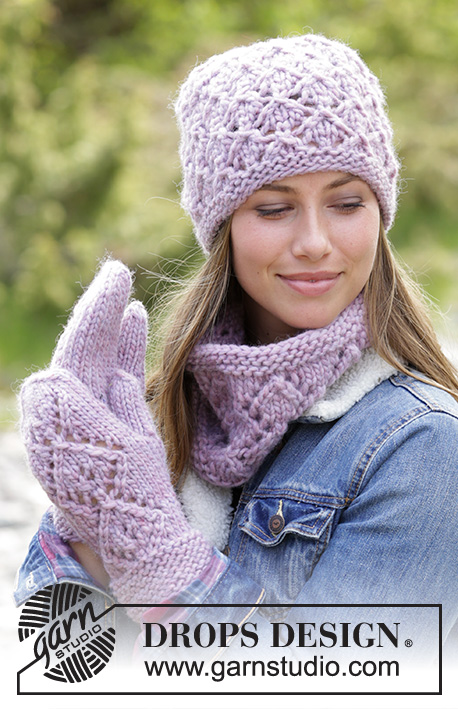
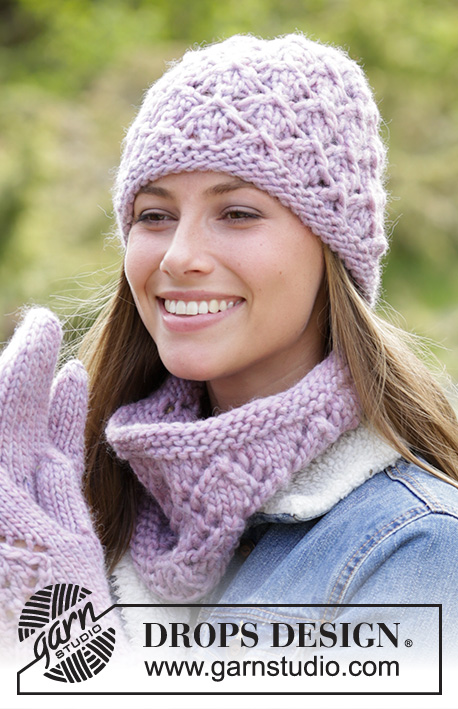
The set consists of: Knitted hat, neck warmer and mittens with lace pattern. The set is worked in DROPS Andes.
DROPS 182-9 |
||||||||||||||||
|
INFORMATION FOR THE PATTERN: RIDGE/GARTER STITCH (worked in the round): 1 ridge = 2 rounds. Knit 1 round and purl 1 round. PATTERN: Hat: See diagrams A.1 and A.2. Neck warmer: See diagram A.3. Mitten: See diagram A.4. INCREASE TIP (for thumb gusset on mitten): Start before the stitch with marker thread, make 1 yarn over, knit 1 (= stitch with marker thread), make 1 yarn over (= 2 stitches increased). On the next round knit the yarn overs twisted to prevent holes. The next time you increase make 1 yarn over on each side of the stitch with the marker thread + 1 (so outside the previously increased stitches) so you get a gusset for the thumb. DECREASE TIP: Start 2 stitches before the marker, knit 2 together, marker, slip 1 stitch as if to knit, knit 1, pass the slipped stitch over the knitted stitch (= 2 stitches decreased). ---------------------------------------------------------- HAT: The piece is worked in the round with double pointed needles, bottom up. Cast on 54 stitches with double pointed needles size 7 mm and Andes. Work 2 RIDGES – see description above. Change to double pointed needles size 8 mm and knit 2 rounds. Then work A.1 in the round (= 9 repeats of 6 stitches). REMEMBER THE KNITTING TENSION! When A.1 has been worked a total of 3 times in height, the piece measures approx. 18 cm. Work A.2 in the round and decrease as shown in the diagram. When A.2 has been completed, there are 18 stitches on the needles. On the next round knit all stitches twisted together, two and two = 9 stitches. Cut the strand, pull it through the remaining stitches, tighten and fasten well. The hat measures approx. 25 cm top down. ----------------------------------------------------------- NECK WARMER: The piece is worked in the round with circular needle. Cast on 64-72 stitches with circular needle size 7 mm and Andes. Work 2 RIDGES – see description above. Change to circular needle size 8 mm and knit 2 rounds. Then work A.3 in the round (= 8-9 repeats of 8 stitches). When A.3 has been worked 2-3 times in height, change to circular needle size 7 mm. Work 2 ridges and loosely cast off with knit. The neck warmer measures approx. 20-28 cm in height. ---------------------------------------------------------- LEFT MITTEN: Size S/M is worked in the round with double pointed needles sizes 6 and 7 mm. Size M/L is worked in the round with double pointed needles sizes 7 and 8 mm. Cast on 26 stitches with double pointed needles size 6-7 mm and Andes. Work GARTER STITCH – see description above. When the piece measures 6 cm change to double pointed needles size 7-8 mm. Knit 2 rounds. The next round is worked as follows: 15 stitches stocking stitch, A.4 (= 9 stitches), 2 stitches stocking stitch. Continue the pattern in this way. REMEMBER THE KNITTING TENSION! When the piece measures 14 cm insert 1 marker thread in the 12th stitch on the round. On the next round increase for the thumb gusset by increasing 1 stitch on each side of the stitch with the marker thread – read INCREASE TIP (= 2 stitches increased). Increase in this way on each side of the increased stitches also on the next round = 5 stitches in the thumb gusset. Work 2-3 rounds without increases. On the next round place the 5 thumb-gusset stitches on a thread, in addition cast on 1 new stitch on the needle over the stitches on the thread = 26 stitches on the needles. Continue with stocking stitch and A.4 (A.4 repeats as far as it will fit, then work stocking stitch over all stitches). AT THE SAME TIME when the piece measures 24-26 cm from the cast-on edge, insert 1 marker at the beginning of the round and 1 marker after 13 stitches (= in each side of the mitten). On the next round decrease 1 stitch on each side of both markers - read DECREASE TIP (= 4 stitches decreased). Decrease in this way every round, 5 times in each side = 6 stitches left on the needles. Cut the strand, pull it through the remaining stitches, tighten and fasten well. The whole mitten measures approx. 27-29 cm from the cast-on edge. THUMB: Place the 5 thumb-gusset stitches back on double pointed needles size 7-8 mm. In addition, knit up 5 stitches behind the thumb (i.e. knit up 1 stitch in the stitch which was cast on + 2 stitches on each side of this stitch) = 10 stitches. Work stocking stitch in the round until the thumb measures 5-6 cm. Insert 1 marker at the beginning of the round and 1 marker after 5 stitches. On the next round decrease 1 stitch on each side of both markers in the same way as at the top of the mitten (= 4 stitches decreased). Decrease in this way on the next round as well = 2 stitches left on the needles. Cut the strand, pull it through the remaining stitches, tighten and fasten well. RIGHT MITTEN: Cast on as for the left mitten and work garter stitch until the piece measures 6 cm. Change to double pointed needles size 7-8 mm. Knit 2 rounds. The next round is worked as follows: 2 stitches stocking stitch, A.4 (= 9 stitches), 15 stitches stocking stitch. Continue the pattern in this way. When the piece measures 14 cm insert 1 marker thread in the 15th stitch on the round. On the next round increase to thumb gusset by increasing 1 stitch on each side of the stitch with the marker thread – read INCREASE TIP! Increase in this way on each side of the increased stitches on the next round as well = 5 stitches in the thumb gusset. The rest of the mitten is worked in the same way as the left mitten. Work the thumb in the same way as for the left mitten. |
||||||||||||||||
Diagram explanations |
||||||||||||||||
|
||||||||||||||||
 |
||||||||||||||||
Have you finished this pattern?Tag your pictures with #dropspattern #deliciaset or submit them to the #dropsfan gallery. Do you need help with this pattern?You'll find 26 tutorial videos, a Comments/Questions area and more by visiting the pattern on garnstudio.com. © 1982-2026 DROPS Design A/S. We reserve all rights. This document, including all its sub-sections, has copyrights. Read more about what you can do with our patterns at the bottom of each pattern on our site. |
||||||||||||||||


With over 40 years in knitting and crochet design, DROPS Design offers one of the most extensive collections of free patterns on the internet - translated to 17 languages. As of today we count 324 catalogues and 12245 patterns translated into English (UK/cm). 12245
We work hard to bring you the best knitting and crochet have to offer, inspiration and advice as well as great quality yarns at incredible prices! Would you like to use our patterns for other than personal use? You can read what you are allowed to do in the Copyright text at the bottom of all our patterns. Happy crafting!
Post a comment to pattern DROPS 182-9
We would love to hear what you have to say about this pattern!
If you want to leave a question, please make sure you select the correct category in the form below, to speed up the answering process. Required fields are marked *.