
Popular categories
Looking for a yarn?


Comments / Questions (24)
![]() Rebecca wrote:
Rebecca wrote:
The pattern to says to knit one before marker thread to increase, should the marker thread be dividing the sleeves from the body?
27.01.2021 - 15:17DROPS Design answered:
Dear Rebecca, the increases explained under INCREASE TIP (applies to side of body) are worked after the division of sleeve, but the marker thread is the one you inserted in the middle of the new stitches cast on under sleeve after dividing piece at the end of yoke. That way you will increase on each side of 2 sts on both sides of body. (= YO, K1, marker thread for side, K1, YO). Hope this helps. Happy knitting!
28.01.2021 - 10:05
![]() Françoise HEYNEMAN wrote:
Françoise HEYNEMAN wrote:
Merci beaucoup pour votre réponse ! A bientôt ! Françoise
10.01.2020 - 19:37
![]() Françoise HEYNEMAN wrote:
Françoise HEYNEMAN wrote:
Comment faire pour enregistrer les explications en PDF si on ne dispose pas d'imprimante ? D'avance merci. Ce petite modèle est magnifique !
09.01.2020 - 21:35DROPS Design answered:
Bonjour Mme Heyneman, cliquez sur "imprimer" puis sélectionner une imprimante virtuelle, vous pourrez ainsi sauvegarder les explications en format .PDF. Bon tricot!
10.01.2020 - 09:02
![]() Roberta Ferrari wrote:
Roberta Ferrari wrote:
Ciao non capisco: per aumento ai ai lati davanti e dietro devo fare 1 gettato prima e dopo il diagramma o quello che dice in "suggerimenti per aumenti ai lati davanti e dietro?"
07.12.2019 - 15:44DROPS Design answered:
Buongiorno Roberta. Se sta aumentando per il raglan, deve seguire le indicazioni per gli aumenti prima / dopo il diagramma. Se invece sta lavorando il davanti / dietro e ha già messo in attesa le maglie delle maniche, segue le indicazioni per aumentare ai lati del davanti / dietro. Buon lavoro!
09.12.2019 - 16:37
![]() Deb wrote:
Deb wrote:
Continued: Instructions for size ¾ say: “Increase 2 stitches on back piece and 2 stitches on front piece 22 times 4 increases each round. X 22 = 44 increases “Increase 2 stitches on each sleeve 17 times 4 X 17 = 68 76 cast on + 44 front & back increases + 68 sleeve increases = 188 total stitches. I should have 224 st after all increases. I am short 36 stitches! Please. What am I doing wrong
04.12.2018 - 13:20DROPS Design answered:
Dear Deb, inc 4 sts on body (2 on front piece + 2 on back piece) x 21 times (size 3/4 years) = 4x21 = 84 sts - inc on sleeve: 2 sts x 2 sleeves x 16 times = 4x16= 64 sts. You started with 76 sts + 84 sts + 64 sts = 224 sts. Happy knitting!
04.12.2018 - 14:02Deb wrote:
I am making size ¾. I do not have the correct total stitches after the increases. It sounds like I should: Knit ½ back piece Increase 1 Knit A.1 Increase 1 Knit sleeve Increase 1 Knit A.1 Increase 1 Knit front piece Increase 1 Knit A.1 Increase 1 Knit sleeve Increase 1 Knit A.1 Increase 1 Knit ½ back piece Continued
04.12.2018 - 13:18Deb wrote:
In the schematic you say the neck width is 11cm for size 3/4. This would make the neck circumference 22 cm. Yes? If the gauge is 2.1 stitches per cm.: Wouldn’t the number of stitches to cast on be 46 st.? (2.1 st. per cm X 22 cm neck = 46.2 stitches), not 76 stitches for size 3/4?
04.12.2018 - 07:03DROPS Design answered:
Dear Deb, the 11 cm are the width of the neckline measured flat, ie the whole neckline (circumference) will be: 10 sts for back piece + the 11 sts for each of the 4 raglan lines + 4 sts for each sleeve + 10 sts for front piece = 72 sts = 34 cm circumference. Happy knitting!
04.12.2018 - 07:55
![]() Claudette Bouchard wrote:
Claudette Bouchard wrote:
Je ne vois pas d’instruction pour les motifs A-1, que faire après l’empiècement? Je vois les nombres de mailles pour les manches, le devant et le dos mais aucune note quant a ce motif.
10.05.2018 - 22:15DROPS Design answered:
Bonjour Mme Bouchard, après avoir divisé les manches et monté les mailles sous les manches, on continue le devant et le dos en rond, en jersey (= on ne tricote plus A.1). Bon tricot!
11.05.2018 - 08:10
![]() Astrid wrote:
Astrid wrote:
Hei ,sorry,så hvor jeg gjorde feil,hjelper å se ting på trykk.Bare dumt at jeg fikk sendt det.Mvh Astrid
26.04.2018 - 17:38
![]() Astrid wrote:
Astrid wrote:
Hei,la opp 84 masker,men får det ikke til å stemme med inndelingen: 8m til halve ryggen,11+4 til arm,16 til forstykket,11+4 til arm,8 til halv rygg.Hva er det jeg ikke ser?? Takk for hjelp.
25.04.2018 - 22:38
|
||||||||||||||||
Tickles#ticklessweater |
||||||||||||||||
 |
 |
|||||||||||||||
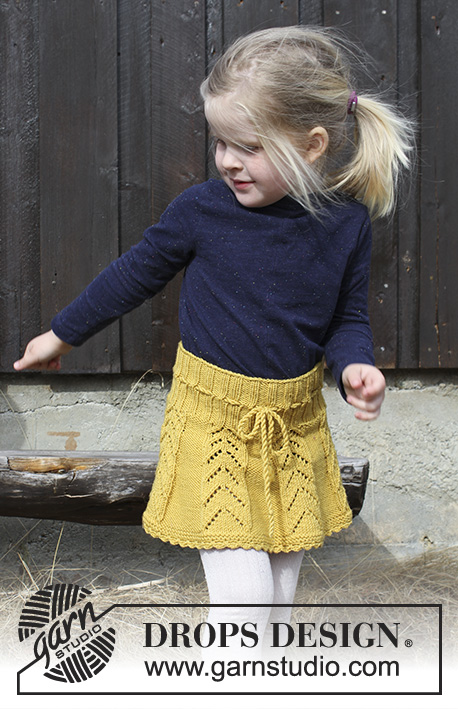
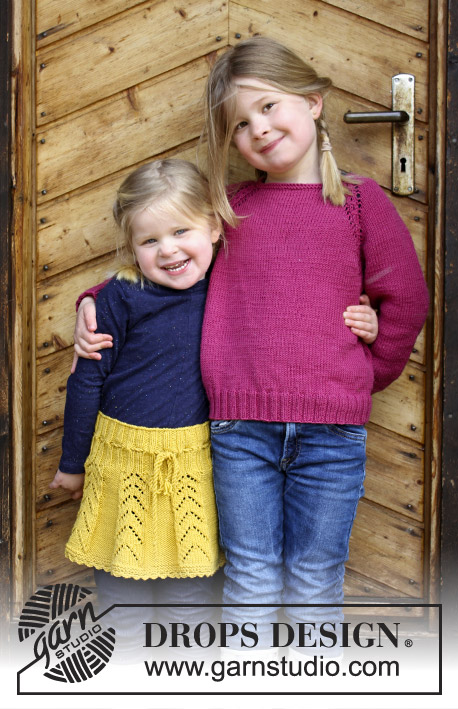
Tunic with raglan and lace pattern, worked top down for kids. Size 2 - 12 years Piece is knitted in DROPS Karisma.
DROPS Children 30-1 |
||||||||||||||||
|
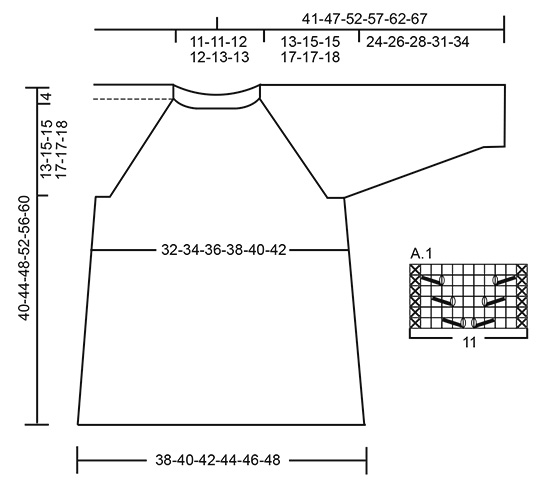
INFORMATION FOR PATTERN: GARTER STITCH (worked in the round): 1 ridge = 2 rounds. Knit 1 round and purl 1 round. PATTERN: See diagram A.1. RAGLAN: Increase for raglan on each side of A.1 in every transition between sleeves and body. INCREASE 2 STITCHES BEFORE A.1 (only applies to size 2 years): Work until 1 stitch remains before A.1: Work 1 yarn over, knit 1, 1 yarn over, work A.1. Knit yarn overs twisted on next round to avoid holes. Work the increased stitches in stocking stitch. INCREASE 2 STITCHES AFTER A.1 (only applies to size 2 years): Work A.1, 1 yarn over, knit 1, 1 yarn over. Knit yarn overs twisted on next round to avoid holes. Work the increased stitches in stocking stitch. INCREASE 1 STITCH BEFORE A.1 (applies to all sizes): Work until A.1: Work 1 yarn over, work A.1. Knit yarn overs twisted on next round to avoid holes. Work the increased stitches in stocking stitch. INCREASE 1 STITCH AFTER A.1 (applies to all sizes): Work A.1, 1 yarn over. Knit yarn overs twisted on next round to avoid holes. Work the increased stitches in stocking stitch. INCREASE TIP (applies to sides of body): Work until 1 stitch remains before marker thread. Make 1 yarn over, knit 2 (marker is between these 2 stitches), and make 1 yarn over. On next round knit yarn overs twisted to avoid holes. DECREASE TIP (applies to mid under sleeves): Decrease 1 stitch on each side of marker thread as follows: Work until 2 stitches remain before marker thread, knit 2 together (marker thread), slip 1 stitch knitwise, knit 1, pass slipped stitch over stitch worked (= 2 stitches decreased). ---------------------------------------------------------- TUNIC: Worked in the round on circular needle from mid back. Work top down. YOKE: Cast on 72-76-80-80-84-84 stitches on a short circular needle size 4 mm with Karisma. Work 2 ridges in GARTER STITCH - see explanation above. Work next round as follows from mid back: Work 5-6-7-7-8-8 stitches in stocking stitch (= half back piece), A.1 (= 11 stitches), 4 stitches in stocking stitch (= sleeve), A.1, 10-12-14-14-16-16 stitches in stocking stitch (= front piece), A.1, 4 stitches in stocking stitch (= sleeve), A.1, 5-6-7-7-8-8 stitches in stocking stitch (= half back piece). REMEMBER THE KNITTING TENSION! Continue this pattern AT THE SAME TIME on next round begin increases for RAGLAN – see explanation above. NOTE! Increase differently on body and sleeves as explained below. SIZE 2 YEARS: INCREASE AS FOLLOWS ON FRONT/BACK PIECE: Increase 4 stitches on back piece and 4 stitches on front piece (= 2 stitches before/after A.1): Increase like this every other round 4 times. Then increase 2 stitches on back piece and 2 stitches on front piece (= 1 stitch before/after A.1): Increase like this every other round 12 times. INCREASE AS FOLLOWS ON SLEEVES: Increase 2 stitches on each sleeve (= 1 stitch before/after A.1): Increase every other round 14 times, then increase every 4th round 1 time (= 15 times in total). SIZE 3/4 - 5/6 - 7/8 - 9/10 - 11/12 years: INCREASE AS FOLLOWS ON FRONT/BACK PIECE: Increase 2 stitches on back piece and 2 stitches on front piece (= 1 stitch before/after A.1): Increase every other round 21-22-24-24-26 times in total. INCREASE AS FOLLOWS ON SLEEVES: Increase 2 stitches on each sleeve (= 1 stitch before/after A.1): Increase every other round 11-12-12-12-12 times, then increase every 4th round 5-5-6-6-7 times (16-17-18-18-19 times in total). ALL SIZES: After all increases are done there are 212-224-236-248-252-264 stitches on needle. Work pattern as before (without increases) until piece measures 14-16-16-18-18-19 cm from cast-on edge mid back. Work next round as follows: Work the first 31-33-35-37-38-40 stitches (= half back piece), slip the next 44-46-48-50-50-52 stitches on a stitch holder for sleeve, cast on 6-6-6-6-8-8 new stitches (= in the side under sleeve), work the next 62-66-70-74-76-80 stitches (= front piece), slip the next 44-46-48-50-50-52 stitches on a stitch holder for sleeve, cast on 6-6-6-6-8-8 new stitches (= in the side under sleeve), work the last 31-33-35-37-38-40 stitches (= half back piece). Finish body and sleeves separately. NOW MEASURE THE PIECE FROM HERE! BODY: = 136-144-152-160-168-176 stitches. Insert 1 marker thread in each side, in the middle of the 6-6-6-6-8-8 new stitches that were cast on. Continue working in stocking stitch in the round over all stitches. When piece measures 4 cm, increase 1 stitch on each side of marker threads in the sides - read INCREASE TIP (= 4 stitches increased). Increase like this every 2½.-3.-3½.-4.-4½.-5½ cm 6 times in total = 160-168-176-184-192-200 stitches. When piece measures 21-23-27-29-33-36 cm from division, work 2 ridges. Knit 1 round and loosely cast off by purling. Tunic measures approx. 40-44-48-52-56-60 cm in total from shoulder and down. SLEEVE: Slip the stitches from stitch holder in one side of piece on double pointed needles/a short circular needle and pick in addition up 1 stitch in each of the 6-6-6-6-8-8 new stitches cast on under sleeve = 50-52-54-56-58-60 stitches. Insert 1 marker thread mid under sleeve and work in stocking stitch in the round. When piece measures 3 cm, decrease 1 stitch on each side of marker thread - read DECREASE TIP. Decrease like this every 2-3-3-3½-3½-4 cm 7-7-8-8-9-9 times in total = 36-38-38-40-40-42 stitches. Continue in stocking stitch until sleeve measures 22-26-30-33-38-42 cm from division. Work 2 ridges. Knit 1 round and loosely cast off by purling. Work the other sleeve the same way. |
||||||||||||||||
Diagram explanations |
||||||||||||||||
|
||||||||||||||||
 |
||||||||||||||||
Have you finished this pattern?Tag your pictures with #dropspattern #ticklessweater or submit them to the #dropsfan gallery. Do you need help with this pattern?You'll find 25 tutorial videos, a Comments/Questions area and more by visiting the pattern on garnstudio.com. © 1982-2026 DROPS Design A/S. We reserve all rights. This document, including all its sub-sections, has copyrights. Read more about what you can do with our patterns at the bottom of each pattern on our site. |
||||||||||||||||


With over 40 years in knitting and crochet design, DROPS Design offers one of the most extensive collections of free patterns on the internet - translated to 17 languages. As of today we count 324 catalogues and 12290 patterns translated into English (UK/cm). 12290
We work hard to bring you the best knitting and crochet have to offer, inspiration and advice as well as great quality yarns at incredible prices! Would you like to use our patterns for other than personal use? You can read what you are allowed to do in the Copyright text at the bottom of all our patterns. Happy crafting!
Post a comment to pattern DROPS Children 30-1
We would love to hear what you have to say about this pattern!
If you want to leave a question, please make sure you select the correct category in the form below, to speed up the answering process. Required fields are marked *.