
Popular categories
Looking for a yarn?


Comments / Questions (73)
![]() Karoline wrote:
Karoline wrote:
Hei jeg strikke My Fairy dåps kjolen og driver med diagram A. 2B på rad 11 etter å ha strikket A.2A og A.2B en gang, hvordan strikker jeg når det starter imellom fellingen og kastene? For da skal jeg ikke strikke A.2A men begynne å strikke A.2B gjentagende? Strikker strl 12/18mnd
14.05.2020 - 09:00DROPS Design answered:
Hej Karoline, du gentager omslag/indtagning/omslag på hver side af de 3 midterste masker som strikkes sammen, du kan sætte et mærke i retmasken som strikkes imellem de 2 omslag som deler rapporterne. God fornøjelse!
22.05.2020 - 09:34
![]() Mirosława wrote:
Mirosława wrote:
Sukienka piękna ! Zrobiłam wnuczce na chrzest, wyglądała w niej wyjątkowo. Do tego opaska na główke. Rodzice i goście byli zachwyceni. Dziękuję wzór. Opis jasny i czytelny.
12.02.2020 - 10:31
![]() Ingrid Skøtt wrote:
Ingrid Skøtt wrote:
I mønsterrapport B rager maskerne i 6. 8. Og 10. Række ind i rapport c som jo først skal strikkes efter til sidst efter 9 gange B. Hvad gør man her ?
05.06.2019 - 14:11DROPS Design answered:
Hei Ingrid. Hvis du ser på starten av raden på B, så vil du se at det samme skjer her - altså den "manglende" delen fra slutten av rapporten passer sammen med den delen som er i starten av rapporten. Så det går helt fint å gjenta B 9 ganger etter hverandre. God fornøyelse
06.06.2019 - 07:34
![]() Sigrid Karlsson wrote:
Sigrid Karlsson wrote:
Hei! Jeg har lurt på om jeg vil strikke denne oppskriten uten picotkant. Er det mulig? Isåfall hva kreves? HIlsen Sigid
15.04.2019 - 21:30DROPS Design answered:
Hei Sigrid. Picot-kanten hekles på etter at arbeidet er ferdig, så om du ikke ønsker denne kan du helt fint la vær å lage den. God fornøyelse
23.04.2019 - 14:01
![]() Eva Solberg wrote:
Eva Solberg wrote:
Jeg holder på å strikke My Fairy dåpskjole. Mønsteret A.9 står ikke i oppskriften. Etter A.8 står det at jeg skal strikke A.10.
26.01.2019 - 15:10DROPS Design answered:
Hej Eva, diagram A.9 bruges til "KJOLE MED VANLIG LENGDE" God fornøjelse!
30.01.2019 - 09:24
![]() Asta wrote:
Asta wrote:
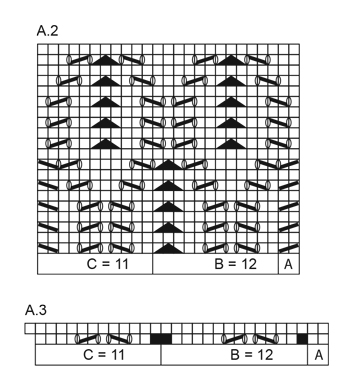
Nå ser jeg det skal være et kast på pinnen i A1. Skal begynne på A2 og har 145 masker på pinnen. Det stemmer jo ikke med A2 som har 25 masker i bredden. Skal man bare strikke A2A og A2B først? Og så A2C eller hele skjemaet som det står?
04.01.2019 - 22:41DROPS Design answered:
Hei Asta. Jeg regner med du strikker størrelse 12/18 mnd, siden du har 145 masker. Du skal strikke A.2A kun over de første 2 maskene på omgangen. Så gjentar du A.2B 11 ganger i bredden (altså over de neste 132 maskene), og avslutter omgangen med å strikke A.2C over de siste 11 maskene. A.2A viser altså hvordan omgangen starter og A.2C viser hvordan omgangen slutter, mens A.2B er "hoveddelen" av mønsteret. God fornøyelse
07.01.2019 - 07:46
![]() Asta wrote:
Asta wrote:
I diagram A1 skal man strikke to masker sammen. Da har man bare halvparten av maskene igjen. Videre står det at man skal øke 33 masker fra 121 masker som man hadde før man strikket to og to sammen. Dette skjønner jeg ikke.
04.01.2019 - 07:28
![]() Loredana Brusamolino wrote:
Loredana Brusamolino wrote:
Sto eseguendo il modello lungo ma ho verifucato che mancano le indicazioni per la lavorazione dello schema A6. Probabilmente c'è un errore nella descrizione del lavoro.
17.12.2018 - 08:19DROPS Design answered:
Buongiorno Loredana. Abbiamo aggiunto la parte mancante del testo. La ringraziamo per la segnalazione. Buon lavoro!
17.12.2018 - 09:10
![]() Rachel wrote:
Rachel wrote:
Can you tell me why I am losing stiches while following the pattern A2? Do I need to increase each knitted row after I complete the pattern for one row? So first row is the pattern. Then the second row is all knit. Do I need to increase back to the original amount of stiches I had in row 1?
26.09.2018 - 23:58DROPS Design answered:
Hi Rachel, The rows in A.2 have the same number of yarn overs and decreases. So for example, row 1 has a total of 8 yarn overs (increases), 6 purl/knit 2 togethers and 1 psso and knit 2 together, which is a total of 8 decreases. So the number of stitches remains the same. Happy knitting!
27.09.2018 - 07:59
![]() Carol wrote:
Carol wrote:
Can you tell me where the A1 pattern is please
26.09.2018 - 21:03DROPS Design answered:
Hi Carol, The patterns A.1 and A.2 plus the measurement sketch are all at the bottom of the page. Happy knitting!
27.09.2018 - 08:07
|
|||||||||||||||||||||||||
My Fairy#myfairychristeninggown |
|||||||||||||||||||||||||
 |
 |
||||||||||||||||||||||||
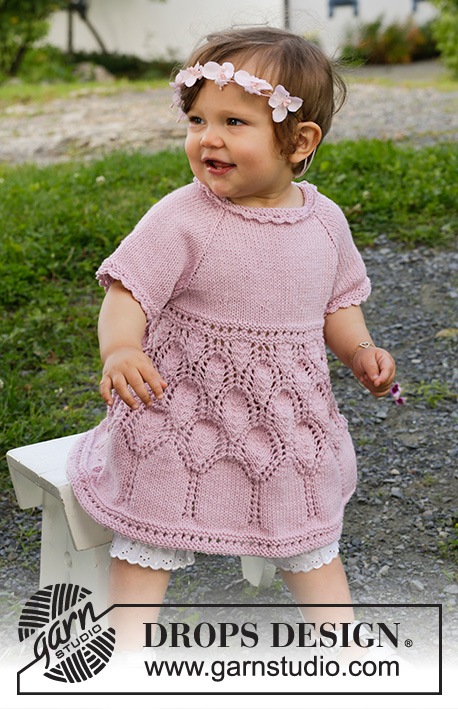
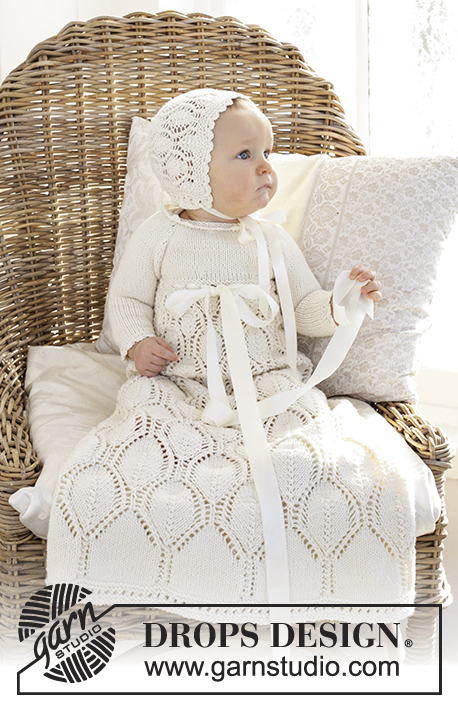
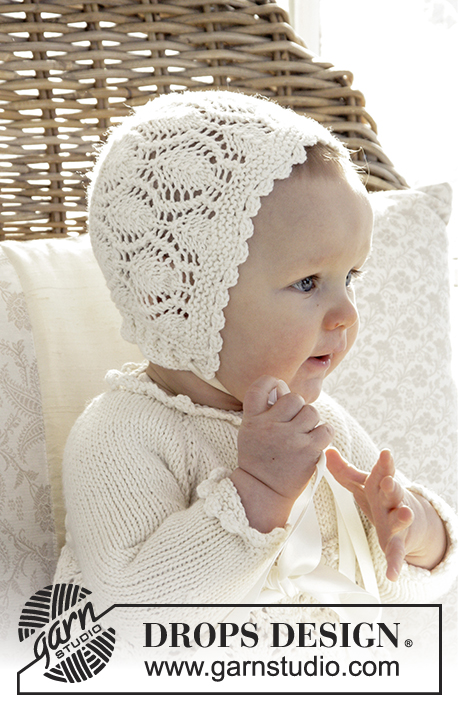
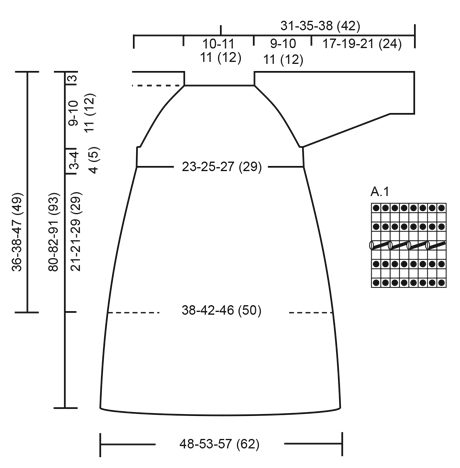
This set is made up of: Dress for Christening or special occasions worked top down with raglan and lace pattern in DROPS Cotton Merino. Knitted hat with lace pattern in DROPS Cotton Merino. Baby sizes 0 - 2 years.
DROPS Baby 29-1 |
|||||||||||||||||||||||||
|
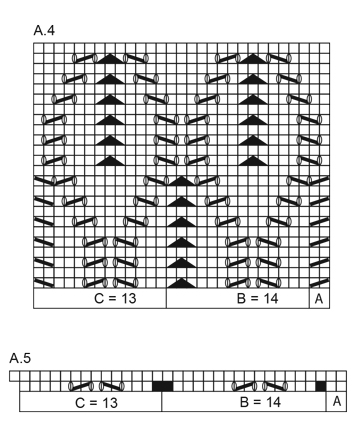
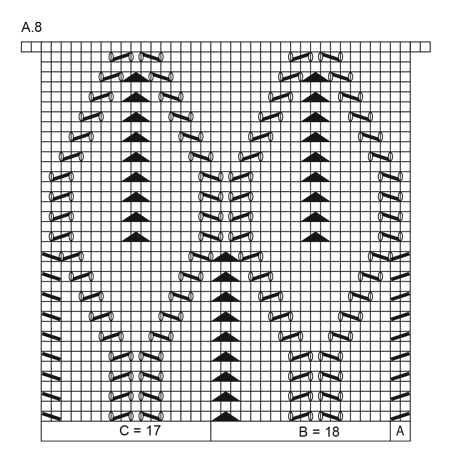
DRESS: RIDGE/GARTER STITCH (worked back and forth): 1 ridge = knit 2 rows. RIDGE/GARTER STITCH (worked in the round): 1 ridge = 2 rounds. Knit 1 round and purl 1 round. PATTERN: See diagrams A.1 to A.10. The diagrams show all the rows in the pattern from the right side. INCREASE TIP: To work out how to increase evenly along the row, count the total number of stitches on the needle (e.g. 96 stitches) and divide by the number of increases to be made (e.g. 25) = 3.84. In other words, in this example you increase after approx. every 4 stitches. Increase by making 1 yarn over. On the next round knit the yarn overs twisted to prevent holes. DECREASE TIP (for mid under sleeve): Decrease on each side of the marker thread mid under the sleeve as follows: Start 3 stitches before the marker thread, knit 2 together, knit 2 (the marker thread sits in the middle of these 2 stitches), slip 1 stitch as if to knit, knit 1, pass the slipped stitch over the knitted stitch (= 2 stitches decreased). RAGLAN: Increase to raglan on each side of the stitch with the marker thread. Increase as follows: Start just before the stitch with the marker thread, make 1 yarn over, knit 1 (= stitch with marker thread), 1 yarn over (= 2 stitches increased). On the next round, purl the yarn overs twisted to prevent holes. BUTTONHOLES: Decrease for the buttonholes on the right band at the back (when the garment is worn). 1 buttonhole = knit the second and third stitch from the edge together and make 1 yarn over. On the next row, knit the yarn overs so that there are holes. Decrease for the buttonholes when the piece measures: SIZE 0/6 MONTHS: 2, 5 and 8 cm. SIZE 6/12 MONTHS: 2, 5 and 8 cm. SIZE 12/18 MONTHS: 2, 6 and 10 cm. SIZE 2 YEARS: 2, 6 and 10 cm. ---------------------------------------------------------- DRESS: The piece is worked top down. It is worked back and forth from mid back until the band at the back is finished, then the piece is worked in the round to desired length (normal dress length or long dress) – see description in the text. YOKE: Cast on 50-54-54 (58) stitches with circular needle size 3 mm and Cotton Merino. Work 2 RIDGES – see description above. Knit 1 row from the right side where you increase 21 stitches evenly along the row (increase after approx. every 2nd stitch and do not increase over the outermost 3 stitches in each side) = 71-75-75 (79) stitches on the needle. Now insert 4 marker threads in the piece as follows (start mid back – NOTE: Do NOT work the stitches whilst inserting the marker threads): Skip the first 10-11-11 (12) stitches (= right back piece when the garment is worn), insert 1 marker thread in the next stitch, skip the next 12 stitches (= sleeve), insert 1 marker thread in the next stitch, skip the next 20-22-22 (24) stitches (= front piece), insert 1 marker thread in the next stitch, skip the next 12 stitches (= sleeve) and insert the last marker thread in the next stitch (there are now 13-14-14 (15) stitches on the row after the last marker thread (= left back piece). READ THE WHOLE OF THE NEXT SECTION BEFORE CONTINUING! Change to circular needle size 4 mm and work stocking stitch back and forth from mid back, but the 3 outermost stitches in each side are worked in garter stitch (= bands). REMEMBER THE KNITTING TENSION and remember BUTTONHOLE on the right band – see description above. AT THE SAME TIME on the first row from the right side, increase to RAGLAN on each side of the 4 marker threads – see description above (= 8 stitches increased). Increase in this way every 2nd row (i.e. every row from the right side) a total of 11-13-15 (16) times = 159-179-195 (207) stitches. After the final increase to raglan work the next row from the wrong side as follows: Work 25-28-30 (32) stitches as before (= left back piece), place the next 34-38-42 (44) stitches on 1 thread (= sleeve), cast on 6-6-8 (8) new stitches on the needle (= under the sleeve), work the next 44-50-54 (58) stitches as before (= front piece), place the next 34-38-42 (44) stitches on 1 thread (= sleeve), cast on 6-6-8 (8) new stitches on the needle (= under the sleeve) and work the remaining 22-25-27 (29) stitches as before (= right back piece). The yoke is now finished and the body and sleeves are worked separately. BODY: Insert 1 marker in the piece – THE PIECE IS NOW MEASURED FROM HERE! Start mid back, lay the 3 band stitches on the left back piece under the 3 band stitches on the right back piece (so that the band with the buttonholes is on top). Work in the round and knit 1 round over all stitches and AT THE SAME TIME knit the stitches from the two bands together 2 and 2 = 100-112-124 (132) stitches on the needle. Continue working stocking stitch in the round for 1-2-2 (3) cm – decrease AT THE SAME TIME 4-8-12 (12) stitches evenly along the first round = 96-104-112 (120) stitches. Change to circular needle size 3 mm and work pattern according to diagram A.1. When A.1 has been completed, change to circular needle size 4.5 mm. Knit 1 round where you increase 25-29-33 (37) stitches evenly – READ INCREASE TIP = 121-133-145 (157) stitches. Continue to work pattern in the round as follows: A.2A (= 2 stitches), A.2B (= 12 stitches) a total of 9-10-11 (12) times and A.2C (= 11 stitches). Continue the pattern in this way, but follow the description onwards for the desired length (dress of normal length or long dress). DRESS OF NORMAL LENGTH: When A.2 has been completed 1 time in height in all sizes, continue with pattern in the same way, but now work A.3 instead of A.2. When A.3 has been completed 1 time in height you have increased 2 stitches in each repeat of the lace pattern = 141-155-169 (183) stitches on the needle. Continue working pattern as before, but now work A.4 instead of A.3. When A.4 has been worked 1-1-2 (2) times in height (or to desired length) work A.5 instead of A.4. After A.5 there are 161-177-193 (209) stitches on the needle. Now work pattern according to diagram A.9 in the same way for approx. 5 cm, i.e. work A.9A (= 2 sts), A.9B (= 16 stitches) a total of 9-10-11 (12) times and A.9C (= 15 stitches). Work 4 rounds stocking stitch. Change to circular needle size 4 mm and work A.1 in the round over all the stitches before LOOSELY casting off (NOTE: On round 5 in A.1 knit the last stitch of the round). The dress measures approx. 36-38-47 (49) cm from the shoulder down. LONG DRESS: When A.2 has been completed 1 time in height in all sizes, continue with pattern in the same way, but now work A.3 instead of A.2. When A.3 has been completed 1 time in height you have increased 2 stitches in each repeat of the lace pattern = 141-155-169 (183) stitches. Continue working pattern as before, but now work A.4 instead of A.3. When A.4 has been worked 2-2-3 (3) times in height, work pattern in the same way, but now with A.5 instead of A.4. When A.5 has been completed 1 time in height you have increased 2 stitches in each repeat of the lace pattern = 161-177-193 (209) stitches. Continue working pattern as before, but with A.6 instead of A.5. When A.6 has been completed 2 times in height in all sizes (or to desired length), work A.7 instead of A.6. When A.7 has been completed 1 time in height you have increased 2 stitches in each repeat of the lace pattern = 181-199-217 (235) stitches. Work 1 repeat of A.8 in height. After A.8 there are 201-221-241 (261) stitches on the needle. Now work pattern according to diagram A.10 in the same way for approx. 5 cm, i.e. work A.10A (= 2 stitches), A.10B (= 20 stitches) a total of 9-10-11 (12) times and A.10C (= 19 stitches). Work 4 rounds stocking stitch. Change to circular needle size 4 mm and work A.1 in the round over all stitches before LOOSELY casting off (NOTE: On round 5 in A.1 knit the last stitch on the round). The dress measures approx. 80-82-91 (93) cm from the shoulder down. BOTH DRESSES: SLEEVE: Place the stitches from the thread on one side of the piece on double pointed needles size 4 mm. Knit 1 round and knit up in addition 1 stitch in each of the 6-6-8 (8) new stitches mid under the sleeve = 40-44-50 (52) stitches. Insert 1 marker thread in the middle of the new stitches (= the round begins mid under the sleeve) – THE PIECE IS NOW MEASURED FROM HERE! Work stocking stitch in the round. When the piece measures 2 cm in all sizes decrease 2 stitches mid under the sleeve – READ DECREASE TIP. Decrease in this way every 3-2½-2 (2) cm a total of 4-6-8 (8) times = 32-32-34 (36) stitches. Continue working until the sleeve measures 16-18-20 (23) cm. Change to double pointed needles size 3 mm and work 2 RIDGES – see description above, before loosely casting off with knit. Work the other sleeve in the same way. PICOT EDGE: Work a picot edge at the bottom of both sleeves with crochet hook size 3 mm as follows: 1 double crochet in the first stitch, * 3 chain stitches, 1 treble crochet in the first chain stitch worked, skip 2 stitches on the sleeve, 1 double crochet in the next stitch *, repeat from *-*, but finish the round with 1 slip stitch in the double crochet at the beginning of the round (instead of 1 double crochet in the next stitch). Work the same picot edge along the neckline in the transition between the garter stitch edge and the stocking stitch section on the yoke – NOTE: The edge is worked top down. ASSEMBLY: Fasten 3 buttons on the left band at the back. Thread the silk ribbon up and down through the row of holes on the yoke (start and finish mid front) and tie a bow mid front. ---------------------------------------------------------- HAT: RIDGE/GARTER STITCH (worked back and forth): 1 ridge = knit 2 rows. PATTERN: See diagrams A.1 and A.2. The diagrams show all the rows in the pattern from the right side. DECREASE TIP (for mid piece on the back of the hat): Decrease inside the outermost stitch in garter stitch in each side. All decreases are done from the right side! Decrease as follows after the first stitch in garter stitch: Slip 1 stitch as if to knit, knit 1, pass the slipped stitch over the knitted stitch. Decrease as follows before the last stitch in garter stitch: Start 2 stitches before the last stitch in garter stitch and knit 2 together. ---------------------------------------------------------- HAT: The piece is worked back and forth on circular needle. Cast on 70-78-82 (90) stitches (including 1 edge stitch in each side) with circular needle size 3 mm and Cotton Merino. Work 2 RIDGES – see description above. Knit 1 row from the right side where you decrease 7-3-7 (3) stitches evenly along the row = 63-75-75 (87) stitches. Knit 1 row from the wrong side. The next row is worked as follows from the right side: 1 edge stitch in garter stitch, A.2A (= 2 stitches), A.2B (= 12 stitches) a total of 4-5-5 (6) times, A.2C (= 11 stitches) and 1 edge stitch in garter stitch. Continue the pattern in this way. REMEMBER THE KNITTING TENSION! When the piece measures 12-13-14 (15) cm work 1 ridge over all stitches. Cut the strand. Now place the outermost 23-28-28 (33) stitches in each side on separate threads or extra needle = 17-19-19 (21) stitches left on the row (= mid piece at the back of the hat). Work garter stitch back and forth over the mid piece AT THE SAME TIME as the last stitch on each row (both from the right and wrong side) is knitted together with the first stitch on the thread/extra needle. Continue in this way. AT THE SAME TIME when the mid piece measures 4 cm in all sizes, decrease 1 stitch in each side of the mid piece – READ DECREASE TIP! Repeat the decrease when the piece measures 8-8-9 (9) cm = 13-15-15 (17) stitches left on the mid piece. Continue working until all the stitches from the threads/extra needle in each side have been worked together with the mid piece, then cast off the 13-15-15 (17) stitches on the mid piece. ASSEMBLY: Knit up from the right side approx. 66-72-76 (82) stitches along the bottom edge of the hat with circular needle size 3 mm and work pattern according to diagram A.1 with 1 edge stitch in garter stitch in each side (first row = from the wrong side). When A.1 has been completed, cast off in knit from the right side. PICOT EDGE: Work a picot edge at the front of the hat. Start from the right side at the bottom in the corner and work with hook size 3 mm as follows: 1 double crochet in the first stitch, * 3 chain stitches, 1 treble crochet in the first chain stitch worked, skip 2 stitches on the hat, 1 double crochet in the next stitch *, repeat from *-* along the whole of the front edge of the hat. Cut and fasten the strand. Thread the silk ribbon up and down through the row of holes at the bottom of the hat. |
|||||||||||||||||||||||||
Diagram explanations |
|||||||||||||||||||||||||
|
|||||||||||||||||||||||||
 |
|||||||||||||||||||||||||
 |
|||||||||||||||||||||||||
 |
|||||||||||||||||||||||||
 |
|||||||||||||||||||||||||
 |
|||||||||||||||||||||||||
Have you finished this pattern?Tag your pictures with #dropspattern #myfairychristeninggown or submit them to the #dropsfan gallery. Do you need help with this pattern?You'll find 35 tutorial videos, a Comments/Questions area and more by visiting the pattern on garnstudio.com. © 1982-2026 DROPS Design A/S. We reserve all rights. This document, including all its sub-sections, has copyrights. Read more about what you can do with our patterns at the bottom of each pattern on our site. |
|||||||||||||||||||||||||


With over 40 years in knitting and crochet design, DROPS Design offers one of the most extensive collections of free patterns on the internet - translated to 17 languages. As of today we count 324 catalogues and 12290 patterns translated into English (UK/cm). 12290
We work hard to bring you the best knitting and crochet have to offer, inspiration and advice as well as great quality yarns at incredible prices! Would you like to use our patterns for other than personal use? You can read what you are allowed to do in the Copyright text at the bottom of all our patterns. Happy crafting!
Post a comment to pattern DROPS Baby 29-1
We would love to hear what you have to say about this pattern!
If you want to leave a question, please make sure you select the correct category in the form below, to speed up the answering process. Required fields are marked *.