
Popular categories
Looking for a yarn?


Comments / Questions (99)
![]() Mirella wrote:
Mirella wrote:
Buongiorno, lo schema a3 delle maniche quando si lavora? Grazie
14.04.2026 - 18:34DROPS Design answered:
Buonasera Mirella, non è previsto lo schema A.3 sulle maniche. Buon lavoro!
14.04.2026 - 22:38
![]() Ivana wrote:
Ivana wrote:
Dobrý den, nerozumím systému přidávání přední/zadní díl x rukávy.
22.03.2026 - 11:31
![]() MIRELLA wrote:
MIRELLA wrote:
Buongiorno, è la prima volta che faccio una maglia top down e chiedo scusa per la domanda: dopo aver fatto i 4 giri a punto legaccio e aver aumentato le 20 maglie sull'ultimo giro sul 5 giro devo iniziare ad aumentare per la maniche ? Invece quando inizio ad aumentare per il davanti e dietro?
30.07.2025 - 12:00DROPS Design answered:
Buonasera Mirella, deve aumentare per il davanti e dietro e per le maniche ogni 2 giri per il numero di volte indicato nel modello. Buon lavoro!
31.07.2025 - 22:48
![]() Annalena wrote:
Annalena wrote:
Hallo, ist es richtig, dass in A2 Zeile zwei am Ende des Musters für den Ärmel noch ein Umschlag gemacht wird? Der Umschlag befindet sich somit direkt vor dem Markierungsfaden. Bisher wurde immer eine Masche und dann der Umschlag vor und nach dem Markierungsfaden gestrickt. Vielen Dank.
05.06.2025 - 13:07DROPS Design answered:
Liebe Annalena, die 2. Reihe A.2 ist eine gerade Reihe, dh bei dieser Reihe nehmen Sie nicht zu, aber stricken Sie die Umschläge der vorigen Runde für den Raglan. Viel Spaß beim Stricken!
05.06.2025 - 14:28
![]() Gabriela Cueva M wrote:
Gabriela Cueva M wrote:
No entiendo este patrón! sería útil que pusieran algunas fotos de cómo va quedando!, porque no sé si lo estoy haciendo bien! en la parte donde dice que debo montar 8 puntos en las mangas (talla M) me quedan unos agujeros enormes que no se ven bien! y me pregunto si así deberían quedar, o si lo estoy haciendo mal...
09.11.2024 - 01:40DROPS Design answered:
Hola Gabriela, aquí tenemos todas las fotos disponibles de la prenda; no disponemos de fotos para hacer un tutorial paso a paso, solo del resultado final. Si te quedan huecos entre los puntos montados entonces la tensión no era correcta cuando estabas montado puntos; tienes que estirar bien el hilo para que los puntos no queden flojos.
10.11.2024 - 19:43
![]() Serena wrote:
Serena wrote:
Buonasera, sono un principiante, questo progetto è molto bello e avrei una domanda: posso avere indicazioni su come fare gli aumenti sul secondo ferro a maglia legaccio? All'inizio delle istruzioni. Se non sbaglio dovrebbe essere un ferro a rovescio.. e poi come li lavoro sul ferro successivo? Sarà sicuramente una cosa banalissima, ma non so farlo! Grazie Mille!
02.04.2024 - 16:28DROPS Design answered:
Buonasera Serena, il modello è lavorato in tondo, e sull'ultimo giro delle coste iniziali deve aumentare 20 maglie, distribuendo gli aumenti in modo uniforme sul giro. Poi prosegue con la lavorazione come indicato. Buon lavoro!
03.04.2024 - 20:16
![]() Theresa wrote:
Theresa wrote:
Rumpfteil: Größe L 200 Maschen, dann nach 4 cm 4 Maschen abnehmen= 196 Dann 4 x alle 3 cm 4 Maschen abnehmen also 16 weitere Maschen abgenommen. 196-16 da komme ich auf 180 Maschen und nicht 184 Maschen?
21.08.2023 - 21:10DROPS Design answered:
Liebe Theresa, diese Abnahmen sollen insgesamt 4 Mal gestrickt werden, dh nicht 4 weitere Mal nach der 1. Mal aber 4 Mal, so noch 3 Mal nach der 1. Abnahmenrunde. Viel Spaß beim stricken!
22.08.2023 - 09:30
![]() Lauri wrote:
Lauri wrote:
I am having a problem with this pattern( Petronella Top), specifically the cap sleeve: Questions: 1. The pattern instructions state to Increase a stitch every 2nd round 15 times-Is it 15 rows or 15 increases? 2. Do I knit A-1, A-2 and A3 diagrams? If so how many times of each diagram? thank you!!!!
02.07.2023 - 01:58DROPS Design answered:
Dear Lauri, you increase a total of 15 times on every other round for body (size M), this means (1 round with increase, 1 round without increase) x 15 (- 30 rounds); then 7 times on every 4th round, and, at the same time, you will increase 23 times on every other round for sleeve and 3 times on every 4th round. This means you will first increase 8 sts on ever other round (body and sleeve), then increase alternately 4 sts and 8 sts (when increasing still on every other round on sleeve but on every 4th round on body). Make sure to increase in row like 1, 3, 5 in diagrams. Happy knitting!
03.07.2023 - 10:29
![]() Chiara wrote:
Chiara wrote:
Bonjour Quand on dit "Augmenter 12-15-17-25-30-35 fois tous les 2 tours, et 7-7-7-4-3-2 fois tous les 4 tours." Cela veut dire qu’on aura terminé les augmentations tous les 2 tours au 24e tour (pour la taille S) et qu’au 25e tour on commence à augmenter tous les 4 tours, donc pas d’augmentation au tour 25 ni 26 , et une augmentation au 27e tour. C’est bien ça ? Merci bcp de votre aide!
13.06.2023 - 03:48DROPS Design answered:
Bonjour Chiara, tricotez 12 fois (1 tour avec augmentations, 1 tour sans augmentation) soit 24 tours au total, puis 7 fois (1 tour avec augmentations, 3 tours sans augmentations). Bon tricot!
13.06.2023 - 08:35
![]() Astrid wrote:
Astrid wrote:
Frage zu Strickmuster A1: die Raglanzunahme endet mit Umschlag, danach beginnt dann A 1 mit Umschlag, d.h. 2 Umschläge hintereinander? Wenn man mit 2 Maschen zusammenstricken beginnt, hat man das gleiche Problem am Ende bzw die Maschenanzahl reduziert sich um 1. Damit fehlt bei Wiederholung A 1 eine Masche. Bitte um Hilfe. Danke.
13.05.2023 - 09:09DROPS Design answered:
Liebe Astrid, die Raglanzunahmen werden beidseitig von 2 Maschen glatt rechts gestrickt, so sind es immer 2 Maschen rechts zwischen den Umschlägen; die 1. Raglanzunnahme wird bei der 1. Reihe A.1 sowie bei der 1. Reihe A.2 gestrickt, so entstehen sie nicht bei der gleichen Reihe wie das Lochmuster in A.2. Viel Spaß beim stricken!
15.05.2023 - 08:04
|
|||||||||||||
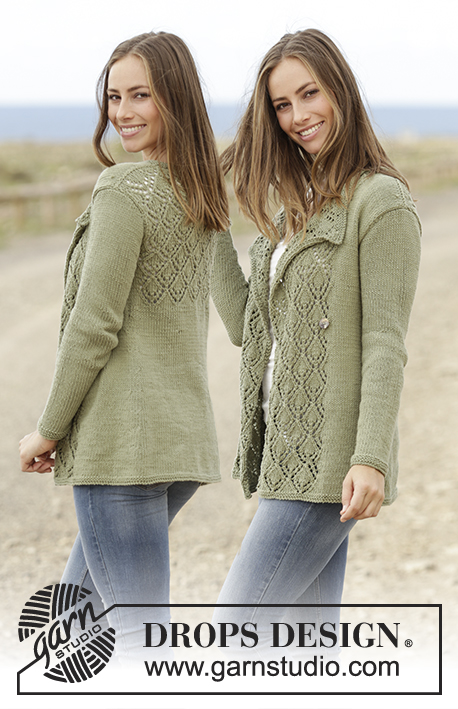
Petronella Top#petronellatop |
|||||||||||||
|
|
|||||||||||||
Knitted top with raglan and lace pattern, worked top down in DROPS Muskat. Sizes S - XXXL.
DROPS 175-32 |
|||||||||||||
|
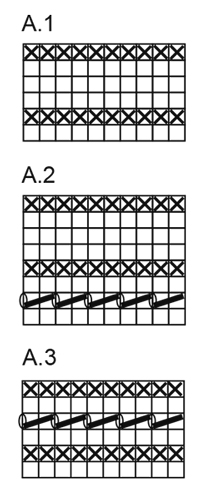
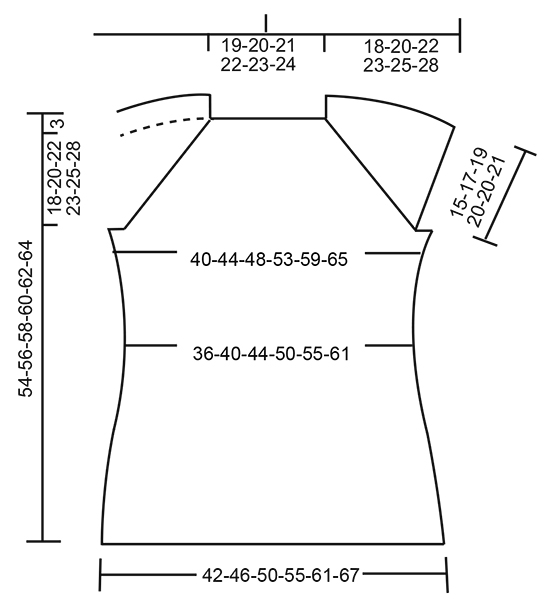
RIDGE/GARTER STITCH (worked in the round): 1 ridge = 2 rounds. Knit 1 round and purl 1 round. PATTERN: See diagrams A.1, A.2 and A.3. The diagrams show all the rows in the pattern from the right side. RAGLAN: Increase every 2nd round as follows: Increase as follows before the marker thread: Start 1 stitch before the marker thread: Make 1 yarn over, knit 1, marker thread. Increase as follows, after the marker thread: Marker thread, knit 1, make 1 yarn over. On the next round work the yarn overs knit, there will be holes. Increase every 4th round as follows: Increase as follows before the marker thread: ROUND 1: Start 1 stitch before the marker thread: Make 1 yarn over, knit1, marker thread. ROUND 2: The yarn overs are worked knit, there will be holes. ROUND 3: Start 3 stitches before the marker thread: Knit 2 together, make 1 yarn over, knit1, marker thread. No increases, but the row of holes continues as before. ROUND 4: The yarn overs are worked knit, there will be holes. Increase as follows, after the marker thread: ROUND 1: Marker thread, knit 1, make 1 yarn over. ROUND 2: The yarn overs are worked knit, there will be holes. ROUND 3: Marker thread, knit 1, make 1 yarn over, slip 1 stitch as if to knit, knit 1, pass the slipped stitch over the knitted stitch. No increases, but the row of holes is continued as before. ROUND 4: Work the yarn overs knit, there will be holes. DECREASE TIP: Start 3 stitches before the marker thread: Knit 2 together, knit 2 (the marker thread sits between these 2 stitches), slip 1 stitch as if to knit, knit 1, pass the slipped stitch over the knitted stitch = 2 stitches decreased. INCREASE TIP: Work until there is 1 stitch left before the marker thread. Make 1 yarn over, knit 2 (the marker thread sits between these 2 stitches) and make 1 yarn over. On the next round work the yarn overs twisted knit to prevent holes (the increased stitches are worked in stocking stitch). --------------------------------------------------------- TOP: The piece is worked in the round with circular needle from mid back, top down. YOKE: Cast on 80-84-88-92-96-100 stitches with circular needle size 4 mm and Muskat. Work 2 RIDGES – see description above, on the last round of the ridges increase 20 stitches evenly along the round = 100-104-108-112-116-120 stitches. Insert 4 marker threads in the piece as follows: first marker thread after 19-20-21-22-23-24 stitches (= half the back piece), second marker thread after 12 new stitches (= sleeve), third marker thread after 38-40-42-44-46-48 new stitches (= front piece), fourth marker thread after 12 new stitches (= sleeve), there are 19-20-21-22-23-24 stitches left on the needle after the last marker thread (= half the back piece). Begin with the increases to RAGLAN as described above and work stocking stitch across the stitches on the back piece and front piece and A.1 across all the sleeve stitches. READ THIS WHOLE SECTION BEFORE WORKING! The increases are different on the front piece/back piece and the sleeves as follows: FRONT PIECE/BACK PIECE: Increase every 2nd round 12-15-17-25-30-35 times, then every 4th round 7-7-7-4-3-2 times. SLEEVES: Increase every 2nd round 18-23-27-29-26-25 times, then every 4th round 4-3-2-2-5-7 times. When A.1 has been completed 1 time in height, repeat A.2 in height. The increased stitches on the sleeves are worked in to the pattern as you go. After the next to last increase on the sleeve (there are 4 rounds left), continue by working garter stitch across the stitches on each sleeve, the stitches on the front piece/back piece are continued in stocking stitch as before. REMEMBER THE KNITTING TENSION! After all the increases to raglan there are 264-296-320-352-372-396 stitches on the needle. The next round is worked as follows: Work 38-42-45-51-56-61 stitches (= half the back piece), cast off the next 56-64-70-74-74-76 stitches, work the next 76-84-90-102-112-122 stitches (= front piece), cast off the next 56-64-70-74-74-76 stitches, work the next 38-42-45-51-56-61 stitches (= half the back piece). BODY: Continue working as follows: work half the back piece, cast on 8-8-10-10-12-14 new stitches, work the front piece, cast on 8-8-10-10-12-14 new stitches, work half the back piece. There are now 168-184-200-224-248-272 stitches on the body. Insert a marker thread in each side, in the middle of the new stitches which were cast on. THE PIECE IS NOW MEASURED FROM HERE. Continue with stocking stitch, but across the 8-8-10-10-12-14 new stitches in each side work 2 ridges, then work stocking stitch across all stitches. When the piece measures 4 cm decrease 1 stitch on each side of the marker threads (= 4 stitches decreased), decrease every 3 cm in total 4 times – READ DECREASE TIP = 152-168-184-208-232-256 stitches. When the piece measures 19-19-19-18-18-19 cm increase 1 stitch on each side of the marker threads (= 4 stitches increased), increase every 2 cm in total 6 times– READ INCREASE TIP = 176-192-208-232-256-280 stitches. When the piece measures 32-32-32-33-33-32 cm work A.3 across all stitches. Then cast off in knit, the piece measures approx. 54-56-58-60-62-64 cm from the shoulder. |
|||||||||||||
Diagram explanations |
|||||||||||||
|
|||||||||||||
 |
|||||||||||||
 |
|||||||||||||
Have you finished this pattern?Tag your pictures with #dropspattern #petronellatop or submit them to the #dropsfan gallery. Do you need help with this pattern?You'll find 24 tutorial videos, a Comments/Questions area and more by visiting the pattern on garnstudio.com. © 1982-2026 DROPS Design A/S. We reserve all rights. This document, including all its sub-sections, has copyrights. Read more about what you can do with our patterns at the bottom of each pattern on our site. |
|||||||||||||


With over 40 years in knitting and crochet design, DROPS Design offers one of the most extensive collections of free patterns on the internet - translated to 17 languages. As of today we count 324 catalogues and 12290 patterns translated into English (UK/cm). 12290
We work hard to bring you the best knitting and crochet have to offer, inspiration and advice as well as great quality yarns at incredible prices! Would you like to use our patterns for other than personal use? You can read what you are allowed to do in the Copyright text at the bottom of all our patterns. Happy crafting!
Post a comment to pattern DROPS 175-32
We would love to hear what you have to say about this pattern!
If you want to leave a question, please make sure you select the correct category in the form below, to speed up the answering process. Required fields are marked *.