
Popular categories
Looking for a yarn?


Comments / Questions (84)
![]() Rita wrote:
Rita wrote:
Buongiorno allora mi sembra di aver capito che prima /dopoA2 si aumenta sia per le maniche che per davanti dietro. Poi a rovescio la gettata piu\\\'vicina ad A2 la lavoro a rovescio e l\\\'altra (quella davanti dietro)si lavora rovescio ritorto Giusto ?Grazie per la cortese risposta
13.01.2026 - 15:36DROPS Design answered:
Buongiorno Rita per la lavorazione sul ferro successivo deve seguire quanto riportato nelle spiegazioni all'inizio del modello, perchè sono diversi a seconda del tipo di aumento. Buon lavoro!
17.01.2026 - 12:06
![]() Rita wrote:
Rita wrote:
Non riesco capire gli aumenti raglan! Non dovrebbero essere 4 punti dove fare gli aumenti....non riesco a capire.,sembra che siano di più,🤔Spero di essermi spiegata, grazie
13.01.2026 - 14:33DROPS Design answered:
Buonasera Rita, per gli aumenti del raglan deve seguire quanto riportato nei due paragrafi all'inizio delle spiegazioni. Buon lavoro!
14.01.2026 - 16:31
![]() Rita wrote:
Rita wrote:
Non riesco capire gli aumenti raglan! Non dovrebbero essere 4 punti dove fare gli aumenti....non riesco a capire.,sembra che siano di più,🤔Spero di essermi spiegata, grazie
13.01.2026 - 14:32DROPS Design answered:
Buongiorno Rita, gli aumenti per il raglan sono all'altezza di A.2 e sono diversi per il davanti/dietro e le maniche, deve seguire quanto riportato nelle spiegazioni all'inizio del lavoro. Buon lavoro!
17.01.2026 - 12:04
![]() Dani wrote:
Dani wrote:
Hallo, wie wird A2 am rechten und linken Vorderteil nach dem Stillegen der Maschen gestrickt? Lt. Muster oder alles glatt? Man kann das am Bild nicht sehen. Kann ein Bild wo man den unteren Ärmelteil sieht online gestellt werden? Danke und lG
22.10.2024 - 20:39DROPS Design answered:
Liebe Dani, beim Rumpfteil werden die Maschen glatt rechts an beiden Seiten gestrickt, aber bei den Ärmeln wird man A.2 über die mittleren Maschen unten stricken. Viel Spaß beim Stricken!
23.10.2024 - 08:16
![]() Lena wrote:
Lena wrote:
Så, är det 2 A2 på insidan av ärmen? Eller är det 1? Om bara 1, var finns den andra? Att ni svarar på hur jag ska öka hjälper inte då jag redan ökat 20 gånger.
04.05.2023 - 16:02DROPS Design answered:
Hei Lena. Når du strikker bærestykket strikkes A.2A 4 steder, på hver side av raglan, MEN når du strikker ermene strikkes A.2A kun 1 gang på undersiden av ermet. Se evnt bildet av modellen der modellen står med ryggen til. Da ser du 1 stk A.2A som er strikket langs innersiden av ermet hele veien. A.2 strikkes midt under ermet (dvs det er 4 masker av A.2 på hver side av merket du har satt under ermet), de resterende maskene på omgangen strikkes i glattstrikk. mvh DROPS Design
08.05.2023 - 09:14
![]() Lena wrote:
Lena wrote:
Hej! Fått ihop antalet maskor efter ett antal försök. Nu undrar jag, jag ska lägga ärmarna på lina och sticka vidare. Är A2 på båda sidor del av en ärm? Jag har ökat exakt enligt mönstret och då är bara A2 på framsidan av ärmarna med. Den som är på baksidan nämns inte
02.05.2023 - 19:19DROPS Design answered:
Hej Lena, jo du strikker A.2 i hver raglanovergang og tager ud på hver side af A.2 i alle 4 overgange. :)
04.05.2023 - 12:03
![]() Lena wrote:
Lena wrote:
Hej! I mönstret ska det vara 138 maskor efter ökning. Men från varv fem är det 118 maskor i mönstret i XL. Hur ska man lösa det?
19.04.2023 - 14:48DROPS Design answered:
Hei Lena. Litt usikker på hvor du er i oppskriften. I str. XL skal du før og etter forhøyningen ha 134 masker. Så strikker du etter forklaringen ( = 4 stolpe-m rille, 1 vr, A.1 3 ganger, 1 vr, 1 r , A.2, 16 m rett, A.2, 1 r, 1 vr, A.1 7 ganger, 1 vr, 1 r, A.2, 16 m rett, A.2, 1 r, 1 vr, A.1 3 ganger, 1 vr, 4 stolpe-m rille =det er strikket over 134 masker). Strikk 1 p tilbake fra vrangen på samme måte. Nå starter økningen til RAGLAN BOL og RAGLAN ERME – les forklaringen i i oppskriften. NB: Det økes forskjellig på ermer og bol. mvh DROPS Design
24.04.2023 - 10:39
![]() Bonnie wrote:
Bonnie wrote:
In the 171-14 pattern, there is A1 and A2, A1 is 12 rows and A2 is 8 rows, why do they not coordinate? After you cast on and do the garter stitch rows and increase, you do a the first row with A1and A2 in it, it then says work 1 row from WS the same way, so what do you do when you get to the YO .
14.04.2023 - 22:45DROPS Design answered:
Dear Bonnie, they are different patterns, applied on different sections of the garment so they don't need to match in the number of rows. The yarn overs on each side of the raglan stitches are simply purled (not twisted, there should be a hole). Happy knitting!
16.04.2023 - 19:55
![]() Janice wrote:
Janice wrote:
Please explain A.1 and A.2 171-14\\r\\nPlus said equals 4 stitches and 8 stitches.
22.02.2023 - 00:52DROPS Design answered:
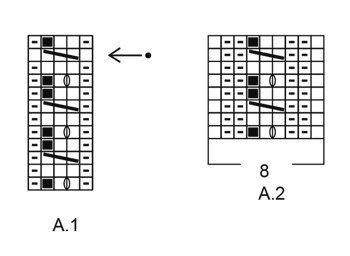
See answer et video linked below in previous answer - A.1 should be counted over 4 sts even when there are 5 sts - A.2 should be counted as 8 sts even when there are 9 sts. the yarn over made for the small cable doesn't count as a stitch when counting the stitches on the row. Happy knitting!
22.02.2023 - 08:49
![]() Janice wrote:
Janice wrote:
Please explain A. and A.2
22.02.2023 - 00:45DROPS Design answered:
Dear Janice, this video shows how to work this cable over 3 stitches - in A.1 you will purl 1 stitch on each side of these 2/3 sts and in A.2 you will work K1, P2, the cable, P2, K1 (seen from RS). Hope it can help you. Happy knitting!
22.02.2023 - 08:47
|
|||||||||||||||||||
Lobelia#lobeliacardigan |
|||||||||||||||||||
 |
 |
||||||||||||||||||
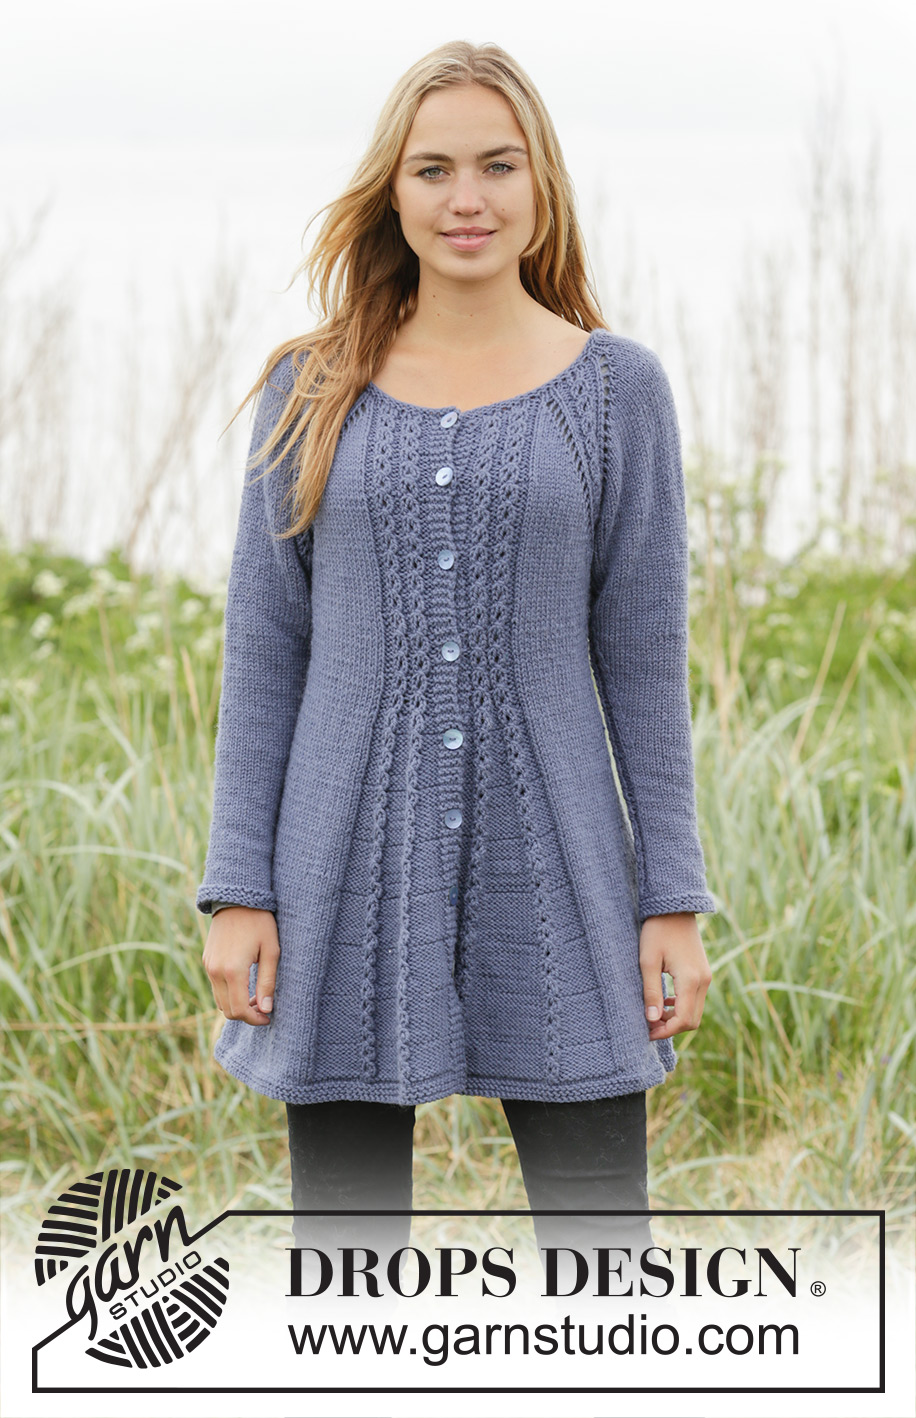
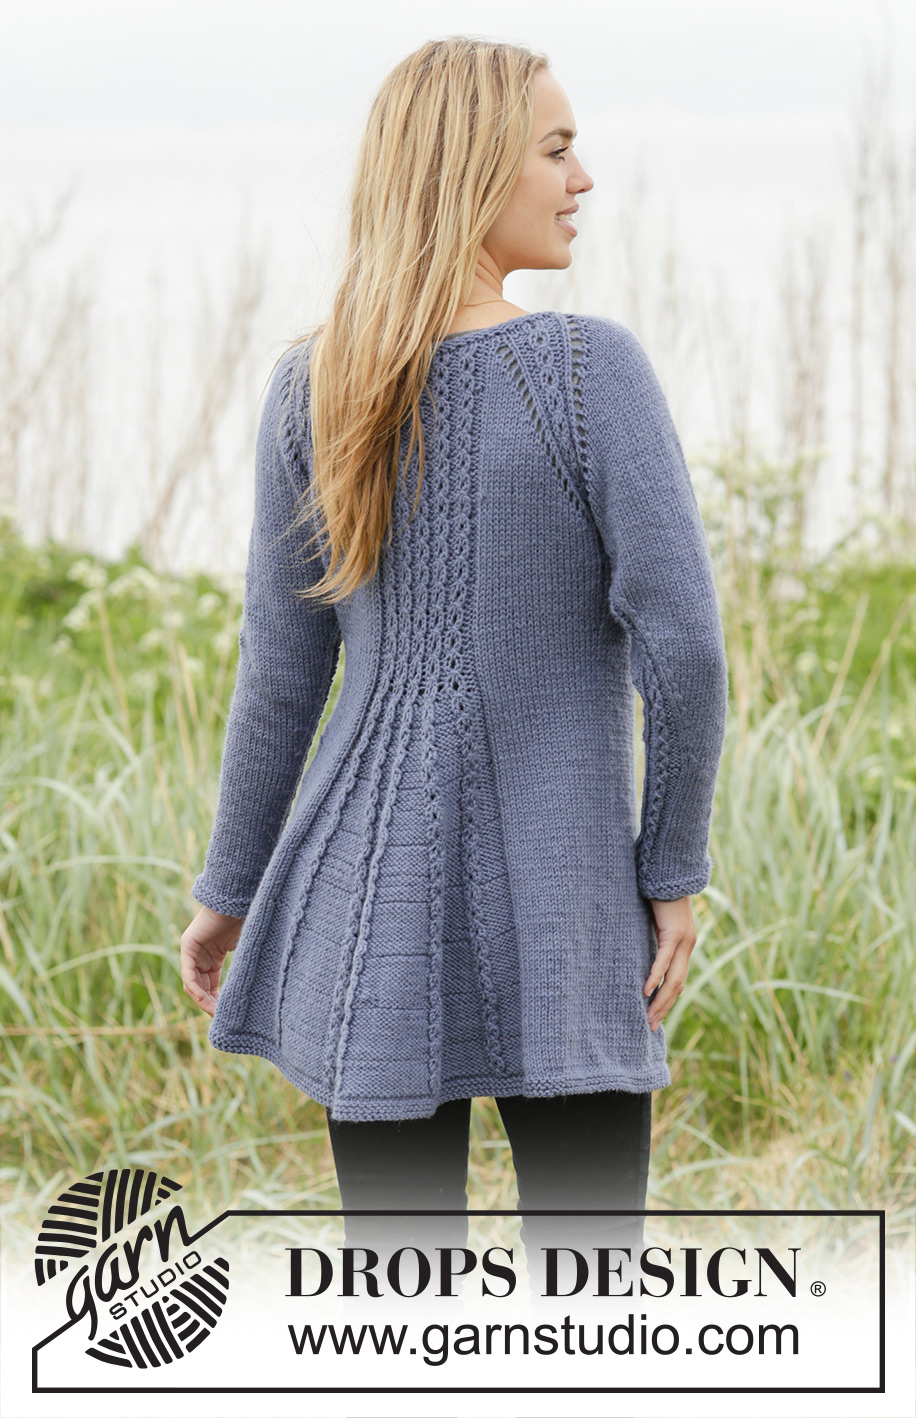
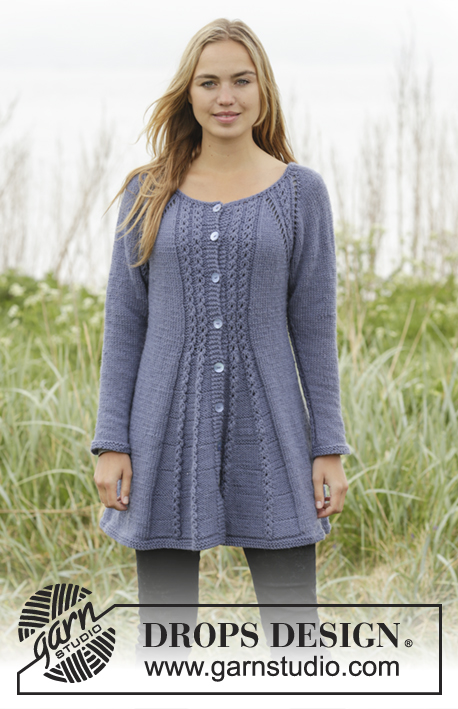
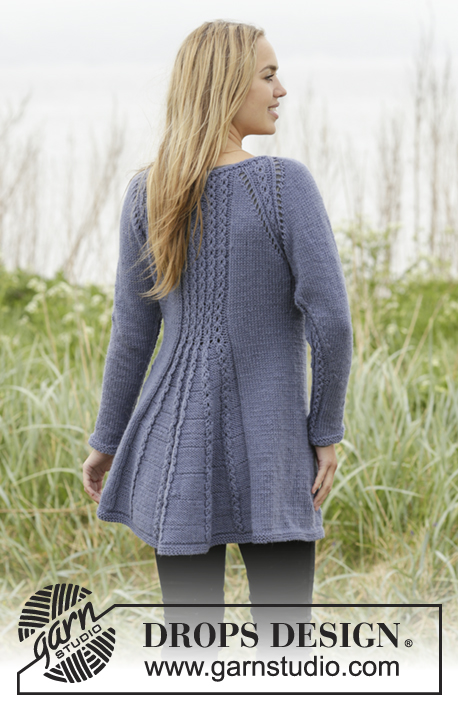
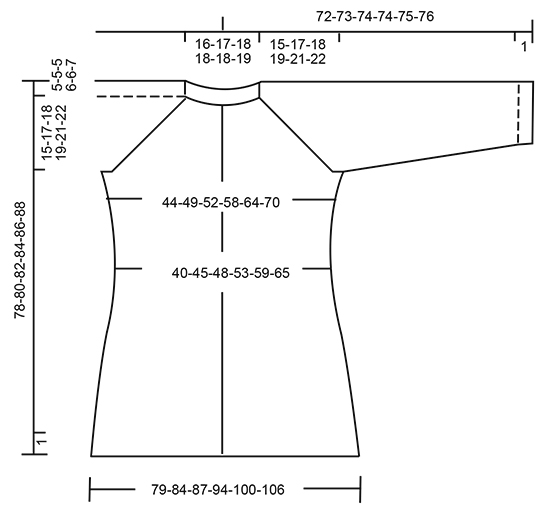
Knitted DROPS jacket with raglan and cables, worked top down in ”Nepal”. Size S-XXXL.
DROPS 171-14 |
|||||||||||||||||||
|
GARTER ST (worked in the round): 1 ridge = 2 rounds. * K 1 round and P 1 round *, repeat from *-*. GARTER ST (back and forth): K all rows. 1 ridge = 2 rows K. PATTERN: See diagrams A.1 and A.2. The diagrams show all rows in pattern seen from RS. INCREASE TIP-1 (evenly spaced): To calculate how often inc should be done, use the total no of sts on row (e.g. 97 sts), minus bands (e.g. 8 sts) and divide the remaining sts by no of inc to be done (e.g. 20) = 4.4. I.e. in this example inc 1 st alternately for every 4th and 5th st (and do not inc over bands). INCREASE TIP-2 (body): All inc are done from RS. Inc 1 st P by making a YO. On next row K YO twisted to avoid holes. RAGLAN SLEEVE: Inc 1 st after/before A.2 on sleeve by making a YO (= 2 sts inc on each sleeve). On next row P YOs to make holes. RAGLAN BODY: Inc first 2 sts before/after A.2 on front and back piece (= 8 sts inc in total), then inc 1 st before/after A.2 on front and back piece (= 4 sts inc in total). Inc 2 sts before A.2 as follows: Work until 1 st remains before A.2, 1 YO, K 1, 1 YO. Inc 2 sts after A.2 as follows: 1 YO, K 1, 1 YO. NOTE: On next row P YOs closest A.2 to make holes. P the other YOs twisted to avoid holes. Inc 1 st before/after A.2 as follows: Inc 1 st by making a YO. On next row P YOs to make holes. DECREASE TIP-1 (body): Work until 4 sts remain before marker, K 2 tog, K 4 (marker is between these sts), slip next st as if to K, K 1, psso. Repeat in the other side (= 4 sts dec). DECREASE TIP-2 (sleeve): Work until 2 sts remain before A.2, K 2 tog, A.2, slip next st as if to K, K 1, psso (= 2 sts dec). BUTTONHOLES: Dec for buttonholes on right band. I.e. band at the end of row seen from RS. 1 buttonhole = K tog third and fourth st from edge and make 1 YO. Dec for buttonholes when piece measures (from cast-on edge and along the band): SIZE S: 2, 11, 20, 29, 38 and 47 cm. SIZE M: 2, 11, 20, 29, 38 and 47 cm. SIZE L: 2, 12, 21, 31, 40 and 50 cm. SIZE XL: 2, 12, 21, 31, 40 and 50 cm. SIZE XXL: 2, 12, 22, 32, 42 and 52 cm. SIZE XXXL: 2, 12, 22, 32, 42 and 52 cm. CAST-OFF TIP: To avoid a tight cast-off edge you may use a needle ½ size larger. ---------------------------------------------------------- JACKET: Worked back and forth on circular needle, top down. YOKE: Cast on 97-99-103-109-111-117 sts (incl 4 band sts in garter st in each side) on circular needle size 4.5 mm. Work 2 ridges in GARTER ST - see explanation above and inc 17-19-19-25-27-25 sts evenly on last row from RS - READ INCREASE TIP-1 = 114-118-122-134-138-142 sts. Switch to circular needle size 5 mm. Now work an elevation in stocking st in the back of neck as follows: Work the first 61-63-67-73-77-79 sts, turn and work 16-16-20-20-24-24 sts, turn and work 20-20-24-24-28-28 sts, turn and work 24-24-28-28-32-32 sts, turn and work the rest of row. Then P 1 row with 4 band sts in garter st in each side. REMEMBER BUTTONHOLES! Now work pattern as follows from RS: 4 band sts in garter st, P 1, A.1 (= 4 sts) 2-2-2-3-3-3 times, P 1, K 1-2-2-1-2-3 (= left front piece), A.2 (= 8 sts on 1st row), K 14-14-16-16-16-16 (= sleeve), A.2, K 1-2-2-1-2-3, P 1, A.1 5-5-5-7-7-7 times, P 1, K 1-2-2-1-2-3, (= back piece) A.2, K 14-14-16-16-16-16 (= sleeve), A.2, K 1-2-2-1-2-3, P 1, A.1 2-2-2-3-3-3 times, P 1, 4 band sts in garter st. Work 1 row from WS the same way. REMEMBER THE KNITTING TENSION On next row from RS, beg inc for RAGLAN BODY and RAGLAN SLEEVE – see explanation above. NOTE: Inc differently on sleeves and body. BODY: Inc 2 sts every other row 4-4-5-6-7-9 times and 1 st every other row 11-14-14-14-15-14 times (= 15-18-19-20-22-23 times in total). SLEEVES: Inc like this every other row 15-18-19-20-22-23 times in total. When all inc are done there are 250-278-294-318-342-362 sts on needle. Now work as follows from WS: Work the first 38-42-44-49-53-57 sts (= right front piece), slip the next 52-58-62-64-68-70 sts on a stitch holder (= sleeve), cast on 6-6-8-8-10-12 sts under sleeve, work the next 70-78-82-92-100-108 sts (= back piece), slip the next 52-58-62-64-68-70 sts on a stitch holder (= sleeve), cast on 6-6-8-8-10-12 sts under sleeve, work the remaining 38-42-44-49-53-57 sts (= left front piece). Piece measures approx. 15-17-18-19-21-22 cm along band. BODY: There are now 158-174-186-206-226-246 sts for body. NOW MEASURE THE PIECE FROM HERE. Continue pattern back and forth as before and insert a marker in the middle of the new sts under sleeve in each side. Then dec in each side and in pattern as follows: DECREASE IN THE SIDES: When piece measures 4 cm, dec 1 st on each side of marker in each side - READ DECREASE TIP-1 (body). Repeat dec every 8th row 2 times in total = 8 sts dec in total. DECREASE IN PATTERN: When piece measures 6 cm, dec 1 st P by P 2 tog in every section with P between 2 cables = 6-6-6-10-10-10 sts dec (i.e. dec 1-1-1-2-2-2 sts on each front piece and 4-4-4-6-6-6 sts on back piece). When all dec are done, there are 144-160-172-188-208-228 sts on needle. When piece measures 15-15-16-16-16-16 cm, inc 1 st P in every section where P sts were dec – READ INCREASE TIP-2 (= 6-6-6-10-10-10 sts inc) = 150-166-178-198-218-238 sts. On next row from RS inc 1 st P on each side of each cable = 18-18-18-26-26-26 sts inc on needle. Inc like this every 10th-10th-10th-14th-14th-14th row (= every 5th-5th-5th-7th-7th-7th row from RS) 7-7-7-5-5-5 times in total = 276-292-304-328-348-368 sts. When all inc are done, continue back and forth in pattern. When piece measures 56-56-57-57-57-57 cm – adjust to finish after 4th or 8th row in pattern, work 2 rows in stocking st inside 4 band sts in garter st in each side. Switch to circular needle size 4.5 mm and work 2 ridges. Cast off - READ CAST-OFF TIP. SLEEVE: Work sleeves in the round on double pointed needles. Slip the 52-58-62-64-68-70 sts from stitch holder on double pointed needles size 5 mm and pick up 1 st in each of the 6-6-8-8-10-12 new sts cast on under sleeves = 58-64-70-72-78-82 sts. Insert a marker in the middle of the new sts. NOW MEASURE THE PIECE FROM HERE. Now work A.2 (= 8 sts on 1st row) mid under sleeve (i.e. there are 4 sts of A.2 on each side of marker), work the remaining sts on round in stocking st. When piece measures 4 cm, dec 1 st on each side of A.2 - READ DECREASE TIP-2 (sleeve). Dec like this every 8th-6th-5th-4th-4th-4th round 11-14-15-19-18-19 times in total = 36-36-40-40-42-44 sts. When sleeve measures 48-47-46-45-44-44 cm, switch to double pointed needles size 4.5 mm. Work 2 ridges. Cast off. Knit another sleeve the same way. ASSEMBLY: Sew the buttons on to left band. |
|||||||||||||||||||
Diagram explanations |
|||||||||||||||||||
|
|||||||||||||||||||
 |
|||||||||||||||||||
 |
|||||||||||||||||||
Have you finished this pattern?Tag your pictures with #dropspattern #lobeliacardigan or submit them to the #dropsfan gallery. Do you need help with this pattern?You'll find 30 tutorial videos, a Comments/Questions area and more by visiting the pattern on garnstudio.com. © 1982-2026 DROPS Design A/S. We reserve all rights. This document, including all its sub-sections, has copyrights. Read more about what you can do with our patterns at the bottom of each pattern on our site. |
|||||||||||||||||||


With over 40 years in knitting and crochet design, DROPS Design offers one of the most extensive collections of free patterns on the internet - translated to 17 languages. As of today we count 324 catalogues and 12290 patterns translated into English (UK/cm). 12290
We work hard to bring you the best knitting and crochet have to offer, inspiration and advice as well as great quality yarns at incredible prices! Would you like to use our patterns for other than personal use? You can read what you are allowed to do in the Copyright text at the bottom of all our patterns. Happy crafting!
Post a comment to pattern DROPS 171-14
We would love to hear what you have to say about this pattern!
If you want to leave a question, please make sure you select the correct category in the form below, to speed up the answering process. Required fields are marked *.