
Popular categories
Looking for a yarn?


Comments / Questions (91)
![]() Ans Bezema wrote:
Ans Bezema wrote:
Als ik alle meerderingen voor de raglan heb gedaan meet mijn werk 16 cm, ik heb wel 272 steken, moet ik verder breien zonder meerderingen om op de 23 cm te komen?
23.12.2020 - 14:12
![]() Nicole wrote:
Nicole wrote:
Merci!
01.11.2020 - 01:33
![]() Nicole wrote:
Nicole wrote:
Bonjour, les 21cm est-ce que je les calculent après la dernière diminution ou à partir du dessous de la manche ou vous indiquez MESUREZ À PARTIR D'ICI? Et est-ce la même chose pour le 40 cm et 45 cm? Merci!
21.10.2020 - 09:42DROPS Design answered:
Bonjour Nicole, mesurez à partir de la division = MESURER DÉSORMAIS À PARTIR D'ICI, donc 21 cm à partir de la division pour les augmentations des côtés du pull; et 40 cm pour le début des côtes et donc 45 cm rabattre + les 21 cm de l'empiècement = 66 cm de hauteur totale. Même chose pour les manche, on mesure à partir de là où il est écrit: MESURER DÉSORMAIS À PARTIR D'ICI . Bon tricot!
21.10.2020 - 11:04
![]() Nicole wrote:
Nicole wrote:
Merci de votre aide!
08.10.2020 - 21:37
![]() Nicole wrote:
Nicole wrote:
Ok pour la leçon où on divise les m par le nombre d'augmentation mais est-ce que cette augmentation se fait seulement avec 1 jeté? Vous ne le mentionnez pas dans le patron. Ce sont juste les aug du raglan. Merci
06.10.2020 - 22:21DROPS Design answered:
Bonjour Nicole, vous pouvez augmenter en faisant 1 jeté (à tricoter torse au tour suivant) ou bien en utilisant la technique que vous préférez. Bon tricot!
07.10.2020 - 08:53
![]() Nicole wrote:
Nicole wrote:
Vous n'avez pas répondu à ce message : Bonjour, j'ai terminé mes 4cm de côtes et je dois faire 12 augmentations. J'aimerais savoir où les faire et comment les faire. Si vous pouvez être très explicative je suis une novice en tricot. Merci
06.10.2020 - 00:35DROPS Design answered:
Bonjour Nicole, comme répondu précédemment, vous trouverez dans cette leçon (cliquez sur lien) comment répartir des augmentations. Bon tricot!
06.10.2020 - 11:33
![]() Nicole wrote:
Nicole wrote:
Raglan suis-je correcte 4m avant marqueur, 2 aug et 2 m jersey, après marqueur 2 m jersey et 2 aug aug 1 m : 2 m avant je fais jeté en 1er et 2 m jers. ensuite après marq. je fais 2 m jers. et ensuite 1 jeté. Est-ce cela?
04.10.2020 - 21:58DROPS Design answered:
Bonjour Nicole, tout à fait, c'est bien ainsi que l'on doit procéder. Bon tricot!
05.10.2020 - 11:46
![]() Nicole wrote:
Nicole wrote:
Bonjour, j'ai terminé mes 4cm de côtes et je dois faire 12 augmentations. J'aimerais savoir où les faire et comment les faire. Si vous pouvez être très explicative je suis une novice en tricot. Merci
04.10.2020 - 20:45DROPS Design answered:
Bonjour Nicole, vous trouverez ici comment répartir vos augmentations. Bon tricot!
05.10.2020 - 11:47
![]() Nicole wrote:
Nicole wrote:
Vous trouverez ici (ça ne fonctionne pas le lien ici) Pouvez vous me donner l'adresse du site? Merci
29.09.2020 - 16:12DROPS Design answered:
Bonjour Nicole, le lien a été modifié, vous pouvez retrouver ces explications sous la FAQ: Vous avez une question? Découvrez la liste des questions fréquentes (FAQ).. juste au-dessus de la rubrique commentaires/questions du modèle. Bon tricot!
30.09.2020 - 08:33
![]() Nicole wrote:
Nicole wrote:
J'aimerais savoir si je peux adopter ce modèle pour mon fils qui fait 100-102cm de poitrine. Et si oui quelle taille je dois suivre? Merci
28.09.2020 - 23:13DROPS Design answered:
Bonjour Nicole, tout à fait, vous trouverez ici quelques astuces, comptez sur votre magasin pour vous en donner d'autres - vous pouvez également vous inspirer de ce modèle homme. Bon tricot!
29.09.2020 - 08:16
|
|
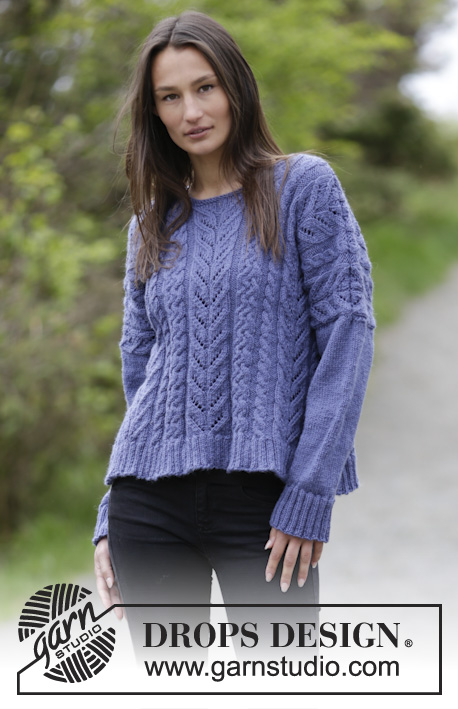
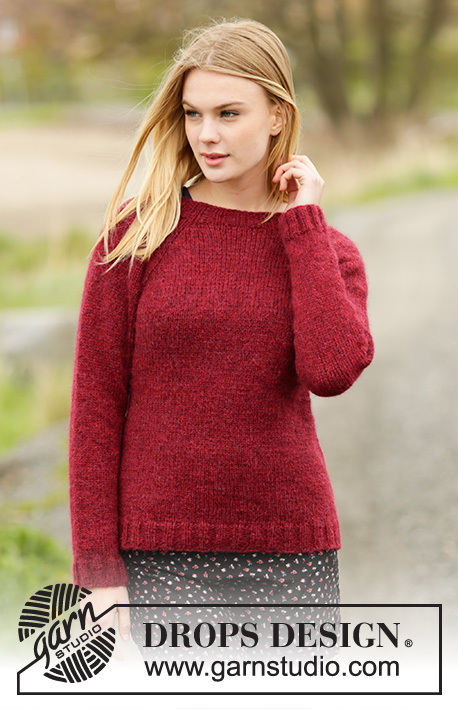
Winter Wine#winterwinesweater |
|
 |
 |
Knitted DROPS jumper with rib and raglan in ”Air”. Worked top down. Size: S - XXXL.
DROPS 164-20 |
|
|
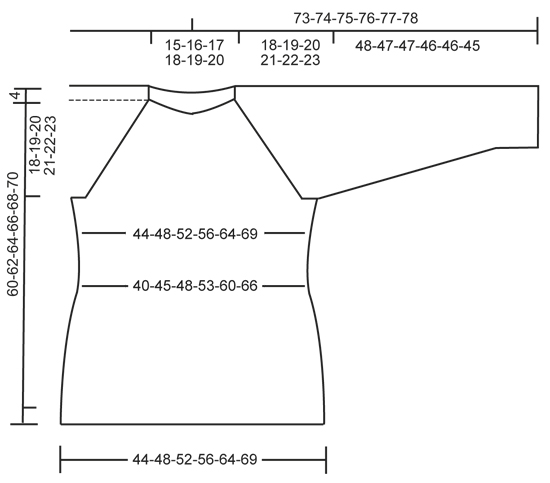
RAGLAN: Inc 2 st on each side of every raglan as follows (= 16 sts inc): Inc as follows before 4 sts in stocking st and marker: K 2 in the next 2 sts (i.e. work in front and back loop of st), 2 sts in stocking st = 2 sts inc. Inc as follows after marker and 2 sts in stocking st: K 2 in the next 2 sts (i.e. work in front and back loop of st) = 2 sts inc. Inc 1 st on each side of every raglan as follows (= 8 sts inc): Inc as follows before 2 sts in stocking st and marker: 1 YO, 2 sts in stocking st. Inc after marker as follows: 2 sts in stocking st, 1 YO. K YOs twisted on next round to avoid holes. INCREASE TIP: Inc as follows before 2 sts in stocking st and marker: 1 YO, 2 sts in stocking st. Inc after marker as follows: 2 sts in stocking st, 1 YO. K YOs twisted on next round to avoid holes. DECREASE TIP: Dec as follows before marker: Work until 3 sts remain before marker, K 2 tog, K 1. Dec as follows after marker: K 1, slip 1 st as if to K, K 1, psso ---------------------------------------------------------- JUMPER: Worked in the round, top down on circular needle. Work sleeve in the round on circular needle/double pointed needles. YOKE: Cast on 64-72-76-84-88-92 sts on circular needle size 4.5 mm with Air. K 1 round, then work rib = K 2/P 2. When rib measures 4 cm, K 1 round while inc 8-8-8-12-24-32 sts evenly = 72-80-84-96-112-124 sts. Switch to circular needle size 5 mm. Now work as follows (from mid back): K 11-13-14-17-21-24 (= half back piece), insert a marker, K 14 (= sleeve), insert a marker, K 22-26-28-34-42-48 (= front piece), insert a marker, K 14 (= sleeve), insert a marker, K 11-13-14-17-21-24 (= half back piece). REMEMBER THE KNITTING TENSION Continue in stocking st, AT THE SAME TIME on next round beg inc for RAGLAN – see explanation above! Inc 2 sts on each side of every marker on every other round 2-3-4-4-5-6 times in total. Then inc 1 st on each side of every marker on every other round 18-18-18-19-19-19 times in total = 248-272-292-312-344-372 sts. Piece measures 22-23-24-25-26-27 cm from shoulder. Now work as follows: Work the first 33-37-40-44-50-55 sts (= half back piece), slip the next 58-62-66-68-72-76 sts on a stitch holder (= sleeve), cast on 8 new sts under sleeve (insert a marker in the middle of these new sts), work the next 66-74-80-88-100-110 sts (= front piece), slip the next 58-62-66-68-72-76 sts on a stitch holder (= sleeve), cast on 8 new sts under sleeve (insert a marker in the middle of these new sts), work the remaining 33-37-40-44-50-55 sts (= half back piece). NOW MEASURE THE PIECE FROM HERE. BODY: There are now 148-164-176-192-216-236 sts on round. Continue in stocking st. When piece measures 4 cm, dec 1 st on each side of each marker - READ DECREASE TIP! Repeat dec every 4-4½-5-5½-6-6½ cm 2 more times = 136-152-164-180-204-224 sts. When piece measures 18-19-20-21-22-23 cm, inc 1 st on each side of every marker – see INCREASE TIP. Repeat inc every 8 cm 2 more times = 148-164-176-192-216-236 sts. When piece measures 37-38-39-40-41-42 cm, switch to circular needle size 4.5 mm. Work rib (= K 2/P 2). When piece measures 42-43-44-45-46-47 cm, loosely cast off as follows: * Cast off 4 sts (2 K + 2 P), 1 YO, cast off YO *, repeat from *-*. SLEEVE: Work sleeve in stocking st in the round on circular needle/double pointed needles. There are 58-62-66-68-72-76 sts for each sleeve. Slip sts from stitch holder back on circular needle/double pointed needles size 5 mm and cast on 8 new sts under sleeve = 66-70-74-76-80-84 sts. Work in stocking st in the round, AT THE SAME TIME insert a marker in the middle of the new sts under sleeve (i.e. 4 sts on each side of marker). NOW MEASURE THE PIECE FROM HERE. When piece measures 4 cm, dec 1 st on each side of marker - READ DECREASE TIP. Repeat dec approx. every 3-2½-2½-2½-2-2 cm 12-14-14-15-15-17 more times = 40-40-44-44-48-48 sts. When sleeve measures 44-43-43-42-42-41 cm, switch to double pointed needles size 4.5 mm and work rib (K 2/P 2) over all sts. When sleeve measures 48-47-47-46-46-45 cm, cast off with K over K and P over P. Work the other sleeve the same way. ASSEMBLY: Sew the openings under the sleeves. |
|
 |
|
Have you finished this pattern?Tag your pictures with #dropspattern #winterwinesweater or submit them to the #dropsfan gallery. Do you need help with this pattern?You'll find 23 tutorial videos, a Comments/Questions area and more by visiting the pattern on garnstudio.com. © 1982-2026 DROPS Design A/S. We reserve all rights. This document, including all its sub-sections, has copyrights. Read more about what you can do with our patterns at the bottom of each pattern on our site. |
|


With over 40 years in knitting and crochet design, DROPS Design offers one of the most extensive collections of free patterns on the internet - translated to 17 languages. As of today we count 324 catalogues and 12290 patterns translated into English (UK/cm). 12290
We work hard to bring you the best knitting and crochet have to offer, inspiration and advice as well as great quality yarns at incredible prices! Would you like to use our patterns for other than personal use? You can read what you are allowed to do in the Copyright text at the bottom of all our patterns. Happy crafting!
Post a comment to pattern DROPS 164-20
We would love to hear what you have to say about this pattern!
If you want to leave a question, please make sure you select the correct category in the form below, to speed up the answering process. Required fields are marked *.