
Popular categories
Looking for a yarn?


Comments / Questions (64)
Kamalpreet Kaur wrote:
Thanks Team , I will try that way .
06.02.2015 - 10:10Kamalpreet Kaur wrote:
Hi, Thanks for this pattern. its very beautiful. I have one concern regarding arm holes. On back and front pieces arm hole length is appx 7 inches (I am considering L size), whereas on sleeves its appx 4 inches. This makes arm holes very tight. Isn't both arm holes body and sleeves should be approximate same?
21.01.2015 - 09:17DROPS Design answered:
Dar Mrs Kamalpreet Kaur, you can first pin the sleeve around armhole before sewing so that you will be sure sleeve fits nice around armhole. Happy knitting!
23.01.2015 - 14:11
![]() Helga Kempkensteffen wrote:
Helga Kempkensteffen wrote:
Möchte dieses Modell gerne nacharbeiten, aber ohne Rundung, einfach vorne gerade. Ich trage Gr. XL gibt es dafür auch eine Anleitung? Ich gebrauche ja nur die Voder-Randteile. mit freundlichem Gruß H. Kempkensteffen
08.12.2014 - 22:59DROPS Design answered:
Leider können wir Ihnen für dieses Modell keine andere Anleitung mit geraden Vorderteilen bieten, die Anleitung ist auf diese Rundung ausgelegt und lässt sich nicht einfach abändern. Vielleicht stöbern Sie einfach noch etwas und lassen sich von den vielen anderen Jackenmodellen inspirieren.
10.12.2014 - 22:48
![]() Ann wrote:
Ann wrote:
Mönstret är sett från rätsidan av arbetet. Hur att göra på avigsidan?
03.12.2014 - 10:19DROPS Design answered:
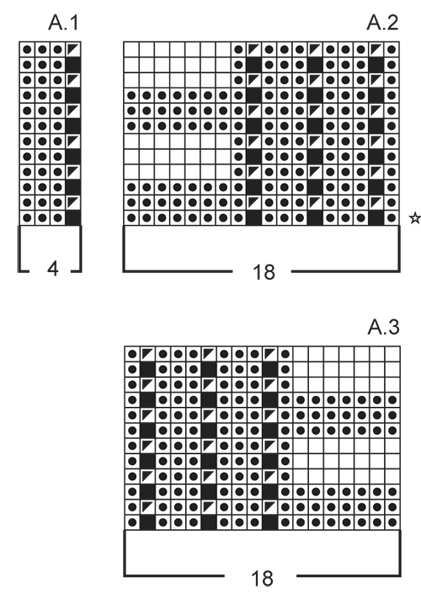
Hei Ann. Ja, og alle pinde i diagrammet er vist. Dvs, du strikker raekke 2-4-6 osv paa avigsidan og beskrivelsen af maskerne staar under diagram. Se ogsaa her hvordan du laeser vores diagrammer.
03.12.2014 - 16:24
![]() Tina wrote:
Tina wrote:
Bellissimo!!! grazie
18.11.2014 - 10:27
![]() Cindy Marxen wrote:
Cindy Marxen wrote:
Thank you! I got it to work. My problem is that I was trying to get the pattern to show on both sides; however it only shows on the right side. The video helped, just have to remember to do parts of it in reverse.
13.11.2014 - 12:31
![]() Diana wrote:
Diana wrote:
On page 3 of 9, in the section BACK PIECE, third line, it says: "... until 2 sts remain on row, work 1 st st in A.1, 1 edge st in garter st. ..." In order for it to come out right, it needs to say: "... until 2 sts remain on row, work first st in A.1 [that is YO and slip 1 purlwise], 1 edge st in garter st. ..." As printed, we would normally read it "work 1 stockinette stitch in A.1", but there aren't any stockinette stitches in A.1, so it makes no sense.
11.11.2014 - 20:11DROPS Design answered:
Dear Diana, you are correct, the typo will be corrected as soon as possible, thank you! Happy knitting!
12.11.2014 - 10:10
![]() Elisabeth Rönnbäck wrote:
Elisabeth Rönnbäck wrote:
När jag ska börja med vändningarna på vänster kantstycke fram ska jag börja på aviga varvet
09.11.2014 - 06:48DROPS Design answered:
Hej Elisabeth, ja på vänster kantstycke skall du börja med vändningarna på aviga varvet. Lycka till!
25.11.2014 - 09:46
![]() Josette wrote:
Josette wrote:
Wanneer ik naar de foto van het vest kijk,zie ik duidelijk een boord, maar zie deze niet terug in het patroon
11.09.2014 - 22:25DROPS Design answered:
Hoi Josette. De boord is in het patroon. Je breit A.3 voor het rechter voorpand langs de voorkant en A.2 voor het linker voorpand langs de voorkant.
16.09.2014 - 16:39
![]() Konny wrote:
Konny wrote:
Hallo, ich möchte diese Jacke stricken und habe eine Frage zur Strickrichtung bei den Diagrammen. Normalerweise beginne ich unten in der rechten Ecke und lesen die erste Zeile nach links. Jetzt ist hier ein Pfeil angegeben, als ob das Diagramm von links nach rechts stricken soll. Was ist korrekt? Vielen Dank für Eure Hilfe.
08.09.2014 - 11:47DROPS Design answered:
Der Pfeil zeigt nur in der Schnittzeichnung an, in welche Richtung gestrickt wird, damit ersichtlich wird, wo die Anschlagkante ist und wie die Reihen liegen. Die Diagramme lesen Sie ganz normal von unten rechts nach links, wie Sie es gewohnt sind und beschrieben haben.
09.09.2014 - 21:49
|
|||||||||||||||||||
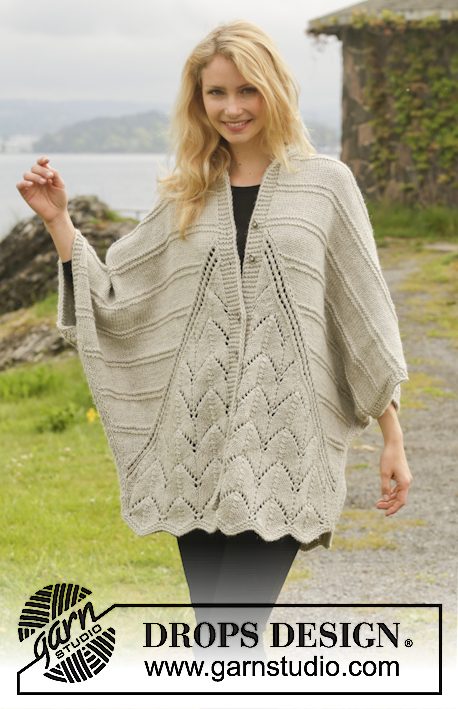
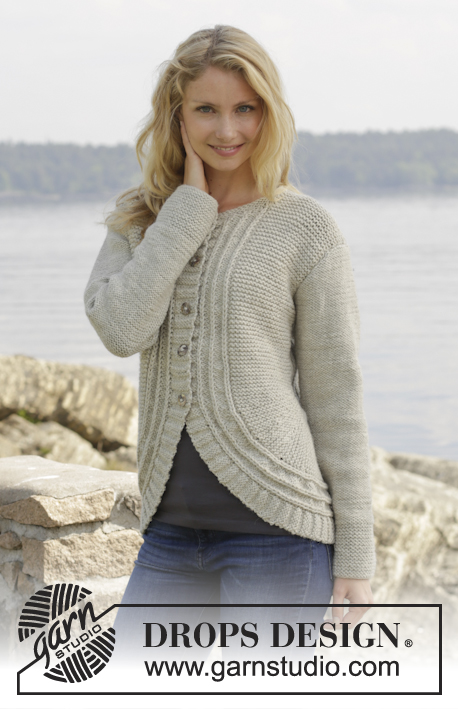
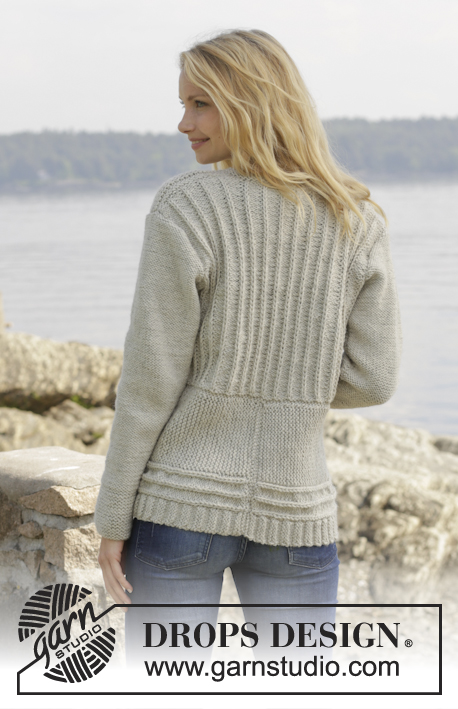
Enchanted#enchantedcardigan |
|||||||||||||||||||
 |
 |
||||||||||||||||||
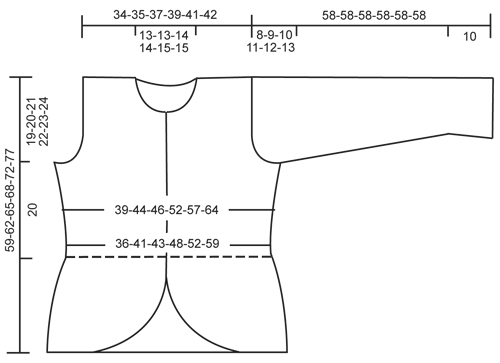
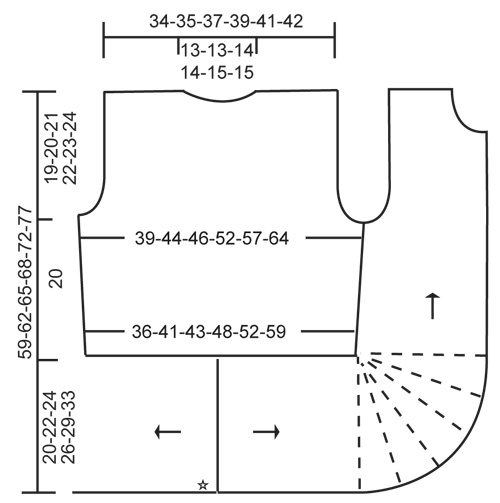
Knitted DROPS jacket with False English rib and short rows in "Nepal". Size S-XXXL
DROPS 157-25 |
|||||||||||||||||||
|
GARTER ST (back and forth on needle): K all rows. 1 ridge = 2 rows K. PATTERN: See diagrams A.1-A.3. The diagram shows all rows in pattern seen from RS. INCREASE TIP (applies to sleeve): Inc inside 1 edge st in garter st and 1 P by making 1 YO. On next round work YO twisted, i.e. work in the back loop of st instead of front, to avoid holes. DECREASE TIP: Dec inside 1 edge st in garter st. All dec are done from RS! Dec before 1 edge st as follows: K 2 tog. Dec after 1 edge st as follows: Slip 1 st as if to K, K 1, psso. SHORT ROWS: Work short rows on front piece to get a rounded edge on the piece. Also work short rows between pattern A.2/A.3! Work short rows as follows with 1st row from RS: Row 1 and 2: Work 8 sts in all sizes, turn and work back. Row 3 and 4: Work 12 sts in all sizes, turn and work back. Row 5 and 6: Work 16 sts in all sizes, turn and work back. Row 7 and 8: Work 19-19-20-20-19-20 sts, turn and work back. Row 9 and 10: Work 21-21-23-23-21-23 sts, turn and work back. Continue to work 3 sts more on every turn until all sts have been worked. Repeat from 1st row a total of 5 times. (The rounded edge now measures approx. 28-31-34-37-41-46 cm on the outer side and 3 cm on the inside.) BUTTONHOLES: Dec for buttonholes on right band. 1 buttonhole = K tog second and third st from mid front and make 1 YO. Dec for buttonholes when piece measures (measured from the marker in the side): SIZE S: 1-8-15-22-29 cm SIZE M: 1-8-15-22-30 cm SIZE L: 1-8-15-22-30 cm SIZE XL: 1-8-16-23-31 cm SIZE XXL: 1-8-16-23-31 cm SIZE XXXL: 1-9-17-25-32 cm ---------------------------------------------------------- JACKET: Worked back and forth in parts on circular needle and sewn tog when finished. BACK PIECE: Cast on 63-71-75-83-91-103 sts (incl 1 edge st in garter st in each side) on circular needle size 5 mm with Nepal. Work 1 ridge in GARTER ST - see explanation above. Then work as follows: 1 edge st in garter st, A.1 (= 4 sts) until 2 sts remain on row, work 1st st in A.1, 1 edge st in garter st. Continue like this with pattern, AT THE SAME TIME when piece measures 4 cm, inc inside 1 edge st in garter st in each side of piece by making 1 YO. On next row work YOs twisted to avoid holes, then P the new sts (seen from RS)! Repeat inc every 4-4-4-3-3-3 cm 2-2-2-3-3-3 more times = 69-77-81-91-99-111 sts. REMEMBER THE KNITTING TENSION! When piece measures 20 cm in all sizes, cast off for armholes on each side as follows: Cast off 3-4-5-6-7-8 sts 1 time and 1 st 1-3-3-6-7-11 times = 61-63-65-67-71-73 sts. Continue with pattern as before until piece measures 37-38-39-40-41-42 cm. On next row from RS cast off for neck as follows: Work the first 21-22-22-23-24-25 sts, cast off the next 19-19-21-21-23-23 sts and work the remaining 21-22-22-23-24-25 sts. Then finish each shoulder separately as follows: Continue back over left shoulder and dec 1 st towards the neck on next row from RS = 20-21-21-22-23-24 sts for shoulder. When piece measures 38-39-40-41-42-43 cm, work 1 ridge and loosely cast off. Work the other shoulder the same way. RIGHT EDGE PIECE/FRONT PIECE: Cast on 35-38-42-45-50-57 sts (incl 1 edge st in garter st) on circular needle size 5 mm with Nepal. Work 1 ridge in garter st. Then work as follows from RS: Pattern A.3 (= 18 sts), 16-19-23-26-31-38 sts in garter st, 1 edge st in garter st. When piece measures approx. 18-21-23-24-26-30 cm, work SHORT ROWS - see explanation above, AT THE SAME TIME on last row in 1st repetition with short rows, inc 1 st by making a YO between A.3 and sts in garter st = 36-39-43-46-51-58 sts. Work YOs twisted on next row to avoid holes. Repeat inc on last row in the remaining repetitions of short rows 3-4-1-2-0-0 more times = 39-43-44-48-51-58 sts on needle. When all short rows have been worked, insert 1 marker. NOW MEASURE PIECE FROM HERE! Continue with garter st and pattern as before. Remember BUTTONHOLES - see explanation above. When piece measures 4 cm, inc in the side as on back piece (i.e. the shorter side). After all inc, there are 42-46-47-52-55-62 sts on needle. When piece measures 20 cm, cast off for armhole in the side as on back piece (i.e in same side of piece as inc) = 38-39-39-40-41-43 sts. When piece measures 30-31-31-32-32-33 cm, slip the first 9 sts on needle from RS on a stitch holder for neck. Then cast off sts as follows on every row from neck: 3 sts 1 time, 2 sts 2 times and 1 st 2 times = 20-21-21-22-23-25 sts remain for shoulder. When piece measures 38-39-40-41-42-43 cm, work 1 ridge and cast off. LEFT EDGE PIECE/FRONT PIECE: Cast on and work as right edge piece/front piece but reversed. I.e. K 1 row from WS before working pattern like this: 1 edge st in garter st, 16-19-23-26-31-38 sts in garter st, A.2 over the remaining 18 sts on needle. Do not dec for buttonholes. SLEEVE: Worked back and forth on circular needle in reversed stocking st. Cast on 42-42-44-44-46-48 sts (incl 1 edge st each side) on needle size 5 mm with Nepal. Work 10 cm in garter st. Continue with reversed stocking st. On next row inc 1 st in each side of sleeve - Read INCREASE TIP! Repeat inc every 4-3-3-2½-2-2 cm 8-10-10-12-13-14 more times = 60-64-66-70-74-78 sts. When piece measures 50-49-48-47-46-45 cm (shorter measurements in the larger sizes because of longer sleeve cap and wider shoulders) cast off for sleeve cap at beg of every row in each side: 3 sts 1 time, 2 sts 3 times and 1 st 1-2-3-4-5-6 times, then cast off 2 sts in each side until piece measures 57 cm, then cast off 3 sts 1 time in each side, cast off remaining sts. Piece measures approx. 58 cm. Knit another sleeve. ASSEMBLY: Sew cast on edge on edge pieces tog mid back - sew edge to edge to avoid a chunky seam. Then sew edge piece to bottom edge of back piece. Sew the shoulder seams. Sew side seams and sleeve seams inside 1 edge st and sew sleeves in body. Sew the buttons on to the left band. NECK EDGE: Pick up approx. 72 sts (incl sts on stitch holders) around the neck. Work 2 ridges and cast off from WS. Cut and fasten the yarn. |
|||||||||||||||||||
Diagram explanations |
|||||||||||||||||||
|
|||||||||||||||||||
 |
|||||||||||||||||||
 |
|||||||||||||||||||
 |
|||||||||||||||||||
Have you finished this pattern?Tag your pictures with #dropspattern #enchantedcardigan or submit them to the #dropsfan gallery. Do you need help with this pattern?You'll find 27 tutorial videos, a Comments/Questions area and more by visiting the pattern on garnstudio.com. © 1982-2026 DROPS Design A/S. We reserve all rights. This document, including all its sub-sections, has copyrights. Read more about what you can do with our patterns at the bottom of each pattern on our site. |
|||||||||||||||||||


With over 40 years in knitting and crochet design, DROPS Design offers one of the most extensive collections of free patterns on the internet - translated to 17 languages. As of today we count 324 catalogues and 12290 patterns translated into English (UK/cm). 12290
We work hard to bring you the best knitting and crochet have to offer, inspiration and advice as well as great quality yarns at incredible prices! Would you like to use our patterns for other than personal use? You can read what you are allowed to do in the Copyright text at the bottom of all our patterns. Happy crafting!
Post a comment to pattern DROPS 157-25
We would love to hear what you have to say about this pattern!
If you want to leave a question, please make sure you select the correct category in the form below, to speed up the answering process. Required fields are marked *.